


 本文详细介绍了如何利用Delphi XE7为Moto360手表设计应用程序,包括自定义视图设计、设备信息配置、蓝牙调试设置等关键步骤,以及提供了一个完整的代码包和示例应用。文章还涵盖了Moto360的屏幕特性、部署挑战和解决方法,旨在帮助开发者高效地为智能手表开发应用。
Hello Moto 360 from Delphi XE7(翻译版)
http://delphi.org/2014/09/hello-moto-360-from-delphi-xe7/
我真的很喜欢我的Moto 360手表。它看起来很棒,也很为我的Android手机的一种延伸,当然最重要的问题是如何使一个应用程序。仅使用RAD Studio X7,Delphi或C + +来设计app。由于新FireUI多设备设计我可以创建UI的自定义视图做出完美的用户界面设计的微风。这里有一些我制作APP的细节,其次是下载我的样品和自定义视图。
底线是,它只是工作,这真的不是一个惊喜。最新的Android设备使用ARMv7和NEON指令集。(NEON是一种类似于英特尔平台上的多媒体标准。首先不是每个人都使用这些指令,但一旦他们用了,大家也就都这样做了。)因此,Moto 360也不奇怪。不像一些其他的手表,Moto 360没有微型USB端口。所以你必须使用ADB蓝牙。这需要一些额外的步骤来安装,真是缓慢的部署在。所以我取消了第一个部署缓慢,因为我以为我把某些东西错了。
|
1
2
3
4
5
|
TDeviceinfo
.
AddDevice(TDeviceinfo
.
TDeviceClass
.
Tablet, ViewName,
// The Moto360 is 320x290 phyiscal and 240x218 logical with 213 PPI
TSize
.
Create(
320
,
290
), TSize
.
Create(
240
,
218
),
TOSVersion
.
TPlatform
.
pfAndroid,
213
,
True
);
// Exclusive
|
设备CLASS枚举实际上有一个手表类,但在检测类在运行时的代码,它不知道如何检测手表呢。所以它默认为平板电脑。XE7是在Moto 360发布之前发行的,我想象一个更新将解决这个问题。
获取自定义视图显示在IDE的要求是你需要更新在%APPDATA%Roaming \Embarcadero\ BDS\ 15.0 \ mobiledevices.xml参考的新视角。在移动设备元件,添加以下:
|
1
2
3
4
5
6
7
8
9
10
|
<
MobileDevice
>
<
Displayname
>Moto360</
Displayname
>
<
Name
>Moto360</
Name
>
<
DevicePlatform
>3</
DevicePlatform
>
<
FormFactor
>2</
FormFactor
>
<
Portrait
Enabled
=
"True"
Width
=
"240"
Height
=
"218"
Top
=
"102"
Left
=
"29"
StatusbarHeight
=
"0"
StatusBarPos
=
"0"
Artwork
=
"C:\Users\jim\Documents\Embarcadero\Studio\Projects\HelloMoto360\Moto360.png"
/>
<
UpsideDown
Enabled
=
"False"
Width
=
"240"
Height
=
"218"
Top
=
"0"
Left
=
"0"
StatusbarHeight
=
"0"
StatusBarPos
=
"0"
Artwork
=
""
/>
<
LandscapeLeft
Enabled
=
"False"
Width
=
"240"
Height
=
"218"
Top
=
"0"
Left
=
"0"
StatusbarHeight
=
"0"
StatusBarPos
=
"0"
Artwork
=
""
/>
<
LandscapeRight
Enabled
=
"False"
Width
=
"240"
Height
=
"218"
Top
=
"0"
Left
=
"0"
StatusbarHeight
=
"0"
StatusBarPos
=
"0"
Artwork
=
""
/>
</
MobileDevice
>
|
你需要更新路径,作品点到您的系统上的PNG的正确位置。或者你可以只留下空白。这里是什么,它都像当安装在IDE。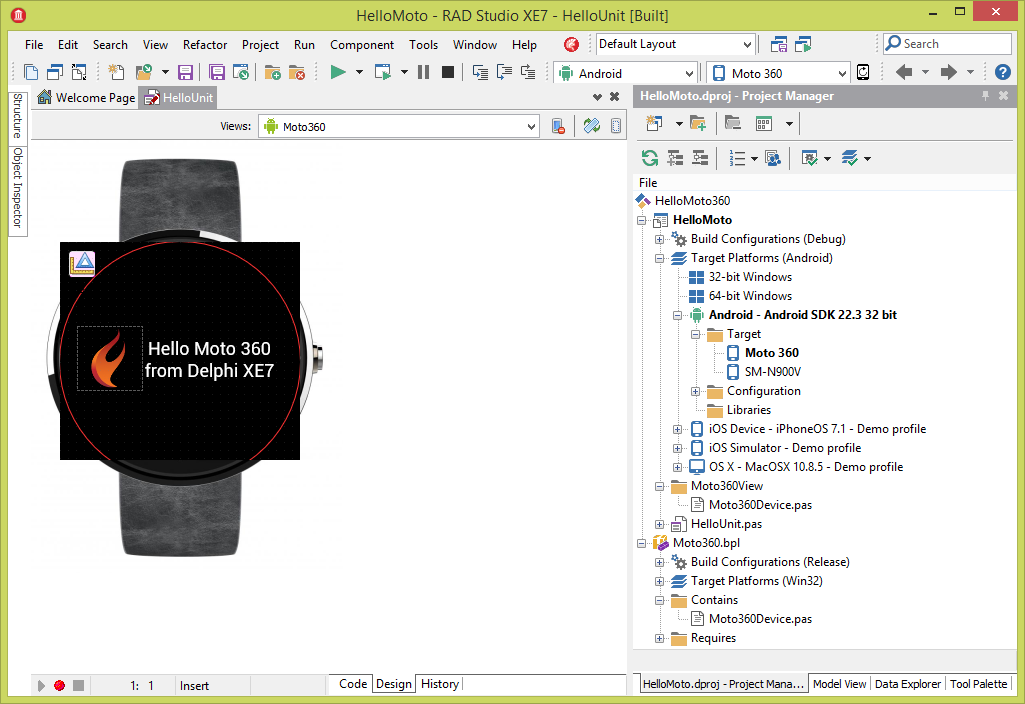
你会注意到设计图面上的红圈。我又看到哪里的角落(因为显示是圆的)。在运行时,你仅仅能看到红色的如果你拿着看吧。我会隐藏在生产运行时。我把文本外框- 1,- 1,设置大小为242 x 242。这样的循环遵循圆而不是屏幕显示区域。
-
让Moto 360显示为目标设备,你首先需要启用蓝牙调试。
1.将侧键按下直到出现设置窗口,向下滑动,点击它。
- Hold the side button in until Settings appears
- Swipe down to About and tap it.
- Tap on build number until it tells you that you are a developer.
- Swipe back to settings and then tap on Developer options.
- Tap on ADB Debugging until it says Enabled.
- Tap on Debug over Bluetooth until it says Enabled.
- On your paired phone, go into Android Wear settings (gears in the upper right)
- Enable Debugging over Bluetooth.
- It should show
- Host: disconnected
- Target: connected
- Target is the watch, Host is your computer.
- It should show
Then you connect your phone that is connected to the Moto 360 via USB and run the following commands (assuming ADB is on your system path) to connect via Bluetooth. I made a batch file.
 @echo off
 REM optional cleaning up
 adb disconnect localhost:4444
 adb -d forward --remove-all
 REM this is the connection
 adb -d forward tcp:4444 localabstract:/adb-hub
 adb -d connect localhost:4444
 REM these lines are to see if it worked
 echo Here is the forwarded ports . . . .
 adb forward --list
 echo.
 echo Wait a second for it to connect . . . .
 pause
 adb devices
The ADB Devices list should show something like
List of devices attached
123456abcd device
localhost:4444 device
Now the Android Wear app on your phone should show
- Host: connected
- Target: connected
Be sure that your Moto 360 app uses the unit that defines the Moto 360 device (from your package). This way your app can select it at runtime. If you do all that, you’ll see something similar to this with it running on the Moto 360:
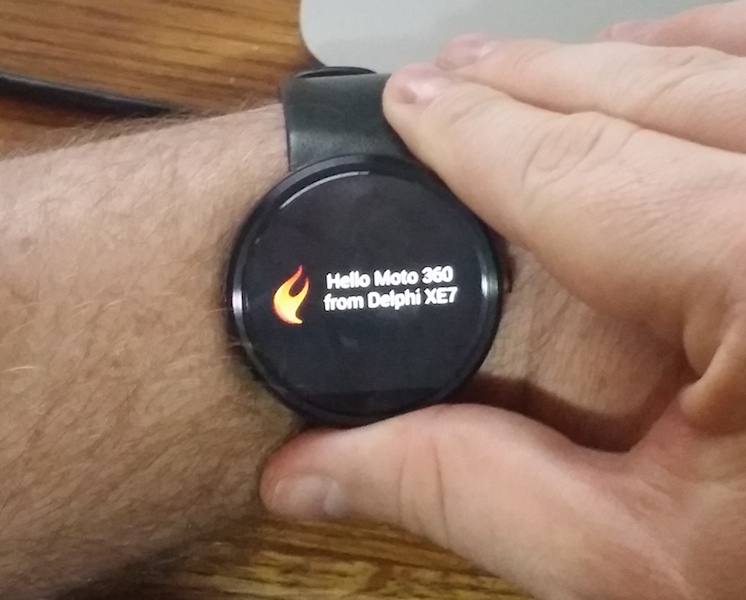
My camera had a hard time focusing on it, but rest assured it looks fabulous! I tried C++ too, and no surprises, it works as well. More experimenting to do, but it is nice to know I have a tool that will take me everywhere I want to go.
If you don’t have a Moto 360, you can setup an Android emulator (AVD) instead. I did that before mine showed up. You need to download the Android 4.4W (API20) SDK Platform and ARM System image.
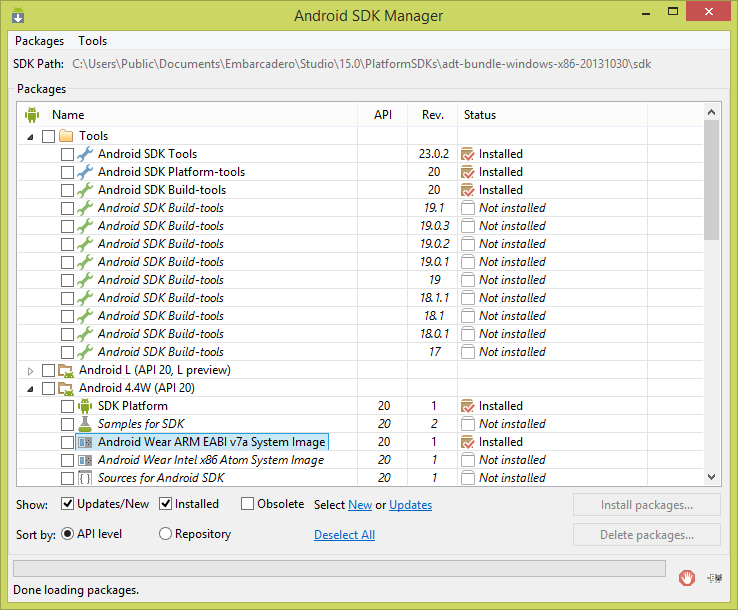
Then create an AVD with the new Emulator.
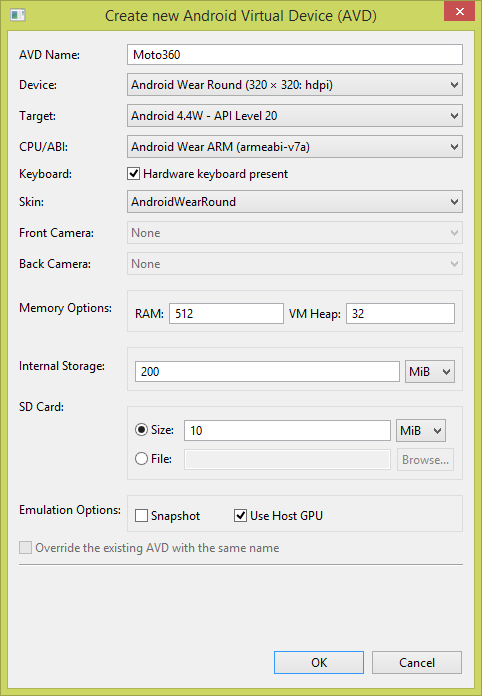
It actually gives you the rectangle screen with a round bezel. Also it is 320 x 320 (so completely round) and 240 PPI. This means the view I created (since it was exclusive) won’t work on the emulator. You’ll need to create a new custom view for the emulator, but I’ll leave that up to to.
you can download all of my code for the custom view, Bluetooth ADB batch file, and sample apps from Github. (Update: Added a view for Galaxy Gear Live & LG-G) BTW, XE7 adds local Git support, which is another great new feature. Download the trial and check it out.


 165
165

 被折叠的 条评论
为什么被折叠?
被折叠的 条评论
为什么被折叠?
 到【灌水乐园】发言


