


 本文详细介绍如何使用Spring4.0.6.RELEASE、Maven3及JDK1.8构建SpringMVC4的HelloWorld实例。通过创建Maven webapp项目、配置Spring依赖关系、实现控制器与视图、设置Spring配置文件以及更新Web配置文件等步骤,指导读者完成整个项目的搭建过程。
构建Spring MVC 4的HelloWorld实例。
使用以下技术:
- Spring 4.0.6.RELEASE
- Maven 3
- JDK 1.8
如果您已经熟悉maven使用eclipse 创建项目,请随意跳过第1步。
让我们开始。
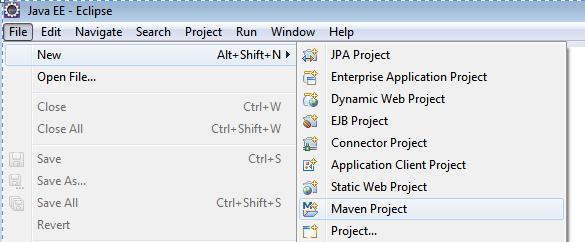
步骤1:在Eclipse中创建一个新的Maven webapp项目
Goto File-> New - > Maven Project,
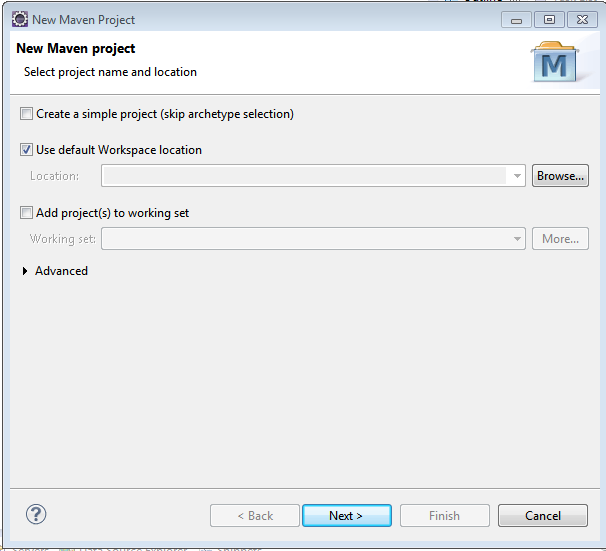
取消选中“使用默认工作区位置”,以防您希望在其他位置创建项目
点击下一步
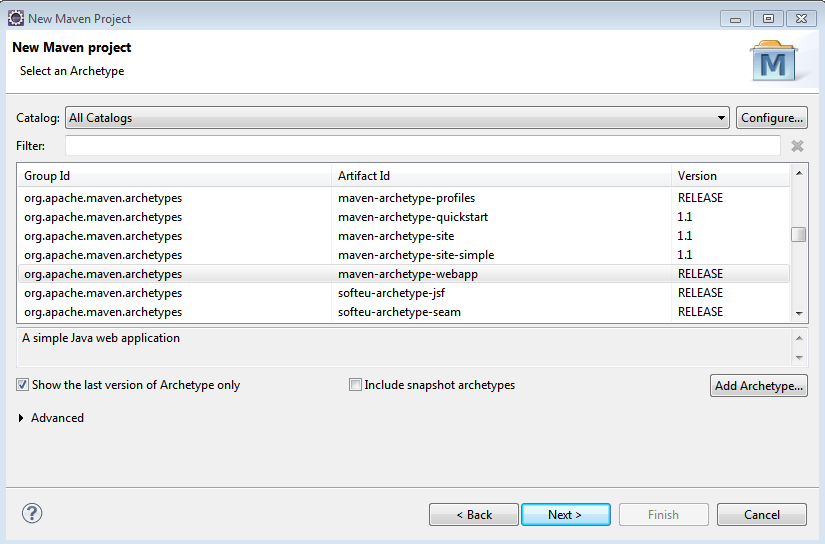
从选项列表中选择maven web app archetype,单击下一步
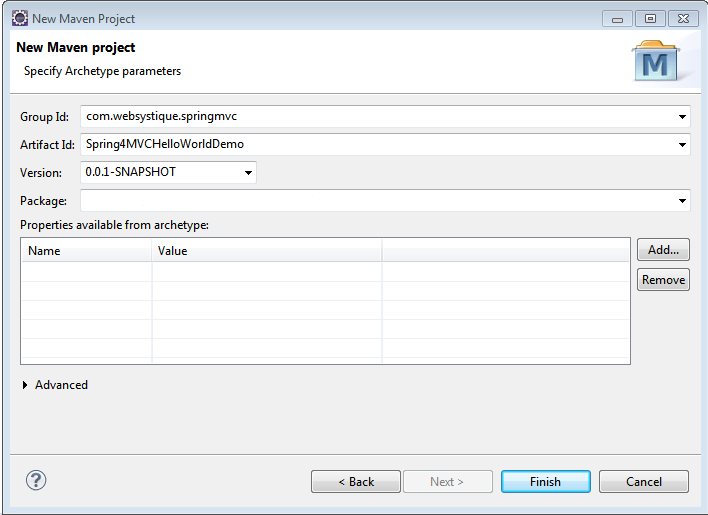
提供Group Id,Artifact Id,如上所示的版本,然后单击Finish。更新您的项目
你应该得到如下所示的文件结构
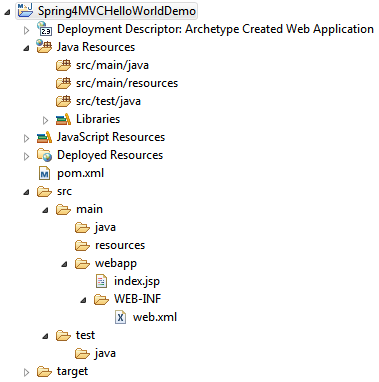
注意:如果您没有在项目结构中看到src/main/java和src/test/java文件夹,请转到Project>Properties>Java BuildPath>Libraries,选择/更改为适当的Java版本,单击确定,您应该现在看到这些文件夹。
步骤2:在Maven pom.xml中提供Spring依赖关系
由于它是一个maven项目,所有项目依赖关系都可以配置,pom.xml并且maven将自动下载所有相应的依赖项。以下是我们项目的pom.xml。
<project xmlns="http://maven.apache.org/POM/4.0.0" xmlns:xsi="http://www.w3.org/2001/XMLSchema-instance" xsi:schemaLocation="http://maven.apache.org/POM/4.0.0 http://maven.apache.org/xsd/maven-4.0.0.xsd">
  <modelVersion>4.0.0</modelVersion>
  <groupId>com.demo.springmvc</groupId>
  <artifactId>Spring4MVCHelloWorldDemo</artifactId>
  <version>0.0.1-SNAPSHOT</version>
  <packaging>war</packaging>

  <properties>
        <springframework.version>4.0.6.RELEASE</springframework.version>
    </properties>

    <dependencies>
        <dependency>
            <groupId>org.springframework</groupId>
            <artifactId>spring-webmvc</artifactId>
            <version>${springframework.version}</version>
        </dependency>

        <!-- Below declared dependencies are included for the servers who may complain about servlet/jstl missing dependency -->
        <dependency>
            <groupId>javax.servlet</groupId>
            <artifactId>javax.servlet-api</artifactId>
            <version>3.1.0</version>
        </dependency>
        <dependency>
            <groupId>javax.servlet.jsp</groupId>
            <artifactId>javax.servlet.jsp-api</artifactId>
            <version>2.3.1</version>
        </dependency>
        <dependency>
            <groupId>javax.servlet</groupId>
            <artifactId>jstl</artifactId>
            <version>1.2</version>
        </dependency>
    </dependencies>

    <build>
        <pluginManagement>
            <plugins>
                <plugin>
                    <groupId>org.apache.maven.plugins</groupId>
                    <artifactId>maven-compiler-plugin</artifactId>
                    <version>3.2</version>
                    <configuration>
                        <source>1.8</source>
                        <target>1.8</target>
                    </configuration>
                </plugin>
            </plugins>
        </pluginManagement>
        <finalName>Spring4MVCHelloWorldDemo</finalName>
    </build>
</project>在maven-compiler-plugin这里添加了Maven插件来明确指定我们将要使用的java版本。请注意,它也强制eclipse用于项目的jdk版本。如果不存在,eclipse将jdk-version切换回1.5,这是令人讨厌的。所以请添加它在您的项目pom.xml。
步骤3:添加控制器和视图
import org.springframework.stereotype.Controller;
import org.springframework.ui.ModelMap;
import org.springframework.web.bind.annotation.RequestMapping;
import org.springframework.web.bind.annotation.RequestMethod;

@Controller
@RequestMapping("/")
public class HelloWorldController {

    @RequestMapping(method = RequestMethod.GET)
    public String sayHello(ModelMap model) {
        model.addAttribute("greeting", "Hello World from Spring 4 MVC");
        return "welcome";
    }

    @RequestMapping(value="/helloagain", method = RequestMethod.GET)
    public String sayHelloAgain(ModelMap model) {
        model.addAttribute("greeting", "Hello World Again, from Spring 4 MVC");
        return "welcome";
    }

}
在WEB-INF下创建一个名为views的新文件夹,并添加一个简单的JSP页面welcome.jsp(WEB-INF / views / welcome.jsp),在我们的例子中,它将简单地访问从控制器发送的模型值。
<%@ page language="java" contentType="text/html; charset=UTF-8"
    pageEncoding="UTF-8"%>
<!DOCTYPE html PUBLIC "-//W3C//DTD HTML 4.01 Transitional//EN" "http://www.w3.org/TR/html4/loose.dtd">
<html>
<head>
<meta http-equiv="Content-Type" content="text/html; charset=UTF-8">
<title>Insert title here</title>
</head>
<body>
	Greeting:${greeting}
</body>
</html>
步骤4:创建Spring配置文件
<?xml version="1.0" encoding="UTF-8"?>
<beans xmlns="http://www.springframework.org/schema/beans" xmlns:xsi="http://www.w3.org/2001/XMLSchema-instance"
	xmlns:context="http://www.springframework.org/schema/context" xmlns:mvc="http://www.springframework.org/schema/mvc"
	xsi:schemaLocation="http://www.springframework.org/schema/beans http://www.springframework.org/schema/beans/spring-beans-4.1.xsd
		http://www.springframework.org/schema/context http://www.springframework.org/schema/context/spring-context-4.1.xsd
		http://www.springframework.org/schema/mvc http://www.springframework.org/schema/mvc/spring-mvc.xsd">

    <context:component-scan base-package="com.springmvc" />

    <mvc:annotation-driven />

    <bean
        class="org.springframework.web.servlet.view.InternalResourceViewResolver">
        <property name="prefix">
            <value>/WEB-INF/views/</value>
        </property>
        <property name="suffix">
            <value>.jsp</value>
        </property>
    </bean>

</beans>
步骤5:更新Web配置(web.xml)文件
<?xml version="1.0" encoding="UTF-8"?>
<web-app xmlns:xsi="http://www.w3.org/2001/XMLSchema-instance" xmlns="http://java.sun.com/xml/ns/javaee" xsi:schemaLocation="http://java.sun.com/xml/ns/javaee http://java.sun.com/xml/ns/javaee/web-app_3_0.xsd" id="WebApp_ID" version="3.0">

 <display-name>Spring4MVCHelloWorldDemo Web Application</display-name>

 <servlet>
    <servlet-name>dispatcher</servlet-name>
    <servlet-class>
        org.springframework.web.servlet.DispatcherServlet
    </servlet-class>
    <init-param>
        <param-name>contextConfigLocation</param-name>
        <param-value>classpath:spring-mvc.xml</param-value>
    </init-param>
    <load-on-startup>1</load-on-startup>
 </servlet>

 <servlet-mapping>
    <servlet-name>dispatcher</servlet-name>
    <url-pattern>/</url-pattern>
 </servlet-mapping>

</web-app>


 被折叠的 条评论
为什么被折叠?
被折叠的 条评论
为什么被折叠?
 到【灌水乐园】发言


