


 本文详细介绍rcp命令的使用方法及远程文件拷贝的配置步骤,包括配置hosts文件、rhosts文件,启动rsh服务等内容。
rcp代表"remote file copy"(远程文件拷贝)。
1.命令格式:
rcp [参数] [源文件] [目标文件]
2.命令功能:
功能: rcp命令用于在计算机之间拷贝文件。
rcp命令使在两台Linux主机之间的文件复制操作更简单。通过适当的配置,在两台Linux主机之间复制文件而无需输入密码,就像本地文件复制一样简单。
rcp命令有两种格式。第一种格式用于文件到文件的拷贝;第二种格式用于把文件或目录拷贝到另一个目录中。
配置rcp命令的使用环境:
1)如果系统中有 /etc/hosts 文件,系统管理员应确保该文件内包含要与之进行通信的远程主机的项:
[root@localhost etc]# cat hosts                                    //hosts文件的内容
127.0.0.1   localhost localhost.localdomain localhost4 localhost4.localdomain4
::1         localhost localhost.localdomain localhost6 localhost6.localdomain6
[root@localhost etc]#
介绍/etc/hosts:
hosts文件是Linux主机名和ip配置文件,The static table lookup for host name(主机名查询静态表)。可以介绍本机或其他主机的主机名和IP地址。不同的Linux版本,其配置文件名可能不一样,比如Debian的对应文件时/etc/hostname。
hosts配置文件对于在网络中作为服务器的Linux主机拥有极大作用。它记载了本地主机或远程主机的IP地址、域名和主机名的对应关系。因此我们可以 通过输入域名或主机名访问IP,而不必输入难记的数字IP地址。而主机名多用来区分在同一局域网下的不同主机。
host文件每一行的意思是:第一部分:网络IP地址;第二部分:主机名或域名;第三部分:主机名的别名。当然每行也可以是两部分,即主机IP地址和主机名。
主机名(hostname)和域名(domain)的区别:
主机名通常在局域网内使用,通过hosts文件,主机名就被解析到对应IP;
域名通常在INTERNET上使用,但如果本机不想使用internet上的域名解析,这时就可以更改hosts文件,加入自己的域名解析。
hosts文件可以解决的问题:
1.远程登录linux主机过慢:有时候客户端想要远程登录一台linux主机,但每次登录输入密码后都会等很长一段时间才会进入,这是因为linux主 机在返回信息时需要解析IP,如果在linux主机的hosts文件事先就加入客户端的IP地址,这时再从客户端远程登录linux就会很快。
2.双机互联:当两台主机只是双机互连时,这时两台主机都需要设置自己的ip,同时在对方的hosts文件里加入自己的ip和主机名。
主机名修改工具hostname的使用:
hostname
命令用于显示和设置系统的主机名称。环境变量HOSTNAME也保存了当前的主机名。在使用hostname命令设置主机名后,系统并不会永久保存新的主
机名,重新启动机器之后还是原来的主机名。如果需要永久修改主机名,需要同时修改/etc/hosts和/etc/sysconfig/network的
相关内容。

hostname---show or set the system's host name
[root@localhost etc]# hostname                              //显示主机名
localhost.localdomain
[root@localhost etc]# hostname -a                //显示所有hosts配置信息
localhost.localdomain localhost4 localhost4.localdomain4 localhost.localdomain localhost6 localhost6.localdomain6
[root@localhost etc]# hostname -i                //显示已配置的IP地址
::1 127.0.0.1
[root@localhost etc]# hostname sunmeng
[root@localhost etc]# hostname
sunmeng
2)修改两台Linux主机的hosts文件: (host文件里的内容就相当于一个用户DNS服务器,将主机名解释为对应IP地址)
在这里我实现的是CentOS7.0与Unbuntu14.04之间的连接,它们的信息如下:
Unbuntu:
IP地址:192.168.0.11     //用ifconfig命令获得
主机名:Unbuntu          //用hostname主机名修改工具获得
CentOS:
IP地址:192.168.0.15
主机名:CentOS
在两者的hosts文件中加上对方的信息:
Unbuntu:
root@SJM:/home/xiong#cat /etc/hosts
127.0.0.1        localhost
127.0.1.1        SJM
192.168.0.15  CentOS

#The following lines are desirable for IPv6 capable hosts
::1           ip6-localhost  ip6-loopback
fe00::0    ip6-localnet
ff00::0     ip6-mcastprefix
ff02::1     ip6-allnodes
ff02::2     ip6-allrouters
CentOS:
[root@localhost ~]# cat /etc/hosts
127.0.0.1   localhost localhost.localdomain localhost4 localhost4.localdomain4
::1         localhost localhost.localdomain localhost6 localhost6.localdomain6
192.168.0.11 Unbuntu
3)在root用户的根目录下创建.rhosts文件,加入远端主机的主机名和要连接的用户名:
.rhosts 文件是 /etc/hosts.equiv 文件的用户等效文件。此文件包含主机-用户组合列表,而不包含一般意义的主机。如果此文件中列出了主机-用户组合,则指定用户将被授予从指定主机登录而不必提供口令的权限。
在.rhosts文件和hosts.equiv文件中,真正起作用的是后者。但在不同系统中,都写上终归不会错。
Unbuntu:     //配置允许CentOS上的用户root和sunmeng免密码登录
root@Unbuntu:/home/xiong# cat /etc/hosts.equiv
# /etc/hosts.equiv: list  of  hosts  and  users  that are granted "trusted" r
#            command access to your system
CentOS      sunmeng
CentOS      root
root@Unbuntu:/home/xiong# cat /root/.rhosts
CentOS      sunmeng
CentOS      root

CentOS:    //配置允许Unbuntu上的用户root和xiong免密码登录
[root@CentOS sunmeng]# cat /root/.rhosts
Unbuntu  xiong
Unbuntu  root
[root@CentOS sunmeng]# cat /etc/hosts.equiv
Unbuntu  xiong
Unbuntu  root   //需要注意的一点是:从CentOS主机上登录Unbuntu,不能直接用Unbuntu的root登录。而从Unbuntu上均可。(Unbuntu不允许远端用户直接获得root权限,应该先登录用户,再用su命令)
而且.rhosts文件得权限最好进行如下配置:(.rhosts 文件存在严重的安全问题。任何用户都可以创建 .rhosts 文件,从而可以在系统管理员不知情时对其选择的任何人授予访问权限。)
root@Unbuntu:/home/xiong# ls -l /root/.rhosts
-rw-r--r-- 1 root root 37  6月 24 12:48 /root/.rhosts
root@Unbuntu:/home/xiong# chmod 600 $HOME/.rhosts
root@Unbuntu:/home/xiong# ls -l /root/.rhosts
-rw------- 1 root root 37  6月 24 12:48 /root/.rhosts
4)启动rsh服务(rcp命令的实现实际上是系统调用rsh服务实现的)
CentOS:
1.检查系统是否安装rsh和rsh-server软件包:
CentOS                        //已经安装好,如果没有安装,使用yum install rsh和yum install rsh-server安装
[root@localhost sunmeng]# rpm -aq |grep "rsh"
rsh-0.17-76.el7_1.1.x86_64
rsh-server-0.17-76.el7_1.1.x86_64
2.检查系统是否安装xinetd守护进程:
[root@localhost xinetd.d]# rpm -qa |grep xinetd
xinetd-2.3.15-12.el7.x86_64
xinetd的配置文件:xinetd.conf:
[root@localhost etc]# cat xinetd.conf
#
# This is the master xinetd configuration file. Settings in the
# default section will be inherited by all service configurations
# unless explicitly overridden in the service configuration. See
# xinetd.conf in the man pages for a more detailed explanation of
# these attributes.

defaults
{
# The next two items are intended to be a quick access place to
# temporarily enable or disable services.
#
#    enabled        =
#    disabled    =

# Define general logging characteristics.
    log_type    = SYSLOG daemon info
    log_on_failure    = HOST
    log_on_success    = PID HOST DURATION EXIT

# Define access restriction defaults
#
#    no_access    =
#    only_from    =
#    max_load    = 0
    cps        = 50 10
    instances    = 50
    per_source    = 10

# Address and networking defaults
#
#    bind        =
#    mdns        = yes
    v6only        = no

# setup environmental attributes
#
#    passenv        =
    groups        = yes
    umask        = 002

# Generally, banners are not used. This sets up their global defaults
#
#    banner        =
#    banner_fail    =
#    banner_success    =
}

includedir /etc/xinetd.d          //这里说明xinetd启动时将/etc/xinetd.d文件夹下的文件包含进来
3.在/etc/xinetd.d目录下查找是否有rsh和rlogin,如果没有按照下面文件得内容创建一份,注意红色的部分为no。
[root@localhost xinetd.d]# cat rlogin
#default:on
# description: rlogind is the server for the rlogin(1) program. The server
# provides a remote login facility with authentication based on
# privileged port numbers from trusted hosts.
service login
{
disable = no
socket_type = stream
wait = no
user = root
log_on_success += USERID
log_on_failure += USERID
server = /usr/sbin/in.rlogind
}
[root@localhost xinetd.d]# cat rsh
#default:on
# description: The rshd server is the server for the rcmd(3) routine and,
# consequently, for the rsh(1) program. The server provides
# remote execution facilities with authentication based on
# privileged port numbers from trusted hosts.
service shell
{
disable = no
socket_type = stream
wait = no
user = root
log_on_success += USERID
log_on_failure += USERID
server = /usr/sbin/in.rshd
}
然后最好用service xinetd restart命令重启一下守护进程。
4.编辑/etc/securetty,确保存在rexec、rsh、rlogin三行
[root@localhost etc]# cat /etc/securetty
console
vc/1
vc/2
vc/3
vc/4
vc/5
vc/6
vc/7
vc/8
vc/9
vc/10
vc/11
tty1
tty2
tty3
tty4
tty5
tty6
tty7
tty8
tty9
tty10
tty11
ttyS0
ttysclp0
sclp_line0
3270/tty1
hvc0
hvc1
hvc2
hvc3
hvc4
hvc5
hvc6
hvc7
hvsi0
hvsi1
hvsi2
xvc0
rexec                       //如果没有自己添加
rsh
rlogin
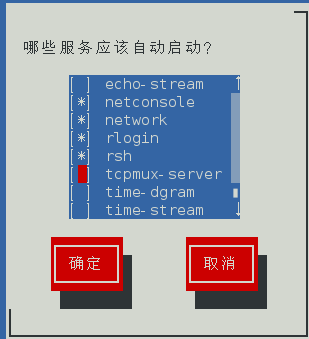
5.此时用setup命令查看系统服务,已经包含了rsh和rlogin,并且默认启动:(之前是没有的)
Ubuntu:
1.安装rsh-client和rsh-server软件包:
root@Unbuntu:/home/xiong# apt-get install rsh        //在Unbuntu的软件包库中没有rsh软件。
正在读取软件包列表... 完成
正在分析软件包的依赖关系树
正在读取状态信息... 完成
E: 未发现软件包 rsh
root@Unbuntu:/home/xiong# apt-get install rsh-client    //rsh-client相当于CentOS(Red Hat系列)的rsh
正在读取软件包列表... 完成
正在分析软件包的依赖关系树
正在读取状态信息... 完成
rsh-client 已经是最新的版本了。
升级了 0 个软件包,新安装了 0 个软件包,要卸载 0 个软件包,有 588 个软件包未被升级。
root@Unbuntu:/home/xiong# apt-get install rsh-server
正在读取软件包列表... 完成
正在分析软件包的依赖关系树
正在读取状态信息... 完成
rsh-server 已经是最新的版本了。
升级了 0 个软件包,新安装了 0 个软件包,要卸载 0 个软件包,有 588 个软件包未被升级。
2.安装守护进程xinetd:
root@Unbuntu:/home/xiong# apt-get install xinetd
正在读取软件包列表... 完成
正在分析软件包的依赖关系树
正在读取状态信息... 完成
xinetd 已经是最新的版本了。
升级了 0 个软件包,新安装了 0 个软件包,要卸载 0 个软件包,有 588 个软件包未被升级。
Unbuntu的xinetd守护进程的配置文件xinetd.conf:
root@Unbuntu:/etc# cat xinetd.conf
# Simple configuration file for xinetd
#
# Some defaults, and include /etc/xinetd.d/

defaults
{

# Please note that you need a log_type line to be able to use log_on_success
# and log_on_failure. The default is the following :
# log_type = SYSLOG daemon info

}

includedir /etc/xinetd.d              //也要求包含/etc/xinetd.d目录下的文件
3.在/etc/init.d文件夹下新建rsh、rlogin和rexec文件:(如果之前没配置)
root@Unbuntu:/etc/xinetd.d# cat rsh
# default: on
# descrīption: The rshd server is the server for the rcmd(3) routine and,
#       consequently, for the rsh(1) program.  The server provides
#       remote execution facilities with authentication based on
#       privileged port numbers from trusted hosts.
service shell
{
        disable = no
        socket_type             = stream
        wait                    = no
        user                    = root
        log_on_success          += USERID
        log_on_failure          += USERID
        server                  = /usr/sbin/in.rshd
}
root@Unbuntu:/etc/xinetd.d# cat rlogin
#####################################################
#default:on
# descrīption: rlogind is the server for the rlogin(1) program.  The server
#       provides a remote login facility with authentication based on
#       privileged port numbers from trusted hosts.
service login
{
        disable = no
        socket_type             = stream
        wait                    = no
        user                    = root
        log_on_success          += USERID
        log_on_failure          += USERID
        server                  = /usr/sbin/in.rlogind
}
root@Unbuntu:/etc/xinetd.d# cat rexec
#default:off
# descrīption: Rexecd is the server for the rexec(3) routine. The server
# provides remote execution facilities with authentication based
# on user names and passwords.
service exec
{
disable = no
socket_type = stream
wait = no
user = root
log_on_success += USERID
log_on_failure += USERID
server = /usr/sbin/in.rexecd
}
4.重启xinetd服务:
root@Unbuntu:/etc# /etc/init.d/xinetd restart
 * Stopping internet superserver xinetd                                  [ OK ]
 * Starting internet superserver xinetd                                  [ OK ]
5)rsh服务的简单测试:(实现用CentOS登录Unbuntu列出Unbuntu的home目录和Unbuntu登录CentOS列出CentOS的home目录)
CentOS的home目录:
[root@localhost home]# ll
total 4
drwx------. 14 sunmeng sunmeng 4096 Jun 28 01:47 sunmeng
Unbuntu的home目录:
xiong@Unbuntu:/home$ ll
总用量 12
drwxr-xr-x  3 root      root      4096  6月 24 13:36 ./
drwxr-xr-x 23 root      root      4096  6月 24 10:37 ../
drwxr-xr-x 20 xiong xiong 4096  6月 28 14:54 xiong/
CentOS登录Unbuntu:
[root@localhost home]# rsh Unbuntu      //等价于rsh 192.168.0.11
Password:

Login incorrect
Unbuntu login: xiong
Password:
Last login: Tue Jun 28 18:09:24 CST 2016 from CentOS on pts/4
Welcome to Ubuntu 14.04.1 LTS (GNU/Linux 3.13.0-32-generic x86_64)

 * Documentation:  https://help.ubuntu.com/

xiong@Unbuntu:~$ ls -l /home
总用量 4
drwxr-xr-x 20 xiong xiong 4096  6月 28 14:54 xiong

Unbuntu登录CentOS:
xiong@Unbuntu:/home$ rsh CentOS    //等价于rsh 192.168.0.15
Password:
Password:
Login incorrect

CentOS login: sunmeng
Password:
Last failed login: Tue Jun 28 03:26:40 PDT 2016 from Unbuntu on pts/2
There was 1 failed login attempt since the last successful login.
Last login: Tue Jun 28 01:27:45 from ::ffff:192.168.0.18
[sunmeng@CentOS ~]$ ls /home
sunmeng
远程登录时可能会出现下面的问题:
xiong@Unbuntu:~$ rsh CentOS
CentOS: No route to host
有两种原因:1.远程机没有安装并启动rsh-server服务;2.防火墙阻止了本地机对远程机rsh服务端口(无论是rsh还是rlogin都是513端口) 。
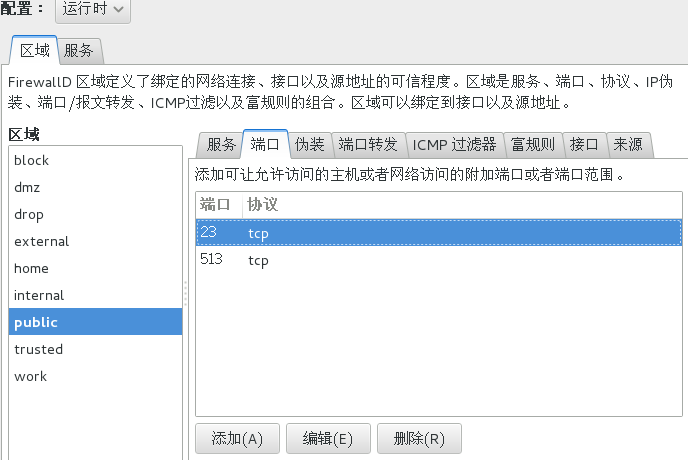
对于第二个问题:你可以选择关闭远程机防火墙,也可以让防火墙开启tcp连接的513端口,对外部所有IP开放访问。(同时,你还可以修改rsh和rlogin的端口,不用513号端口)
在CentOS中使用iptables命令操作防火墙,也可以用图形界面,类似telnet命令中开放23号端口的那样。
在Unbuntu中使用了iptables的升级命令ufw命令操作防火墙。
root@Unbuntu:/home/xiong# ufw status    //显示防火墙状态
状态:不活动
root@Unbuntu:/home/xiong# ufw allow 513    //开放513号端口
防火墙规则已更新
规则已更新(v6)
root@Unbuntu:/home/xiong# ufw disable      //关闭防火墙
3.命令参数:
1) -r 递归地把源目录中的所有内容拷贝到目的目录中。要使用这个选项,目的必须是一个目录。
2) -p 试图保留源文件的修改时间和模式,忽略umask。
3) -x 为传送的所有数据打开DES加密。
4) -D 指定远程服务器的端口号。
5) -r 递归处理,将指定目录下的文件与子目录一并处理
4.命令参数
1)root@Unbuntu:/home/xiong# rsh -l root CentOS rsh指定用户名登录
root@Unbuntu:/home/xiong# rsh -l root CentOS
Password:
Last failed login: Tue Jun 28 03:54:33 PDT 2016 from Unbuntu on pts/2
There were 2 failed login attempts since the last successful login.
Last login: Tue Jun 28 03:53:19 from Unbuntu
[root@CentOS ~]#
在集群的所有节点都已经配置好了.rhosts和/etc/hosts的信息,并且rsh服务已经打开,防火墙已经关闭。rsh hostname已经通过测试,但是使用rsh hostname rcmd 来执行命令,未能通过,出现no route to host错误:
root@Unbuntu:/etc# rsh -l root CentOS ls -l /home/sunmeng            //Unbuntu登录CentOS
CentOS: No route to host
[root@localhost sunmeng]# rsh -l sunjimen Unbuntu /bin/ls -l /home        //CentOS登录Unbuntu
poll: protocol failure in circuit setup
解决方法:
1.修改SELinux的配置文件(目的是关闭SELinux):
[root@localhost selinux]# cd /etc/selinux
[root@localhost selinux]# ll
total 12
-rw-r--r--. 1 root root  547 Jun 21 11:15 config
-rw-r--r--. 1 root root 2321 Jun  9  2014 semanage.conf
drwxr-xr-x. 6 root root 4096 Jun 23 01:50 targeted
[root@localhost selinux]# vi config
[root@localhost selinux]# cat config

# This file controls the state of SELinux on the system.
# SELINUX= can take one of these three values:
#     enforcing - SELinux security policy is enforced.
#     permissive - SELinux prints warnings instead of enforcing.
#     disabled - No SELinux policy is loaded.
#SELINUX=enforcing   //oringin version
SELINUX=disabled     //after modifying
# SELINUXTYPE= can take one of three two values:
#     targeted - Targeted processes are protected,
#     minimum - Modification of targeted policy. Only selected processes are protected.
#     mls - Multi Level Security protection.
SELINUXTYPE=targeted
修改之后并无明显作用,但最好关闭。
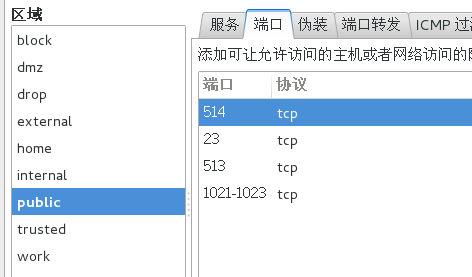
2.让防火墙开放端口513,514和1021-1023:(直接把两台主机的防火墙都关了也行)
CentOS:
Unbuntu:ufw allow 513 514 1021 1022 1023
原因:(http://goodluck1982.blog.sohu.com/134666734.html)
直接使用 rsh <host> 命令方式和使用 rsh <host> <cmd> 命令方式,其实本质上是不一样的:前者实质上调用的是 rlogin 程序,而后者才是真正意义上的 remote shell。所以,前者对应的是 rlogin 服务的端口,为 513;后者对应的才是 remote shell 服务的端口 514。
而使用 rsh <host> <cmd> 命令方式时,具体过程还是有些特殊的:本地机先链接服务端的 514 端口,然后服务端还要以约定好的端口(1021~1023)与客户端相连,所以要顺利执行该命令的话,即要求服务端允许 514 端口链接,还要求本地机允许1021~1023端口的链接,这样就必须正确配置防火墙。
如果没有在本地机允许1021~1023端口,则会出现如下错误: poll: protocol failure in circuit setup。
2)以rsh [host] [command]的方式登录远程主机并执行命令:
CentOS登录Unbuntu并执行命令:
[root@localhost sunmeng]# rsh Unbuntu ls -l /home/xiong
total 48
-rw-r--r-- 1 xiong xiong 8980 Jun 24 10:26 examples.desktop
drwxr-xr-x 2 root      root      4096 Jun 24 12:12 vm
drwxr-xr-x 2 xiong xiong 4096 Jun 28 21:12 下载
drwxr-xr-x 2 xiong xiong 4096 Jun 24 10:43 公共的
drwxr-xr-x 2 xiong xiong 4096 Jun 24 10:43 图片
drwxr-xr-x 2 xiong xiong 4096 Jun 24 10:43 文档
drwxr-xr-x 4 xiong xiong 4096 Jun 28 14:42 桌面
drwxr-xr-x 2 xiong xiong 4096 Jun 24 10:43 模板
drwxr-xr-x 2 xiong xiong 4096 Jun 24 10:43 视频
drwxr-xr-x 2 xiong xiong 4096 Jun 24 10:43 音乐
Unbuntu登录CentOS并执行命令:
root@Unbuntu:/home/xiong# rsh CentOS ls -l /home/sunmeng
total 4
drwxr-xr-x. 2 sunmeng sunmeng    6 Jun 23 02:29 Desktop
drwxr-xr-x. 2 sunmeng sunmeng 4096 Jun 27 20:18 Documents
drwxr-xr-x. 2 sunmeng sunmeng    6 Jun 21 03:31 Downloads
drwxr-xr-x. 2 sunmeng sunmeng    6 Jun 21 03:31 Music
drwxr-xr-x. 2 sunmeng sunmeng    6 Jun 21 03:31 Pictures
drwxr-xr-x. 2 sunmeng sunmeng    6 Jun 21 03:31 Public
drwxr-xr-x. 2 sunmeng sunmeng    6 Jun 21 03:31 Templates
-rw-rw-r--  1 sunmeng sunmeng    0 Jun 28 05:45 text.c
drwxr-xr-x. 2 sunmeng sunmeng    6 Jun 21 03:31 Videos
drwxr-xr-x  7 sunmeng sunmeng  155 Jun 28 04:34 桌面
3)将文件拷贝到远端机,或者把远端机上的文件拷贝到本地
将Unbuntu的 /home/xiong/下载 目录下的text文件拷贝到CentOS的 /home/sunmeng文件夹下:
//1.拷贝前的文件信息:
[root@localhost sunmeng]# ll
总用量 4
drwxr-xr-x. 2 sunmeng sunmeng    6 6月  23 02:29 Desktop
drwxr-xr-x. 2 sunmeng sunmeng 4096 6月  27 20:18 Documents
drwxr-xr-x. 2 sunmeng sunmeng    6 6月  21 03:31 Downloads
drwxr-xr-x. 2 sunmeng sunmeng    6 6月  21 03:31 Music
drwxr-xr-x. 2 sunmeng sunmeng    6 6月  21 03:31 Pictures
drwxr-xr-x. 2 sunmeng sunmeng    6 6月  21 03:31 Public
drwxr-xr-x. 2 sunmeng sunmeng    6 6月  21 03:31 Templates
-rw-rw-r--  1 sunmeng sunmeng    0 6月  28 05:45 text.c
drwxr-xr-x. 2 sunmeng sunmeng    6 6月  21 03:31 Videos
drwxr-xr-x  7 sunmeng sunmeng  155 6月  28 04:34 桌面
//2.在Unbuntu终端执行:
root@Unbuntu:/home/xiong/下载# vi text
root@Unbuntu:/home/xiong/下载# cat text
This is from Unbuntu!

root@Unbuntu:/home/xiong/下载# rcp text CentOS:/home/sunmeng
//3.拷贝后的文件信息
[root@localhost sunmeng]# ll
总用量 8
drwxr-xr-x. 2 sunmeng sunmeng    6 6月  23 02:29 Desktop
drwxr-xr-x. 2 sunmeng sunmeng 4096 6月  27 20:18 Documents
drwxr-xr-x. 2 sunmeng sunmeng    6 6月  21 03:31 Downloads
drwxr-xr-x. 2 sunmeng sunmeng    6 6月  21 03:31 Music
drwxr-xr-x. 2 sunmeng sunmeng    6 6月  21 03:31 Pictures
drwxr-xr-x. 2 sunmeng sunmeng    6 6月  21 03:31 Public
drwxr-xr-x. 2 sunmeng sunmeng    6 6月  21 03:31 Templates
-rw-r--r--  1 root    root      23 6月  28 18:33 text
-rw-rw-r--  1 sunmeng sunmeng    0 6月  28 05:45 text.c
drwxr-xr-x. 2 sunmeng sunmeng    6 6月  21 03:31 Videos
drwxr-xr-x  7 sunmeng sunmeng  155 6月  28 04:34 桌面
[root@localhost sunmeng]# cat text
This is from Unbuntu!

---------------------------------------------------------------------------------------------------------------------------------
将CentOS的 /home/sunmeng 下的text.c拷贝到Unbuntu的 /home/xiong/下载:
//1.拷贝文件之前:
root@Unbuntu:/home/xiong/下载# ll
总用量 12
drwxr-xr-x  2 xiong xiong 4096  6月 29 09:32 ./
drwxr-xr-x 20 xiong xiong 4096  6月 29 08:27 ../
-rw-r--r--  1 root      root        23  6月 29 09:32 text
//2.在CentOS主机上执行下面的命令:
[root@localhost sunmeng]# vi text.c
[root@localhost sunmeng]# cat text.c
This is form CentOS!

[root@localhost sunmeng]# rcp text.c Unbuntu:/home/xiong/下载
//3.拷贝文件之后:
root@Unbuntu:/home/xiong/下载# ll
总用量 16
drwxr-xr-x  2 xiong xiong 4096  6月 29 09:42 ./
drwxr-xr-x 20 xiong xiong 4096  6月 29 08:27 ../
-rw-r--r--  1 root      root        23  6月 29 09:32 text
-rw-r--r--  1 root      root        22  6月 29 09:42 text.c
root@Unbuntu:/home/xiong/下载# cat text.c
This is form CentOS!
5.其他:
在这个命令学习时遇到的问题:
1)要实现Unbuntu14.04虚机与win10物理机的数据传输,虚机需要安装VMware Tools工具:
1.在VMware Workstations的虚拟机菜单下选择安装VMware Tools:
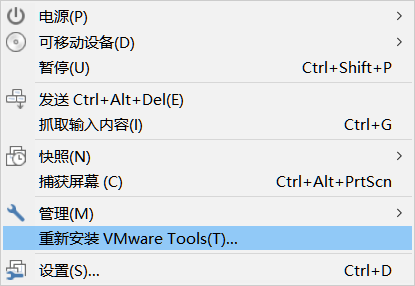
2.此时虚拟机将默认挂载虚拟CD/DVD驱动器,里面含有VMware Tools的安装包,默认权限是只可读。
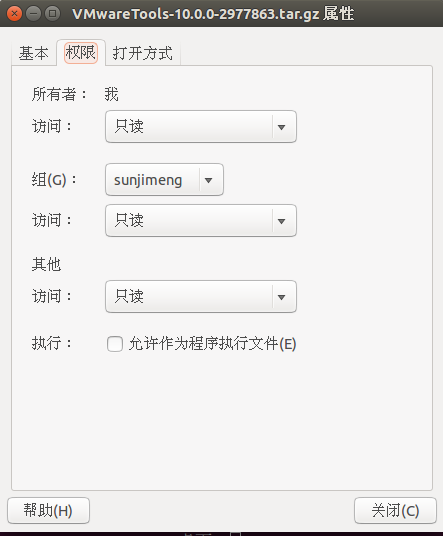
3.把安装包拷贝一份到用户具有读写权限的目录下,用tar命令解压:
root@SJM:/home/xiong/桌面# tar -ztvf VMwareTools-10.0.0-2977863.tar.gz
root@SJM:/home/xiong/桌面# ll
总用量 69864
drwxr-xr-x  3 xiong xiong     4096  6月 28 09:49 ./
drwxr-xr-x 19 xiong xiong     4096  6月 28 10:10 ../
-rw-rw-r--  1 xiong xiong 71524872  8月 12  2015 VMwareTools-10.0.0-2977863.tar.gz
drwxr-xr-x  9 root      root          4096  8月 12  2015 vmware-tools-distrib/
4.然后进入解压后自动生成的文件夹,执行安装软件的脚本:
root@SJM:/home/xiong/桌面# cd vmware-tools-distrib
root@SJM:/home/xiong/桌面/vmware-tools-distrib# ll
总用量 524
drwxr-xr-x  9 root      root        4096  8月 12  2015 ./
drwxr-xr-x  3 xiong xiong   4096  6月 28 09:49 ../
drwxr-xr-x  2 root      root        4096  8月 12  2015 bin/
drwxr-xr-x  5 root      root        4096  8月 12  2015 caf/
drwxr-xr-x  2 root      root        4096  8月 12  2015 doc/
drwxr-xr-x  5 root      root        4096  8月 12  2015 etc/
-rw-r--r--  1 root      root      279342  8月 12  2015 FILES
-rw-r--r--  1 root      root        2538  8月 12  2015 INSTALL
drwxr-xr-x  2 root      root        4096  8月 12  2015 installer/
drwxr-xr-x 15 root      root        4096  8月 12  2015 lib/
drwxr-xr-x  3 root      root        4096  8月 12  2015 vgauth/
-rwxr-xr-x  1 root      root         243  8月 12  2015 vmware-install.pl*
-rwxr-xr-x  1 root      root      205572  8月 12  2015 vmware-install.real.pl*
root@SJM:/home/xiong/桌面/vmware-tools-distrib# ./vmware-install.pl*      //必须要带./
接下来就是安装过程。
5.检查是否启动虚拟机与物理机共享剪贴板:(安装VMware Tools的主要目的)
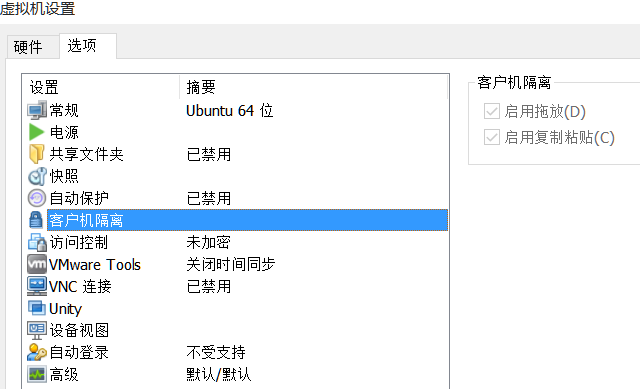
如果此时共享剪贴板还不能用,就重启一下虚拟机。
2)在首次登录Unbuntu的终端时,su切换用户的命令不能使用:
原因: Unbuntu刚安装后,不能在terminal中运行su命令,因为root没有默认密码,需要手动设定。
以安装unbuntu时输入的用户名登陆,该用户在admin组中,有权限给root设定密码。(默认打开终端就已登录)
root@SJM:/# sudo password [root]
sudo:password: command not found   //注意是"passwd"而不是"password"
root@SJM:/# sudo passwd [root]
输入新的 UNIX 密码:
重新输入新的 UNIX 密码:
passwd:已成功更新密码
3)Unbuntu默认不开启xinetd守护进程:
apt-get install xinetd    //安装守护进程服务软件
/etc/init.d/xinetd start  //启动xinetd服务
4)在Unbuntu中如何查看系统服务:
在Unbuntu中安装一个工具:sysv-rc-conf:
root@SJM:/home/xiong/下载# apt-get install sysv-rc-conf
正在读取软件包列表... 完成
正在分析软件包的依赖关系树
正在读取状态信息... 完成
sysv-rc-conf 已经是最新的版本了。
升级了 0 个软件包,新安装了 0 个软件包,要卸载 0 个软件包,有 588 个软件包未被升级。


 2117
2117

 被折叠的 条评论
为什么被折叠?
被折叠的 条评论
为什么被折叠?
 到【灌水乐园】发言


