


 本文详细介绍如何使用Rails框架结合MySQL数据库创建一个基本应用的过程,包括安装mysql2 gem包、配置Gemfile、设置数据库连接等关键步骤。
前提:建议安装 nautilus-open-terminal 。【不会,就Google】
一、新建一个使用mysql作为数据库的Rails工程
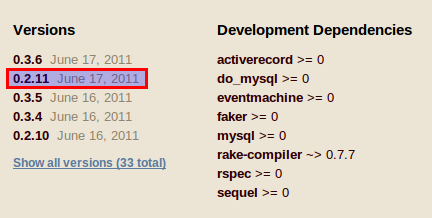
1、安装gem包 mysql2 。
$ sudo gem install mysql2 -v=0.2.11
注意:
- Rails3 默认搭配 mysql2 的0.2.x版本,不要采用mysql2的0.3.x版本,所以安装时要用参数 -v 指定安装哪个版本。
- gem install 时,rubygems会到网站http://rubygems.org/搜索gem包,因此你可以到这个网站搜索、查看、下载……gem包。
2、新建Rails工程 r1
到你要新建工程的目录下,右键,打开终端。
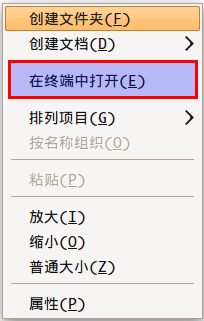
在终端中输入:
$ rails new r1 -d=mysql
解释 :
- rails命令,不解释。
- new,rails命令中的一个动作,即新建。rails命令还有很多动作,以后慢慢解释。
- r1,要新建的工程名。
- -d,指定数据库类型,可以省略,默认采用SQLite数据库。
执行完命令后,会在当前目录下新建了一个r1文件夹。
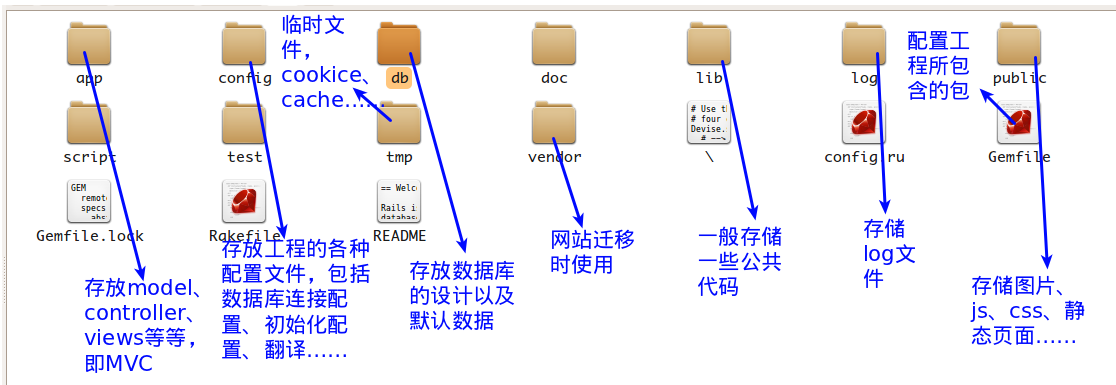
3、观察rails工程的内容
4、配置Gemfile文件
观察一下:
source 'http://rubygems.org'

gem 'rails', '3.0.9'

# Bundle edge Rails instead:
# gem 'rails', :git => 'git://github.com/rails/rails.git'

gem 'mysql2', '~> 0.2.6'

# Use unicorn as the web server
# gem 'unicorn'

# Deploy with Capistrano
# gem 'capistrano'

# To use debugger (ruby-debug for Ruby 1.8.7+, ruby-debug19 for Ruby 1.9.2+)
# gem 'ruby-debug'
# gem 'ruby-debug19', :require => 'ruby-debug'

# Bundle the extra gems:
# gem 'bj'
# gem 'nokogiri'
# gem 'sqlite3-ruby', :require => 'sqlite3'
# gem 'aws-s3', :require => 'aws/s3'

# Bundle gems for the local environment. Make sure to
# put test-only gems in this group so their generators
# and rake tasks are available in development mode:
# group :development, :test do
#   gem 'webrat'
# end
可以看到:
- 我用的rails版本是3.0.9
- 对mysql2包的要求是~>0.2.6,我们可以根据我们的实际情况改为0.2.11
3、将Gemfile中配置的包引入工程
在r1文件夹中打开终端,执行
$ bundle install
将会在工程中引入Gemfile所配置的包已经它们所依赖的包。
这时工程文件夹没什么变化,就是多了一个Gemfile.lock文件,它详细记录了该工程所包含的各个包的信息。
===========================================================================
跑题闲扯:
有时候我们要在其它计算机上运行我们的工程,要么其它计算机上没装我们需要的gem包,要么工程中包含我们自己写的私人包,要么发懒不想再装一遍……总之,我们要轻松迁移工程。
执行以下命令:
$ bundle package
发生了什么?vendor文件夹下多了一个cache文件夹,我们所需要的包全部备份在了里面,这样我们在其它计算机上执行 bundle install命令时,它不会再到网上、本地搜索,直接从备份取。
============================================================================
4、配置数据库连接
打开config/database.yml文件:
# MySQL.  Versions 4.1 and 5.0 are recommended.
#
# Install the MySQL driver:
#   gem install mysql2
#
# And be sure to use new-style password hashing:
#   http://dev.mysql.com/doc/refman/5.0/en/old-client.html
development:
  adapter: mysql2
  encoding: utf8
  reconnect: false
  database: r1_development
  pool: 5
  username: root
  password:
  socket: /var/run/mysqld/mysqld.sock

# Warning: The database defined as "test" will be erased and
# re-generated from your development database when you run "rake".
# Do not set this db to the same as development or production.
test:
  adapter: mysql2
  encoding: utf8
  reconnect: false
  database: r1_development
  pool: 5
  username: root
  password:
  socket: /var/run/mysqld/mysqld.sock

production:
  adapter: mysql2
  encoding: utf8
  reconnect: false
  database: r1_development
  pool: 5
  username: root
  password:
  socket: /var/run/mysqld/mysqld.sock
在这里我们发现Rails默认有三种运行模式 development、test和production。
================================================================
再跑题一次:
config/environments文件夹下包含了这三种模式的配置文件。
================================================================
在这里我们可以修改数据库名称、用户名和密码。比如,我把三种模式下的数据库名称全部改为了r1_development。当然如果没什么特殊要求,数据库名称可以保持默认不变。
注意:一定要填写正确的密码,如果不填写密码,连接数据库时,Rails会询问密码,然后mysql数据库密码莫名其妙的就变为了空。
5、创建数据库
$ rake db:create
mysql会创建上面所配置的数据库。
6、启动Rails工程
$ rails sever
可以简写为:
$ rails s
打开浏览器, http://localhost:3000/

显示的页面为public/index.html。
注意:如何结束运行?在终端中Ctrl+C。
一个最简单的Rails工程就完成了。


 被折叠的 条评论
为什么被折叠?
被折叠的 条评论
为什么被折叠?
 到【灌水乐园】发言


