


 本文介绍了一个简单的ListView应用案例,展示了如何使用C#设置ListView的视图样式、分组及添加项目。通过具体代码实现了列表视图中不同分组的数据展示。
ListView Designer代码:
//
// listView1
//
this .listView1.Columns.AddRange( new System.Windows.Forms.ColumnHeader[] {
this .name,
this .caption});
this .listView1.Dock = System.Windows.Forms.DockStyle.Fill;
listViewGroup1.Header = " 系统基本信息 " ;
listViewGroup1.Name = " 系统基本信息 " ;
listViewGroup2.Header = " 设备信息 " ;
listViewGroup2.Name = " 设备信息 " ;
this .listView1.Groups.AddRange( new System.Windows.Forms.ListViewGroup[] {
listViewGroup1,
listViewGroup2});
this .listView1.Location = new System.Drawing.Point( 0 , 0 );
this .listView1.Name = " listView1 " ;
this .listView1.Size = new System.Drawing.Size( 474 , 262 );
this .listView1.TabIndex = 0 ;
this .listView1.UseCompatibleStateImageBehavior = false ;
this .listView1.View = System.Windows.Forms.View.Details;
//
前台代码:
string
[] stra
=
{
"
计算机系统
"
,
"
WIN7 旗舰版
"
};
this .listView1.Items.Add( new ListViewItem(stra, 1 , this .listView1.Groups[ 0 ]));
this .listView1.Items.Add( new ListViewItem( new string []{ " 1 " , " 2 " }, 0 , this .listView1.Groups[ 1 ]));
this .listView1.Items.Add( new ListViewItem(stra, 1 , this .listView1.Groups[ 0 ]));
this .listView1.Items.Add( new ListViewItem( new string []{ " 1 " , " 2 " }, 0 , this .listView1.Groups[ 1 ]));
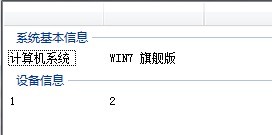
效果图:


 1065
1065

 被折叠的 条评论
为什么被折叠?
被折叠的 条评论
为什么被折叠?
 到【灌水乐园】发言


