http://blog.youkuaiyun.com/janice0529/article/details/44344169
Android系统 小米,三星,索尼手机发送桌面快键提醒数字图标,在Android系统中,众所周知不支持BadgeNumber,虽然第三方控件BadgeView可以实现应用内的数字提醒,但对于系统的图标,特别是app的logo图标很难实现数字标志,即使是绘图的方式不断修改,但这种方式天生弊端,实用性很差。但幸运的是,某些ROM厂商提供了私有的API,但也带来了难度,API的不同意意味着代码量的增加和兼容性问题更加突出。
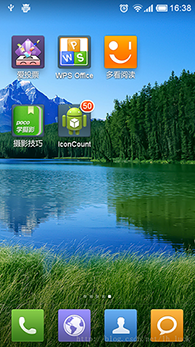
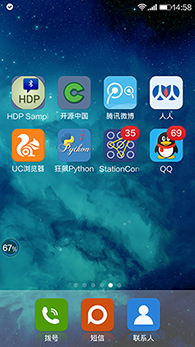
我们现在来实现桌面logo或者说icon右上角的图标,先来看2张图,第一张来自互联网,第二张来自个人实践!(由于实验条件有限,只能测试小米的(⊙o⊙)…,有兴趣的同学测试一下其他的吧)


好了,上代码
public class MainActivity extends Activity {
      //必须使用,Activity启动页
      private final static String lancherActivityClassName = Welcome.class.getName();

	@Override
	protected void onCreate(Bundle savedInstanceState) {
		super.onCreate(savedInstanceState);
		setContentView(R.layout.common_listview_layout);
	}

	@Override
	protected void onResume() {
		super.onResume();
		sendBadgeNumber();
	}

	private void sendBadgeNumber() {
		String number = "35";
		if (TextUtils.isEmpty(number)) {
			number = "0";
		} else {
			int numInt = Integer.valueOf(number);
			number = String.valueOf(Math.max(0, Math.min(numInt, 99)));
		}

		if (Build.MANUFACTURER.equalsIgnoreCase("Xiaomi")) {
			sendToXiaoMi(number);
		} else if (Build.MANUFACTURER.equalsIgnoreCase("samsung")) {
			sendToSony(number);
		} else if (Build.MANUFACTURER.toLowerCase().contains("sony")) {
			sendToSamsumg(number);
		} else {
			Toast.makeText(this, "Not Support", Toast.LENGTH_LONG).show();
		}
	}

	private void sendToXiaoMi(String number) {
		NotificationManager nm = (NotificationManager) getSystemService(Context.NOTIFICATION_SERVICE);
		Notification notification = null;
		boolean isMiUIV6 = true;
		try {
			NotificationCompat.Builder builder = new NotificationCompat.Builder(this);
			builder.setContentTitle("您有"+number+"未读消息");
			builder.setTicker("您有"+number+"未读消息");
			builder.setAutoCancel(true);
			builder.setSmallIcon(R.drawable.common_icon_lamp_light_red);
			builder.setDefaults(Notification.DEFAULT_LIGHTS);
			notification = builder.build();
			Class miuiNotificationClass = Class.forName("android.app.MiuiNotification");
			Object miuiNotification = miuiNotificationClass.newInstance();
			Field field = miuiNotification.getClass().getDeclaredField("messageCount");
			field.setAccessible(true);
			field.set(miuiNotification, number);// 设置信息数
			field = notification.getClass().getField("extraNotification");
			field.setAccessible(true);
        field.set(notification, miuiNotification);
        Toast.makeText(this, "Xiaomi=>isSendOk=>1", Toast.LENGTH_LONG).show();
		}catch (Exception e) {
		    e.printStackTrace();
		    //miui 6之前的版本
		    isMiUIV6 = false;
    		    Intent localIntent = new Intent("android.intent.action.APPLICATION_MESSAGE_UPDATE");
    		    localIntent.putExtra("android.intent.extra.update_application_component_name",getPackageName() + "/"+ lancherActivityClassName );
    		    localIntent.putExtra("android.intent.extra.update_application_message_text",number);
    		    sendBroadcast(localIntent);
		}
		finally
		{
          if(notification!=null && isMiUIV6 )
		   {
		       //miui6以上版本需要使用通知发送
			nm.notify(101010, notification);
		   }
		}

	}

	private void sendToSony(String number) {
		boolean isShow = true;
		if ("0".equals(number)) {
			isShow = false;
		}
		Intent localIntent = new Intent();
		localIntent.putExtra("com.sonyericsson.home.intent.extra.badge.SHOW_MESSAGE",isShow);//是否显示
		localIntent.setAction("com.sonyericsson.home.action.UPDATE_BADGE");
		localIntent.putExtra("com.sonyericsson.home.intent.extra.badge.ACTIVITY_NAME",lancherActivityClassName );//启动页
		localIntent.putExtra("com.sonyericsson.home.intent.extra.badge.MESSAGE", number);//数字
		localIntent.putExtra("com.sonyericsson.home.intent.extra.badge.PACKAGE_NAME",getPackageName());//包名
		sendBroadcast(localIntent);

		Toast.makeText(this, "Sony," + "isSendOk", Toast.LENGTH_LONG).show();
	}

	private void sendToSamsumg(String number)
	{
		Intent localIntent = new Intent("android.intent.action.BADGE_COUNT_UPDATE");
		localIntent.putExtra("badge_count", number);//数字
		localIntent.putExtra("badge_count_package_name", getPackageName());//包名
		localIntent.putExtra("badge_count_class_name",lancherActivityClassName ); //启动页
		sendBroadcast(localIntent);
		Toast.makeText(this, "Samsumg," + "isSendOk", Toast.LENGTH_LONG).show();
	}
}
注意lancherActivityClassName 必须被配置为 启动页 android.intent.category.LAUNCHER
 <activity
            android:name="com.sample.activites.Welcome"
            android:configChanges="locale|keyboard|screenSize"
            android:label="@string/app_name"
            android:screenOrientation="portrait" >
            <intent-filter>
                <action android:name="android.intent.action.MAIN" />

                <category android:name="android.intent.category.LAUNCHER" />
            </intent-filter>
            <intent-filter>
                <action android:name="android.intent.action.CREATE_SHORTCUT" />
            </intent-filter>
        </activity>


 本文介绍了一种在Android系统的小米、三星和索尼手机上实现桌面应用图标数字提醒的方法。通过利用各ROM厂商提供的私有API,文章给出了具体的代码示例,包括如何根据不同设备制造商调用相应的API来更新图标上的数字。


 3241
3241

 被折叠的 条评论
为什么被折叠?


