


 本文介绍了Jetty Web服务器的基本概念、架构及其在Java Web应用中的应用,包括如何通过简单的HelloWorld示例启动Jetty,详细分析了Jetty的整体架构,并展示了如何将Jetty嵌入到Web项目中作为WebServer使用。此外,文章还演示了如何部署Java Web应用到Jetty,提供了开发时的部署示例和使用Jetty部署war包的方法。
Jetty 是一个 Web server/servlet container, 支持 SPDY,WebSocket, OSGi, JMX,JNDI, JAAS 。Jetty非常高效而且灵活,Google App Engine 选择了Jetty,而放弃了Tomcat,或是其他的服务器。
Jetty has a slogan, "Don't deploy your application in Jetty, deploy Jetty in your application." What this means is that, putting an HTTP module into your application, rather than putting your application into an HTTP server.
Jetty的口号是:“不要把你的程序部署到Jetty里,而是把Jetty部署到你的程序里”,意味着,你可以把Jetty当成程序的一个HTTP模块放到你的程序里。
本文先通过一个简单的HelloWorld示例,展示了java应用中的Jetty是如何启动的;接着详细分析了Jetty的整体架构;最后展示了用Jetty启动一个标准的Java web app。
Hello World 示例
需要的jar包:
jetty-server-8.1.11.v20130520.jar
javax.servlet-3.0.0.v201112011016.jar
jetty-continuation-8.1.11.v20130520.jar
jetty-http-8.1.11.v20130520.jar
jetty-io-8.1.11.v20130520.jar
jetty-util-8.1.11.v20130520.jar
HelloWorldHandler 类:
package edu.shao.jetty.sample;

import java.io.IOException;
import javax.servlet.ServletException;
import javax.servlet.http.HttpServletRequest;
import javax.servlet.http.HttpServletResponse;
import org.eclipse.jetty.server.Request;
import org.eclipse.jetty.server.handler.AbstractHandler;

public class HelloWorldHandler extends AbstractHandler {
public void handle(String target, Request baseRequest,
            HttpServletRequest request, HttpServletResponse response)
            throws IOException, ServletException {
        response.setContentType("text/html;charset=utf-8");
        response.setStatus(HttpServletResponse.SC_OK);
        baseRequest.setHandled(true);
        response.getWriter().println("<h1>Hello World</h1>");
    }
}
MyServer 类:
package edu.shao.jetty.sample;

import org.eclipse.jetty.server.Server;

public class MyServer {

    public static void main(String[] args) throws Exception {
        Server server = new Server(8081);
        server.setHandler(new HelloWorldHandler());
        server.start();
        server.join();
    }
}
运行main()函数,在浏览器内输入:http://localhost:8081/ 就可以看得结果。
Jetty架构
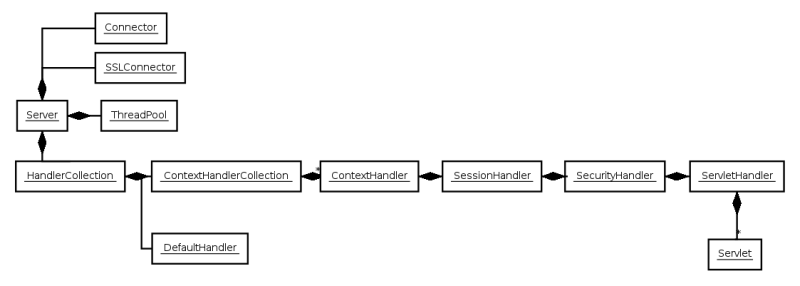
1、整体架构图:
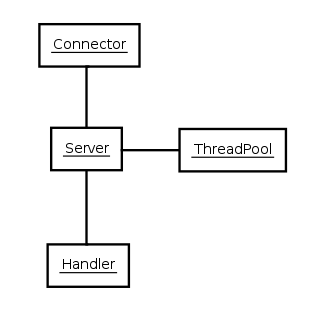
The Jetty Server is the plumbing between a collection of Connectors that accept HTTP connections, and a collection of Handlers that service requests from the connections and produce responses, with the work being done by threads taken from a thread pool.(The concept of a Servlet itself is implemented by a Servlet Handler. you can build a Jetty server using only connectors and handlers, without using Servlets.)
2、顶层类结构:
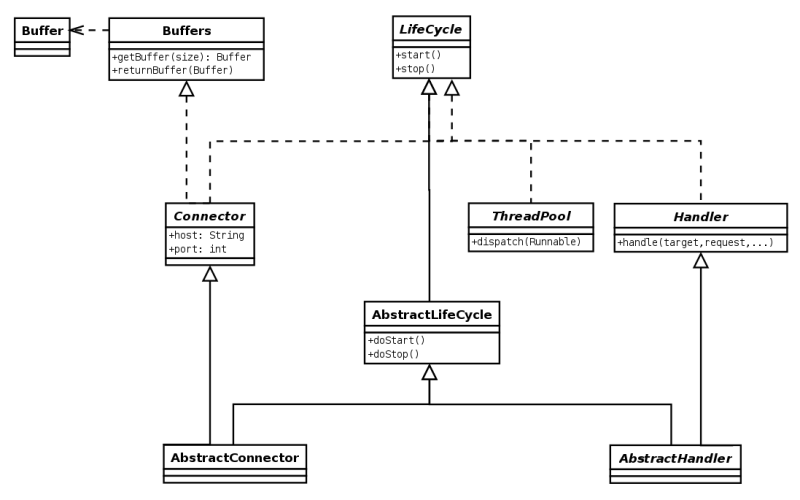
受JSR77规范的启发,Jetty的绝大多数的组件(Connector, Handler ,Buffer)都实现了LifeCycle接口。
3、Connectors:
The connectors represent the protocol handlers that accept connections, parse requests and generate responses. The different types of connectors available are based on the protocols, scheduling model and IO APIs used:
1、SocketConnector - for few busy connections or when NIO is not available
2、BlockingChannelConnector - for few busy connections when NIO is available
3、SelectChannelConnector - for many mostly idle connections or asynchronous handling of Ajax requests
4、SslSocketConnector - SSL without NIO
5、SslSelectChannelConnector - SSL with non blocking NIO support
6、AJPConnector - AJP protocol support for connections from apache mod_jk or mod_proxy_ajp
4、Handlers:
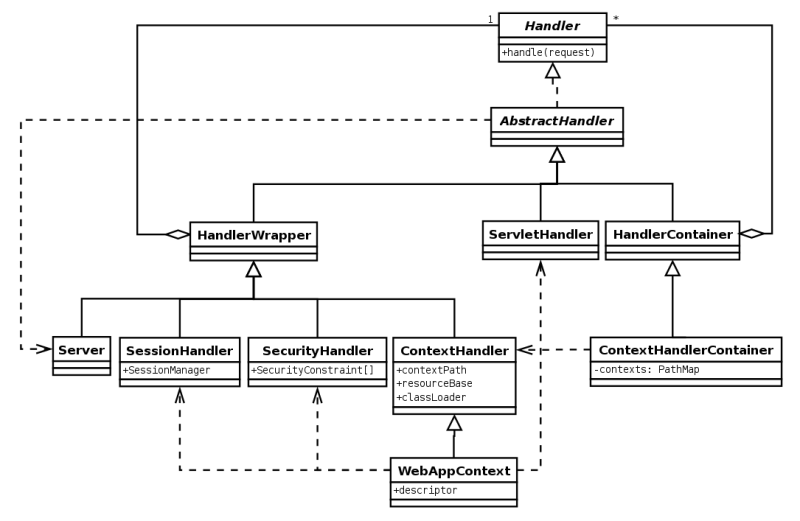
The Handler is the component that deals with received requests. Three styles of Handler:
1、Coordinating Handlers - Handlers that route requests to other handlers (eg HandlerCollection, ContextHandlerCollection)
2、Filtering Handlers - Handlers that augment a request and pass it on to other handlers (eg. HandlerWrapper, ContextHandler, SessionHandler)
3、Generating Handlers - Handlers that produce content (eg ResourceHandler and ServletHandler)
重点Handler:
1、The ServletHandler is a Handler that generates content by passing the request to any configured Filters and then to a Servlet mapped by a URI pattern.
2、A WebAppContext combines handlers for security, session and servlets in a single unit that can be configured with a web.xml descriptor.
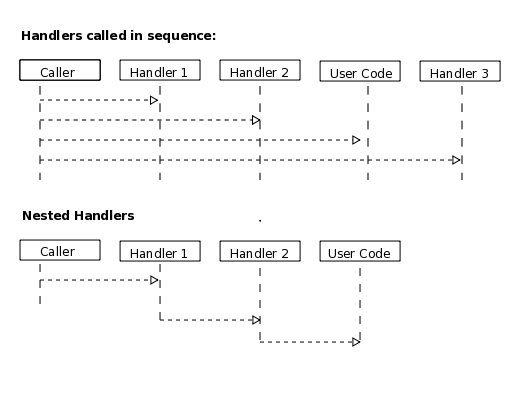
你可以顺序调用Handler,或者嵌套调用Handler,来处理请求的不同方面。
5、web应用
A WebAppContext supports the standardized layout of a web application and configuration of session, security, listeners, filter, servlets and JSP via a web.xml descriptor normally found in the WEB-INF directory of a webapplication.
把Jetty“部署”到Web应用中
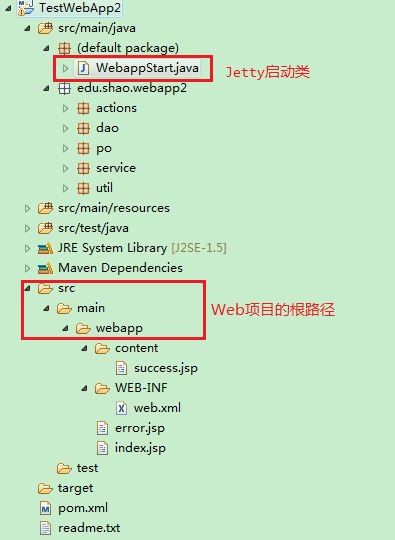
1、开发时的部署示例:
这种部署方式还有一个诱人的特性:项目启动后,如果某个类没有被加载到内存中,对这个类的修改在下次该类被调用时就会生效,而不用重启动项目;对JSP的修改,任何时候都会在下次被调用时生效,而不用重启项目。这将给开发web应用带来极大的便利。
1、这是用Maven构件的Java Web App项目,项目结构如下:
2、WebappStart 类:
import org.eclipse.jetty.server.Server;
import org.eclipse.jetty.webapp.WebAppContext;

public class WebappStart {

    public static void main(String[] args) throws Exception {
        Server server = new Server(8082);

        WebAppContext context = new WebAppContext();
        context.setResourceBase("./src/main/webapp");
        context.setDescriptor("./src/main/webapp/WEB-INF/web.xml");
        context.setContextPath("/test2");
        context.setParentLoaderPriority(true);

        server.setHandler(context);

        server.start();
        server.join();

    }

}
WebappStart类是整个项目的入口,运行此类,整个web项目就启动了。
我们可以体验到,把Jetty嵌入到Web项目中,作为Web Server,十分便利、灵活,并且相比其他服务器软件要高效,是开发Web应用的首选WebServer。
2、用Jetty部署war包
我们在此示例中部署上面web工程的war包:TestWebApp2.war
1、文件目录的组织形式如下:

2、StartWar.java
import java.io.File;
import org.eclipse.jetty.server.Server;
import org.eclipse.jetty.webapp.WebAppContext;

public class StartWar {

    public static void main(String[] args) throws Exception {
        String warPath= "E:/jetty/myapp/TestWebApp2.war";//war包的绝对地址
        String tempDir=new File(warPath).getParent();//war包所在的目录,我们使用此目录为临时目录

        Server server = new Server(8083);

        WebAppContext context = new WebAppContext();//构造Context Handler
        context.setWar(warPath);
        context.setTempDirectory(new File(tempDir));
        context.setContextPath("/test");

        server.setHandler(context);
        server.start();
        server.join();
    }
}
3、start.bat
前面是设置必要的变量,最后两行分别是编译StartWar.java类、运行StarWar.class。
@echo off
set directory=E:\jetty\
set java_dir=D:\Java\jdk1.6.0_35\
set classp=.;%java_dir%lib\dt.jar;%java_dir%lib\tools.jar;%directory%lib\*;

%java_dir%bin\javac -classpath %classp% StartWar.java
%java_dir%bin\java -classpath %classp% StartWar
4、此时控制台会显示如下信息
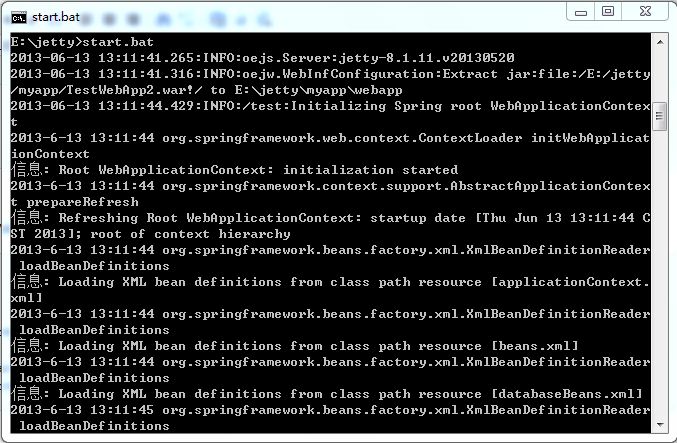
此时已经部署完了,就是这么简单
参考:


 6854
6854

 被折叠的 条评论
为什么被折叠?
被折叠的 条评论
为什么被折叠?
 到【灌水乐园】发言


