Header V3 DSA/SHA1 Signature, key ID 5072e1f5: NOKEY

本文解决在使用YUM安装MySQL5.7过程中遇到的GPGKey验证失败问题,通过修改配置文件中的gpgcheck设置,避免了版本不匹配导致的错误。

摘要生成于 C知道 ,由 DeepSeek-R1 满血版支持, 前往体验 >

yum安装mysql5.7 下载安装包警告提示信息:

Total download size: 194 M
Downloading packages:
warning: /var/cache/yum/x86_64/7/mysql57-community/packages/mysql-community-common-5.7.26-1.el7.x86_64.rpm: Header V3 DSA/SHA1 Signature, key ID 5072e1f5: NOKEY                                                                              ]  0.0 B/s |  90 kB  --:--:-- ETA 
Public key for mysql-community-common-5.7.26-1.el7.x86_64.rpm is not installed

下载软件包完成,安装的时候提示信息:

Total                                                                                                                                                                                                                                            49 kB/s | 194 MB  01:06:58     
Retrieving key from file:///etc/pki/rpm-gpg/RPM-GPG-KEY-mysql


The GPG keys listed for the "MySQL 5.7 Community Server" repository are already installed but they are not correct for this package.
Check that the correct key URLs are configured for this repository.


 Failing package is: mysql-community-server-5.7.26-1.el7.x86_64
 GPG Keys are configured as: file:///etc/pki/rpm-gpg/RPM-GPG-KEY-mysql

网上有很多问题的方法,其实最简单就是修改yum源,对应安装的版本不检查GPG key就可以解决。

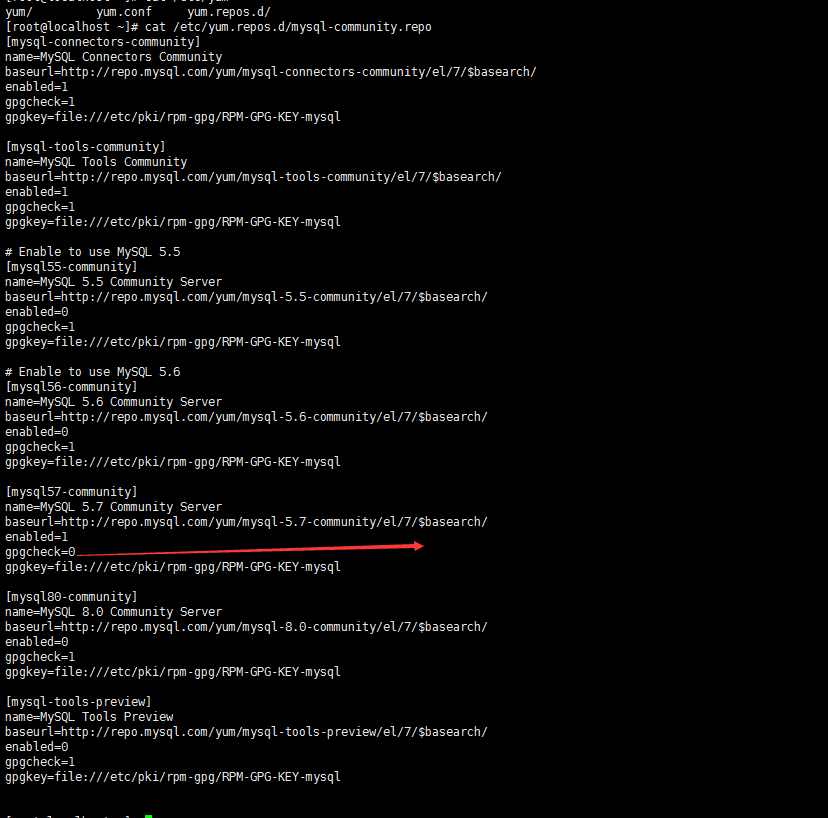
安装mysql使用的是官方的源配置文件:/etc/yum.repos.d/mysql-community.repo

gpgcheck 设置的值设置为0即可

589455-20190701172642865-1112289292.png

转载于:https://www.cnblogs.com/zqsb/p/11115454.html

Centos7安装mysql5.7 rpm安装 卸载MariaDB CentOS7默认安装MariaDB而不是MySQL,而且yum服务器上也移除了MySQL相关的软件包。因为MariaDB和MySQL可能会冲突,故先卸载MariaDB。 1、安装新版mysql之前,我们需要将系统自带的mariadb-lib卸载 [root@iZwz94qazh62gk5ewl4ei2Z home]# rpm -qa | grep -i mariadb mariadb-libs-5.5.52-1.el7.x86_64 [root@iZwz94qazh62gk5ewl4ei2Z home]# rpm -e --nodeps mariadb-libs-5.5.52-1.el7.x86_64 如果系统之前有安装过mysql,要先查看有没有安装: rpm -qa | grep -i mysql 如果有安装要先进行删除,避免安装冲突; yum -y remove mysql-libs-5.1.73-7.el6.x86_64 2、到mysql的官网下载最新版mysql的rpm集合包:mysql-5.7.19-1.el6.x86_64.rpm-bundle.tar 3、上传mysql-5.7.18-1.el6.x86_64.rpm-bundle.tar到linux服务器,并解压tar包 复制代码 [root@iZwz94qazh62gk5ewl4ei2Z home]# mkdir mysql [root@iZwz94qazh62gk5ewl4ei2Z home]# tar -xf mysql-5.7.19-1.el6.x86_64.rpm-bundle.tar -C mysql [root@iZwz94qazh62gk5ewl4ei2Z home]# cd mysql [root@iZwz94qazh62gk5ewl4ei2Z mysql]# ll total 459492 -rw-r--r-- 171553141523618836 Mar 2017:40 mysql-community-client-5.7.19-1.el6.x86_64.rpm -rw-r--r-- 1715531415335496 Mar 2017:40 mysql-community-common-5.7.19-1.el6.x86_64.rpm -rw-r--r-- 17155314153747352 Mar 2017:40 mysql-community-devel-5.7.19-1.el6.x86_64.rpm -rw-r--r-- 171553141539086508 Mar 2017:40 mysql-community-embedded-5.7.19-1.el6.x86_64.rpm -rw-r--r-- 1715531415135869292 Mar 2017:40 mysql-community-embedded-devel-5.7.19-1.el6.x86_64.rpm -rw-r--r-- 17155314152177064 Mar 2017:40 mysql-community-libs-5.7.19-1.el6.x86_64.rpm -rw-r--r-- 17155314151723180 Mar 2017:40 mysql-community-libs-compat-5.7.19-1.el6.x86_64.rpm -rw-r--r-- 1715531415159060212 Mar 2017:41 mysql-community-server-5.7.19-1.el6.x86_64.rpm -rw-r--r-- 1715531415104881084 Mar 2017:41 mysql-community-test-5.7.19-1.el6.x86_64.rpm 复制代码 4、使用rpm -ivh命令进行安装 复制代码 [root@iZwz94qazh62gk5ewl4ei2Z mysql]# rpm -ivh mysql-community-common-5.7.19-1.el6.x86_64.rpm warning: mysql-community-common-5.7.18-1.el6.x86_64.rpm: Header V3 DSA/SHA1 Signature, key ID 5072e1f5: NOKEY Preparing... ################################# [100%] Updating / installing... 1:mysql-community-common-5.7.18-1.e################################# [100%] [root@iZwz94qazh62gk5ewl4ei2Z mysql]# rpm -ivh mysql-community-libs-5.7.19-1.el6.x86_64.rpm warning: mysql-community-libs-5.7.18-1.el6.x86_64.rpm: Header V3 DSA/SHA1 Signature, key ID 5072e1f5: NOKEY Preparing... ################################# [100%] Updating / installing... 1:mysql-community-libs-5.7.18-1.el6################################# [100%] [root@iZwz94qazh62gk5ewl4ei2Z mysql]# rpm -ivh mysql-community-client-5.7.19-1.el6.x86_64.rpm warning: mysql-community-client-5.7.18-1.el6.x86_64.rpm: Header V3 DSA/SHA1 Signature, key ID 5072e1f5: NOKEY Preparing... ################################# [100%] Updating / installing... 1:mysql-community-client-5.7.18-1.e################################# [100%] [root@iZwz94qazh62gk5ewl4ei2Z mysql]# rpm -ivh mysql-community-server-5.7.19-1.el6.x86_64.rpm warning: mysql-community-server-5.7.18-1.el6.x86_64.rpm: Header V3 DSA/SHA1 Signature, key ID 5072e1f5: NOKEY Preparing... ################################# [100%] Updating / installing... 1:mysql-community-server-5.7.18-1.e################################# [100%] [root@iZwz94qazh62gk5ewl4ei2Z mysql]# 复制代码 上面几个包有依赖关系,执行有先后。 使用rpm安装方式安装mysql,安装的路径如下:(系统自动配置好了,不需要手动配置) a 数据库目录 /var/lib/mysql/ b 配置文件 /usr/share/mysql(mysql.server命令及配置文件) c 相关命令 /usr/bin(mysqladmin mysqldump等命令) d 启动脚本 /etc/rc.d/init.d/(启动脚本文件mysql的目录) e /etc/my.conf 5数据库初始化 为了保证数据库目录为与文件的所有者为 mysql 登陆用户,如果你的linux系统是以 root 身份运行 mysql 服务,需要执行下面的命令初始化 [root@iZwz94qazh62gk5ewl4ei2Z mysql]# mysqld --initialize --user=mysql 如果是以 mysql 身份登录运行,则可以去掉 --user 选项。 另外 --initialize 选项默认以“安全”模式来初始化,则会为 root 用户生成一个密码并将该密码标记为过期,登陆后你需要设置一个新的密码, 而使用 --initialize-insecure 命令则不使用安全模式,则不会为 root 用户生成一个密码。 这里演示使用的 --initialize 初始化的,会生成一个 root 账户密码,密码在log文件里,红色区域的就是自动生成的密码 复制代码 [root@iZwz94qazh62gk5ewl4ei2Z mysql]# cat /var/log/mysqld.log 2017-06-05T14:30:52.709474Z 0 [Warning] TIMESTAMP with implicit DEFAULT value is deprecated. Please use --explicit_defaults_for_timestamp server option (see documentation for more details). 2017-06-05T14:30:55.590590Z 0 [Warning] InnoDB: New log files created, LSN=457902017-06-05T14:30:56.000269Z 0 [Warning] InnoDB: Creating foreign key constraint system tables. 2017-06-05T14:30:56.109868Z 0 [Warning] No existing UUID has been found, so we assume that this is the first time that this server has been started. Generating a new UUID: 960c533e-49fb-11e7-91f2-00163e089fd2. 2017-06-05T14:30:56.116186Z 0 [Warning] Gtid table isnot ready to be used. Table 'mysql.gtid_executed' cannot be opened. 2017-06-05T14:30:56.116777Z 1 [Note] A temporary password is generated for root@localhost: :Wu?2QQutQwj 复制代码 现在启动mysql数据库 [root@iZwz94qazh62gk5ewl4ei2Z mysql]# service mysqld start 可以使用下面两个命令对mysql进行停止,启动和重启: 启动: 使用 service 启动:service mysqld start 使用 mysqld 脚本启动:/etc/inint.d/mysqld start 使用 safe_mysqld 启动:safe_mysqld& 停止: 使用 service 启动:service mysqld stop 使用 mysqld 脚本启动:/etc/inint.d/mysqld stop mysqladmin shutdown 重启: 使用 service 启动:service mysqld restart 使用 mysqld 脚本启动:/etc/inint.d/mysqld restart 连接数据库 [root@iZwz94qazh62gk5ewl4ei2Z mysql]# mysql -u root -p Enter password: 密码输入: :Wu?2QQutQwj 修改密码: set password = password('你的密码'); 设置远程访问 grant all privileges on *.* to 'root' @'%' identified by '123456'; flush privileges; 设置mysql开机启动 复制代码 加入到系统服务: chkconfig --add mysqld 自动启动: chkconfig mysqld on 查询列表: chkconfig
评论
添加红包

请填写红包祝福语或标题

红包个数最小为10个

红包金额最低5元

当前余额3.43前往充值 >
需支付:10.00
成就一亿技术人!
领取后你会自动成为博主和红包主的粉丝 规则
hope_wisdom
发出的红包
实付
使用余额支付
点击重新获取
扫码支付
钱包余额 0

抵扣说明:

1.余额是钱包充值的虚拟货币,按照1:1的比例进行支付金额的抵扣。
2.余额无法直接购买下载,可以购买VIP、付费专栏及课程。

余额充值