


概论
目前使用corosync+pacemaker可实现在ubuntu环境下相当于windows下的failover的功能。例如在我们生产环境下的两台omaha server,当其中一台宕机的时候另一台会接替其继续进行工作。当再加上drbd的同时,又能实现两台server数据双机备份。
corosync、pacemake、drbd简介
corosync概述
Corosync是OpenAIS发展到Wilson版本后衍生出来的开放性集群引擎工程。可以说Corosync是OpenAIS工程的一部分。
pacemaker概述
pacemaker(直译:心脏起搏器),是一个群集资源管理器。它实现最大可用性群集服务(亦称资源管理)的节点和资源级故障检测和恢复使用您的首选集群基础设施(OpenAIS的或Heaerbeat)提供的消息和成员能力。它可以做乎任何规模的集群,并配备了一个强大的依赖模型,使管理员能够准确地表达群集资源之间的关系(包括顺序和位置)。几乎任何可以编写脚本,可以管理作为心脏起搏器集群的一部分。Pacemaker只是个资源管理器,不是提供心跳信息的,因为它似乎是一个普遍的误解,也是值得的。pacemaker是一个延续的CRM(亦称Heartbeat V2资源管理器),最初是为心跳,但已经成为独立的项目。
DRBD概述
简单的说,DRBD (Distributed Replicated Block Device,分布式复制块设备)是由内核模块和相关脚本而构成,用以构建高可用性的集群。其实现方式是通过网络来镜像整个设备。你可以把它看作是一种网络RAID1。
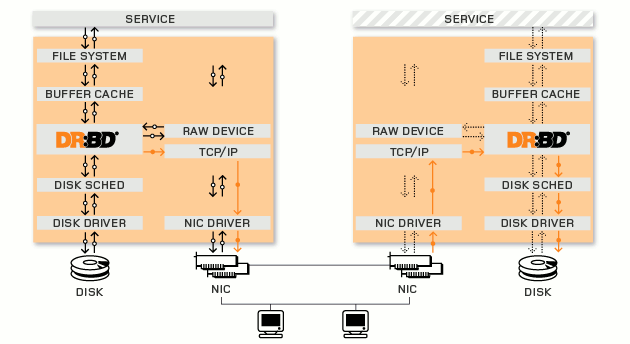
简单说一下DRBD主要功能,DRBD 负责接收数据,把数据写到本地磁盘,然后通过网络将同样的数据发送给另一个主机,另一个主机再将数据存到自己的磁盘中。
corosync、pacemaker、DRBD的安装与配置
corosync与pacemaker的配置与安装
- 安装corosync与pacemakerroot@node3:~# apt-get install corosync pacemaker
root@node4:~# apt-get install corosync pacemaker
- 各节点之间主机名互相解析root@node3:~# uname -n
node3
root@node3:~# vi /etc/hosts(按如下编辑hosts)
127.0.0.1 localhost
10.18.10.163 node3
10.18.10.164 node4
测试其是否编辑成功:
root@node3:~# ping node3
root@node3:~# ping node4
- 设置各节点之间时间同步root@node3:~# ntpdate 10.17.37.157
root@node4:~# ntpdate 10.17.37.157
- 各节点之间ssh互信(两节点之间无需密码也可以访问)
root@node3:~# ssh-keygen -t rsa -f ~/.ssh/id_rsa -P ''
root@node3:~# ssh-copy-id -i .ssh/id_rsa.pub root@node4
root@node4:~# ssh-keygen -t rsa -f ~/.ssh/id_rsa -P ''
root@node4:~# ssh-copy-id -i .ssh/id_rsa.pub root@node3
检测是否已建立互相信任:
root@node3:~# ssh node4
若不输入密码能登录node4证明已建立信任。
corosync详细配置
- 备份配置文件root@node3:~# cd /etc/corosync/
root@node3:/etc/corosync# cp corosync.conf corosync.conf.bak
- 修改配置文件root@node3:/etc/corosync# vi corosync.conf
(只修改标红地方)
rrp_mode: none
interface {
# The following values need to be set based on your environment
ringnumber: 0
bindnetaddr: 10.18.10.0(修改心跳网段)
mcastaddr: 226.94.1.1
mcastport: 5405
tty:1
}
}
- 生成密钥文件
注:corosync生成key文件会默认调用/dev/random随机数设备,一旦系统中断的IRQS的随机数不够用,将会产生大量的等待时间,因此,为了节约时间,我们在生成key之前讲random替换成urandom,以便节约时间。
root@node3:/etc/corosync# mv /dev/{random,random.bak}
root@node3:/etc/corosync# ln -s /dev/urandom /dev/random
root@node3:/etc/corosync# corosync-keygen - 查看密钥文件 root@node3:/etc/corosync# ls –l
total 28
-r-------- 1 root root 128 Aug 11 05:29 authkey(生成的密钥文件)
-rw-r--r-- 1 root root 1623 Aug 11 06:57 corosync.conf
-rw-r--r-- 1 root root 1663 Aug 11 06:55 corosync.conf.bak
-rw-r--r-- 1 root root 445 May 15 2014 corosync.conf.example
-rw-r--r-- 1 root root 1084 May 15 2014 corosync.conf.example.udpu
drwxr-xr-x 2 root root 4096 May 15 2014 service.d
drwxr-xr-x 2 root root 4096 May 15 2014 uidgid.d
- 将key文件authkey与配置文件corosync.conf复制到node4上
root@node3:/etc/corosync# scp -p authkey corosync.conf node2:/etc/corosync/
root@node4:/etc/corosync# ll /etc/corosync/
total 28
-r-------- 1 root root 128 Aug 11 05:29 authkey
-rw-r--r-- 1 root root 1623 Aug 11 06:57 corosync.conf
-rw-r--r-- 1 root root 1663 Aug 11 06:55 corosync.conf.bak
-rw-r--r-- 1 root root 445 May 15 2014 corosync.conf.example
-rw-r--r-- 1 root root 1084 May 15 2014 corosync.conf.example.udpu
drwxr-xr-x 2 root root 4096 May 15 2014 service.d
drwxr-xr-x 2 root root 4096 May 15 2014 uidgid.d
- 启动corosync
root@node3:~# ssh node4 “service corosync start”
root@node3:~#service corosync start - 查看集群的状态
root@node3:~# crm_mon
ttempting connection to the cluster...
============
Last updated: Thu Aug 13 02:46:02 2015
Last change: Thu Aug 13 06:56:00 2015 via crm_attribute on node3
Stack: openais
Current DC: node4 - partition with quorum
Version: 1.1.6-9971ebba4494012a93c03b40a2c58ec0eb60f50c
2 Nodes configured, 2 expected votes
7 Resources configured.
============
Online: [ node3 node4 ] 能看到node3及node4同时在线则配置成功)
注:corosync与pacemaker安装配置完成
DRBD的安装与配置
- 安装DRBD
root@node3:~# apt-get install drbd8-utils
root@node4:~# apt-get install drbd8-utils
root@node3:~# modprobe drbd
root@node4:~# modprobe drbd
- 配置DRBD
- 编辑配置文件
root@node3:~# vi /etc/drbd.d/global_common.conf
global {
usage-count yes;
# minor-count dialog-refresh disable-ip-verification
}
common {
handlers {
pri-on-incon-degr"/usr/lib/drbd/notify-pri-on-incon-degr.sh;/usr/lib/drbd/notify-emergency-reboot.sh; echo b > /proc/sysrq-trigger ; reboot -f";
pri-lost-after-sb"/usr/lib/drbd/notify-pri-lost-after-sb.sh;/usr/lib/drbd/notify-emergency-reboot.sh; echo b > /proc/sysrq-trigger ; reboot -f";
local-io-error"/usr/lib/drbd/notify-io-error.sh;/usr/lib/drbd/notify-emergency-shutdown.sh; echo o > /proc/sysrq-trigger ; halt -f";
#将这3个语句前的字符#去掉即可
# fence-peer "/usr/lib/drbd/crm-fence-peer.sh";
# split-brain "/usr/lib/drbd/notify-split-brain.sh root";
# out-of-sync "/usr/lib/drbd/notify-out-of-sync.sh root";
# before-resync-target "/usr/lib/drbd/snapshot-resync-target-lvm.sh -p 15 -- -c 16k";
# after-resync-target /usr/lib/drbd/unsnapshot-resync-target-lvm.sh;
}
startup {
# wfc-timeout degr-wfc-timeout outdated-wfc-timeout wait-after-sb
}
options {
# cpu-mask on-no-data-accessible
}
disk {
# size max-bio-bvecs on-io-error fencing disk-barrier disk-flushes
# disk-drain md-flushes resync-rate resync-after al-extents
# c-plan-ahead c-delay-target c-fill-target c-max-rate
# c-min-rate disk-timeout
}
net {
# protocol timeout max-epoch-size max-buffers unplug-watermark
# connect-int ping-int sndbuf-size rcvbuf-size ko-count
# allow-two-primaries cram-hmac-alg shared-secret after-sb-0pri
# after-sb-1pri after-sb-2pri always-asbp rr-conflict
# ping-timeout data-integrity-alg tcp-cork on-congestion
# congestion-fill congestion-extents csums-alg verify-alg
# use-rle
}
}
- 创建单独的主分区
注:在装ubuntu os时可以规划并创建其主分区,如要在装好os后再创建,那么在装系统的时候必需预留空间。
root@node3:~# fdisk /dev/sda
Command (m for help): n
Partition type:
p primary (3 primary, 0 extended, 1 free)
e extended
Select (default e): p
Selected partition 4
First sector (100001792-209715199, default 100001792):
Using default value 100001792
Last sector, +sectors or +size{K,M,G} (100001792-209715199, default 209715199): +1024 M
Command (m for help): w
(Node4 按上述分区)
- 增加资源
root@node3:~# cd /etc/drbd.d/
新建配置文件web.res
root@node3:/etc/drbd.d# vi web.res
resource web {
protocol C;
on node3 {
device /dev/drbd0;
disk /dev/sda4;
address 10.18.10.163:7789;
meta-disk internal;
}
on node4 {
device /dev/drbd0;
disk /dev/sda4;
address 10.18.10.164:7789;
meta-disk internal;
}
}
将配置文件同步到node 4
root@node3:/etc/drbd.d# scp global_common.conf web.res node4:/etc/drbd.d/
注:该处需重启server下一步才能运行生效
初始化资源
root@node3:~# drbdadm create-md web
Writing meta data...
initializing activity log
NOT initializing bitmap
New drbd meta data block successfully created.
root@node4:~# drbdadm create-md web
Writing meta data...
initializing activity log
NOT initializing bitmap
New drbd meta data block successfully created.
- 启动DRBD服务root@node3:~# service drbd start
root@node4:~# service drbd start
- 查看启动状态root@node3:~# drbd-overview
0:web/0 Connected Secondary/Secondary Inconsistent/Inconsistent C r-----
root@node3:~# drbd-overview
0:web/0 Connected Secondary/Secondary Inconsistent/Inconsistent C r-----
从上面的信息中可以看出此时两个节点均处于Secondary状态。于是,我们接下来需要将其中一个节点设置为Primary。在要设置为Primary的节点上执行如下命令:drbdsetup /dev/drbd0 primary –o ,也可以在要设置为Primary的节点上使用如下命令来设置主节点: drbdadm -- --overwrite-data-of-peer primary web
- 将node3设置为主节点
root@node3:~# drbdsetup /dev/drbd0 primary –o
root@node3:~# drbd-overview
0:web/0 SyncSource Primary/Secondary UpToDate/Inconsistent C r---n-
[>...................] sync'ed: 5.1% (19440/20476)M
注:可以看到正在同步数据,得要一段时间
同步完成后,查看一下
[root@node3 ~]# drbd-overview
0:web/0 Connected Primary/Secondary UpToDate/UpToDate C r-----
[root@node4 ~]# drbd-overview
0:web/0 Connected Secondary/Primary UpToDate/UpToDate C r-----
- 格式化并且挂载
[root@node3 ~]# mke2fs -j /dev/drbd
[root@node3 ~]# mke2fs -j /dev/drbd0
[root@node3 ~]# mkdir /drbd
[root@node3 ~]# mount /dev/drbd0 /drbd
[root@node3 ~]# mount
/dev/sda2 on / type ext4 (rw)
proc on /proc type proc (rw)
sysfs on /sys type sysfs (rw)
devpts on /dev/pts type devpts (rw,gid=5,mode=620)
tmpfs on /dev/shm type tmpfs (rw)
/dev/sda1 on /boot type ext4 (rw)
/dev/sda3 on /data type ext4 (rw)
none on /proc/sys/fs/binfmt_misc type binfmt_misc (rw)
/dev/drbd0 on /drbd type ext3 (rw) (可看到已经挂载在/drbd目录下)
然后,我们任意复制一些文件和新建carl.log文件到该目录下以供后面验证使用
[root@node3 ~]# cd /drbd
root@node3:/drbd# cp /etc/init/ /drbd/
root@node3:/drbd# touch carl.log
root@node3:/drbd# ll
drwxr-xr-x 4 root root 4096 Aug 12 12:09 ./
drwxr-xr-x 24 root root 4096 Aug 12 06:34 ../
-rw-r--r-- 1 root root 0 Aug 12 12:09 carl.log
drwxr-xr-x 2 root root 4096 Aug 12 06:25 init/
drwx------ 2 root root 16384 Aug 12 06:17 lost+found/
- 切换primary和secondary节点
说明:对主Primary/Secondary模型的drbd服务来讲,在某个时刻只能有一个节点为Primary,因此,要切换两个节点的角色,只能在先将原有的Primary节点设置为Secondary后,才能原来的Secondary节点设置为Primary。
[root@node3 ~]# umount /drbd/
[root@node3 ~]# drbdadm secondary web
[root@node3 ~]# drbd-overview
0:web/0 Connected Secondary/Secondary UpToDate/UpToDate C r-----
[root@node3 ~]# drbdadm primary web
[root@node3 ~]# drbd-overview
0:web/0 Connected Primary/Secondary UpToDate/UpToDate C r-----
[root@node3 ~]# mkdir /drbd
[root@node3 ~]# mount /dev/drbd0 /drbd/
[root@node3 ~]# ll /drbd/
drwxr-xr-x 4 root root 4096 Aug 12 12:09 ./
drwxr-xr-x 24 root root 4096 Aug 12 06:34 ../
-rw-r--r-- 1 root root 0 Aug 12 12:09 carl.log
drwxr-xr-x 2 root root 4096 Aug 12 06:25 init/
drwx------ 2 root root 16384 Aug 12 06:17 lost+found/
(由此可以看见在node3上复制和新建到/drbd的文件在node4也存在了)
DRBD 配置完成
测试
- 创建web集群测试failover功能
- 创建ip地址资源root@node3:~# crm
crm(live)# configure
crm(live)configure# property stonith-enabled=false
crm(live)configure# property no-quorum-policy=ignore
crm(live)configure# primitive vip ocf:heartbeat:IPaddr params ip=10.18.10.165 nic=eth0 cidr_netmask=24 #增加一个VIP资源
crm(live)configure# show #查看已增加好的VIP
node3
node4
primitive vip ocf:heartbeat:IPaddr \
params ip="10.18.10.165" nic="eth0" cidr_netmask="24"
property $id="cib-bootstrap-options" \
dc-versinotallow="1.1.8-7.el6-394e906" \
cluster-infrastructure="classic openais (with plugin)" \
expected-quorum-votes="2" \
stonith-enabled="false"
crm(live)configure# verify #检查一下配置文件有没有错误
crm(live)configure#提交配置的资源,在命令行配置资源时,只要不用commit提交配置好资源,就不会生效,一但用commit命令提交,就会写入到cib.xml的配置文件中
crm(live)# status查看一下配置好的资源状态,有一个资源vip,运行在node3上
- 查看VIP是否已经生效
root@node3:~# ifconfig
eth0 Link encap:Ethernet HWaddr 00:0c:29:a1:d9:4c
inet addr:10.18.10.163 Bcast:10.18.10.255 Mask:255.255.255.0
inet6 addr: fe80::20c:29ff:fea1:d94c/64 Scope:Link
UP BROADCAST RUNNING MULTICAST MTU:1500 Metric:1
RX packets:490587 errors:0 dropped:193282 overruns:0 frame:0
TX packets:92392 errors:0 dropped:0 overruns:0 carrier:0
collisions:0 txqueuelen:1000
RX bytes:47523328 (47.5 MB) TX bytes:13418396 (13.4 MB)
eth0:0 Link encap:Ethernet HWaddr 00:0c:29:a1:d9:4c
inet addr:10.18.10.165 Bcast:10.18.10.255 Mask:255.255.255.0
UP BROADCAST RUNNING MULTICAST MTU:1500 Metric:1
(红色表明已生效)
lo Link encap:Local Loopback
inet addr:127.0.0.1 Mask:255.0.0.0
inet6 addr: ::1/128 Scope:Host
UP LOOPBACK RUNNING MTU:16436 Metric:1
RX packets:1316 errors:0 dropped:0 overruns:0 frame:0
TX packets:1316 errors:0 dropped:0 overruns:0 carrier:0
collisions:0 txqueuelen:0
RX bytes:170696 (170.6 KB) TX bytes:170696 (170.6 KB)
- 建立web服务集群
root@node3:~# apt-get install apache2
root@node3:~# echo "<h1>node3.qms.com</h1>" > /var/www/index.html
root@node4:~# apt-get install apache2
root@node4:~# echo "<h1>node4.qms.com</h1>" > /var/www/index.html
- 测试其功能
这是用crm_mon命令看一下Apache2工作在那个节点
root@node3:~# crm_mon
Attempting connection to the cluster...
============
Last updated: Thu Aug 13 20:20:10 2015
Last change: Thu Aug 13 06:56:00 2015 via crm_attribute on node3
Stack: openais
Current DC: node3 - partition with quorum
Version: 1.1.6-9971ebba4494012a93c03b40a2c58ec0eb60f50c
2 Nodes configured, 2 expected votes
7 Resources configured.
============
Online: [ node3 node4 ]
vip (ocf::heartbeat:IPaddr): Started node3
apache2 (lsb:apache2): Started node3
由上可知,vip和apache2都工作在node3.于是访问10.18.10.165应该得到的结果是node3.qms.com而测试的结果
- 模拟故障,将node3 shutdown观察情况
root@node4:~# crm_mon
Attempting connection to the cluster...
============
Last updated: Thu Aug 13 20:29:04 2015
Last change: Thu Aug 13 06:56:00 2015 via crm_attribute on node3
Stack: openais
Current DC: node4 - partition WITHOUT quorum
Version: 1.1.6-9971ebba4494012a93c03b40a2c58ec0eb60f50c
2 Nodes configured, 2 expected votes
7 Resources configured.
============
Online: [ node4 ]
OFFLINE: [ node3 ]
vip (ocf::heartbeat:IPaddr): Started node4
apache2 (lsb:apache2): Started node4
明显看出node3已经offline 而vip 及 apache2已经工作在node4上,并且访问10.18.10.165的结果如下: - 将node3开机,shutdown node4,观察情况root@node3:~# crm_mon
Attempting connection to the cluster...
============
Last updated: Thu Aug 13 20:29:04 2015
Last change: Thu Aug 13 06:56:00 2015 via crm_attribute on node3
Stack: openais
Current DC: node4 - partition WITHOUT quorum
Version: 1.1.6-9971ebba4494012a93c03b40a2c58ec0eb60f50c
2 Nodes configured, 2 expected votes
7 Resources configured.
============
Online: [ node3 ]
OFFLINE: [ node4 ]
vip (ocf::heartbeat:IPaddr): Started node3
apache2 (lsb:apache2): Started node3
明显看出node3已online,node4 已offline了并访问10.18.10.165结果如下 - 总结
由上述可知,使用corosync+pacemaker可以实现在ubuntu环境下的对web服务的故障转移功能。当其中一台发生故障时,另一台会自动接替其继续工作。
DRBP 测试
- 增加DRBD资源root@node3:~# crm
crm(live)# configure
crm(live)configure# primitive source ocf:linbit:drbd params drbd_resource=web op start timeout=240 op stop timeout=100 op monitor role=Master interval=20 timeout=30 op monitor role=Slave interval=30 timeout=30
crm(live)configure# ms ms_source source meta master-max=1 master-node-max=1 clone-max=2 clone-node-max=1 notify=true
crm(live)configure# show
node node3 \
attributes standby="off"
node node4 \
attributes standby="off"
primitive apache2 lsb:apache2
primitive source ocf:linbit:drbd \
params drbd_resource="web" \
op start interval="0" timeout="240" \
op stop interval="0" timeout="100" \
op monitor interval="20" role="Master" timeout="30" \
op monitor interval="30" role="Slave" timeout="30"
property $id="cib-bootstrap-options" \
dc-versinotallow="1.1.6-9971ebba4494012a93c03b40a2c58ec0eb60f50c" \
cluster-infrastructure="openais" \
expected-quorum-votes="2" \
stonith-enabled="false" \
no-quorum-policy="ignore" \
last-lrm-refresh="1439459915"
rsc_defaults $id="rsc-options" \
resource-stickiness="100"
root@node3:~# crm status
Last updated: Thu Aug 13 21:41:54 2015
Last change: Thu Aug 13 06:56:00 2015 via crm_attribute on node3
Stack: openais
Current DC: node4 - partition with quorum
Version: 1.1.6-9971ebba4494012a93c03b40a2c58ec0eb60f50c
2 Nodes configured, 2 expected votes
7 Resources configured.
============
Online: [ node3 node4 ]
vip (ocf::heartbeat:IPaddr): Started node4
apache2 (lsb:apache2): Started node4
Master/Slave Set: ms_source [source]
Masters: [ node4 ]
Slaves: [ node3 ]
- 增加文件系统资源root@node3:~# crm
crm(live)# configure
crm(live)configure# primitive mstore ocf:heartbeat:Filesystem params device=/dev/drbd1 directory=/drbd fstype=ext3 op start timeout=60 op stop timeout=60
crm(live)configure# verify
crm(live)configure# colocation mstore_with_ms_drbd inf: mstore ms_source:Master
crm(live)configure# order mstore_after_ms_source mandatory: ms_source:promote mystore:start
crm(live)configure# verify
crm(live)configure# commit
crm(live)configure# show
node node3 \
attributes standby="off"
node node4 \
attributes standby="off"
primitive apache2 lsb:apache2
primitive mstore ocf:heartbeat:Filesystem \
params device="/dev/drbd1" directory="/drbd" fstype="ext3" \
op start interval="0" timeout="60" \
op stop interval="0" timeout="60" \
meta target-role="Started"
primitive source ocf:linbit:drbd \
params drbd_resource="web" \
op start interval="0" timeout="240" \
op stop interval="0" timeout="100" \
op monitor interval="20" role="Master" timeout="30" \
op monitor interval="30" role="Slave" timeout="30"
primitive vip ocf:heartbeat:IPaddr \
params ip="10.18.10.165" nic="eth0" cidr_netmask="24"
ms ms_source source \
meta master-max="1" master-node-max="1" clone-max="2" clone-node-max="1" notify="true"
colocation apache2_with_ms_source INFUNTY: apache2 vip
colocation mstore_with_ms_source inf: mstore ms_source:Master
order mstore_after_ms_source inf: ms_source:promote mstore:start
property $id="cib-bootstrap-options" \
dc-versinotallow="1.1.6-9971ebba4494012a93c03b40a2c58ec0eb60f50c" \
cluster-infrastructure="openais" \
expected-quorum-votes="2" \
stonith-enabled="false" \
no-quorum-policy="ignore" \
last-lrm-refresh="1439459915"
rsc_defaults $id="rsc-options" \
resource-stickiness="100"
查看状态:
crm(live)# status
Last updated: Thu Aug 13 21:49:31 2015
Last change: Thu Aug 13 06:56:00 2015 via crm_attribute on node3
Stack: openais
Current DC: node4 - partition with quorum
Version: 1.1.6-9971ebba4494012a93c03b40a2c58ec0eb60f50c
2 Nodes configured, 2 expected votes
7 Resources configured.
============
Online: [ node3 node4 ]
vip (ocf::heartbeat:IPaddr): Started node4
apache2 (lsb:apache2): Started node4
mstore (ocf::heartbeat:Filesystem): Started node4
Master/Slave Set: ms_source [source]
Masters: [ node4 ]
Slaves: [ node3 ]
- 增加vip资源
由于在之前已增加了vip资源,为了使其同apache2、mstore、source工作在同一节点,现在值需加如下命令即可:
crm(live)configure# colocation vip_with_ms_mysqldrbd inf: ms_mysqldrbd:Master vip
crm(live)configure# verify
crm(live)configure# show
node node3 \
attributes standby="off"
node node4 \
attributes standby="off"
primitive apache2 lsb:apache2
primitive mstore ocf:heartbeat:Filesystem \
params device="/dev/drbd1" directory="/drbd" fstype="ext3" \
op start interval="0" timeout="60" \
op stop interval="0" timeout="60" \
meta target-role="Started"
primitive source ocf:linbit:drbd \
params drbd_resource="web" \
op start interval="0" timeout="240" \
op stop interval="0" timeout="100" \
op monitor interval="20" role="Master" timeout="30" \
op monitor interval="30" role="Slave" timeout="30"
primitive vip ocf:heartbeat:IPaddr \
params ip="10.18.10.165" nic="eth0" cidr_netmask="24"
ms ms_source source \
meta master-max="1" master-node-max="1" clone-max="2" clone-node-max="1" notify="true"
colocation apache2_with_ms_source INFUNTY: apache2 vip
colocation mstore_with_ms_source inf: mstore ms_source:Master
order mstore_after_ms_source inf: ms_source:promote mstore:start
property $id="cib-bootstrap-options" \
dc-versinotallow="1.1.6-9971ebba4494012a93c03b40a2c58ec0eb60f50c" \
cluster-infrastructure="openais" \
expected-quorum-votes="2" \
stonith-enabled="false" \
no-quorum-policy="ignore" \
last-lrm-refresh="1439459915"
rsc_defaults $id="rsc-options" \
resource-stickiness="100"
crm(live)configure# commit
增加资源完成
- DRBD 测试
- 在/drbd 目录下新增目录/drdb/qms 和文件/drbd/qms/test.log
首先查看主节点在哪里:
crm(live)# status
Last updated: Thu Aug 13 21:49:31 2015
Last change: Thu Aug 13 06:56:00 2015 via crm_attribute on node3
Stack: openais
Current DC: node4 - partition with quorum
Version: 1.1.6-9971ebba4494012a93c03b40a2c58ec0eb60f50c
2 Nodes configured, 2 expected votes
7 Resources configured.
============
Online: [ node3 node4 ]
vip (ocf::heartbeat:IPaddr): Started node4
apache2 (lsb:apache2): Started node4
mstore (ocf::heartbeat:Filesystem): Started node4
Master/Slave Set: ms_source [source]
Masters: [ node4 ]
Slaves: [ node3 ]
由此可见在node4上,于是在node4上/drbd 目录下新增目录/drdb/qms 和文件/drbd/qms/test.log。当然也可以直接登录10.18.10.165 直接创建,从而不需要去看及主节点在哪里。
root@node4:~# cd /drbd/
root@node4:/drbd# mkdir qms
root@node4:/drbd# touch qms/test.log
root@node4:/drbd# ll
total 32
drwxr-xr-x 5 root root 4096 Aug 13 22:12 ./
drwxr-xr-x 24 root root 4096 Aug 12 06:34 ../
-rw-r--r-- 1 root root 0 Aug 12 12:09 carl.log
drwxr-xr-x 2 root root 4096 Aug 12 06:25 init/
drwx------ 2 root root 16384 Aug 12 06:17 lost+found/
drwxr-xr-x 2 root root 4096 Aug 13 22:12 qms/
root@node4:/drbd# ll qms/
total 8
drwxr-xr-x 2 root root 4096 Aug 13 22:12 ./
drwxr-xr-x 5 root root 4096 Aug 13 22:12 ../
-rw-r--r-- 1 root root 0 Aug 13 22:12 test.log
然而查看node3 /drbd目录里面是空的
root@node3:~# ls -l /drbd/
total 0
- 把node4 shutdown观察情况
登录10.18.10.163/165都会观察到如下情况:
root@node3:~# ls -l /drbd/
total 24
-rw-r--r-- 1 root root 0 Aug 12 12:09 carl.log
drwxr-xr-x 2 root root 4096 Aug 12 06:25 init
drwx------ 2 root root 16384 Aug 12 06:17 lost+found
drwxr-xr-x 2 root root 4096 Aug 13 22:23 qms
root@node3:~# ls -l /drbd/qms/
total 0
-rw-r--r-- 1 root root 0 Aug 13 22:23 test.log
3).开启node4,将node3 shutdown观察情况
登录10.18.10.164/165都会观察到如下情况:
root@node3:~# ls -l /drbd/
total 24
-rw-r--r-- 1 root root 0 Aug 12 12:09 carl.log
drwxr-xr-x 2 root root 4096 Aug 12 06:25 init
drwx------ 2 root root 16384 Aug 12 06:17 lost+found
drwxr-xr-x 2 root root 4096 Aug 13 22:23 qms
root@node3:~# ls -l /drbd/qms/
total 0
-rw-r--r-- 1 root root 0 Aug 13 22:23 test.log
总结
由上述可知,当登录10.18.10.165上时且主节点在node3时,在/drbd目录下新增目录及文件时,它都会同时向node3本地磁盘写入和向node4写入。当node3宕机时,node4会接替node3工作,而我们只需要访问虚拟ip :10.18.10.165。实际上DRBD相当于一个共享存储,也相当于一个网络raid1结构,当其中一台server宕机时,数据仍然存在。


 794
794

 被折叠的 条评论
为什么被折叠?
被折叠的 条评论
为什么被折叠?
 到【灌水乐园】发言


