 Apache Shiro安全框架全面解析


 本文介绍了Apache Shiro这一强大易用的Java安全框架,涵盖其架构、常见名词、配置文件。详细阐述认证实现,包括身份和凭证,还介绍了JDBCRealm、自定义Realm的使用及实现步骤。此外,对几种常见加密算法进行比较,讲解MD5加密、加盐与迭代及凭证匹配器。
Shiro简介
Apache Shiro是一个强大易用的Java安全框架,提供了认证、授权、加密和
会话管理等功能。
对于任何一个应用程序,Shiro都可以提供全面的安全管理服务。其不仅可
以用在JavaSE环境,也可以用在JavaEE环境。
二、Shiro架构图
1.从外部来看Shiro,即从应用程序角度来观察如何使用Shiro完成工作。如
下图:
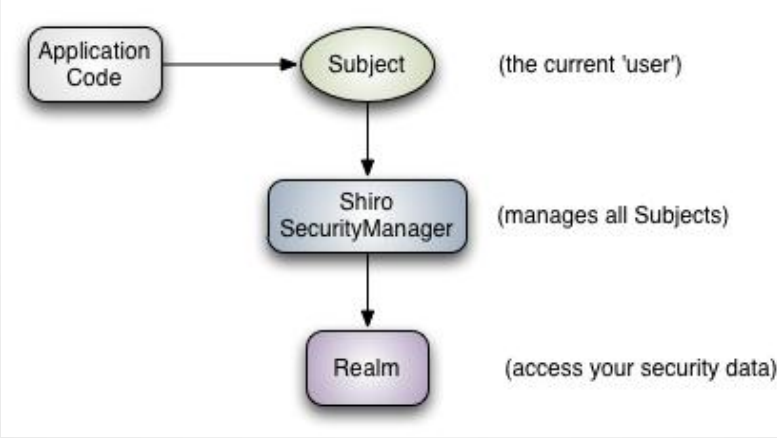
2.从Shiro内部看Shiro的架构,如下图所示:

三、Shiro涉及常见名词

四、Shiro配置文件详解
shiro.ini文件放在classpath下,shiro会自动查找。其中格式是key/value
键值对配置。INI配置文件一般适用于用户少且不需要在运行时动态创建的
情景下使用。
ini文件中主要配置有四大类:main,users,roles,urls
示例:
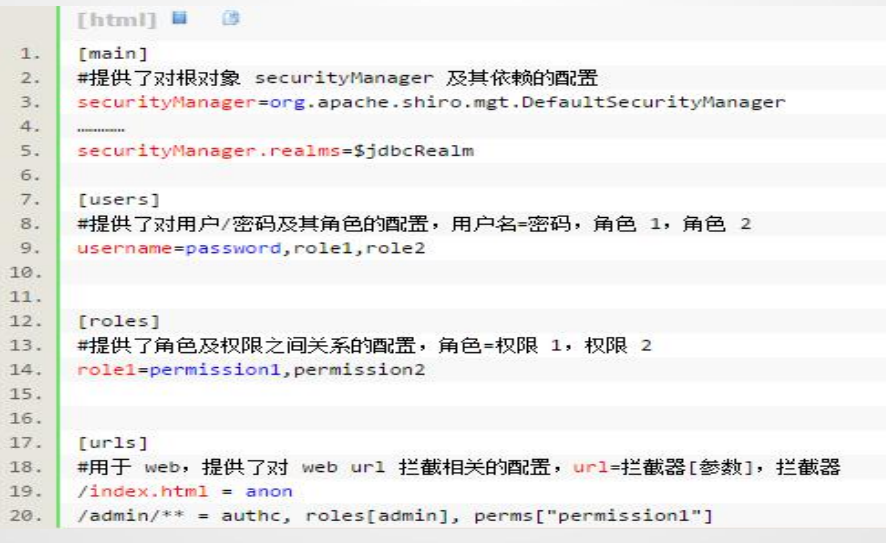
1、[main]
main主要配置shiro的一些对象,例如securityauthenticator,authcStrategy 等等,例如:
2、[users]
[users]允许你配置一组静态的用户,包含用户名,密码,角色,一个用户
可以有多个角色,可以配置多个角色,例如:

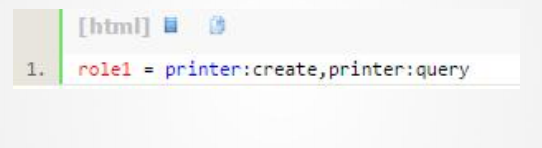
3、[roles]
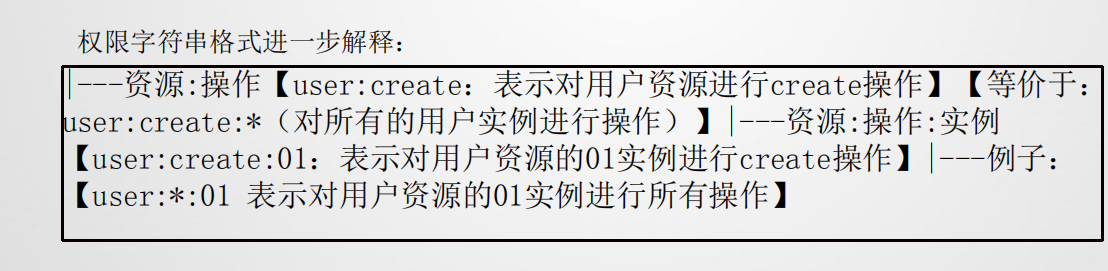
[roles]将角色和权限关联起来,格式为:角色名=权限字符串1,权限字符
串2…..,例如:
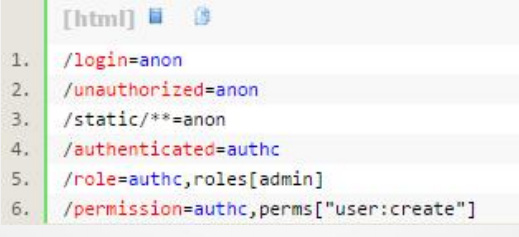
4、[urls]
这部分配置主要在web应用中,格式为:url=拦截器[参数],拦截器[参
数]……,例如
五、认证实现
认证:验证用户是否合法
在 shiro 中,用户需要提供principals (身份)和credentials(凭证)
给shiro,从而实现对用户身份的验证。
5.1.principals
身份,即主体的标识属性,可以是任何东西,如用户名、邮箱等,唯一即可。
例如:用户名/邮箱/手机号等。
5.2.credentials
凭证,即只有主体知道的安全值,如密码/数字证书等。
最常见的principals和credentials组合就是用户名/密码了。
5.3 实现步骤
5.3.1 导入jar包
5.3.2 从源码的示例项目quickstart中拷贝shiro.ini放到src下,并配置
5.3.3 编写代码


package com.bjsxt.test;

import org.apache.shiro.SecurityUtils;
import org.apache.shiro.authc.UsernamePasswordToken;
import org.apache.shiro.config.IniSecurityManagerFactory;
import org.apache.shiro.mgt.SecurityManager;
import org.apache.shiro.subject.Subject;
import org.junit.Test;

//实现简单认证
public class AuthenticationTest {
    @Test
    public void testAuthentication(){
        //1.构建SecurityManager工厂
        IniSecurityManagerFactory securityManagerFactory = new IniSecurityManagerFactory("classpath:shiro.ini");
        //2.通过securityManagerFactory工厂获取SecurityManager实例
        SecurityManager securityManager = securityManagerFactory.getInstance();
        //3.将securityManager设置到运行环境当中
        SecurityUtils.setSecurityManager(securityManager);
        //4.获取subject实例
        Subject subject = SecurityUtils.getSubject();
        //5.创建用户名密码验证令牌Token
        UsernamePasswordToken token = new UsernamePasswordToken("victor","123456");
        //6.进行身份验证
        subject.login(token);
        //7.判断是否认证通过
        System.out.println(subject.isAuthenticated());
    }
}
shiro.ini
[users]

victor=123456
六、JDBCRealm
Shiro默认使用自带的IniRealm,IniRealm从ini配置文件中读取用户的信息。
大部分情况下需要从系统的数据库中读取用户信息,所以需要使用JDBCRealm或自定义Realm。
需求:使用JDBCRealm提供数据源,从而实现认证
实现步骤:
6.1建users表(表名、字段对应上)
6.2添加jar包(数据库驱动、数据库连接池、beanutils等)
6.3编写shiro.ini
6.4编写测试代码
AuthenticationTest.java
package com.bjsxt.test;

import org.apache.shiro.SecurityUtils;
import org.apache.shiro.authc.UsernamePasswordToken;
import org.apache.shiro.config.IniSecurityManagerFactory;
import org.apache.shiro.mgt.SecurityManager;
import org.apache.shiro.subject.Subject;
import org.junit.Test;

//实现简单认证
public class AuthenticationTest {
    @Test
    public void testAuthentication(){
        //1.构建SecurityManager工厂
        IniSecurityManagerFactory securityManagerFactory = new IniSecurityManagerFactory("classpath:shiro.ini");
        //2.通过securityManagerFactory工厂获取SecurityManager实例
        SecurityManager securityManager = securityManagerFactory.getInstance();
        //3.将securityManager设置到运行环境当中
        SecurityUtils.setSecurityManager(securityManager);
        //4.获取subject实例
        Subject subject = SecurityUtils.getSubject();
        //5.创建用户名密码验证令牌Token
        UsernamePasswordToken token = new UsernamePasswordToken("victor","123456");
        //6.进行身份验证
        subject.login(token);
        //7.判断是否认证通过
        System.out.println(subject.isAuthenticated());
    }
}
shiro.ini
[main]
#配置Realm
jdbcRealm = org.apache.shiro.realm.jdbc.JdbcRealm

#配置数据源
dataSource = com.mchange.v2.c3p0.ComboPooledDataSource
dataSource.driverClass = com.mysql.jdbc.Driver
dataSource.jdbcUrl = jdbc:mysql:///test
dataSource.user = root
dataSource.password = victor

jdbcRealm.dataSource = $dataSource

#将Realm注入给SecurityManager
securityManager.realm = $jdbcRealm
七、如何自定义Realm
自定义Realm,可以注入给securityManager更加灵活的安全数据源(例如,
JDBCRealm中表和字段都限定了)
通过实现Realm接口,或根据需求继承他的相应子类即可。
需求:使用自定义Realm提供数据源,从而实现认证
实现步骤:
6.1添加jar包
6.2编写自定义Realm
6.3编写shiro.ini
6.4编写测试类
【代码示例】
realms
package com.bjsxt.realms;

import java.net.ConnectException;
import java.security.interfaces.RSAKey;
import java.sql.Connection;
import java.sql.DriverManager;
import java.sql.ResultSet;
import java.sql.SQLException;
import java.sql.Statement;

import org.apache.shiro.authc.AuthenticationException;
import org.apache.shiro.authc.AuthenticationInfo;
import org.apache.shiro.authc.AuthenticationToken;
import org.apache.shiro.authc.SimpleAuthenticationInfo;
import org.apache.shiro.realm.AuthenticatingRealm;

import com.mysql.jdbc.Driver;

public class CustomRealm extends AuthenticatingRealm {

    private String principal;
    private String credentials;
    private ResultSet rs;
    private Statement state;
    private Connection conn;

    @Override
    protected AuthenticationInfo doGetAuthenticationInfo(AuthenticationToken token) throws AuthenticationException {
        //使用JDBC,从数据库获取数据
        try {
            //1.注册驱动
            Driver driver = new Driver();
            DriverManager.registerDriver(driver);
            //2.获取连接对象
            String url ="jdbc:mysql:///test";
            String user = "root";
            String password = "victor";
            conn = DriverManager.getConnection(url , user , password );
            state = conn.createStatement();
            //4.执行sql语句
            String sql = "select userName,passwd from starLogin";
            rs = state.executeQuery(sql );
            //5.处理结果集
            while (rs.next()) {
                principal = rs.getString("userName");
                credentials = rs.getString("passwd");
            }
        } catch (SQLException e) {
            e.printStackTrace();
        }finally{
            if(rs != null){
                try {
                    rs.close();
                } catch (SQLException e) {
                    e.printStackTrace();
                }
            }
            if(state != null){
                try {
                    state.close();
                } catch (SQLException e) {
                    e.printStackTrace();
                }
            }
            if(conn != null){
                try {
                    conn.close();
                } catch (SQLException e) {
                    e.printStackTrace();
                }
            }
        }

        SimpleAuthenticationInfo simpleAuthenticationInfo = new SimpleAuthenticationInfo(principal, credentials, "customRealm");
        return simpleAuthenticationInfo;
    }


}
AuthenticationTest
package com.bjsxt.test;

import org.apache.shiro.SecurityUtils;
import org.apache.shiro.authc.UsernamePasswordToken;
import org.apache.shiro.config.IniSecurityManagerFactory;
import org.apache.shiro.mgt.SecurityManager;
import org.apache.shiro.subject.Subject;
import org.junit.Test;

//实现简单认证
public class AuthenticationTest {
    @Test
    public void testAuthentication(){
        //1.构建SecurityManager工厂
        IniSecurityManagerFactory securityManagerFactory = new IniSecurityManagerFactory("classpath:shiro.ini");
        //2.通过securityManagerFactory工厂获取SecurityManager实例
        SecurityManager securityManager = securityManagerFactory.getInstance();
        //3.将securityManager设置到运行环境当中
        SecurityUtils.setSecurityManager(securityManager);
        //4.获取subject实例
        Subject subject = SecurityUtils.getSubject();
        //5.创建用户名密码验证令牌Token
        UsernamePasswordToken token = new UsernamePasswordToken("victor","123");
        //6.进行身份验证
        subject.login(token);
        //7.判断是否认证通过
        System.out.println(subject.isAuthenticated());
    }
}
Shrio.ini
[main]
#配置Realm
customRealm = com.bjsxt.realms.CustomRealm

#将Realm注入给SecurityManager
securityManager.realm = $customRealm
八、密码加密实现方案
8.1几种常见加密算法比较
8.1.1对称加密算法(加密与解密密钥相同)

8.1.2非对称算法(加密密钥和解密密钥不同)

8.1.3 对称与非对称算法比较

8.1.4 散列算法比较‘

8.2 MD5加密、加盐与迭代
加盐:
使用MD5存在一个问题,相同的password生产的Hash值是相同的,如
果两个用户设置了相同的密码,那么数据库当就会存储相同的值,这样是极
不安全的。
加Salt可以一定程度上解决这一问题。所谓加Salt方法,就是加点
“佐料”。其基本想法是这样的:当用户首次提供密码时(通常是注册时),
由系统自动往这个密码里撒一些“佐料”,然后再散列。而当用户登录时,系统为用户提供的代码撒上同样的“佐料”,然后散列,再比较散列值,来确定密码是否正确。
加盐原理:
给原文加入随机数生成新的MD5值。
迭代:加密的次数
【代码示例】
md5Test
package com.bjsxt.test;

import org.apache.shiro.crypto.hash.Md5Hash;
import org.junit.Test;

//MD5加密、加盐以及迭代
public class MD5Test {
    @Test
    public void testMD5(){
        //md5加密
        Md5Hash md5 = new Md5Hash("123456");
        System.out.println(md5);
        //加盐
        md5 = new Md5Hash("123456", "bjsxt");
        System.out.println(md5);
        //迭代
        md5 = new Md5Hash("123456", "bjsxt", 2);
        System.out.println(md5);
    }
}
8.3 凭证匹配器
在Realm接口的实现类AuthenticatingRealm中有credentialsMatcher属性。
意为凭证匹配器。常用来设置加密算法及迭代次数等。
Shiro.ini
[main]

#配置凭证匹配器
credentialsMatcher=org.apache.shiro.authc.credential.HashedCredentialsMatcher

#设置凭证匹配器的相关属性
credentialsMatcher.hashAlgorithmName=MD5
credentialsMatcher.hashIterations=2

#配置Realm
customRealm=com.bjsxt.realms.CustomRealm

#配置Realm的凭证匹配器属性
customRealm.credentialsMatcher=$credentialsMatcher

#将Realm注入给SecurityManager
securityManager.realm=$customRealm
costomRealm
package com.bjsxt.realms;

import java.net.ConnectException;
import java.security.interfaces.RSAKey;
import java.sql.Connection;
import java.sql.DriverManager;
import java.sql.ResultSet;
import java.sql.SQLException;
import java.sql.Statement;

import org.apache.shiro.authc.AuthenticationException;
import org.apache.shiro.authc.AuthenticationInfo;
import org.apache.shiro.authc.AuthenticationToken;
import org.apache.shiro.authc.SimpleAuthenticationInfo;
import org.apache.shiro.realm.AuthenticatingRealm;
import org.apache.shiro.util.ByteSource;

import com.mysql.jdbc.Driver;

public class CustomRealm extends AuthenticatingRealm {

    private String principal;
    private String credentials;
    private ResultSet rs;
    private Statement state;
    private Connection conn;
    private String salt;

    @Override
    protected AuthenticationInfo doGetAuthenticationInfo(AuthenticationToken token) throws AuthenticationException {
        //使用JDBC,从数据库获取数据
        try {
            //1.注册驱动
            Driver driver = new Driver();
            DriverManager.registerDriver(driver);
            //2.获取连接对象
            String url ="jdbc:mysql:///test";
            String user = "root";
            String password = "victor";
            conn = DriverManager.getConnection(url , user , password );
            state = conn.createStatement();
            //4.执行sql语句
            String sql = "select userName,passwd,passwd_salt from starLogin";
            rs = state.executeQuery(sql );
            //5.处理结果集
            while (rs.next()) {
                principal = rs.getString("userName");
                credentials = rs.getString("passwd");
                salt = rs.getString("passwd_salt");
            }
        } catch (SQLException e) {
            e.printStackTrace();
        }finally{
            if(rs != null){
                try {
                    rs.close();
                } catch (SQLException e) {
                    e.printStackTrace();
                }
            }
            if(state != null){
                try {
                    state.close();
                } catch (SQLException e) {
                    e.printStackTrace();
                }
            }
            if(conn != null){
                try {
                    conn.close();
                } catch (SQLException e) {
                    e.printStackTrace();
                }
            }
        }

        ByteSource newSalt = ByteSource.Util.bytes(salt);
        SimpleAuthenticationInfo simpleAuthenticationInfo = new SimpleAuthenticationInfo(principal, credentials,newSalt , "customRealm");
        return simpleAuthenticationInfo;
    }


}
AutenticationTest
package com.bjsxt.test;

import org.apache.shiro.SecurityUtils;
import org.apache.shiro.authc.UsernamePasswordToken;
import org.apache.shiro.config.IniSecurityManagerFactory;
import org.apache.shiro.mgt.SecurityManager;
import org.apache.shiro.subject.Subject;
import org.junit.Test;

//实现简单认证
public class AuthenticationTest {
    @Test
    public void testAuthentication(){
        //1.构建SecurityManager工厂
        IniSecurityManagerFactory securityManagerFactory = new IniSecurityManagerFactory("classpath:shiro.ini");
        //2.通过securityManagerFactory工厂获取SecurityManager实例
        SecurityManager securityManager = securityManagerFactory.getInstance();
        //3.将securityManager设置到运行环境当中
        SecurityUtils.setSecurityManager(securityManager);
        //4.获取subject实例
        Subject subject = SecurityUtils.getSubject();
        //5.创建用户名密码验证令牌Token
        UsernamePasswordToken token = new UsernamePasswordToken("victor","123456");
        //6.进行身份验证
        subject.login(token);
        //7.判断是否认证通过
        System.out.println(subject.isAuthenticated());
    }
}


 1073
1073

 被折叠的 条评论
为什么被折叠?
被折叠的 条评论
为什么被折叠?
 到【灌水乐园】发言


