


iOS--NSAttributedString超全属性详解及应用(富文本、图文混排)
ios项目中经常需要显示一些带有特殊样式的文本,比如说带有下划线、删除线、斜体、空心字体、背景色、阴影以及图文混排(一种文字中夹杂图片的显示效果)。通常想要实现这些效果要使用到iOS的Foundation框架提供的NSAttributedString类,NSAttributedString类中有许多属性,不同属性对应不同的文本样式。本文主要对这些属性做一个解释说明,并会结合实际代码来应用它们。
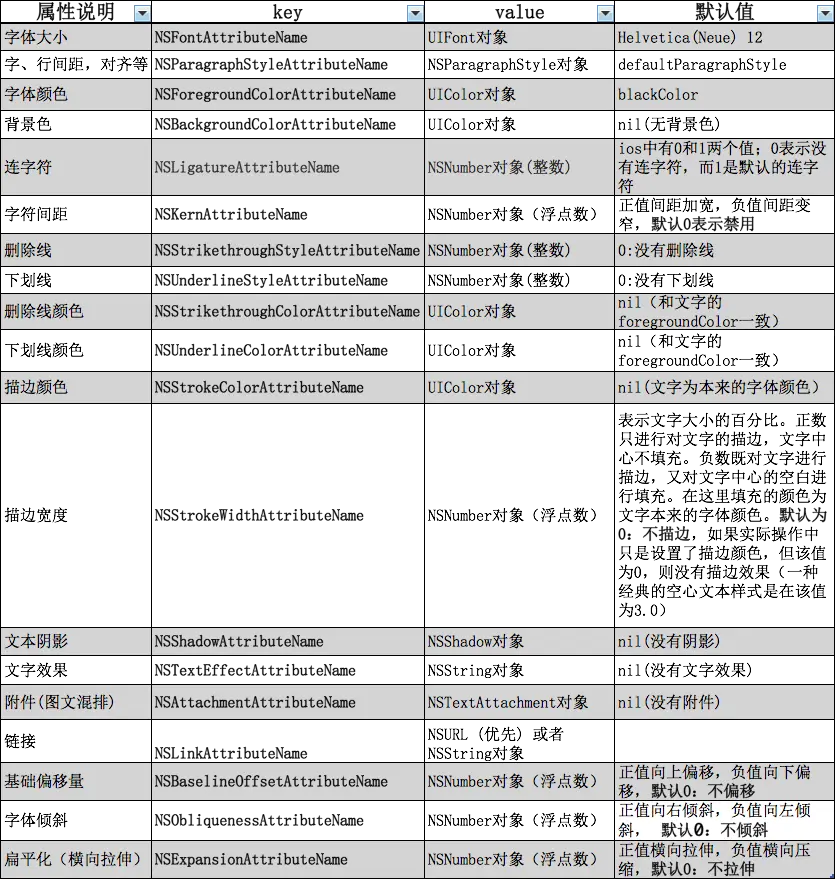
1. NSAttributedString属性概览表
| key | value | 说明 |
|---|---|---|
| NSFontAttributeName | UIFont对象 | 字体大小:默认Helvetica(Neue) 12 |
| NSParagraphStyleAttributeName | NSParagraphStyle对象 | 文本字、行间距,对齐等:默认defaultParagraphStyle |
| NSForegroundColorAttributeName | UIColor对象 | 字体颜色:默认blackColor |
| NSBackgroundColorAttributeName | UIColor对象 | 背景色:默认nil(无背景色) |
| NSLigatureAttributeName | 包含整数的NSNumber对象 | 连字符:ios中有0和1两个值;0表示没有连字符,而1是默认的连字符 |
| NSKernAttributeName | 包含浮点数的NSNumber对象 | 字符间距:默认0(禁用) |
| NSStrikethroughStyleAttributeName | 包含整数的NSNumber对象 | 删除线:默认0(无删除线) |
| NSUnderlineStyleAttributeName | 包含整数的NSNumber对象 | 下划线:默认0(无下划线) |
| NSStrikethroughColorAttributeName | UIColor对象 | 删除线颜色:默认 nil(和文字的 foregroundColor一致) |
| NSUnderlineColorAttributeName | UIColor对象 | 下划线颜色:默认nil(和文字的 foregroundColor一致) |
| NSStrokeColorAttributeName | UIColor对象 | 描边颜色:nil(和文字的 foregroundColor一致) |
| NSStrokeWidthAttributeName | 包含浮点数的NSNumber对象 | 描边宽度:正值空心描边,负值实心描边,默认0(不描边) |
| NSShadowAttributeName | NSShadow对象 | 文本阴影:默认nil(没有阴影) |
| NSTextEffectAttributeName | NSString对象 | 文字效果:默认nil(没有文字效果) |
| NSAttachmentAttributeName | NSTextAttachment对象 | 附件(常用作图文混排) :默认nil(没有附件) |
| NSLinkAttributeName | NSURL (优先) 或 NSString对象 | 链接 |
| NSBaselineOffsetAttributeName | 包含浮点数的NSNumber对象 | 基础偏移量:正值向上偏移,负值向下偏移,默认0(不偏移) |
| NSObliquenessAttributeName | 包含浮点数的NSNumber对象 | 字体倾斜 :正值向右倾斜,负值向左倾斜, 默认0(不倾斜) |
| NSExpansionAttributeName | 包含浮点数的NSNumber对象 | 文本扁平化:正值横向拉伸,负值横向压缩,默认0(不拉伸) |
2. 属性详解及应用(图文混排比较特殊,会在第 3 部分单独说明)
NSMutableAttributedString 是 NSAttributedString 的子类,一般来说我比较习惯使用NSMutableAttributedString来实现富文本,本文的例子也是采用NSMutableAttributedString来实现的,与NSAttributedString实现效果相比并无优缺点之分,主要目的是讲清楚这些属性。
本文使用NSMutableAttributedString实现富文本,主要步骤分为以下三步,为避免下面解释代码时所添加的注释不断重复,特在此说明提前说明一下:
-
调用 - (instancetype)initWithString:(NSString *)str 方法来创建 NSMutableAttributedString 实例
-
调用 - (void)addAttribute:(NSString *)name value:(id)value range:(NSRange)range 方法添加所需的 Attribute 属性,要注意range的范围,所添加的属性只对指定范围内的文字有效
-
给 label 赋值 : label.attributedText = attributedString;
2.1 NSFontAttributeName —— 字体大小
代码 :
- (void)fontAttributeNameTest {
    NSString *text = @"我是30号系统字体,你是15号Courier-BoldOblique字体";
    // 1.创建NSMutableAttributedString实例
    NSMutableAttributedString *fontAttributeNameStr = [[NSMutableAttributedString alloc]initWithString:text]; // 2.添加属性 [fontAttributeNameStr addAttribute:NSFontAttributeName value:[UIFont systemFontOfSize:30] range:NSMakeRange(0, 9)]; [fontAttributeNameStr addAttribute:NSFontAttributeName value:[UIFont fontWithName:@"Courier-BoldOblique" size:15] range:NSMakeRange(9, text.length - 9)]; // 3.给label赋值 self.label.attributedText = fontAttributeNameStr; }
效果图 :

2.2 NSParagraphStyleAttributeName —— 文本字、行间距,对齐等
代码:
- (void)paragraphStyleAttributeNameTest {
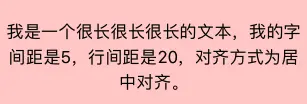
NSString *text = @"我是一个很长很长很长的文本,我的字间距是5,行间距是20,对齐方式为居中对齐。";
NSMutableAttributedString *attributeStr = [[NSMutableAttributedString alloc]initWithString:text]; // 创建NSMutableParagraphStyle实例 NSMutableParagraphStyle *paragraphStyle = [[NSMutableParagraphStyle alloc] init]; paragraphStyle.lineSpacing = 5; //字间距5 paragraphStyle.paragraphSpacing = 20; //行间距是20 paragraphStyle.alignment = NSTextAlignmentCenter; //对齐方式为居中对齐 [attributeStr addAttribute:NSParagraphStyleAttributeName value:paragraphStyle range:NSMakeRange(0, text.length)]; self.label.attributedText = attributeStr; } 效果图:
2.3 NSForegroundColorAttributeName —— 字体颜色
代码:
- (void)foregroundColorAttributeNameTest {
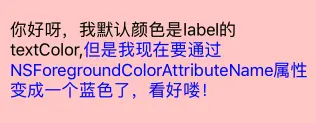
NSString *text = @"你好呀,我默认颜色是label的textColor,但是我现在要通过NSForegroundColorAttributeName属性变成一个蓝色了,看好喽!";
NSMutableAttributedString *attributeStr = [[NSMutableAttributedString alloc]initWithString:text]; [attributeStr addAttribute:NSForegroundColorAttributeName value:[UIColor blueColor] range:NSMakeRange(26, text.length - 26)]; self.label.attributedText = attributeStr; } 效果图:
2.4 NSBackgroundColorAttributeName —— 背景色
代码:
- (void)backgroundColorAttributeNameTest {
    NSString *text = @"我是一个紫色背景色的文本!";
    NSMutableAttributedString *attributeStr = [[NSMutableAttributedString alloc]initWithString:text]; [attributeStr addAttribute:NSBackgroundColorAttributeName value:[UIColor purpleColor] range:NSMakeRange(0, text.length)]; self.label.attributedText = attributeStr; }
效果图:

2.5 NSLigatureAttributeName —— 连字符
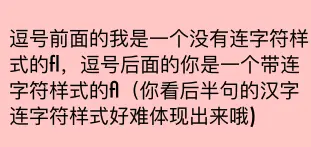
ios 中有 0 和 1 两个值:0表示没有连字符,而1是默认的连字符。(一般对连笔写的英文有效, 中文即使设置了连字符也很难表现出来)。
代码:
- (void)ligatureAttributeNameTest {
   NSString *text = @"逗号前面的我是一个没有连字符样式的fl,逗号后面的你是一个带连字符样式的fl(你看后半句的汉字连字符样式好难体现出来哦)";
   NSMutableAttributedString *attributeStr = [[NSMutableAttributedString alloc]initWithString:text]; [attributeStr addAttribute:NSFontAttributeName value:[UIFont fontWithName: @"futura" size: 20] range:NSMakeRange(0, text.length)]; // 设置文本前半句无连字符效果 [attributeStr addAttribute:NSLigatureAttributeName value:[NSNumber numberWithInt:0] range:NSMakeRange(0, 19)]; // 设置文本后半句有连字符效果 [attributeStr addAttribute:NSLigatureAttributeName value:[NSNumber numberWithInt:1] range:NSMakeRange(19, text.length - 19)]; self.label.attributedText = attributeStr; }
效果图:
2.6 NSKernAttributeName —— 字符间距
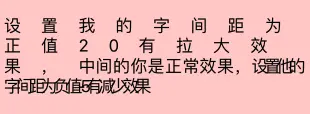
注意: 正值间距加宽,负值间距变窄,0表示默认效果
代码:
- (void)kernAttributeNameTest {
   NSString *text = @"设置我的字间距为正值20有拉大效果,中间的你是正常效果,设置他的字间距为负值-5有减少效果";
   NSMutableAttributedString *attributeStr = [[NSMutableAttributedString alloc]initWithString:text]; [attributeStr addAttribute:NSKernAttributeName value:@20 range:NSMakeRange(0, 18)]; [attributeStr addAttribute:NSKernAttributeName value:@(-5) range:NSMakeRange(28, text.length - 28)]; self.label.attributedText = attributeStr; }
效果图:
----------------------------写在设置文本的删除线和下划线之前----------------------
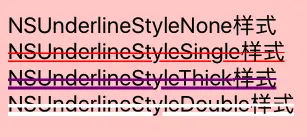
删除线和下划线的区别就是:删除线是在文字中间显示,下划线是在文字的底部显示;除这一点外,设置的可选值是一样的,都是NSUnderlineStyle的枚举常量
    NSUnderlineStyleNone                                    = 0x00,
    NSUnderlineStyleSingle                                  = 0x01,
    NSUnderlineStyleThick NS_ENUM_AVAILABLE(10_0, 7_0) = 0x02, NSUnderlineStyleDouble NS_ENUM_AVAILABLE(10_0, 7_0) = 0x09, NSUnderlinePatternSolid NS_ENUM_AVAILABLE(10_0, 7_0) = 0x0000, NSUnderlinePatternDot NS_ENUM_AVAILABLE(10_0, 7_0) = 0x0100, NSUnderlinePatternDash NS_ENUM_AVAILABLE(10_0, 7_0) = 0x0200, NSUnderlinePatternDashDot NS_ENUM_AVAILABLE(10_0, 7_0) = 0x0300, NSUnderlinePatternDashDotDot NS_ENUM_AVAILABLE(10_0, 7_0) = 0x0400, NSUnderlineByWord NS_ENUM_AVAILABLE(10_0, 7_0) = 0x8000
在 2.7 中会对他们进行一个统一说明。
--------------------------------------------------------------------------------------------------
2.7 NSStrikethroughStyleAttributeName —— 删除线NSStrikethroughColorAttributeName —— 删除线颜色NSUnderlineStyleAttributeName —— 下划线NSUnderlineColorAttributeName —— 下划线颜色
代码:
- (void)strikethroughStyleAndUnderlineStyleTest {
   NSArray *textArr = @[@"NSUnderlineStyleNone样式", @"NSUnderlineStyleSingle样式", @"NSUnderlineStyleThick样式", @"NSUnderlineStyleDouble样式"]; NSArray *colorArr = @[[UIColor blueColor], [UIColor redColor], [UIColor purpleColor], [UIColor whiteColor]]; NSMutableAttributedString *attributeStr = [[NSMutableAttributedString alloc] init]; //依次为每个字符串数组中的字符添加不同样式和不同颜色的删除线、下划线 for (int i = 0; i < textArr.count; i++) { NSMutableAttributedString *singleAttributeStr = [[NSMutableAttributedString alloc]initWithString:textArr[i]]; //设置删除线样式 [singleAttributeStr addAttribute:NSStrikethroughStyleAttributeName value:@(i) range:NSMakeRange(0, ((NSString *)textArr[i]).length)]; //设置删除线颜色 [singleAttributeStr addAttribute:NSStrikethroughColorAttributeName value:colorArr[i] range:NSMakeRange(0, ((NSString *)textArr[i]).length)]; //设置下划线样式 [singleAttributeStr addAttribute:NSUnderlineStyleAttributeName value:@(i) range:NSMakeRange(0, ((NSString *)textArr[i]).length)]; //设置下划线颜色 [singleAttributeStr addAttribute:NSUnderlineColorAttributeName value:colorArr[i] range:NSMakeRange(0, ((NSString *)textArr[i]).length)]; [attributeStr appendAttributedString:singleAttributeStr]; } self.label.attributedText = attributeStr; }
效果图:
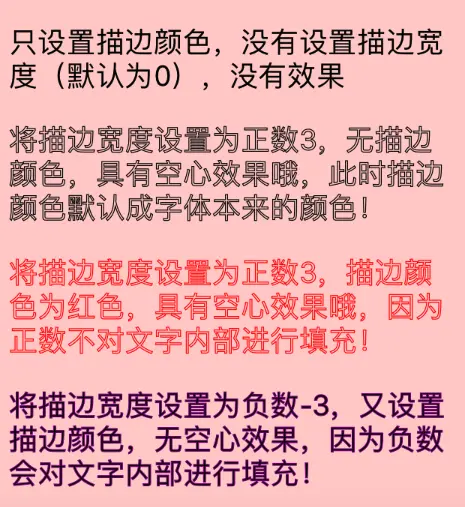
2.8 NSStrokeColorAttributeName —— 描边颜色NSStrokeWidthAttributeName —— 描边宽度
注意事项:
- 描边颜色要搭配非0的描边宽度才会生效,如果只设置了描边颜色,描边宽度为0,则没有描边效果
- 描边宽度是正数,会对文字进行描边,但文字中心不填充( 一种经典的空心文本样式是在该值为3.0)
- 描边宽度是负数,会对文字进行描边,而且会同时对文字中心进行填充(填充的颜色为文字本来的字体颜色)
代码:
- (void)strokeTest {
   // 给第一个label只设置描边颜色
   NSString *text1 = @"只设置描边颜色,没有设置描边宽度(默认为0),没有效果";
   NSMutableAttributedString *attributeStr1 = [[NSMutableAttributedString alloc] initWithString:text1 ]; [attributeStr1 addAttribute:NSStrokeColorAttributeName value:[UIColor blueColor] range:NSMakeRange(0, text1.length)]; self.label1.attributedText = attributeStr1; // 给第二个label设置描边宽度为正数3,不设置描边颜色 NSString *text2 = @"将描边宽度设置为正数3,无描边颜色,具有空心效果哦,此时描边颜色默认成字体本来的颜色!"; NSMutableAttributedString *attributeStr2 = [[NSMutableAttributedString alloc] initWithString:text2 ]; [attributeStr2 addAttribute:NSStrokeWidthAttributeName value:@(3) range:NSMakeRange(0, text2.length)]; self.label2.attributedText = attributeStr2; // 给第三个label设置描边宽度为正数3,描边颜色为红色 NSString *text3 = @"将描边宽度设置为正数3,描边颜色为红色,具有空心效果哦,因为正数不对文字内部进行填充!"; NSMutableAttributedString *attributeStr3 = [[NSMutableAttributedString alloc] initWithString:text3 ]; [attributeStr3 addAttribute:NSStrokeColorAttributeName value:[UIColor redColor] range:NSMakeRange(0, text3.length)]; [attributeStr3 addAttribute:NSStrokeWidthAttributeName value:@(3) range:NSMakeRange(0, text3.length)]; self.label.attributedText = attributeStr3; // 给第四个label设置描边宽度为负数-3,描边颜色为紫色 NSString *text4 = @"将描边宽度设置为负数-3,又设置描边颜色,无空心效果,因为负数会对文字内部进行填充!"; NSMutableAttributedString *attributeStr4 = [[NSMutableAttributedString alloc] initWithString:text4 ]; [attributeStr4 addAttribute:NSStrokeColorAttributeName value:[UIColor purpleColor] range:NSMakeRange(0, text4.length)]; [attributeStr4 addAttribute:NSStrokeWidthAttributeName value:@(-3) range:NSMakeRange(0, text4.length)]; self.label3.attributedText = attributeStr4; }
效果图:
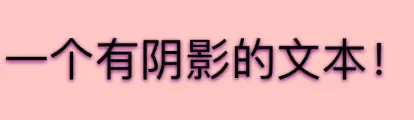
2.9 NSShadowAttributeName —— 文本阴影
代码:
- (void)shadowTest {
   NSString *text = @"一个有阴影的文本!";
   NSMutableAttributedString * attributeStr = [[NSMutableAttributedString alloc] initWithString:text]; // 创建NSShadow实例 NSShadow *shadow = [[NSShadow alloc] init]; shadow.shadowColor = [UIColor purpleColor]; shadow.shadowBlurRadius = 3.0; shadow.shadowOffset = CGSizeMake(0, 0.8); // 添加属性 [attributeStr addAttribute:NSShadowAttributeName value:shadow range:NSMakeRange(0, text.length)]; self.label.attributedText = attributeStr; }
效果图:
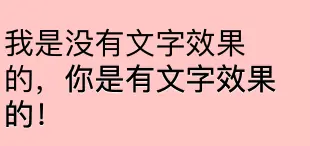
2.10 NSTextEffectAttributeName —— 文字效果
代码:
- (void)textEffectAttributeTest {
   NSString *text = @"我是没有文字效果的,你是有文字效果的!";
   NSMutableAttributedString * attributeStr = [[NSMutableAttributedString alloc] initWithString:text]; [attributeStr addAttribute:NSTextEffectAttributeName value:NSTextEffectLetterpressStyle range:NSMakeRange(10, text.length - 10)]; self.label.attributedText = attributeStr; }
效果图:
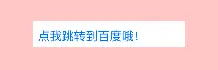
2.11 NSLinkAttributeName —— 链接
注意:UILabel无法使用该属性, 但UITextView 控件可以使用,所以下面关于 NSLinkAttributeName 属性的代码也是使用 UITextView 来测试的。
代码:
// 注意:跳转链接要实现UITextView的这个委托方法
- (BOOL)textView:(UITextView *)textView shouldInteractWithURL:(NSURL *)url inRange:(NSRange)characterRange { return YES; } - (void)linkAttributeTest { NSString *text = @"点我跳转到百度哦!"; NSMutableAttributedString * attributeStr = [[NSMutableAttributedString alloc] initWithString:text]; NSURL *url = [NSURL URLWithString:@"https://www.baidu.com"]; [attributeStr addAttribute:NSLinkAttributeName value:url range:NSMakeRange(0, text.length)]; self.textView.attributedText = attributeStr; }
效果图:

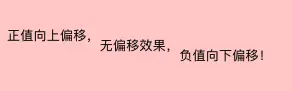
2.12 NSBaselineOffsetAttributeName —— 基础偏移量
注意:正值向上偏移,负值向下偏移,默认0(不偏移)
代码:
- (void)baselineOffsetAttributeName {
   NSString *text = @"正值向上偏移,无偏移效果,负值向下偏移!";
   NSMutableAttributedString * attributeStr = [[NSMutableAttributedString alloc] initWithString:text]; [attributeStr addAttribute:NSBaselineOffsetAttributeName value:@(10) range:NSMakeRange(0, 7)]; [attributeStr addAttribute:NSBaselineOffsetAttributeName value:@(-10) range:NSMakeRange(13, text.length - 13)]; self.label3.attributedText = attributeStr; }
效果图:
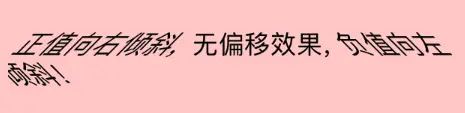
2.13 NSObliquenessAttributeName —— 字体倾斜
注意:正值向右倾斜,负值向左倾斜, 默认0(不倾斜)
代码:
- (void)obliquenessTest {
   NSString *text = @"正值向右倾斜,无偏移效果,负值向左倾斜!";
   NSMutableAttributedString * attributeStr = [[NSMutableAttributedString alloc] initWithString:text]; [attributeStr addAttribute:NSObliquenessAttributeName value:@(1) range:NSMakeRange(0, 7)]; [attributeStr addAttribute:NSObliquenessAttributeName value:@(-1) range:NSMakeRange(13, text.length - 13)]; self.label.attributedText = attributeStr; }
效果图:
2.14 NSExpansionAttributeName —— 文本扁平化(横向拉伸)
注意:正值横向拉伸,负值横向压缩,默认0(不拉伸)
代码:
- (void)expansionAttributeTest {
   NSString *text = @"正值横向拉伸,无扁平效果,负值横向压缩!";
   NSMutableAttributedString * attributeStr = [[NSMutableAttributedString alloc] initWithString:text]; [attributeStr addAttribute:NSExpansionAttributeName value:@(0.8) range:NSMakeRange(0, 7)]; [attributeStr addAttribute:NSExpansionAttributeName value:@(-0.8) range:NSMakeRange(13, text.length - 13)]; self.label.attributedText = attributeStr; }
效果图:

3. 图文混排
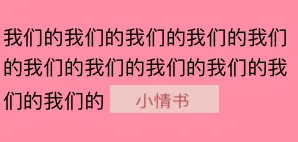
应用场景:如果界面需要显示一串从后台拿到的一个文本,这个文本有长有短,要求文本后面要拼接一个图片,而且如果文本长度为超过一行,图片要跟在文本的最后面。此时就要求图片似乎作为一个文本一样,可以拼接在后台拿到的文本后面。类似这样的:

这样的效果还是通过NSAttributedString类实现的。步骤:
- 使用文本生成指定样式的AttributedString;
- 使用图片生成AttributedString;
- 将生成的AttributedString拼接起来。
- 参考代码:
// 1. 由文本生成attributedString
+ (NSAttributedString *)attributedStringWithText:(NSString *)text textColor:(UIColor *)color textFont:(UIFont *)font hasUnderlineStyle:(BOOL)hasUnderLineStyle lineSpacing:(float)line paragraphSpacing:(float)paragraph { NSMutableAttributedString *attributedString = [[NSMutableAttributedString alloc] initWithString:text]; NSMutableParagraphStyle *paragraphStyle = [[NSMutableParagraphStyle alloc] init]; NSRange range = NSMakeRange(0, text.length); [paragraphStyle setLineSpacing:line]; [paragraphStyle setParagraphSpacing:paragraph]; [attributedString addAttribute:NSParagraphStyleAttributeName value:paragraphStyle range:range]; [attributedString addAttribute:NSForegroundColorAttributeName value:color range:range]; [attributedString addAttribute:NSFontAttributeName value:font range:range]; if (hasUnderLineStyle) { [attributedString addAttribute:NSUnderlineStyleAttributeName value:[NSNumber numberWithInteger:NSUnderlineStyleSingle] range:range]; } return attributedString; } // 2. 由图片生成attributedString + (NSAttributedString *)attributedStringWithImage:(UIImage *)image imageBounds:(CGRect)bounds { NSTextAttachment *textAttachment = [[NSTextAttachment alloc] init]; textAttachment.image = image; textAttachment.bounds = CGRectMake(bounds.origin.x, bounds.origin.y, bounds.size.width, bounds.size.height); NSAttributedString *attachmentAttributedString = [NSAttributedString attributedStringWithAttachment:textAttachment]; return attachmentAttributedString; } // 3. 多个AttributedString拼接成一个resultAttributedString + (NSAttributedString *)jointAttributedStringWithItems:(NSArray *)items { NSMutableAttributedString *resultAttributedString = [[NSMutableAttributedString alloc] init]; for (int i = 0; i < items.count; i++) { if ([items[i] isKindOfClass:[NSAttributedString class]]) { [resultAttributedString appendAttributedString:items[i]]; } } return resultAttributedString; }
图片在文字之后的调用方式:
- (void)initializeLabel:(UILabel *)label withText:(NSString *)text {
    // 传健文本的attributedString
    NSAttributedString *textAttributedString = [UILabel attributedStringWithText:text textColor:[UIColor blackColor] textFont:[UIFont systemFontOfSize:20] hasUnderlineStyle:NO lineSpacing:6 paragraphSpacing:16]; // 创建图片的attributedString NSAttributedString *imageAttributedString = [UILabel attributedStringWithImage:[UIImage imageNamed:@"lovebook.png"] imageBounds:CGRectMake(0, -5, 109, 28)]; // 将文本和图片的attributedString拼接成一个resultAttributedString NSAttributedString *resultAttributedString = [UILabel jointAttributedStringWithItems:@[textAttributedString, imageAttributedString]]; // 将resultAttributedString赋值给label label.attributedText = resultAttributedString; }
其他图片在文字前、在文字中的调用方式和上面的代码类似,这里不再赘述!
PS: 关于图文混排参考这篇文章, 写的很好,收获很大,感谢分享!
最后附一张属性表图:


 405
405

 被折叠的 条评论
为什么被折叠?
被折叠的 条评论
为什么被折叠?
 到【灌水乐园】发言


