


 本文介绍使用Ocelot作为API网关的实践过程,通过配置实现不同服务的路由转发,包括用户服务和文章服务,展示了如何将Ocelot集成到项目中并设置路由规则。
前言
Ocelot是一个基于中间件的网关实现,功能有很多。从浅入深简单学习并记录一下吧。本篇就是一个简单的路由配置实现。
DEMO 搭建
首先建立三个项目。Api.User,Api.Article,Api.GateWay.ApiGateWay项目中引入Ocelot Nuget包.添加配置文件Ocelot.json.
{
  "ReRoutes": [
    {
      "DownstreamPathTemplate": "/{all}",
      "DownstreamScheme": "http",
      "DownstreamHostAndPorts": [
        {
          "Host": "localhost",
          "Port": 60001
        }
      ],
      "UpstreamPathTemplate": "/user/{all}",
      "UpstreamHttpMethod": ["GET","POST"]
    },
    {
      "DownstreamPathTemplate": "/{all}",
      "DownstreamScheme": "http",
      "DownstreamHostAndPorts": [
        {
          "Host": "localhost",
          "Port": 60002
        }
      ],
      "UpstreamPathTemplate": "/article/{all}",
      "UpstreamHttpMethod": ["GET","POST"]
    }
  ],
  "GlobalConfiguration": {
    "BaseUrl": "https://localhost:60003/"
  }
} 启动的时候将配置文件加进去,并且Startup中添加相应的中间件:services.AddOcelot(),app.UseOcelot();
 public static IWebHostBuilder CreateWebHostBuilder(string[] args) =>
            WebHost.CreateDefaultBuilder(args)
             .ConfigureAppConfiguration((hostingContext, config) =>
             {
                 config.SetBasePath(hostingContext.HostingEnvironment.ContentRootPath)
                       .AddJsonFile("ocelot.json", optional: true, reloadOnChange: true)
                       .AddEnvironmentVariables();
             }).UseStartup<Startup>();
启动三个项目,运行效果如下: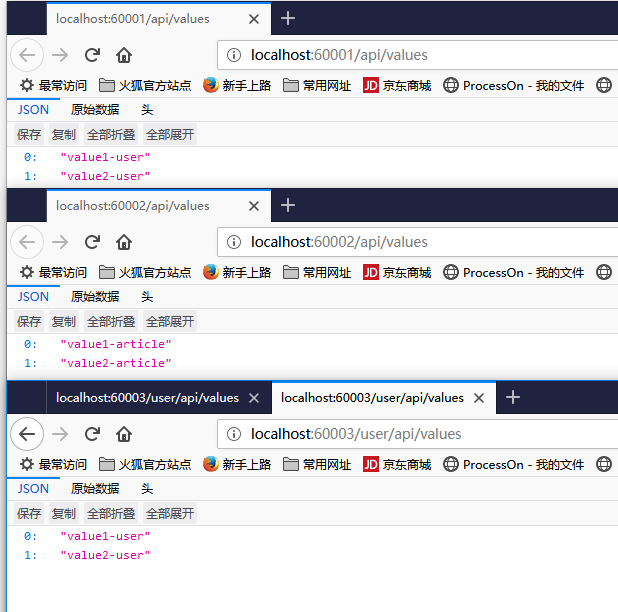
总结
这样就能实现将网关做为统一入口,统一管理了。后续在加上各种Ocelot的功能实现。


 1365
1365

 被折叠的 条评论
为什么被折叠?
被折叠的 条评论
为什么被折叠?
 到【灌水乐园】发言


