


 本文详细介绍了Java5中新增的两种并发工具:CountDownLatch和Exchanger。CountDownLatch用于线程同步,确保某些线程在其他线程执行完特定任务后再继续执行;Exchanger则用于线程间的数据交换。
本文将要介绍的内容都是Java5中的新特性,一个是倒计时记数器---CountDownLatch,另一个是用于线程间数据交换的Exchanger.
一.CountDownLatch
1.什么是CountDownLatch?
倒计时计数器,调用CountDownLatch对象的CountDown()方法就将计数器减一,当计数到达0时,则所有等待者或者全部等待者开始执行.
2.如何用?
new CountDownLatch(1);
直接new,其构造函数必须传一个int类型的参数,参数的意思是:
count the number of times countDown must be invoked before threads can pass through await
大致可理解成,有一个门,有N个门闩,要想打开门必须把所有门闩都打开,对应到线程上是说在线程通过等待前必须要执行的倒计时操作.
3.举例
packagecom.amos.concurrent;importjava.util.Random;importjava.util.concurrent.CountDownLatch;importjava.util.concurrent.ExecutorService;importjava.util.concurrent.Executors;/*** @ClassName: Count_Down_Latch_Test
* @Description: 倒计时学习
*@author: amosli
* @email:hi_amos@outlook.com
* @date Apr 27, 2014 11:51:43 PM*/
public classCount_Down_Latch_Test {public static voidmain(String[] args) {
ExecutorService executorService=Executors.newCachedThreadPool();final CountDownLatch countdownOrder = new CountDownLatch(1);//an order
final CountDownLatch countdownAnwser = new CountDownLatch(3);//anwser
for (int i = 0; i < 3; i++) {
Runnable runnable= newRunnable() {public voidrun() {try{
countdownOrder.await();
System.out.println("线程" + Thread.currentThread().getName() + " 正准备接受命令");
System.out.println("线程"+Thread.currentThread().getName()+" 已经接受命令!");
Thread.sleep(new Random().nextInt(1000));
System.out.println("线程"+Thread.currentThread().getName()+" 回应处理结果!");
countdownAnwser.countDown();
}catch(Exception e) {
e.printStackTrace();
}
}
};
executorService.execute(runnable);//启动线程池
}try{
Thread.sleep(new Random().nextInt(1000));
System.out.println("线程"+Thread.currentThread().getName()+" 即将下达命令!!");
countdownOrder.countDown();
System.out.println("线程"+Thread.currentThread().getName()+" 已经下达命令,正在等待返回结果!");
countdownAnwser.await();
System.out.println("线程"+Thread.currentThread().getName()+" 已经收到所有处理结果!");
}catch(InterruptedException e) {
e.printStackTrace();
}
}
}
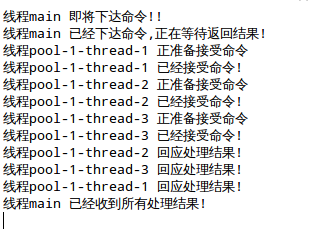
1).效果如下图所示:
2)程序说明
首先是创建了一个可缓存的线程池--->接着,创建两个CountDownLatch类,一个赋值为1,一个赋值为3;----->然后,执行一个for循环,在循环中,首先是实现了一个Runnable接口,然后,将Runnable接口加入到线程池中; 其中Runnable接口,首先是等待计数器为0,然后如果为0那么将计数器2的值减一,每循环一次减一,当第三次循环时,线程执行完毕;----->在Runnable接口中等待计数器为0,整个程序无法向下走,这时main方法,即主线程执行CountDown方法,计数器减一-------->最后等待所有的线程都执行完毕,返回最终的结果.
4.扩展--官方例子


packagecom.amos.concurrent;importjava.util.concurrent.CountDownLatch;public classCountDownLatchTest {public static voidmain(String[] args) {try{new CountDownLatchTest().newDriver().main();
}catch(InterruptedException e) {
e.printStackTrace();
}
}class Driver { //...
void main() throwsInterruptedException {
CountDownLatch startSignal= new CountDownLatch(1);
CountDownLatch doneSignal= new CountDownLatch(3);for (int i = 0; i < 3; ++i)//create and start threads
new Thread(newworker(startSignal, doneSignal)).start();
dosomethingelse();//don't let run yet
startSignal.countDown(); //let all threads proceed
dosomethingelse();
doneSignal.await();//wait for all to finish
}private voiddosomethingelse() {
System.out.println("dosomethingelse...");
}
}class worker implementsRunnable {private finalCountDownLatch startsignal;private finalCountDownLatch donesignal;
worker(CountDownLatch startsignal, CountDownLatch donesignal) {this.startsignal =startsignal;this.donesignal =donesignal;
}public voidrun() {try{
startsignal.await();
dowork();
donesignal.countDown();
}catch(Exception ex) {
}//return;
}voiddowork() {
System.out.println("dowork....");
}
}
}
View Code
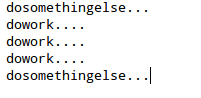
跟上面例子差不多,首先都是设置一个等待,然后再调用计数器减一,执行最后的操作.
CountDownLatch很适用于跑步比赛,当发令枪一声令下,所有选手开始跑起来.
二.Exchanger
1.什么是Exchange?作用是什么?
用于实现两人之间的数据交换,每个人在完成一定的事务后想与对方交换数据;只有两人见面才会有交换.就像是情人间的约会,不见不散.
2.如何使用?
new Exchanger();
这里用到了泛型,即可以指定任意格式的数据,基本类型,对象等等都可以.
这里要注意的是线程要成对出现才能进行数据交换.用来交换的方法为exchange(x);
Parameters:
x the object to exchange
参数为要进行交换给对方的数据.
3.举例:
packagecom.amos.concurrent;importjava.util.Random;importjava.util.concurrent.Exchanger;importjava.util.concurrent.ExecutorService;importjava.util.concurrent.Executors;/*** @ClassName: ExchangerTest
* @Description: 线程间的数据交换Exchanger
*@author: amosli
* @email:hi_amos@outlook.com
* @date Apr 28, 2014 12:26:48 AM*/
public classExchangerTest {public static voidmain(String[] args) {final Exchanger exchanger = new Exchanger();
ExecutorService newCachedThreadPool=Executors.newCachedThreadPool();//线程一
newCachedThreadPool.execute(newRunnable() {public voidrun() {try{
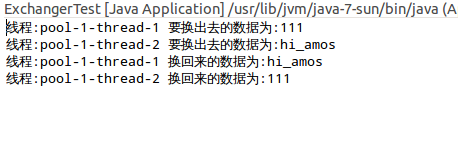
String data1="111";
System.out.println("线程:"+Thread.currentThread().getName()+" 要换出去的数据为:"+data1);
Thread.sleep(new Random().nextInt(1000));
String exchange=exchanger.exchange(data1);
System.out.println("线程:"+Thread.currentThread().getName()+" 换回来的数据为:"+exchange);
}catch(InterruptedException e) {
e.printStackTrace();
}
}
});//线程二
newCachedThreadPool.execute(newRunnable() {public voidrun() {try{
String data1="hi_amos";
System.out.println("线程:"+Thread.currentThread().getName()+" 要换出去的数据为:"+data1);
Thread.sleep(new Random().nextInt(1000));
String exchange=exchanger.exchange(data1);
System.out.println("线程:"+Thread.currentThread().getName()+" 换回来的数据为:"+exchange);
}catch(InterruptedException e) {
e.printStackTrace();
}
}
});
}
}
这里只需要注意使用exchange()方法即可.
效果:
4.扩展---官方例子
classFillAndEmpty {
Exchanger exchanger= newExchanger();
DataBuffer initialEmptyBuffer= ... a made-up type
DataBuffer initialFullBuffer=...class FillingLoop implementsRunnable {public voidrun() {
DataBuffer currentBuffer=initialEmptyBuffer;try{while (currentBuffer != null) {
addToBuffer(currentBuffer);if(currentBuffer.isFull())
currentBuffer=exchanger.exchange(currentBuffer);
}
}catch(InterruptedException ex) { ... handle ... }
}
}class EmptyingLoop implementsRunnable {public voidrun() {
DataBuffer currentBuffer=initialFullBuffer;try{while (currentBuffer != null) {
takeFromBuffer(currentBuffer);if(currentBuffer.isEmpty())
currentBuffer=exchanger.exchange(currentBuffer);
}
}catch(InterruptedException ex) { ... handle ...}
}
}voidstart() {new Thread(newFillingLoop()).start();new Thread(newEmptyingLoop()).start();
}
}
}
官方的例子,也比较简单,启动两个线程,然后调用exchange()方法进行两个线程间的数据交换.


 被折叠的 条评论
为什么被折叠?
被折叠的 条评论
为什么被折叠?
 到【灌水乐园】发言


