


1 自定义复合控件
当使用简单布局定义界面时,客户端对手机内存的消耗是巨大的,同时过多的布局嵌套让代码显得异常的凌乱。因此,解决方式就是自定义控件。接下来,一步一步来实现自定义界面。
1.1 实现效果
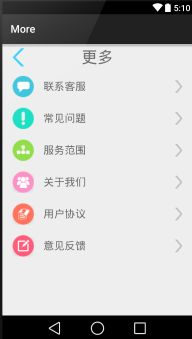
1.2 一般步骤
1.2.1 自定义View的一般步骤:
(1).自定义View的属性
(2).在View的构造方法中获得我们自定义的属性
(3).重写onMesure (不是必须的)
(4).重写onDraw
(5).在布局中使用此自定义View
1.2.2 自定义复合控件的一般步骤:
(1).自定义布局
(2).自定义布局对应的属性
(2).在View的构造方法中获得“自定义布局的控件”&“自定义的属性”(attr.xml),将attr.xml取得的属性值添加到自定义的控件中绑定。
(3).重写onMesure (不是必须的)
(4).重写onDraw
(5).在布局中使用此自定义View
2 先看一张关系图
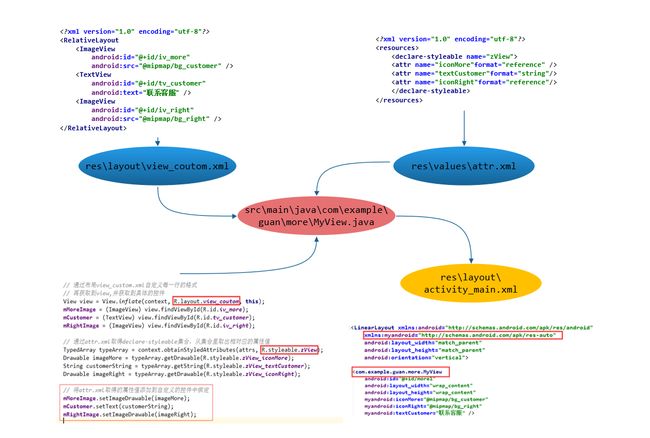
3 例子代码讲解
3.1 attrs.xml
3.2 view_coutom.xml
3.3 MyView.java
/** * Created by Guan on 2015/7/25. */
public class MyView extends FrameLayout {
private ImageView mMoreImage;
private TextView mCustomer;
private ImageView mRightImage;
public MyView(Context context) {
super(context);
}
public MyView(Context context, AttributeSet attrs) {
super(context, attrs);
// 1.1 通过布局view_custom.xml自定义每一行的格式
// 1.2 再获取到view,并获取到具体的控件
View view = View.inflate(context, R.layout.view_coutom, this);
mMoreImage = (ImageView) view.findViewById(R.id.iv_more);
mCustomer = (TextView) view.findViewById(R.id.tv_customer);
mRightImage = (ImageView) view.findViewById(R.id.iv_right);
// 2.1 通过布局attr.xml自定义每一行View的属性
// 2.2 通过attr.xml取得declare-styleable集合,从集合里取出相对应的属性值
TypedArray typeArray = context.obtainStyledAttributes(attrs, R.styleable.zView);
Drawable imageMore = typeArray.getDrawable(R.styleable.zView_iconMore);
String customerString = typeArray.getString(R.styleable.zView_textCustomer);
Drawable imageRight = typeArray.getDrawable(R.styleable.zView_iconRight);
// 3.将attr.xml取得的属性值添加到自定义的控件中绑定
mMoreImage.setImageDrawable(imageMore);
mCustomer.setText(customerString);
mRightImage.setImageDrawable(imageRight);
// 关闭资源
typeArray.recycle();
}
// 4.重写onDraw
@Override
protected void onDraw(Canvas canvas) {
super.onDraw(canvas);
}
}
3.4 activity_main.xml
xmlns:myandroid="http://schemas.android.com/apk/res-auto"
android:layout_width="match_parent"
android:layout_height="match_parent"
android:orientation="vertical">
android:layout_width="match_parent"
android:layout_height="@dimen/text_margin">
android:id="@+id/back"
android:layout_width="wrap_content"
android:layout_height="wrap_content"
android:layout_alignParentLeft="true"
android:layout_centerInParent="true"
android:layout_marginLeft="20dp"
android:src="@mipmap/bg_back" />
android:layout_width="wrap_content"
android:layout_height="wrap_content"
android:layout_centerInParent="true"
android:text="更多"
android:textSize="30sp" />
android:id="@+id/more1"
android:layout_width="wrap_content"
android:layout_height="wrap_content"
myandroid:iconMore="@mipmap/bg_customer"
myandroid:iconRight="@mipmap/bg_right"
myandroid:textCustomer="联系客服" />
android:id="@+id/more2"
android:layout_width="wrap_content"
android:layout_height="wrap_content"
myandroid:iconMore="@mipmap/bg_problem"
myandroid:iconRight="@mipmap/bg_right"
myandroid:textCustomer="常见问题" />
android:id="@+id/more3"
android:layout_width="wrap_content"
android:layout_height="wrap_content"
myandroid:iconMore="@mipmap/bg_service"
myandroid:iconRight="@mipmap/bg_right"
myandroid:textCustomer="服务范围" />
android:id="@+id/more4"
android:layout_width="wrap_content"
android:layout_height="wrap_content"
myandroid:iconMore="@mipmap/bg_about"
myandroid:iconRight="@mipmap/bg_right"
myandroid:textCustomer="关于我们" />
android:id="@+id/more5"
android:layout_width="wrap_content"
android:layout_height="wrap_content"
myandroid:iconMore="@mipmap/bg_user"
myandroid:iconRight="@mipmap/bg_right"
myandroid:textCustomer="用户协议" />
android:id="@+id/more6"
android:layout_width="wrap_content"
android:layout_height="wrap_content"
myandroid:iconMore="@mipmap/bg_feedback"
myandroid:iconRight="@mipmap/bg_right"
myandroid:textCustomer="意见反馈" />
4 注意
在XML使用该组件的时候一定要为该自定义组件设置一个命名空间。
4.1 eclipse
命名空间写法:xmlns:空间名=”http://schemas.android.com/apk/res/自定义组件所在包名”
4.2 android studio
命名空间写法:xmlns:空间名=”http://schemas.android.com/apk/res-auto”
例如:xmlns:myandroid=”http://schemas.android.com/apk/res-auto”


 8423
8423

 被折叠的 条评论
为什么被折叠?
被折叠的 条评论
为什么被折叠?
 到【灌水乐园】发言


