


 本文展示了如何在React应用中实现在滚动时动态加载更多内容的功能,同时保持列表在本地存储的同步。通过使用 的特定属性,当用户滚动到一定阈值时触发加载更多事件。此外,文章还提供了列表头和加载指示器的实现,以提升用户体验。
This piece demonstrates how to load more items in a FlatList component as you scroll down, as well as how to persist lists on device storage, and keep those lists in sync as more items are loaded.
这篇文章演示了如何在向下滚动时在FlatList组件中加载更多项目,以及如何将列表持久保存在设备存储中以及如何在加载更多项目时使这些列表保持同步。
The demo accompanying this piece (available here on GitHub) demonstrates what we’ll achieve, with more items loading from an external data source as the list is being scrolled down. Not only this, the list is persisted on device and in state as more items are loaded.
伴随着这片(可用的演示在这里 GitHub上)证明我们会实现,有更多的项目从外部数据源加载的列表被向下滚动。 不仅如此,该列表会在设备上保持持久状态,并在加载更多项目时保持状态。
The following screencast summarises the process. Note that when we start scrolling more results begin to load immediately. In addition, more results are continuously loaded if the end of the list has been reached. This is due to the onEndReachedThreshold prop of FlatList, that triggers an event to load more items if the scroll position is within this threshold. This behaviour can be seen here:
以下截屏视频总结了该过程。 请注意,当我们开始滚动时,更多结果将立即开始加载。 此外,如果已到达列表的末尾,则会连续加载更多结果。 这是由于onEndReachedThreshold的FlatList ,如果滚动位置在此阈值内,则触发一个事件以加载更多项目。 可以在这里看到此行为:

Notice when the list starts very small (5 items in the above example), the end of the list is on screen from the start. This triggers a load more event as soon as the user starts scrolling.
请注意,当列表开始时很小(上例中为5个项目)时,列表的结尾从头开始显示在屏幕上。 一旦用户开始滚动,就会触发更多加载事件。
We’ll be utilising some supported props of FlatList to display a header that reflects the total amount of items in a list, and a footer that displays a text when more items are being loaded. Importantly, FlatList comes with event listeners out of the box that can be utilised to trigger a load more function.
我们将利用FlatList一些受支持的道具来显示可反映列表中项目总数的页眉,以及在加载更多项目时显示文本的页脚。 重要的是, FlatList提供了开箱即用的事件监听器,可用于触发更多加载功能。
Before exploring the JavaScript, let’s briefly recap how load more functionality can benefit your app and user experience as a whole.
在探索JavaScript之前,让我们简要回顾一下如何加载更多功能可以使您的应用程序和用户体验整体受益。
为什么加载更多重要 (Why Loading More is Important)
The need for a load more function in your apps become very apparent when lists begin getting long, whether that be displaying product lists, saved items, browsing history, or any other type of list that your app may need to display. Fetching longer lists of records becomes more problematic when they take a while to aggregate server-side, leaving the user waiting a prolonged period before the list is returned and rendered in-app.
当列表开始变长时,无论是显示产品列表,已保存的物品,浏览历史记录,还是您的应用可能需要显示的任何其他类型的列表,在应用程序中加载更多功能的需求就变得很明显。 当获取较长的记录列表需要花费一些时间在服务器端进行汇总时,问题变得更加棘手,从而使用户需要等待较长的时间才能返回列表并在应用程序中进行呈现。
A common place to populate list content is when a user signs in to their account. At this stage, user settings and saved items relating to the user account are populated into the app’s Dashboard and on-device data storage. For example, the following illustration considers some of the lists needed for an eCommerce application:
填充列表内容的常见位置是用户登录其帐户时。 在此阶段,与用户帐户有关的用户设置和保存的项目将填充到应用程序的仪表板和设备上的数据存储中。 例如,下图考虑了电子商务应用程序所需的一些列表:

This initial setup can be a time consuming process depending on how much content needs to be fetched and how that data is aggregated server-side. To prevent this initial account setup from taking too long, such lists need to be limited, but without sacrificing the user experience or removing detail from each list item.
根据需要获取多少内容以及如何在服务器端聚合数据,此初始设置可能是一个耗时的过程。 为了防止此初始帐户设置花费太长时间,需要限制此类列表,但又不能牺牲用户体验或从每个列表项中删除详细信息。
This is concretely why a load more function is useful — it allows us to pre-populate lists quickly with a small amount of items, say 5 to 10 records, but leaves the door open to fetch more in the event the user is interested in browsing them.
这就是为什么加载更多功能有用的具体原因-它使我们能够快速填充少量项目(例如5到10条记录)的列表,但如果用户有兴趣浏览,则可以敞开大门以获取更多信息他们。
Apps feel a lot more responsive when lists are limited to a few initial items. The user’s interest to view more items is then signalled rather naturally by scrolling down the list, and this is when additional requests to load more items should be made. This is the scenario we are after, and React Native provides some very useful props that allow us to do just this.
当列表仅限于一些初始项时,应用程序会感觉更加敏感。 然后,通过向下滚动列表就可以很自然地发出用户希望查看更多项目的兴趣,此时应该发出其他请求以加载更多项目。 这是我们所追求的场景,React Native提供了一些非常有用的道具,使我们能够做到这一点。
Initially fetching a small amount of list items is also good app design. There is no guarantee the user will even browse the fetched lists. Therefore, fully populating lists with the expense of longer loading times is a trade-off worth avoiding.
最初获取少量列表项也是不错的应用程序设计。 不能保证用户甚至会浏览获取的列表。 因此,以较长的加载时间为代价完全填充列表是值得避免的折衷方案。
Beyond limiting initial list items, there is more we can do to speed up list loading in future sessions, in the form of saving lists of AsyncStorage and global Redux state.
除了限制初始列表项之外,我们还可以采取其他方法来加快将来会话中的列表加载速度,其形式为保存AsyncStorage和全局Redux状态列表。
使用AsyncStorage保留列表 (Persisting lists with AsyncStorage)
What we’ll be doing further down is saving fetched lists in AsyncStorage and update Redux store state concurrently. Redux makes it easy for us to fetch state using useSelector , whereas AsyncStorage will persist such data to the device so it will stay around even after the user closes the app. Upon subsequent app sessions, the lists will still be present, avoiding another fetch request to populate them again.
我们将做的进一步工作是将获取的列表保存在AsyncStorage并同时更新Redux存储状态。 Redux使我们可以轻松地使用useSelector来获取状态,而AsyncStorage会将此类数据持久保存到设备中,因此即使用户关闭了该应用程序,它也仍然存在。 在后续的应用会话中,列表仍将存在,从而避免了另一个获取请求以再次填充它们。
To learn more about Redux and Redux hooks in-particular, I have published a dedicated piece on the subject: Redux Hooks in React: An Introduction.
要特别了解有关Redux和Redux钩子的更多信息,我已发布了有关该主题的专门文章: React中的Redux Hooks:简介 。
Both sources need to be kept in sync as more list items are loaded as the user is scrolling. In addition, Redux state should be pre-populated from AsyncStorage when an app is initially opened. If there are no saved lists in AsyncStorage, then the app can go ahead and make a fetch request. The following illustration summarises this data flow:
当用户滚动时,随着更多列表项的加载,两个源都需要保持同步。 此外,在最初打开应用程序时, AsyncStorage预填充Redux状态。 如果AsyncStorage中没有保存的列表,则该应用程序可以继续进行提取请求。 下图总结了此数据流:
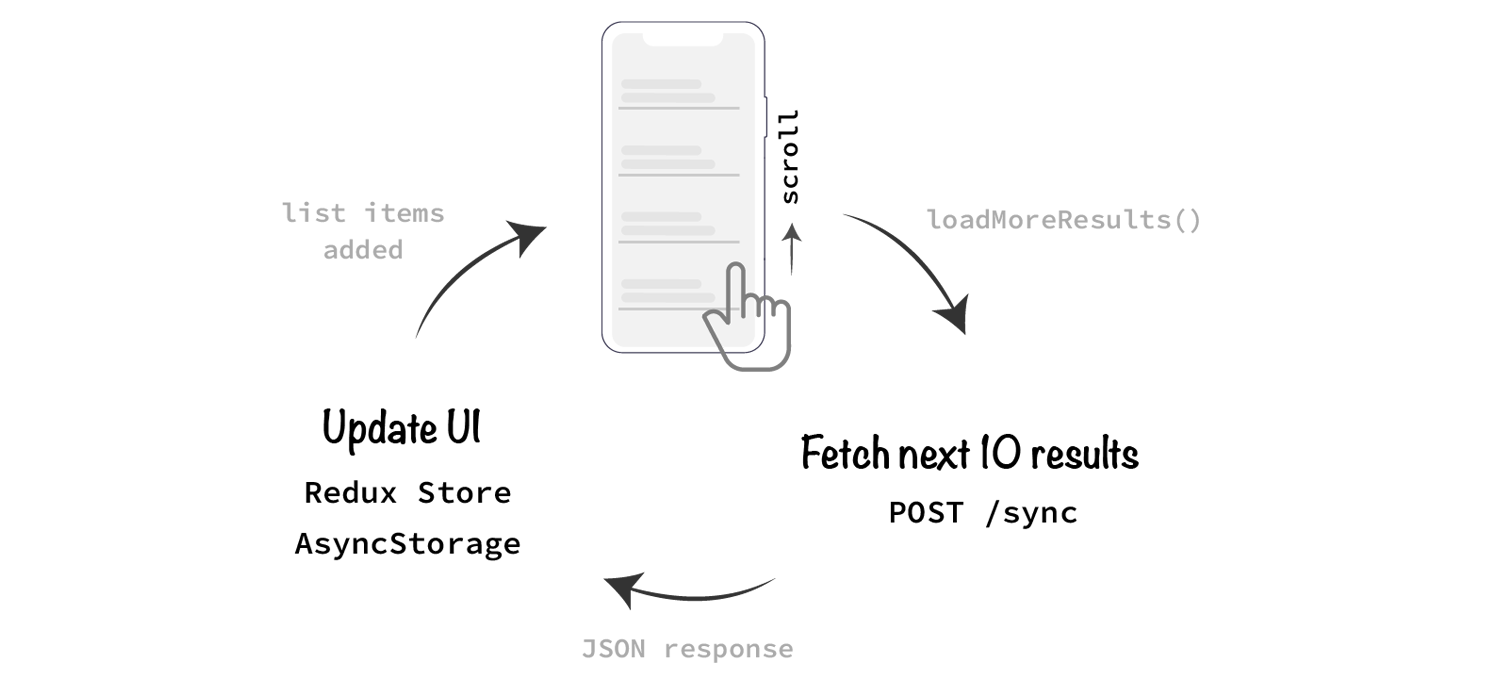
This is the scenario this piece implements using FlatList — we’ll synchronise both the AsyncStorage data source and Redux store simultaneously every time more list items are fetched via a loading more function.
这是本文使用FlatList实现的方案-每次通过加载更多函数获取更多列表项时,我们将同时同步AsyncStorage数据源和Redux存储。
To summarise this section, fetching an initially small amount of items and persisting lists on device storage is good design, because:
总结本节,获取最初少量的项目并在设备存储上保留列表是一个好的设计,因为:
- Faster loading times will result from fetching smaller lists, which will in-turn require less bandwidth and an overall better user experience. 提取较小的列表将导致加载时间加快,进而需要较少的带宽和总体上更好的用户体验。
- Your lists will not need to be populated again after the initial fetch, even upon subsequent app visits — they’ll be in on-device storage. 初次获取后,即使在以后访问应用程序时,也不需要再次填充您的列表-它们将存储在设备上的存储中。
Let’s next explore the List component that has been implemented and to create a working load more function.
接下来,让我们探索已实现的List组件,并创建一个工作负载更多功能。
列出组件设置 (List Component Setup)
From here we will be discussing the List.js component of the accompanying project (on GitHub), and how the component has been configured to load additional items and manage state in the way discussed above. This component houses the FlatList and the accompanying functions to get load more working.
在这里,我们将讨论伴随项目( 在GitHub上 )的List.js组件,以及如何配置该组件以上述方式加载其他项目并管理状态。 该组件包含FlatList及其附带的函数,以使加载工作更多。
Let’s first understand how data is fed into the list.
首先让我们了解如何将数据馈入列表。
将项目送入FlatList (Feeding items into FlatList)
The data being fed into the FlatList is stored in a separate data.js file that contains 50 records, each of which having a unique _id identifier. This file mimics the behaviour of an API request that will be made in production, but for testing purposes the data has been stored locally.
送入FlatList的数据存储在一个单独的data.js文件中,该文件包含50条记录,每个记录都有一个唯一的_id标识符。 该文件模仿了将在生产环境中进行的API请求的行为,但是出于测试目的,数据已存储在本地。
Here is a snippet of the data object:
这是数据对象的片段:
// structure of list dataexport const data = [
  {
    _id: 1,
  },
  {
    _id: 2,
  },
  ...
];
This is actually all the information a FlatList needs to display items — a unique identifier to use with the keyExtractor prop. In this case the _id property of each item is used as the key.
这实际上是FlatList需要显示项目的所有信息—与keyExtractor一起使用的唯一标识符。 在这种情况下,每个项目的_id属性都用作键。
This bare-bones setup was intentional so the reader can adapt the project to their own use cases, with more complex objects. An _id field is also a popular convention for most database systems.
这种简单的设置是有意的,因此读者可以使用更复杂的对象使项目适应他们自己的用例。 一个 _id 领域也是大多数数据库系统的流行惯例。
To mimic a RESTful API request, data.js has another export in the form of the fetchResults(startingId) function. The function will fetch more results starting from a particular _id value. When the list is first initialised, fetchResults(0) will be called to fetch the first 5 list items.
为了模仿RESTful API请求, data.js具有fetchResults(startingId)函数形式的另一个导出。 该函数将从特定的_id值开始获取更多结果。 首次初始化列表时,将调用fetchResults(0)来获取前5个列表项。
Here is fetchResults in its entirety:
这是fetchResults :
// fetchResults takes records from `data` from a particular `_id`const RECORDS_PER_FETCH = 5;export const fetchResults = (startingId = 0) => {
  let obj = []; // loop through records starting at `startingId`  for (
    let i = startingId;
    i < startingId + RECORDS_PER_FETCH;
    i++) {    // break loop if list comes to an end
    if (data[i] === undefined)
      break;    // add record to `obj`    obj.push(data[i]);
  }
  return obj;
}
Notice the RECORDS_PER_FETCH constant that determines how many records are fetched on each load more event. 5 has been set for demonstration purposes, but try to assign a value that will fill the entire device screen on the initial load to prevent immediate subsequent load more requests.
请注意 RECORDS_PER_FETCH 常数, 该 常数确定每次加载更多事件时要提取多少条记录。 出于演示目的已设置了 5 ,但尝试分配一个值,该值将在初始加载时填满整个设备屏幕,以防止立即后续加载更多请求。
Now let’s take a look at initialising this data inside the List component.
现在让我们看一下在List组件中初始化此数据的方法。
初始化来自Redux存储的数据,然后初始化AsyncStorage (Initialising data from Redux store, then AsyncStorage)
It is important to note that initially, we check whether any list data is already saved in either the Redux store and AsyncStorage.
重要的是要注意,最初,我们检查Redux store和AsyncStorage是否已经保存了任何列表数据。
In the event Redux is already in sync, dispatching the action above at the initialisation stage will not result in a re-render as no data changes would be made. Therefore, there are no performance trade-offs by always running this initialisation function, that ensures Redux is in sync with AsyncStorage.
如果Redux已经同步,则在初始化阶段分派上述操作将不会导致重新渲染,因为不会进行任何数据更改。 因此,始终运行此初始化功能不会有性能折衷,这可以确保Redux与AsyncStorage同步。
The following illustration summarises the entire initialisation process:
下图总结了整个初始化过程:
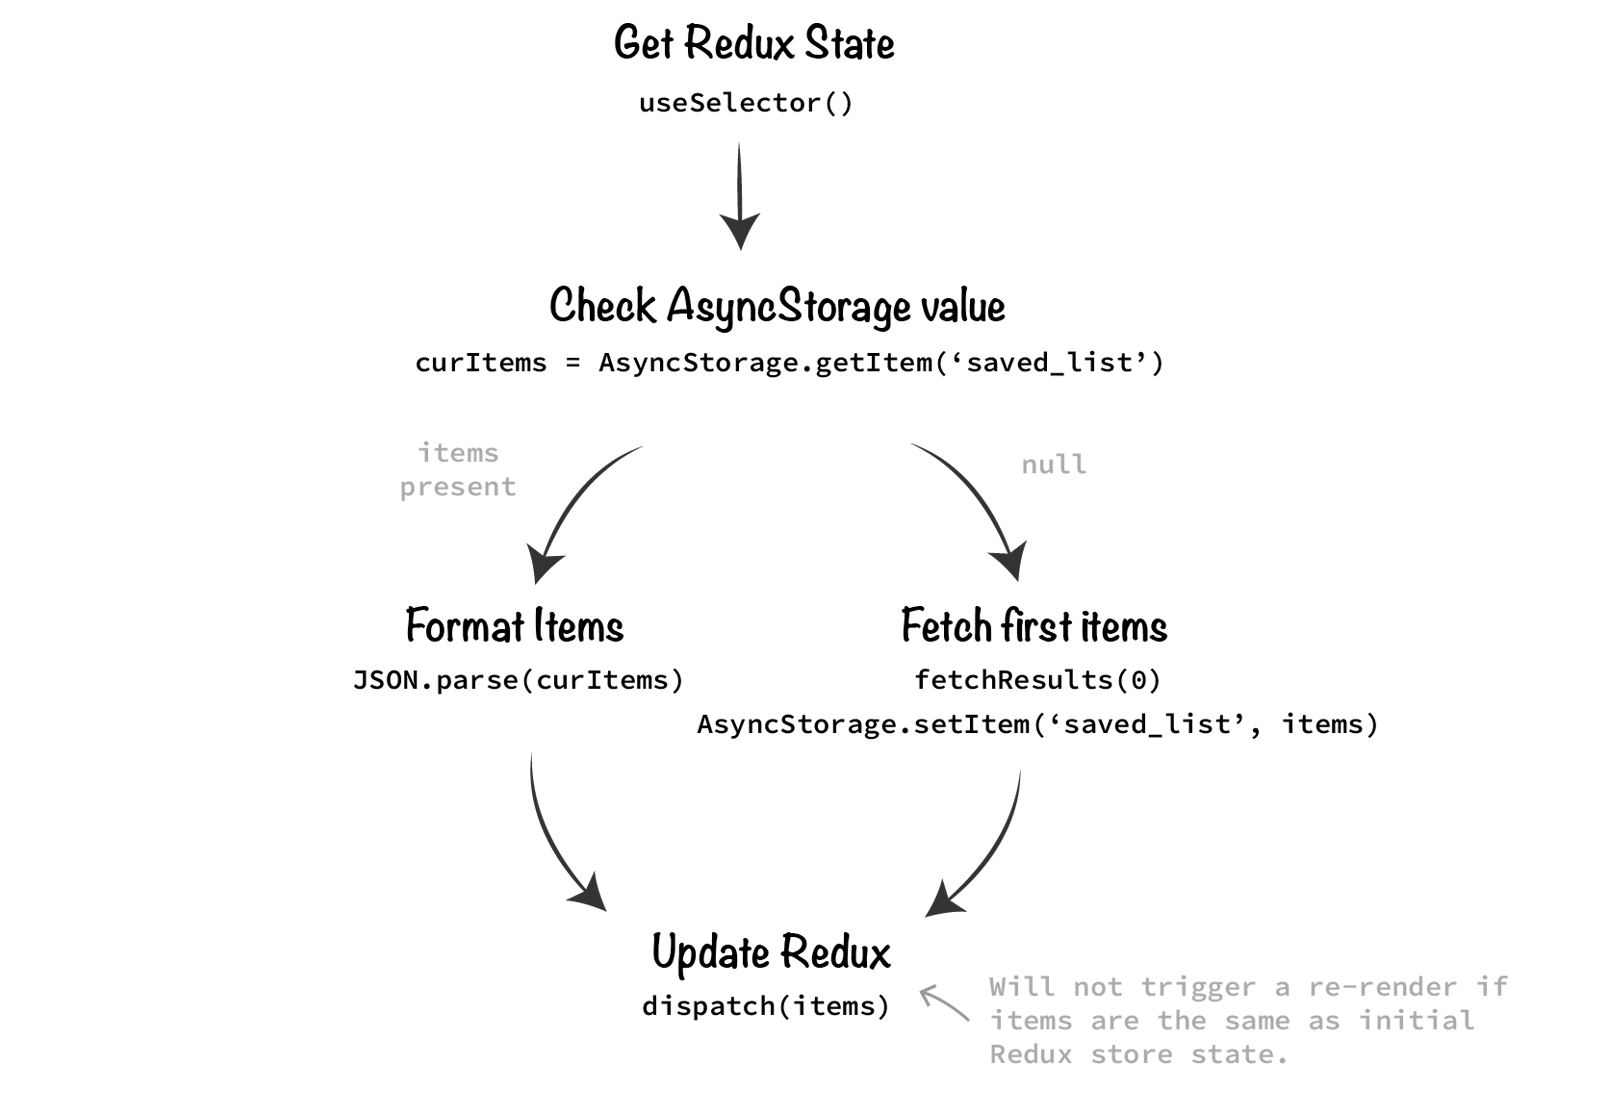
Breaking down this process, we first try to fetch the Redux record using the useSelector hook:
分解此过程,我们首先尝试使用useSelector挂钩获取Redux记录:
const listItems = useSelector(state => state.list.items);List items are stored in a list reducer under an items property.
列表项存储在 items 属性 下的 list 精简器中 。
This is the object that is initially fed into FlatList. If listItems is null, then no items will be displayed. We then go ahead and carry out the initialisation logic to check if the Redux store is in sync with AsyncStorage via an initialiseList() function.
这是最初馈入FlatList的对象。 如果listItems为null ,则不会显示任何项目。 然后,我们继续执行初始化逻辑,以通过AsyncStorage initialiseList()函数检查Redux存储是否与AsyncStorage同步。
This initialisation is triggered in a useEffect hook after the first component render:
在第一个组件渲染之后,在useEffect挂钩中触发此初始化:
// call initialisation function with useEffectuseEffect(() => {
  initialiseList();
}, []);const initialiseList = async () => {
   ...
}
From here we can delve into initialistList(). Here is the function in full with each line commented:
从这里我们可以深入研究initialistList() 。 这是完整的功能,每行都有注释:
// `initialiseList` function in fullconst initialiseList = async () => {   // [for testing purposes] reset AsyncStorage on every app refresh
   await AsyncStorage.removeItem('saved_list');   // get current persisted list items (will be null if above line is not removed)
   const curItems = await AsyncStorage.getItem('saved_list');   if (curItems === null) {
      // no current items in AsyncStorage - fetch initial items
      json = fetchResults(0);      // set initial list in AsyncStorage
      await AsyncStorage.setItem('saved_list', JSON.stringify(json));    } else {
       // current items exist - format as a JSON object
       json = JSON.parse(curItems);
    }   // update Redux store (Redux will ignore if `json` is same as current list items)
    dispatch({
        type: 'UPDATE_LIST_RESULTS',
       items: json
     });
  }
This logic will efficiently set up your list with the initial items in place. Let’s next visit the key FlatList props needed to execute the load more functionality, and finally implement it.
此逻辑将有效地设置您的列表,并放置初始项目。 接下来,让我们访问执行加载更多功能并最终实现所需的关键FlatList道具。
FlatList组件道具 (FlatList Component Props)
This section breaks down the props used in FlatList, but the reader can refer to the entire implementation here on GitHub.
本节分解了FlatList使用的道具,但读者可以在GitHub上参考整个实现。
The data and key extractor have been configured based on listItems, the data derived from Redux:
数据和密钥提取器已基于listItems进行配置, listItems是从Redux派生的数据:
<FlatList
  ...
  data={listItems}
  keyExtractor={(item) => "item_" + item._id}
/>
A threshold has been set to determine when to trigger the load more event — or how far from the end of the list a user has to be before we trigger load more. This is done with the onEndReachedThreshold prop, that triggers the onEndReached event when that threshold has been met:
已设置阈值,以确定何时触发更多加载事件-或在我们触发更多加载之前用户离列表末尾有多远。 这是通过onEndReachedThreshold道具完成的,该道具在onEndReached该阈值时触发onEndReached事件:
<FlatList
  ...
  onEndReachedThreshold={0.01}
  onEndReached={info => {
    loadMoreResults(info);
  }}
/>
A threshold of 0.01 forces the user to scroll right to the bottom of the list before onEndReached is triggered. This is not ideal in production as you will want the additional items to already be in place once the user arrives at the previous bottom list position. Experiment with this value to get the right balance.
阈值 0.01 强制用户在 触发 onEndReached 之前 onEndReached 滚动到列表底部 。 这在生产中并不理想,因为 一旦用户到达上一个最低列表位置 , 您将希望其他物品已经就位 。 试用此值以获得正确的平衡。
Once onEndReached is triggered, the loadMoreResults() function is called. The info argument pertains to metadata about the onEndReached event; it is unneeded here but can be useful for debugging purposes.
一旦onEndReached被触发, loadMoreResults()函数被调用。 info参数与有关onEndReached事件的元数据有关; 这里不需要它,但对于调试目的很有用。
Other notable props are ListHeaderComponent and ListFooterComponent that allow us to display a title and load more label respectively.
其他值得注意的道具是 ListHeaderComponent 和 ListFooterComponent ,它们使我们能够显示标题并分别加载更多标签。
Now let’s turn our attention to loadMoreResults(), the function responsible to orchestrating the load more logic itself.
现在,我们将注意力转向loadMoreResults() ,该函数负责编排更多负载逻辑本身。
载入更多结果 (Loading More Results)
The loadMoreResults() function is designed to mimic an API request and return the additional list items. It relies on some local component state to keep track of whether the component is in the middle of fetching results (as not to duplicate a request), and whether all list items are loaded.
loadMoreResults()函数旨在模仿API请求并返回其他列表项。 它依赖于某些本地组件状态来跟踪组件是否处于获取结果中间(以免重复请求)以及是否加载了所有列表项。
The full implementation of loadMoreResults() is as follows:
loadMoreResults()的完整实现如下:
// `loadMoreResults` function in fullconst loadMoreResults = async info => {   // if already loading more, or all loaded, return
   if (loadingMore || allLoaded)
      return   // set loading more (also updates footer text)
   setLoadingMore(true);   // get next results
   const newItems = fetchResults(totalItems);   // mimic server-side API request and delay execution for 1 second
   await delay(1000);   if (newItems.length === 0) {

      // if no new items were fetched, set all loaded to true to prevent further requests
      setAllLoaded(true);

    } else {
      // process the newly fetched items
      await persistResults(newItems);
    }   // load more complete, set loading more to false
   setLoadingMore(false);
}
Note that this function only executes the process of fetching more results. Those results are then passed into the final function of this implementation, persistResults().
请注意,此函数仅执行获取更多结果的过程。 然后将这些结果传递到此实现的最后一个函数persistResults() 。
persistResults() appends the newly fetched list items to the current list items, then updates our two data sources — Redux and AsyncStorage:
persistResults()将新获取的列表项追加到当前列表项,然后更新我们的两个数据源AsyncStorage和AsyncStorage :
// `persistResults` function in fullconst persistResults = async (newItems) => {   // get current persisted list items
   const curItems = await AsyncStorage.getItem('saved_list');   // format as a JSON object
   let json = curItems === null
      ? {}
      : JSON.parse(curItems);   // add new items to json object
   for (let item of newItems) {
      json.push(item);
   }   // persist updated item list
   await AsyncStorage.setItem('saved_list', JSON.stringify(json));   // update Redux store
   dispatch({
      type: 'UPDATE_LIST_RESULTS',
      items: json
   });
}
Calling the Redux dispatch at the end of this function will trigger a re-render, and thus update the list with the additional items present. And this is the entire load more process completed!
在此函数末尾调用Redux dispatch将触发重新渲染,从而使用存在的其他项更新列表。 而这是整个加载完成的更多过程!
By utilising React Native building blocks in conjunction with state management, the advantages of the article discussed at the beginning of this article can be leveraged to offer a more elegant and streamlined user experience.
通过将React Native构建块与状态管理结合使用,可以利用本文开头讨论的文章的优点来提供更优雅,更精简的用户体验。
综上所述 (In Summary)
This piece visited an efficient method of loading more data into a FlatList. by leveraging multiple data persisting methods, namely Redux and Async Storage.
本文探讨了一种将更多数据加载到FlatList的有效方法。 通过利用多种数据持久化方法,即Redux和Async Storage。
We’ve covered how to keep the two sources in sync by firstly manipulating the AsyncStorage value, then passing that updated value to Redux. Notice that we only need to manipulate one data source before updating the second one with that updated value.
我们已经介绍了如何通过首先处理AsyncStorage值,然后将更新后的值传递给Redux来使两个源保持同步。 请注意,在用该更新值更新第二个数据源之前,我们只需要操纵一个数据源。
Again, the demo of this piece is available on GitHub in an Expo managed app where the reader can simply clone or fork the project for their own purposes.
同样,在Expo托管的应用程序的GitHub上提供了此示例的演示,读者可以简单地出于自己的目的克隆或创建项目。
翻译自: https://medium.com/@rossbulat/react-native-lists-load-more-by-scrolling-378a1c5f56a6


 1167
1167

 被折叠的 条评论
为什么被折叠?
被折叠的 条评论
为什么被折叠?
 到【灌水乐园】发言


