


A step-by-step guide on how to determine which hypothesis test is right for your situation
有关如何确定哪种假设检验适合您的情况的分步指南
Hypothesis testing is a very common and useful form of data analysis in the the world of data science. However, the process of determining which type of hypothesis test to run can be a bit confusing and convoluted.
假设检验是数据科学世界中一种非常普遍且有用的数据分析形式。 但是,确定要运行哪种类型的假设检验的过程可能会有些混乱和混乱。
With modules such as scipy.stats in Python, hypothesis testing has been made faster and easier than ever before. But, in order to get the optimal results out of a hypothesis test, there is a workflow that must be followed so that the correct assumptions can be made before ultimately deciding on which type of hypothesis test will be ran. In this post, I will be taking you through that workflow.
借助Python中的scipy.stats之类的模块,假设测试已比以往更快,更轻松。 但是,为了从假设检验中获得最佳结果,必须遵循一个工作流程,以便在最终决定要运行哪种类型的假设检验之前可以做出正确的假设。 在这篇文章中,我将带您完成该工作流程。
Step 1 — Determine hypotheses and establish alpha value
第1步-确定假设并确定alpha值
If it hasn’t been made clear yet, you kinda need a hypothesis ready before you can run a hypothesis test. In fact, you actually need two hypotheses — a null and alternative hypothesis.
如果尚未弄清楚,您需要先准备好假设,然后才能运行假设检验。 实际上,您实际上需要两个假设-原假设和替代假设。
A null hypothesis makes the assumption that there is no relationship between A and B. An example of a null hypothesis would be, “There is no relationship between this cold medication and a shortened recovery time from a cold.” After completing your testing, you are hoping to reject your null hypothesis, which means that you would then accept your alternative hypothesis. Often, a null hypothesis will be denoted with 𝐻0.
无效假设会假设A和B之间没有关系。无效假设的一个例子是:“这种感冒药与感冒恢复时间缩短之间没有任何关系。” 完成测试后,您希望拒绝原假设,这意味着您将接受替代假设。 通常,零假设会以𝐻0表示。
An alternative hypothesis is what you are actually trying to prove with your test/experiment. Using the same example as above, an example of an alternative hypothesis would be, “This cold medication reduces recovery time for the cold.” An alternative hypothesis will often be denoted with 𝐻1.
另一个假设是您实际上试图通过测试/实验来证明的假设。 使用与上述相同的示例,替代假设的示例将是“这种感冒药会减少感冒的恢复时间。” 另一个假设通常用𝐻1表示。
When conducting a hypothesis test, it is important to establish a threshold for which you, the scientist, can confidently reject your null hypothesis. This is known as your alpha value and is often denoted with the Greek symbol of alpha, 𝛼. So, if you set your alpha value to 0.05, which is very common, you are essentially saying, “I can accept my alternative hypothesis as true, if there is less than a 5% chance that the results are due to randomness.”
在进行假设检验时,重要的是要建立一个阈值,科学家才能自信地拒绝您的零假设。 这就是您的alpha值,通常用希腊字母alpha 𝛼表示。 因此,如果将alpha值设置为0.05(这是很常见的),则实际上是在说:“如果结果是由于随机性导致的可能性不到5%,则我可以接受我的替代假设为真。”
Step 2 — Determine type of data and number of samples/groups
第2步-确定数据类型和样本/组数
Determining your type of data is just knowing if your data is numerical or categorical. That’s it.
确定数据类型只是知道您的数据是数字数据还是分类数据。 而已。
Then, you want to determine how many groups will be compared in your hypothesis test. Once you have answered both of these questions, you can use the table below to determine your type of hypothesis test:
然后,您要确定在假设检验中要比较的组数。 回答完这两个问题后,您可以使用下表确定假设检验的类型:
Step 3 — Meeting proper assumptions
步骤3 —满足适当的假设
Once you have decided on which test you will be performing, there are a number of assumptions that you will want to test for. And in complete honesty, this part is the most confusing. So, if you feel confused or get lost, that is totally okay— because I felt exactly the same way when I first learned this. In total, there are three assumptions that must be tested for. Next to each assumption, the hypothesis tests that the assumptions correspond to will be listed:
确定要执行的测试后,您将需要进行许多假设测试。 老实说,这部分最令人困惑。 因此,如果您感到困惑或迷路,那完全可以,因为我初学时感觉完全一样。 总的来说,必须检验三个假设。 在每个假设的旁边,将列出假设所对应的假设检验:
- Significant Outlier Removal (one-sample T-test, independent (2-sample) T-test, one-way ANOVA) 显着离群值去除(一样本T检验,独立(两样本)T检验,单向方差分析)
- Normality Test (one-sample T-test, independent (2-sample) T-test, one-way ANOVA) 正态性检验(一样本T检验,独立(二样本)T检验,单向方差分析)
- Equal Variance Test (independent (2-sample) T-test, one-way ANOVA) 等方差检验(独立(2个样本)T检验,单向方差分析
The only hypothesis test that was not listed at all was the Chi-Square test, and that’s because you only use this form of hypothesis testing if both of your variables are categorical data.
完全没有列出的唯一假设检验是卡方检验,这是因为如果两个变量都是分类数据,则仅使用这种形式的假设检验。
So, once you’ve determined what types of assumptions to test for, you want to make sure you do them in the right order. First, you always want to make sure you remove outliers because they can affect how your data is distributed.
因此,一旦确定要测试的假设类型,便要确保按正确的顺序进行。 首先,您始终要确保删除异常值,因为它们会影响数据的分布方式。
After that, you want to test for normality. From the module mentioned before, scipy.stats, you can use either the D’Agostino-Pearson’s normality test (scipy.stats.normaltest) or the Shapiro-Wilik Test (scipy.stats.shapiro). Either test will get the job done.
之后,您要测试正常性。 在前面提到的模块scipy.stats中,可以使用D'Agostino-Pearson的正态性检验( scipy.stats.normaltest )或Shapiro-Wilik检验( scipy.stats.shapiro )。 两种测试都可以完成工作。
If you successfully pass the normality assumption, you will then test for equal variance. You will use the Levene’s Test (scipy.stats.levene) to perform this. If you pass this assumption showing that there is equal variance, and have also sucessfully passed the assumption for normality, then you will proceed with the corresponding test you chose from step 2. Now, this is where things will get interesting.
如果您成功通过了正态性假设,则将测试方差是否相等。 您将使用Levene测试( scipy.stats.levene )执行此操作。 如果您通过了表明方差相等的假设,并且还成功通过了关于正态性的假设,那么您将继续执行从步骤2中选择的相应测试。现在,这将使事情变得有趣。
Going back to testing for normality, if your data is not normally distributed, then you must determine if your sample sizes are large enough to safely ignore the normality assumption. The table below will help you in making that determination:
回到正态性测试,如果您的数据不是正态分布的,那么您必须确定样本量是否足够大,可以安全地忽略 正态性假设。 下表将帮助您做出确定:
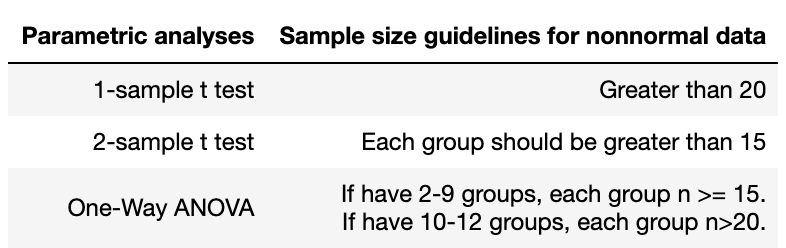
So, to reiterate, if you have failed the normality assumption, but meet one of the conditions above (which is determined by which hypothesis you chose from step 2), then you can ignore the failed normality assumption and go forth with testing for equal variance. Then, If you pass the equal variance assumption, you can proceed with your originally chosen hypothesis test.
因此,重申一下,如果您未通过正态性假设,但满足上述条件之一(由您从步骤2中选择的假设决定),那么您可以忽略失败的正态性假设并进行等方差检验。 然后,如果您通过等方差假设,则可以继续进行最初选择的假设检验。
Next, if you pass the normality assumption, but fail the equal variance test, then you will want to use a Welch’s T-Test. This is for if you are using an independent (2-sample) T-test. If you are using a one-way ANOVA and failed the equal variance test, continue to read on.
接下来,如果您通过了正态性假设,但未通过等方差检验,那么您将要使用韦尔奇T检验。 如果您使用的是独立的(2个样本)T检验,则适用于此。 如果您使用的是单向方差分析,但在等方差检验中未通过,请继续阅读。
Finally, if you have failed the normality assumption and your samples in your groups do not meet the criteria from the table above, and/or you have a one-way ANOVA that failed the equal variance test, then you must run a non-parametric version of your hypothesis test. Reference the table below:
最后,如果您未通过正态假设,并且您的组中的样本不满足上表中的条件,并且/或者您的单向方差分析未通过等方差检验,那么您必须运行非参数假设检验的版本。 请参考下表:
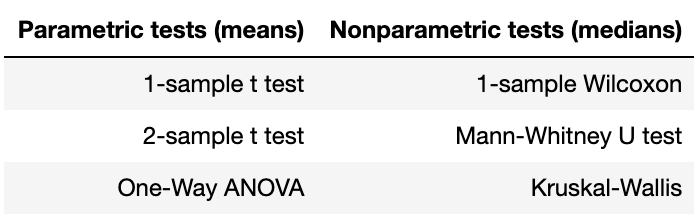
To better understand what exactly a non-parametric test is, here is a concise definition from Extreme Optimization: “A non-parametric test is a hypothesis test that does not make any assumptions about the distribution of the samples.” I like this definition a lot because it references back to the fact that we are running this kind of test because we failed the assumption tests. Below is a table including all the test and their respective ways to be ran from scipy.stats:
为了更好地理解非参数检验的确切含义,以下是Extreme Optimization的简要定义:“非参数检验是一种假设检验,它不对样本的分布进行任何假设。” 我非常喜欢这个定义,因为它引用了由于假设测试失败而我们正在运行这种测试的事实。 下表列出了所有测试以及从scipy.stats运行的各自方法:

Step 4 — Interpret Results
步骤4 —解释结果
After we’ve gone through all the above steps and actually performed our hypothesis test, it is time to interpret our results. The most important result we want to interpret is to discover what our p-value is.
在完成上述所有步骤并实际执行了假设检验之后,现在该解释我们的结果了。 我们要解释的最重要结果是发现我们的p值是什么。
A p-value essentially determines your strength of evidence, either for or against your null hypothesis. Ultimately, your p-value determines what the result of you hypothesis test will be. You interpret your p-value in regards to your alpha-value in that you want p < 𝛼. If p is indeed less than 𝛼, this means that your test has statistical significance, meaning you have strong evidence against your null hypothesis. Thus, this means that you can reject your null hypothesis and accept your alternative hypothesis — the desired outcome. However, if your p ≥ 𝛼, that means you have strong evidence for your null hypothesis, meaning you must accept the null hypothesis and reject the alternative hypothesis — boo.
一个p值从根本上决定了您的证据强度,无论该假设是否成立。 最终,您的p值决定了假设检验的结果。 您希望将p <𝛼解释为与alpha值有关的p值。 如果p比α的确少,这意味着你的测试有统计学意义,这意味着你必须对你的零假设的有力证据。 因此,这意味着您可以拒绝原假设并接受替代假设-期望的结果。 但是,如果你的p≥α,这意味着你有强有力的证据对你的零假设,这意味着你必须接受零假设,并拒绝备择假设-嘘。
If you ran some version of a T-test, you want to calculate the effect size, also known as Cohen’s d. As its name states, this calculation determines how significant, or strong, the effects of the test results actually are. Below are general rules of thumb on how to interpret Cohen’s d:
如果您运行了某个版本的T检验,则需要计算效果大小,也称为Cohen d。 顾名思义,此计算确定测试结果的影响实际有多大或有多强。 以下是有关如何解释Cohen d的一般经验法则:
- Small effect = 0.2 小影响= 0.2
- Medium effect = 0.5 中效= 0.5
- Large effect = 0.8 大效果= 0.8
If you ran an ANOVA test, then you will want to interpret your results using a pairwise Tukey’s test. This test will allow you to know which groups are different, and is basically the ANOVA’s version of interpreting effect size.
如果您进行了ANOVA测试,那么您将希望使用成对的Tukey测试来解释您的结果。 该测试将使您知道哪些组是不同的,并且基本上是ANOVA解释效应大小的版本。
After all of these steps have been taken, you are done! You have completed your workflow for your hypothesis test. Now, you will draw your conclusions and be able to determine if your hypothesis test was successful or not, and determine what your next step(s) will be.
完成所有这些步骤后,您就完成了! 您已经完成了假设检验的工作流程。 现在,您将得出结论,并能够确定假设检验是否成功,并确定下一步将是什么。
I hope this helped and thank you for reading!
希望对您有所帮助,并感谢您的阅读!
翻译自: https://medium.com/swlh/creating-a-hypothesis-testing-workflow-47e55782262d


 被折叠的 条评论
为什么被折叠?
被折叠的 条评论
为什么被折叠?
 到【灌水乐园】发言


