


 本文提供了一个OpenID Connect客户端的示例,帮助开发者理解如何在实际应用中集成和使用OpenID Connect进行身份验证。
openid示例
A walk-through of a concrete implementation of an OpenID Connect Client.
OpenID Connect客户端具体实现的演练。
In this article we will walk through the code of an example Client participating in an OAuth 2.0, with OpenID Connect, Authorization Code Grant Flow. The Authorization Server in this example is the Google Identity Platform. The example client consists of an Express (Node.js) backend (download) and React frontend (download). This article is inspired by the excellent material found in An Illustrated Guide to OAuth and OpenID Connect by David Neal which I would recommend reading before diving in further here.
在本文中,我们将通过OpenID Connect(授权代码授予流程)介绍参与OAuth 2.0的示例客户端的代码。 本示例中的授权服务器是Google身份平台 。 该示例客户端由一个Express (Node.js)后端( 下载 )和React前端( 下载 )组成。 本文的灵感来自《 OAuth和OpenID Connect插图指南》中的出色材料。 David Neal撰写的文章,我建议在深入研究之前先阅读一下。
Step 1: The resource owner wants the client to use the identity from the authorization server
步骤1:资源所有者希望客户端使用授权服务器中的身份

The most relevant code snippet is from the frontend module src/api/oidc.js that prepares the application for login and loads the login screen.
最相关的代码段来自前端模块src / api / oidc.js 准备登录的应用程序并加载登录屏幕。
Points to observe:
注意点:
The login-screen endpoint is provided by the backend application as we will see in the next step
登录屏幕端点由后端应用程序提供,我们将在下一步中看到
We will discuss the purpose of the uniquely generated strings, state, and nonce, in a later section; an important observation here, however, is that we persist in using them in the browser using localStorage
我们将讨论的唯一生成的字符串,州和随机数,在后面的章节的目的; 但是,这里的一个重要观察是,我们坚持使用localStorage在浏览器中使用它们
Step 2: Client redirects the browser to the authorization server
步骤2:客户端将浏览器重定向到授权服务器
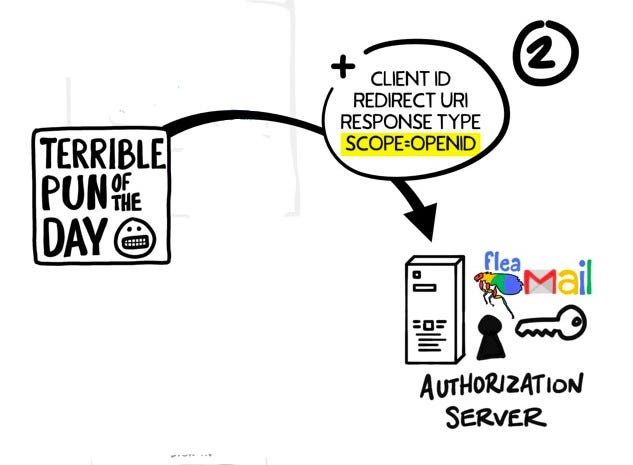
The most relevant code snippet is from the backend module index.js which provides the login-screen endpoint to redirect the browser to Google’s authorization server.
最相关的代码段来自后端模块index.js ,该模块提供了登录屏幕端点来将浏览器重定向到Google的授权服务器。
app.get('/login-screen', (req, res) => {
  const { nonce, state } = req.query;
  if (state === undefined || nonce === undefined) {
    res.status(400).send('missing state and nonce URL parameters');
    return;
  }
  const loginUri = auth.generateAuthUrl({
    access_type: 'offline',
    prompt: 'consent',
    nonce,
    scope: GOOGLE_SCOPE,
    state,
  });
  res.redirect(loginUri);
});
Point to observe:
注意点:
The generateAuthUrl method simplifies the construction of Google’s OAuth 2.0 with OpenID Connect Authentication URI, e.g.:
generateAuthUrl方法可简化具有OpenID Connect身份验证URI的Google OAuth 2.0的构造,例如:
https://accounts.google.com/o/oauth2/v2/auth?
  access_type=offline&
  prompt=consent&
  nonce=[OBMITTED]&
  scope=[OBMITTED]&
  state=[OBMITTED]&
  response_type=code&
  client_id=[OBMITTED]&
redirect_uri=[OBMITTED]Note: While the OAuth 2.0 maintainers recommend using the PKCE extension for additional security with the Authorization Code Grant Flow, Google does not mention it in their OpenID Connect documentation. Google, however, does utilize it in their OAuth 2.0 for Mobile & Desktop documentation. For simplicity and consistency with Google, the example in this article does not attempt to use the PKCE extension.
注意 :虽然OAuth 2.0维护人员建议使用PKCE扩展名,以通过授权代码授予流程提供额外的安全性,但Google并未在其OpenID Connect文档中提及它。 但是,Google确实在OAuth 2.0移动版和桌面版文档中使用了它。 为了简化和与Google保持一致,本文中的示例不尝试使用PKCE扩展名。
Steps 3 and 4: Authorization Server Verifies Identity and Consent
步骤3和4:授权服务器验证身份并同意
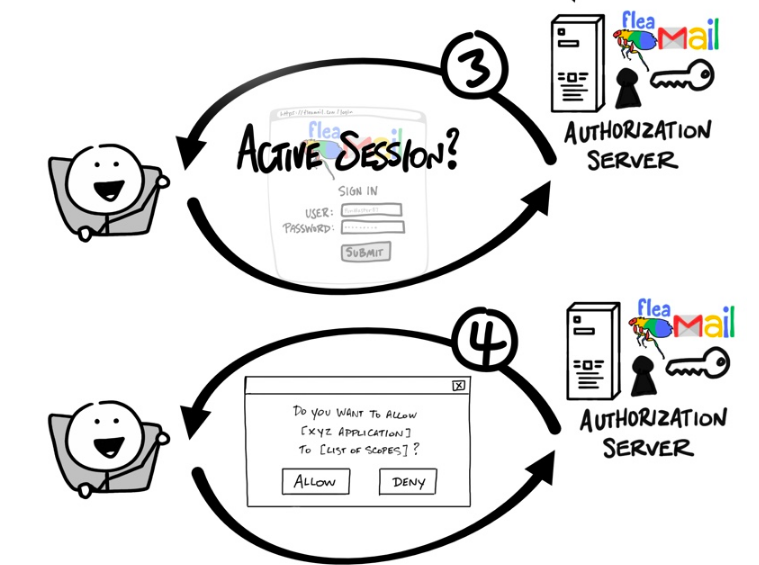
As this part of the flow is managed by the authorization server, i.e., Google, there is no client code supporting it.
由于流程的这一部分由授权服务器(即Google)管理,因此没有支持它的客户端代码。
Step 5: The authorization server redirects back to the client
步骤5:授权服务器重定向回客户端

The authorization server, Google, redirects the browser to the configured callback URI with two key parameters: state and code. In this case to the frontend application (running on http://localhost:3000 during development):
授权服务器Google使用两个关键参数将浏览器重定向到配置的回调URI: state和code 。 在这种情况下,使用前端应用程序(在开发过程中在http:// localhost:3000上运行):
http://localhost:3000/?
  state=[OBMITTED]&
  code=[OBMITTED]&
  scope=[OBMITTED]&
  authuser=0&
  hd=[OBMITTED]
  &prompt=consent#
The most relevant code snippet is from the frontend module src/api/oidc.js:
最相关的代码段来自前端模块src / api / oidc.js :
/** Validates returned state against persisted state */
export const validateState = checkState => {
  const state = window.localStorage.getItem('state');
  window.localStorage.removeItem('state');
  return checkState === state;
}
Points to observe:
注意点:
- Because the backend application is stateless, in that it does not maintain client sessions, the callback URI is the frontend application that can maintain state (e.g., using localStorage) 因为后端应用程序是无状态的,所以它不维护客户端会话,因此回调URI是可以维护状态(例如,使用localStorage)的前端应用程序
Here we see how we are using one, state, of the two, uniquely generated persisted strings in Step 1. By comparing the persisted state (in localStorage) to the state parameter from the redirection we are protecting against a Cross-Site Request Forgery attack specific to OAuth 2.0 (and thus OpenID Connect)
在这里,我们看到了如何在步骤1中使用两个唯一生成的持久字符串中的一个, 状态 。 通过将持久化状态 (在localStorage中)与重定向中的状态参数进行比较,我们可以防止针对OAuth 2.0的跨站点请求伪造攻击(以及OpenID Connect)
Steps 6 and 7: Client Contacts Authorization Server to Exchange Code for Tokens
步骤6和7:客户端联系授权服务器以交换令牌的代码
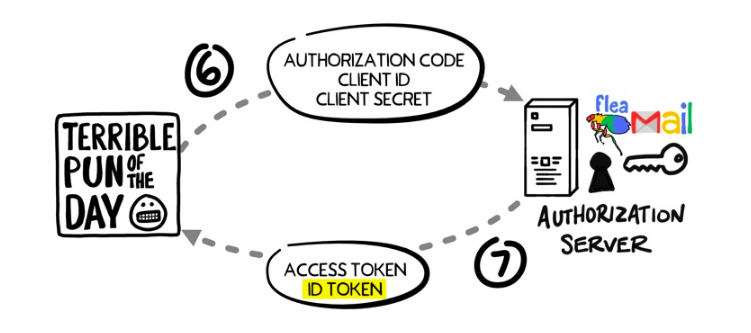
The first relevant code snippet is from the frontend module src/api/oidc.js; supplying the authorization code (code) to the backend application and receiving tokens in return.
第一个相关代码段来自前端模块src / api / oidc.js ; 将授权代码( code )提供给后端应用程序并接收令牌。
/** Exchange code for tokens  */
export const login = async code => {
  const response = await fetch(
    `${process.env.REACT_APP_OIDC_URI_BASE}/get-tokens`,
    {
      method: 'POST',
      headers: {
        'Content-Type': 'application/json'
      },
      body: JSON.stringify({ code }),
    },
  );
  if (!response.ok) {
    throw new Error();
  }
  const { id_token, refresh_token } = await response.json();
  const { nonce } = jwt_decode(id_token);
  const validNonce = validateNonce(nonce);
  if (!validNonce) throw new Error();
  window.localStorage.setItem('id_token', id_token);
  window.localStorage.setItem('refresh_token', refresh_token);
}Note: We will come back to the nonce validation in a bit.
注意 :我们将稍后返回随机数验证。
Point to observe:
注意点:
Here the jwt_decode function does not validate the id_token; it simply decodes it. This is safe because the id_token is securely passed through trusted parties, i.e., from Google and through the backend application.
这里的jwt_decode函数不验证 id_token; 它只是将其解码。 这是安全的,因为id_token是通过受信任的方安全地传递的,即从Google和后端应用程序传递的。
The second relevant code snippet is from the backend module index.js accepting the code from the frontend application, contacting the authorization server to exchange it for tokens (id_token and refresh_token), and returning the tokens to the frontend application.
第二个相关的代码片段来自后端模块index.js,它接受来自前端应用程序的代码,联系授权服务器以将其交换为令牌( id_token和refresh_token ),然后将令牌返回给前端应用程序。
app.post('/get-tokens', async (req, res) => {
  const { code } = req.body;
  if (code === undefined) {
    res.status(400).send('missing code URL parameters');
    return;
  }
  try {
    const { tokens: { id_token, refresh_token } } = await auth.getToken(code);
    res.send({
      id_token,
      refresh_token,
    });
  } catch (err) {
    res.status(401).send('unauthorized');
  }
});
Points to observe:
注意点:
The getToken method simplifies the API call to Google’s OAuth 2.0, with OpenID Connect, token endpoint, e.g.:
getToken方法使用OpenID Connect( 令牌端点)简化了对Google OAuth 2.0的API调用,例如:
POST /token HTTP/1.1
Host: oauth2.googleapis.com
Content-Type: application/x-www-form-urlencodedcode=[OBMITTED]&
client_id=[OBMITTED]&
client_secret=[OBMITTED]&
redirect_uri=[OBMITTED]&
grant_type=authorization_code- Because the Client Secret is not to be broadly shared, e.g., to the Browser, the backend application, and not the frontend application, must obtain the tokens from the Authorization Server 由于客户端机密不会被广泛共享(例如,与浏览器共享),因此后端应用程序而非前端应用程序必须从授权服务器获取令牌。
The last relevant code snippet is from the frontend module src/api/oidc.js; validates the nonce in the returned id_token matches the second, nonce, of the two uniquely generated persisted strings in the first step.
最后一个相关的代码片段来自前端模块src / api / oidc.js ; 验证在返回id_token 随机数相匹配的第二, 随机数 ,唯一地生成的两个坚持在第一步骤中的字符串。
/** Validates returned nonce against persisted nonce */
const validateNonce = checkNonce => {
  const nonce = window.localStorage.getItem('nonce');
  window.localStorage.removeItem('nonce');
  return checkNonce === nonce;
}
Point to observe:
注意点:
Much like, and actually redundant to, the use of the state persisted string, the use of the nonce persisted string protects against a Cross-Site Request Forgery attack specific to OAuth 2.0 (and thus OpenID Connect). This countermeasure, however, is specific to OpenID Connect
与使用状态持久字符串非常类似,并且实际上是多余的,使用现时持久字符串可以防止特定于OAuth 2.0的跨站点请求伪造攻击(以及OpenID Connect)。 但是,此对策特定于OpenID Connect
Step 8: Client Accesses Protected Data on Resource Server
步骤8:客户端访问资源服务器上的受保护数据
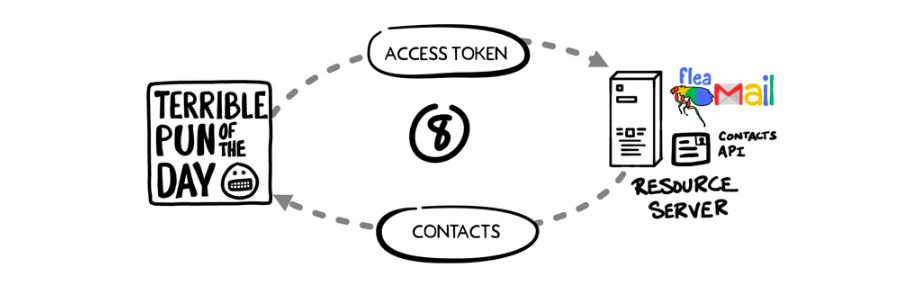
In this example the client does not interact with a Resource Server; we only are interested in authentication using the id_token. While we do get an access_token from the Authorization Server, we do not use it.
在此示例中,客户端不与资源服务器交互; 我们只对使用id_token进行身份验证感兴趣。 虽然确实从授权服务器获得了一个access_token ,但我们并未使用它。
Authentication using an id_token
使用id_token进行身份验证
Once the OAuth 2.0, with OpenID Connect, Authorization Grant Flow completes, the frontend application has an id_token; specifically stored in localStorage. When the frontend application needs to access a protected backend application endpoint, it supplies the id_token in an Authorization header as we can see in the relevant src/api/hello.js module:
一旦OAuth 2.0(带有OpenID Connect,授权授予流程)完成,前端应用程序就会具有id_token ; 专门存储在localStorage中。 当前端应用程序需要访问受保护的后端应用程序端点时,它会在授权标头中提供id_token ,如我们在相关src / api / hello.js模块中所看到的:
const getHelloResponse = async () => {
  const { id_token } = getTokens();
  const response = await fetch(`${process.env.REACT_APP_API_BASE}/`, {
    headers: {
      Authorization: `Bearer ${id_token}`,
    },
  });
  return response;
};Note: This same module includes additional logic around using the refresh_token to obtain an updated id_token when it expires one hour after it is issued.
注意 :相同的模块还包含其他逻辑,这些逻辑围绕使用refresh_token在发布后一小时到期时获取更新的id_token 。
The protected backend application endpoint extracts the id_token from the Authorization header and verifies (and decodes) it before supplying the intended response; returning a 401 status code response if the id_token is missing or invalid. This is implemented in the backend module index.js:
受保护的后端应用程序端点从提供授权头中提取id_token并在提供预期的响应之前对其进行验证(并解码); 如果id_token丢失或无效,则返回401状态代码响应。 这是在后端模块index.js中实现的 :
app.get('/', (req, res) => {
  const authorization = req.header('Authorization');
  if (authorization === undefined) {
    res.status(401).send('unauthorized');
    return;
  }
  const found = authorization.match(AUTHORIZATION_RE);
  if (found === null) {
    res.status(401).send('unauthorized');
    return;
  }
  const { groups: { token } } = found;
  try {
    const { email } = jwt.verify(
      token,
      publicKey,
      {
        audience: process.env.CLIENT_ID,
        issuer: GOOGLE_ISSUER,
      }
    );
    res.send({ hello: email });
  } catch (err) {
    res.status(401).send('unauthorized');
  }
});
Points to observe:
注意点:
Verifying the id_token involves first using an appropriate Google public key to verify its signature; then verifying its iss and aud claims, and finally ensuring it is not expired
验证 id_token涉及首先使用适当的Google公钥来验证其签名;然后, 然后验证其iss和aud声明,最后确保它没有过期
- This same module includes the logic to obtain the appropriate Google public key 该模块包含获取适当的Google公钥的逻辑
结论 (Conclusion)
A walk-through of a concrete implementation of an OpenID Connect Client. There are quite a few nuances to this practice so, while I tried to keep the code as simple as possible, it is a bit longer than I originally hoped for. At the same time you can rest assured that it is fully functional. Sharing information shouldn’t feel like drawing blood from a stone, however, there is a level of security that we want to maintain as we do so. I hope you have found this article helpful, please feel free to leave feedback in the comments!
OpenID Connect客户端的具体实现的演练。 这种做法有很多细微差别,因此,尽管我尝试使代码尽可能简单,但比我最初希望的要长一些。 同时,您可以放心,它功能齐全。 共享信息不应该像从石头上吸血,但是,在此过程中我们需要保持一定的安全性。 希望本文对您有所帮助,请随时在评论中留下反馈!
翻译自: https://codeburst.io/openid-connect-client-by-example-76caf6dae55e
openid示例


 被折叠的 条评论
为什么被折叠?
被折叠的 条评论
为什么被折叠?
 到【灌水乐园】发言


