


Learn how to write a RESTful API using Node.js and Express
了解如何使用Node.js和Express编写RESTful API
In this article, you will learn to write a simple RESTful API using Node.js and Express.
在本文中,您将学习使用Node.js和Express编写一个简单的RESTful API。
This article will be useful if you are familiar with these concepts:
如果您熟悉以下概念,那么本文将非常有用:
- ES6 syntax: arrow function, object notation, string templates. ES6语法:箭头函数,对象符号,字符串模板。
- callbacks. 回调。
- JSON format. JSON格式。
What we’ll cover:
我们将介绍的内容:
1. Setting up the project.
1.设置项目。
2. Adding express.
2.加快递。
3. Running the server.
3.运行服务器。
4. Introducing middlewares.
4.引入中间件。
This article does not cover the design of RESTful APIs. We’ll cover that in another article. The aim of this article is to introduce you to the Express web framework and show you how great is for creating RESTful APIs. I use it often when I have to provide testing APIs for client’s integrations or when I’m developing full stack project and the front client needs to consume an API.
本文不介绍RESTful API的设计。 我们将在另一篇文章中介绍。 本文的目的是向您介绍Express Web框架,并向您展示创建RESTful API的功能。 当我必须提供用于客户端集成的测试API或正在开发完整堆栈项目且前端客户端需要使用API时,我经常使用它。
All sorts of microservices can be made with Nodejs and Express , within a few minutes you can have a nice and small server listening for requests. In this article, I’ll go through the whole process of setting up the project and running the server for the first time.
可以使用Nodejs和Express进行各种微服务,在几分钟之内,您就可以拥有一个不错的小型服务器来监听请求。 在本文中,我将首次完成设置项目和运行服务器的整个过程。
设置项目 (Setting up the project)
Let’s start by creating the project.
让我们从创建项目开始。
$ mkdir micro-server$ cd micro-server$ npm init -yAs you can see npm init creates a package.json , this is the configuration file for our project. It contains scripts and dependencies. The -y option tells npm to autocomplete the questions that otherwise would ask you. Let’s add some elements to our package.json file, open your favorite editor and add the author , description and a start script.
如您所见, npm init创建一个package.json ,这是我们项目的配置文件。 它包含脚本和依赖项。 -y选项告诉npm自动完成否则会问您的问题。 让我们将一些元素添加到package.json文件中,打开您喜欢的编辑器,然后添加author , description和一个start脚本。
{ "name": "temp", "version": "1.0.0", "description": "A hello world example", "main": "index.js", "scripts": { "test": "echo \"Error: no test specified\" && exit 1", "start": "node ." }, "keywords": [], "author": "S.Espinoza", "license": "ISC"}添加Express。 (Adding Express.)
To add express to the dependencies is straight forward by running npm install express --save . This will create and install express inside a node_modules folder and the --save option will save the stable version of Express to our dependencies in the package.json . With express added, we now proceed to create an index.js file and start using express.
通过运行npm install express --save可直接将express添加到依赖项。 这将在node_modules文件夹中创建并安装express ,并且--save选项会将Express的稳定版本保存到package.json的依赖项中。 添加了express ,我们现在开始创建index.js文件并开始使用express。
$ touch index.jsOpen your editor and put this in your file.
打开您的编辑器,并将其放入文件中。
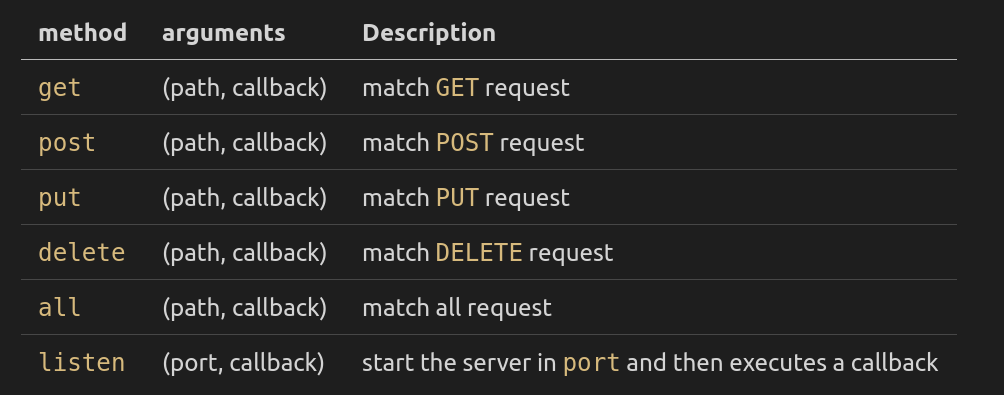
const express = require('express')const app = express()app.get('/user/:name', (req, res) => { return res.status(200).json({ msg: `Hi ${req.params.name}` })})app.all('*', (req, res) => { return res.status(404).json({ msg: 'These are not the droids you are looking for' })})app.listen(4000, () => console.log('listening in on 4000'))In general, every method in express receives as arguments a path and a callback, except listen which receives the port to listen as the first argument. Once the request matches one of the methods, it executes its callback.
通常, express每个方法都将路径和回调作为参数接收, listen除外,后者接收要侦听的端口作为第一个参数。 一旦请求与其中一种方法匹配,它将执行其回调。
An instance of express app has may methods, with different arguments. Here are some of the most important.
Express app的实例具有可以使用不同参数的may方法。 这里是一些最重要的。
In our example
在我们的例子中
app.listen start the server to listen to requests on port 4000.
app.listen启动服务器以侦听端口4000上的请求。
app.get match requests to
localhost:4000/user/:name.app.get匹配请求到
localhost:4000/user/:name。app.all match everything that doesn’t match all the previews methods.
app.all匹配所有不符合所有预览方法的内容。
Yes, the order in which you write you matches matter, they should be structured top to bottom according to it’s relevance.
是的,您编写匹配的顺序很重要,应该根据其相关性从上到下构造它们。
回调 (The callback)
In our callback for the main methods, excluding listen, the first parameter is the path which in our case is user/:name and the second parameter is the callback that receives two arguments:
在我们的主要方法的回调中,除了listen ,第一个参数是路径,在我们的例子中是user/:name ,第二个参数是接收两个参数的回调:
the
requestobjectreqholds all the data that the user sends in this case, theparams.request对象req保留用户在这种情况下发送的所有数据params。the
responseobjectresformats the response to be sent to the user.response对象res格式化将发送给用户的响应。
运行服务器。 (Running the server.)
Let’s run the server now. For that we could type node index.js or node . but as we added a start script in our package.json we can run our server with npm start. The message listening in on 4000 should appear if everything went well.
现在运行服务器。 为此,我们可以输入node index.js或node . 但是随着我们在package.json添加启动脚本,我们可以使用npm start运行服务器。 如果一切顺利,则应该出现listening in on 4000的消息。
$ npm start> micro-server@1.0.0 start /home/sam/micro-server> node .listening in on 4000And now we can test it using curl.
现在我们可以使用curl.进行测试了curl.
$ curl localhost:4000/user/Alexander{"msg":"Hi Alexander"}Great! we are up and running. If we forgot to the add the param or if we try to place any other path we would get Owi One’s words:
大! 我们已经启动并运行了。 如果我们忘记添加参数,或者尝试放置其他任何路径,我们都会得到Owi One的话:
$ curl localhost:4000/this/path/does/not/exist{"msg":"These are not the droids you are looking for"}介绍中间件。 (Introducing middlewares.)
了解中间件 (Understanding middlewares)
A middleware
中间件
is a piece of code that executes sequentially before hitting the last callback to respond to the user.
是一段代码,在命中最后一个回调以响应用户之前按顺序执行。
This is useful, for example, to parse the content in the request object or for authentication proposes. Here we’ll make a little example in our code and then we’ll add some useful Third-party libraries to use as middlewares.
例如,这对于解析请求对象中的内容或进行身份验证提议很有用。 在这里,我们将在代码中做一个小例子,然后添加一些有用的第三方库用作中间件。
A middleware is a function with the following structure:
中间件是具有以下结构的功能:
(req, res, next) => { /* do something*/ next()}Once a middleware finish whatever it does, it should always call the next() function so that the next middleware is called. You can have multiple middlewares that performs different tasks.
中间件完成其所做的一切后,应始终调用next()函数,以便调用next()一个中间件。 您可以有多个执行不同任务的中间件。
app.get('/', (req, res, next) => { /* do something*/ next() }, (req, res, next) => { /* do something*/ next() }, (req, res) => res.status(200).json({}))For our example we’ll use something very simple: put the greeting message in the request object.
在我们的示例中,我们将使用非常简单的方法:将问候消息放入请求对象中。
const formatGreetings = (req, res, next) => { req.greetings = `Hi ${req.params.name}, coffee?` next()}app.get('/user/:name', formatGreetings, (req, res) => { return res.status(200).json({ msg: req.greetings })})app.all('*', (req, res) => { return res.status(404).json({ msg: 'These are not the droids you are looking for' })})app.listen(4000, () => console.log('listening in on 4000'))If we test it again
如果我们再次测试
$ curl localhost:4000/user/Alexander{"msg":"Hi Alexander, coffee?"}Excellent!
优秀的!
第三方库 (Third-party libraries)
Our example as it is wont handle Cross-Origin Resource Sharing (CORS) nor will format well the body of POST requests. So we need to add two more libraries to our dependencies: cors and body-parser.
我们的示例无法处理跨域资源共享( CORS ),也无法很好地格式化POST请求的正文。 因此,我们需要在依赖项中添加两个库: cors和body-parser 。
$ npm install cors body-parser --saveLet’s add a new POST match just before our GET.
让我们在GET之前添加一个新的POST匹配项。
const express = require('express')const app = express()const bparser = require('body-parser')const cors = require('cors')app.use(cors())app.use(bparser.json({ type: 'application/json' })) // parse JSONapp.use(bparser.urlencoded({ extended: true })) // parse URL-encodedconst formatGreetings = (req, res, next) => { req.greetings = `Hi ${req.params.name}, coffee?` next()}app.post('/', (req, res) => { return res.status(200).json({ msg: `creating user ${req.body.name}` })})app.get('/user/:name', formatGreetings, (req, res) => { return res.status(200).json({ msg: `Hi ${req.params.name}` })})app.all('*', (req, res) => { return res.status(404).json({ msg: 'These are not the droids you are looking for' })})app.listen(4000, () => console.log('listening in on 4000'))Now if we test it.
现在,如果我们对其进行测试。
$ curl -s -XPOST -H 'Content-type: application/json' \ -d '{ "name": "sam" }' \ localhost:4000/{"msg":"creating user sam"}Perfect. The app.use() call tells express to use a top-level middleware before every request. In this case to parse JSON and URL-encoded.
完善。 app.use()调用告诉express在每个请求之前使用顶级中间件。 在这种情况下,解析JSON和URL编码。
The urlencoded option in the body-parser just tells the middleware how to parse the body. Here I quote from the docs.
body-parser的urlencoded选项仅告诉中间件如何解析主体。 在这里,我引用了文档。
在中间件(即req.body)之后,在请求对象上填充一个包含已解析数据的新主体对象。 该对象将包含键值对,其中值可以是字符串或数组(当extended为false时)或任何类型(当extended为true时)。
q (jq)
If you are like me and you always consume APIs in the terminal, one of the best tools I’ve found is `jq`. It’s an excellent parser and if you have a huge JSON object it’s very useful. Here is an example.
如果您像我一样,并且总是在终端中使用API,那么我发现的最好的工具之一就是jq。 这是一个出色的解析器,如果您有一个巨大的JSON对象,它非常有用。 这是一个例子。
$ curl -s localhost:4000/Alexander | jq .{“msg”: “Hi Alexander”}$ curl -s localhost:4000/Alexander | jq .msg“Hi Alexander”That’s it for this article, I really hope this was useful for you, if you think there’s a mistake in this article or if there’s room to improve it let me know in the comments.
就是这样,如果您认为本文有误或者有改进的余地,请在评论中告诉我,我真的希望这对您有用。
If you want me to talk about a specific topic just leave a comment or contact me through [my page](https://sespinoza.me/#/contact/).
如果您想让我谈论特定主题,请发表评论或通过[我的页面](https://sespinoza.me/#/contact/)与我联系。
Originally posted in sespinoza.me
最初发布在sespinoza.me
关于我 (About me)
I’m a Software Engineer, writer, tech enthusiast, pianist, origami lover, amateur photographer. In my spare time, I go trekking, play the piano and learn history.
我是一名软件工程师,作家,技术爱好者,钢琴家,折纸爱好者,业余摄影师。 在业余时间,我会徒步旅行,弹钢琴和学习历史。
My tech: JavaScript, Node.js, React, Ruby, Crystal, Bash, Docker.
我的技术:JavaScript,Node.js,React,Ruby,Crystal,Bash,Docker。
You can follow me on Twitter, LinkedIn or visit my page to contact me.
翻译自: https://medium.com/swlh/restful-apis-introduction-to-express-c2395c73599c


 被折叠的 条评论
为什么被折叠?
被折叠的 条评论
为什么被折叠?
 到【灌水乐园】发言


