


创建react应用程序
If you’re a newbie willing out to implement React in your future projects leaving out the unnecessary stuff that comes packed with create-react-app, then I’m sure that this article will build you a concrete understanding of everything you need to know to get started with React & Webpack altogether!
如果您是一个新手,愿意在未来的项目中实现React,而忽略了create-react-app附带的不必要的内容,那么我相信本文将使您对需要了解的一切有一个具体的了解完全开始使用React和Webpack !
Whatever we do in a React project created with create-react-app library is managed by the library itself (except for some additional stuff that we include ourselves). So, in short, everything we’re gonna implement ourselves is pre-implemented in the create-react-app library. This is to make you how to add that pre-implemented stuff manually. I’ll be explaining the things as we go on implementing them.
在使用create-react-app库创建的React项目中,我们所做的一切都由库本身管理(除了我们自己包含的一些其他内容)。 简而言之,我们要自行实现的所有内容都已在create-react-app库中预先实现。 这是使您如何手动添加该预实现的东西。 我将在继续实施这些过程时对其进行解释。
让我们开始吧 (Let’s get started)
1.初始化NPM(1. Initialize the NPM)
Run npm init -y in the project folder named as react-webpack-starter (or whatever you may name it).
跑 npm init -y在名为react-webpack-starter的项目文件夹中(或者您可以命名的任何名称)。
C:\Users\sapin\Desktop\react-webpack-starter>npm init -y
Wrote to C:\Users\sapin\Desktop\react-webpack-starter\package.json:{
 “name”: “react-webpack-starter”,
 “version”: “1.0.0”,
 “description”: “”,
 “main”: “index.js”,
 “scripts”: {
 “test”: “echo \”Error: no test specified\” && exit 1"
 },
 “keywords”: [],
 “author”: “”,
 “license”: “ISC”
}
After done, open the respective folder in your code editor.
完成后,在代码编辑器中打开相应的文件夹。
需要Webpack (Need for Webpack)
The very first thing we need is not the react library, but a module-bundler that will scan the files and bundle them together, and will, meanwhile, use the tools such as -
我们需要的第一件事不是react库,而是一个模块捆绑器,它将扫描文件并将它们捆绑在一起,同时将使用诸如-
babel to transform our JSX code into actual Javascript,
babel将我们的JSX代码转换为实际的Javascript,
css-loader/sass-loader to import styles inside components, etc.
css-loader / sass-loader在组件等中导入样式。
Webpack will start its job by picking up the src/index.js file, because this is what we specify as the entry-point when we configure it up. So let’s jump right into it-
Webpack 将通过捡起 src / index.js文件,因为这是我们在配置文件时指定为入口点的文件。 因此,让我们直接进入它-
We need the following libraries from Webpack for anything to work with it-
我们需要Webpack提供的以下库来进行处理,
a. webpack: This should be obvious that it’s the core library for Webpack and its related stuff.
一种。 webpack:显而易见,它是Webpack及其相关内容的核心库。
b. webpack-cli:If you take a look inside package.json when using create-react-app, you’ll find the following scripts-
b。 webpack-cli: 如果您在使用create-react-app时查看package.json的内容,则会发现以下脚本-
"scripts": {
    "start": "react-scripts start",
    "build": "react-scripts build"
}
The react-scripts is a custom library that runs commands from webpack-cli when you hit, for example, npm run start. So, all that react-scripts does is what we’re gonna do manually-
当您点击时, react-scripts是一个自定义库,可从webpack-cli运行命令,例如npm run start 。 因此, react-scripts所做的只是我们将要手动执行的操作-
"scripts": {
    "start": "webpack-dev-server --mode development",
    "build": "webpack --mode production",
}
c. webpack-dev-server: You already saw the use of this library in the above start script. It is used in development mode to serve the bundled files in a browser. [e.g. localhost:3000]
C。 webpack-dev-server:您已经在上面的start脚本中看到了该库的使用。 它在开发模式下用于在浏览器中提供捆绑的文件。 [例如localhost:3000 ]
2.设置Webpack (2. Setup Webpack)
First, hit the following command in the console. The --save-dev or -D flag is used for installing them as dev-dependencies.
首先,在控制台中单击以下命令。 --save-dev 或-D 标志用于将它们安装为dev-dependencies 。
npm install --save-dev webpack webpack-cli webpack-dev-serveBefore configuring Webpack, grab the src folder from here. with minimum necessary files. After done, add the aforementioned scripts inside package.json file.
在配置Webpack之前,请从此处获取src文件夹。 最少需要的文件。 完成后,添加上述脚本 在package.json文件中。
"scripts": {
    "start": "webpack-dev-server --mode development --open --hot",
    "build": "webpack --mode production",
}
The new highlighted flags --open and --hot do the following respectively:
新突出显示的标志 --open 和--hot分别执行以下操作:
- automatically open the app in the browser after the server starts 服务器启动后自动在浏览器中打开应用程序
- automatically reload the app in the browser whenever there’s a change in the server code伺服器程式码发生变更时,会自动在浏览器中重新载入应用程式
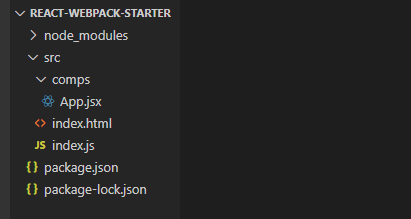
So far, we have the following in our project folder-
到目前为止,我们的项目文件夹中包含以下内容:
Now let’s configure webpack by creating a file webpack.config.js at the root of the folder. Add the following stuff into it-
现在,通过在文件夹的根目录下创建文件webpack.config.js来配置webpack。 在其中添加以下内容-
module.exports = {
  entry: {
    index: './src/index.js'
  },
  output: {
    path: __dirname + '/build',
    filename: 'index.bundle.js'
  }
}
Everything inside module.exports is exported as the configuration for webpack.
module.exports内部的module.exports都将作为webpack的配置导出。
a. entry: Here we specify the file(s) that webpack should look for to start the bundling process.
一种。 entry :在此处,我们指定webpack开始捆绑过程应寻找的文件。
b. output: The directory where the bundled file(s) will be placed. In our case, we have just a single entry-point named index, and so the output should also generate a single bundled file (index.bundle.js). Let’s see its properties-
b。 output :将放置捆绑文件的目录。 在我们的例子中,我们只是一个单一的入口点命名的index ,所以产量也应该产生一个捆绑的文件(index.bundle.js)。 让我们看看它的属性-
path: The path to output directory.path:输出目录的路径。(
(
__dirname[current working path, i.e. the root directory] +/build).__dirname[当前工作路径,即 根目录] +/build)。filename: The name of the bundled file. (index.bundle.js)filename:捆绑文件的名称。 ( index.bundle.js )
Now install the html-webpack-plugin, which will pick up src/index.html, and create an html file in the build folder, placing the same content as in src/index.html.
现在安装html-webpack-plugin ,它将选择src / index.html并创建一个html 文件放在build文件夹中,放置与src / index.html中相同的内容。
npm install --save-dev html-webpack-pluginAdd the highlighted code to webpack.config.js-
添加突出显示的代码 到webpack.config.js-
const HTMLWebpackPlugin = require('html-webpack-plugin');module.exports = {
  entry: {
    index: './src/index.js'
  },
  output: {
    path: __dirname + '/build',
    filename: 'index.bundle.js'
  },
  plugins: [
    new HTMLWebpackPlugin({
      template: './src/index.html'
    })
  ]
}
All it does is-
它所做的就是-
require the
html-webpack-plugin需要
html-webpack-pluginadd, to the
pluginsarray, a new plugin namedHTMLWebpackPlugin, and pass to it the source file that will be used as a template to create new html file in the build directory.添加到
plugins阵列,一个名为新插件HTMLWebpackPlugin,并通过它,将被用作模板来创建生成目录中新HTML文件的源文件。
Now we’re ready to tackle Babel and React/JSX.
现在我们准备解决Babel和React / JSX了。
极品通天塔 (Need for Babel)
Babel is a JavaScript compiler which basically transforms modern-day JavaScript code into backwards compatible version of it. It can also transform JSX and React. And that’s what we need!
Babel是一个JavaScript编译器,基本上可以将现代JavaScript代码转换为向后兼容的版本。 它还可以转换JSX和React 。 这就是我们所需要的!
Here are the dependencies/libraries we need to implement Babel-
这里有依赖性/库,我们需要实现Babel-
@babel/core: It’s the core library for Babel.
@ babel / core:这是Babel的核心库。
@babel/preset-env: This preset is a collection of babel plugins to transform modern JavaScript code, depending on the environment/target-browser we specify in the configuration.
@ babel / preset-env:此预设是babel插件的集合,用于转换现代JavaScript代码,具体取决于我们在配置中指定的环境/目标浏览器。
@babel/preset-react: This preset is the one that transforms the JSX syntax into actual JavaScript code we need.
@ babel / preset-react:此预设是将JSX语法转换为我们所需的实际JavaScript代码的预设。
babel-loader: This one should’ve been mentioned before the rest of dependencies above. A loader acts as a pre-processor for specific file-types. In short, if we want to use the three things above, we must have the babel-loader so that it can pre-process the specific file-types (in this case, js/jsx) before Webpack can work further.
babel-loader:应该在上面的其余依赖项之前提到这一点。 加载程序充当特定文件类型的预处理程序。 简而言之,如果要使用上述三件事,则必须具有babel-loader,以便它可以预处理特定的文件类型(在本例中为js / jsx ),然后Webpack才能进一步工作。
3.设置Babel (3. Setup Babel)
Hit the following command with --save-dev flag as previous-
用--save-dev标志作为前一个命中以下命令
npm install --save-dev babel-loader @babel/core @babel/preset-env @babel/preset-reactAdd the highlighted code to webpack.config.js-
将突出显示的代码添加到webpack.config.js-
const HTMLWebpackPlugin = require('html-webpack-plugin');module.exports = {
  entry: {
    index: './src/index.js'
  },
  output: {
    path: __dirname + '/build',
    filename: 'index.bundle.js'
  },
  module: {
    rules: [
      {
        test: /\.js|\.jsx$/,
        exclude: /node_modules/,
        use: 'babel-loader'
      }
    ]
  },
  plugins: [
    new HTMLWebpackPlugin({
      template: './src/index.html'
    })
  ]}
The rules array is where we specify different loaders for different files. Let’s inspect its properties-
在rules数组中,我们为不同的文件指定了不同的加载器。 让我们检查一下它的属性-
test: It takes a regular expression for the file-type(s) to look for.test:它使用正则表达式来查找文件类型。exclude: As you may guess, it restricts the loader for above-mentioned file-types to not enter this directory/directories.exclude:您可能会猜到,它限制了上述文件类型的加载器不输入该目录。use: This property tells Webpack to use babel-loader for above-mentioned file-types.use:此属性告诉Webpack使用babel-loader 对于上述文件类型。
SO FAR ALL YOU SHOULD UNDERSTAND-
因此,您应该了解的一切-
Webpack looks for the entry-point (./src/index.js) when we hit
npm run start.当我们点击
npm run start时,Webpack会寻找入口点( ./src/index.js )。When it encounters a file with js/jsx extension, it looks for any corresponding loader in its configurations. If it finds one, it handles the file to that loader; else throws an error.
当遇到扩展名为js / jsx的文件时,它将在其配置中查找任何相应的加载程序。 如果找到一个,它将处理文件到那个加载器; 否则抛出错误。
After Webpack will hand index.js over to babel-loader, the babel-loader will look for its configuration. So let’s have one!
Webpack将index.js移交给babel-loader之后,babel-loader将寻找其配置。 因此,让我们来一个!
Create a new file .babelrc in the root directory of our project. Add the presets that we’re using for babel-
在我们的项目的根目录中创建一个新文件.babelrc 。 添加我们用于babel-的presets
{
  "presets": ["@babel/preset-env", "@babel/preset-react"]
}
Note: Any
loadersarray as well as apresetsarray in Webpack always works in the reverse order, i.e., in above example, @babel/preset-react will be used first to interpret the JSX code, and then @babel/preset-env will start transforming the code into backwards-compatible version.注意: Webpack中的任何
loaders数组和presets数组始终以相反的顺序工作,即,在上面的示例中,将首先使用@ babel / preset-react解释JSX代码,然后使用@ babel / preset-env将开始将代码转换为向后兼容的版本。
Now that our Webpack settings are able to interpret and transform the JSX code, let’s actually install the react and react-dom libraries!
现在,我们的Webpack设置可以解释和转换JSX 代码,让我们实际安装react 和 react-dom库!
npm install react react-domNote that I didn’t use --save-dev because these dependencies are used in both the development and production mode.
请注意,我没有使用--save-dev因为在开发和生产模式中都使用了这些依赖项。
Now if you run the npm run start (or npm start for short), it should start webpack-dev-server, and automatically open the app in your browser after it compiles the code.
现在,如果您运行npm run start (或简称为npm start ),它将启动webpack-dev-server ,并在编译代码后自动在浏览器中打开该应用程序。
答对了! …可是等等! (BINGO! …But Wait!)
Despite all of the above stuff, we’re still limited to not using any file-types other than js/jsx in our project because we have to specify loader(s) for each file to tell Webpack what to do with it.
尽管有上述所有内容,但我们仍然限于不使用js / jsx以外的任何文件类型 在我们的项目,因为我们必须指定加载程序(个), 每 文件 告诉Webpack怎么做。
Some commonly used loaders are: css-loader, sass-loader, url-loader, file-loader, etc. You should know how to use some of the loaders listed here.
一些常用的加载器是: css-loader,sass-loader,url-loader,file-loader等。您应该知道如何使用此处列出的某些加载器。
You can fork my git repository where it supports using sass, svg, png, jpe(g), postcss-loader with autoprefixer, file-loader, url-loader, and many more.
您可以使用sass , svg , png , jpe(g) ,具有autoprefixer的postcss-loader , file-loader , url-loader等在我支持的git存储库中进行分叉。
By now, you should have a pretty good understanding of how React and Webpack work together. Also, don’t forget to leave your feedback as it’ll help me write better than before! Thanks!
到目前为止,您应该对React和Webpack的工作方式有了很好的了解。 另外,别忘了留下您的反馈,因为它可以帮助我写得比以前更好! 谢谢!
创建react应用程序


 204
204

 被折叠的 条评论
为什么被折叠?
被折叠的 条评论
为什么被折叠?
 到【灌水乐园】发言


