


 本文介绍了如何搭建docker私有仓库,包括拉取registry镜像,启动容器并配置权限,设置http传输,以及推送和拉取镜像的步骤。
docker私有仓库搭建
第一步先拉取registry镜像。因为我们的私有仓库是基于registry镜像运行的容器的。
pengweiwei@weiweideMacBook-Pro ~ % docker pull registry
Using default tag: latest
latest: Pulling from library/registry
c87736221ed0: Pull complete
1cc8e0bb44df: Pull complete
54d33bcb37f5: Pull complete
e8afc091c171: Pull complete
b4541f6d3db6: Pull complete
Digest: sha256:8004747f1e8cd820a148fb7499d71a76d45ff66bac6a29129bfdbfdc0154d146
Status: Downloaded newer image for registry:latest
然后启动容器,查看
pengweiwei@weiweideMacBook-Pro ~ % docker run -d --name=registry -p 5000:5000  --privileged=true registry
fa142778e71b122322d835079376c12da750095c7db7cb99813e68dade5489fc
pengweiwei@weiweideMacBook-Pro Downloads % docker ps
CONTAINER ID        IMAGE               COMMAND                  CREATED             STATUS              PORTS                    NAMES
fa142778e71b        registry            "/entrypoint.sh /etc…"   7 seconds ago       Up 6 seconds        0.0.0.0:5000->5000/tcp   registry
这个 --privileged=true参数很重要如果不加的话会上传镜像的时候,上传不上去,导致这个问题的原因是,权限不够,需要给这个容器扩展的特权。
可以看到registry已经启动了,并且本地5000端口对应了容器的5000端口。通过浏览器输入http://localhost:5000/v2/_catalog或者终端利用curl查看仓库内容。
pengweiwei@weiweideMacBook-Pro Downloads % curl http://localhost:5000/v2/_catalog
{"repositories":[]}
可以看到仓库为空。接下来需要配置一下http传输,因为私服默认的使用https。
找到安装的docker目录下有个daemon.json文件。在json的body里加上"insecure-registries":[192.168.1.16:5000]
这里的ip就是你私服的ip。这里是我本地的。
mac和windows用户可以打开设置。
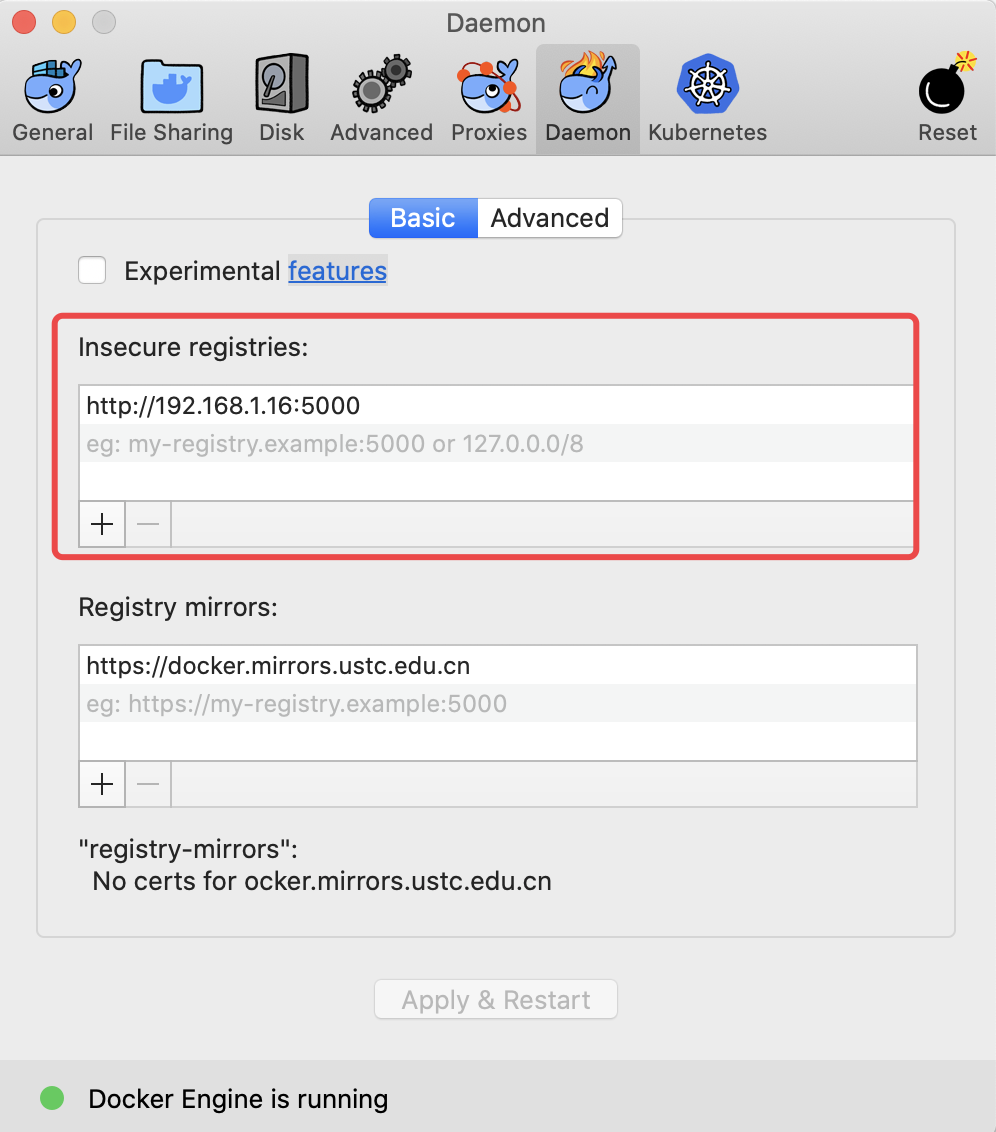
然后点击Apply。docker会自动重启。
接下来往私服推镜像。
先打上标签,表明这个镜像是属于我们私服的。
pengweiwei@weiweideMacBook-Pro Downloads % docker tag hello-world 192.168.1.16:5000/hello:1.0
pengweiwei@weiweideMacBook-Pro Downloads %
查看一下镜像。
pengweiwei@weiweideMacBook-Pro Downloads % docker images
REPOSITORY                TAG                 IMAGE ID            CREATED             SIZE
registry                  latest              f32a97de94e1        9 months ago        25.8MB
hello-world               latest              fce289e99eb9        11 months ago       1.84kB
192.168.1.16:5000/hello   1.0                 fce289e99eb9        11 months ago       1.84kB
然后push 最下面那个。
pengweiwei@weiweideMacBook-Pro ~ % docker push 192.168.1.16:5000/hello:1.0
The push refers to repository [192.168.1.16:5000/hello]
af0b15c8625b: Pushed
1.0: digest: sha256:92c7f9c92844bbbb5d0a101b22f7c2a7949e40f8ea90c8b3bc396879d95e899a size: 524
查看私服镜像。
pengweiwei@weiweideMacBook-Pro ~ % curl http://localhost:5000/v2/_catalog
{"repositories":["hello"]}
可以看到,已经上传成功了。删掉本地的hello-world镜像。查看一下。
pengweiwei@weiweideMacBook-Pro ~ % docker images
REPOSITORY          TAG                 IMAGE ID            CREATED             SIZE
registry            latest              f32a97de94e1        9 months ago        25.8MB
从私服再把hello拉下来。
pengweiwei@weiweideMacBook-Pro ~ % docker pull 192.168.1.16:5000/hello:1.0
1.0: Pulling from hello
1b930d010525: Pull complete
Digest: sha256:92c7f9c92844bbbb5d0a101b22f7c2a7949e40f8ea90c8b3bc396879d95e899a
Status: Downloaded newer image for 192.168.1.16:5000/hello:1.0
查看一下。
pengweiwei@weiweideMacBook-Pro ~ % docker images
REPOSITORY                TAG                 IMAGE ID            CREATED             SIZE
registry                  latest              f32a97de94e1        9 months ago        25.8MB
192.168.1.16:5000/hello   1.0                 fce289e99eb9        11 months ago       1.84kB
可以看到已经拉取成功了。


 591
591

 被折叠的 条评论
为什么被折叠?
被折叠的 条评论
为什么被折叠?
 到【灌水乐园】发言


