


 本文介绍了如何在Springcloud架构中结合Oauth2实现微服务的鉴权认证。详细讲解了Oauth2的四种授权模式,并重点讨论了在密码模式、授权码模式、简化模式和客户端模式的应用场景。文章还提供了基于JWT的实现步骤,包括环境配置、代码结构、鉴权中心和资源服务器的配置,并展示了关键代码示例。最后,通过接口测试展示了获取和使用token的流程。
微服务玩了这么久了,相信每个公司系统体系都有自己的微服务架构,包括网关、鉴权认证、权限管控、资源请求、日志管理等等。
但今天讲的是鉴权认证这两块,比较流行的一个认证方案:Oauth2,这个现在在大城市都比较流行。但其实际应用的都还是比较老的框架,Spring Security等。今天要讲的是结合Springcloud,来作微服务的架构的核心功能。
前言
Oauth2的四种授权模式
Resource Owner Password Credentials(密码模式):client获取用户提交的用户名和密码,之后向认证服务器获取访问令牌;
Authorization Code(授权码模式):客户端先将用户导向认证服务器,登录后获取授权码,然后进行授权,最后根据授权码获取访问令牌;
Implicit(简化模式):和授权码模式相比,取消了获取授权码的过程,直接获取访问令牌;
Client Credentials(客户端模式):客户端直接通过客户端认证(比如client_id和client_secret)从认证服务器获取访问令牌。
应用场景
密码模式主要用在比较信任的用户场景,比如是用户操作系统的一部分。
授权码模式是最常见的一种授权模式,在oauth2.0内是最安全和最完善的。适用于所有有Server端的应用,如Web站点、有Server端的APP。
简化模式适用于如手机/桌面客户端程序、浏览器插件,或是基于JS等脚本语言实现的应用。
客户端模式应用于APP想要以自己的名义与授权服务以及资源服务进行互动。
下面主要介绍基于JWT,结合Springcloud的Oauth2:
环境
ubuntu16.04
docker18.04
k8s1.13.x +
maven3.5.3
java1.8 +
springboot 2.1.8
代码结构:
— cas-server #鉴权中心
— admin-web #后台管理服务
— order-service #订单服务
鉴权中心:
配入依赖:
<parent>
        <groupId>org.springframework.boot</groupId>
        <artifactId>spring-boot-starter-parent</artifactId>
        <version>2.1.8.RELEASE</version>
        <relativePath/>
    </parent>


  <properties>
    <project.build.sourceEncoding>UTF-8</project.build.sourceEncoding>
    <project.reporting.outputEncoding>UTF-8</project.reporting.outputEncoding>
    <java.version>1.8</java.version>
    <swagger.version>2.6.1</swagger.version>
    <xstream.version>1.4.7</xstream.version>
    <pageHelper.version>4.1.6</pageHelper.version>
    <fastjson.version>1.2.51</fastjson.version>
    <springcloud.version>Greenwich.SR4</springcloud.version>
    <springcloud.kubernetes.version>1.1.1.RELEASE</springcloud.kubernetes.version>
    <mysql.version>5.1.46</mysql.version>
  </properties>


  <dependencyManagement>
    <dependencies>
      <dependency>
        <groupId>org.springframework.cloud</groupId>
        <artifactId>spring-cloud-dependencies</artifactId>
        <version>${springcloud.version}</version>
        <type>pom</type>
        <scope>import</scope>
      </dependency>
    </dependencies>
  </dependencyManagement>

  <dependencies>
      <dependency>
      <groupId>org.springframework.boot</groupId>
      <artifactId>spring-boot-starter-web</artifactId>
      <exclusions>
        <exclusion>
          <groupId>org.springframework.boot</groupId>
          <artifactId>spring-boot-starter-tomcat</artifactId>
        </exclusion>
      </exclusions>
    </dependency>
    <dependency>
      <groupId>org.springframework.boot</groupId>
      <artifactId>spring-boot-starter-undertow</artifactId>
    </dependency>

        <dependency>
            <groupId>org.springframework.cloud</groupId>
            <artifactId>spring-cloud-starter-oauth2</artifactId>
        </dependency>
        <!-- spring-cloud-starter-oauth2包含了 spring-cloud-starter-security -->
        <!-- <dependency>
            <groupId>org.springframework.cloud</groupId>
            <artifactId>spring-cloud-starter-security</artifactId>
        </dependency> -->

        <dependency>
        <groupId>org.springframework.boot</groupId>
        <artifactId>spring-boot-starter-actuator</artifactId>
    </dependency>

        <dependency>
            <groupId>org.springframework.boot</groupId>
            <artifactId>spring-boot-starter-test</artifactId>
            <scope>test</scope>
        </dependency>

        <dependency>
            <groupId>io.jsonwebtoken</groupId>
            <artifactId>jjwt</artifactId>
            <version>0.9.0</version>
        </dependency>
        <dependency>
            <groupId>cn.hutool</groupId>
            <artifactId>hutool-all</artifactId>
            <version>4.6.3</version>
        </dependency>

        <dependency>
            <groupId>com.google.guava</groupId>
            <artifactId>guava</artifactId>
            <version>19.0</version>
        </dependency>

        <dependency>
        <groupId>org.apache.commons</groupId>
        <artifactId>commons-lang3</artifactId>
        </dependency>


    <dependency>
        <groupId>commons-collections</groupId>
        <artifactId>commons-collections</artifactId>
        <version>3.2.2</version>
    </dependency>


    <!-- swagger -->
    <dependency>
      <groupId>io.springfox</groupId>
      <artifactId>springfox-swagger2</artifactId>
      <version>${swagger.version}</version>
    </dependency>
    <dependency>
      <groupId>io.springfox</groupId>
      <artifactId>springfox-swagger-ui</artifactId>
      <version>${swagger.version}</version>
    </dependency>


    <!--分页插件-->
      <dependency>
        <groupId>com.github.pagehelper</groupId>
        <artifactId>pagehelper</artifactId>
        <version>${pageHelper.version}</version>
      </dependency>


    <!-- mybatis -->
        <dependency>
            <groupId>org.mybatis.spring.boot</groupId>
            <artifactId>mybatis-spring-boot-starter</artifactId>
            <version>1.1.1</version>
        </dependency>
        <dependency>
      <groupId>mysql</groupId>
      <artifactId>mysql-connector-java</artifactId>
      <version>${mysql.version}</version>
    </dependency>

        <!-- datasource pool-->
        <dependency>
            <groupId>com.alibaba</groupId>
            <artifactId>druid</artifactId>
            <version>1.1.3</version>
        </dependency>

        <!-- 对redis支持,引入的话项目缓存就支持redis了,所以必须加上redis的相关配置,否则操作相关缓存会报异常 -->
    <dependency>
      <groupId>org.springframework.boot</groupId>
      <artifactId>spring-boot-starter-data-redis</artifactId>
    </dependency>


    <dependency>
      <groupId>com.alibaba</groupId>
      <artifactId>fastjson</artifactId>
      <version>${fastjson.version}</version>
    </dependency>


    <dependency>
      <groupId>org.jsoup</groupId>
      <artifactId>jsoup</artifactId>
      <version>1.11.3</version>
    </dependency>


    </dependencies>
配置文件:bootstrap.yaml
management:
  endpoint:
    restart:
      enabled: true
    health:
      enabled: true
    info:
      enabled: true


spring:
  application:
    name: cas-server
  #redis: #redis相关配置
    #database: 8
    #host: localhost
    #port: 6379
    #password:  #有密码时设置
    #jedis:
      #pool:
        #max-active: 8
        #max-idle: 8
        #min-idle: 0
    #timeout: 10000ms


  http:
    encoding:
      charset: UTF-8
      enabled: true
      force: true
  mvc:
    throw-exception-if-no-handler-found: true
  main:
    allow-bean-definition-overriding: true # 当遇到同样名称时,是否允许覆盖注册
application.yaml:
server:
  port: 2000
  undertow:
    accesslog:
      enabled: false
      pattern: combined
  servlet:
    session:
      timeout: PT120M

logging:
  path: /data/${spring.application.name}/logs


#sso_redirect_urls: http://localhost:2001/login,http://localhost:2003/login


client:
  http:
    request:
      connectTimeout: 8000
      readTimeout: 30000

mybatis:
  mapperLocations: classpath:mapper/*.xml
  typeAliasesPackage: com.damon.*.model
然后新建启动类:
package com.damon;


import org.springframework.boot.SpringApplication;
import org.springframework.boot.autoconfigure.EnableAutoConfiguration;
import org.springframework.context.annotation.ComponentScan;
import org.springframework.context.annotation.Configuration;


/**
 *
 * 配置最多的就是认证服务端,验证账号、密码,存储 token,检查 token ,刷新 token 等都是认证服务端的工作
 * @author Damon
 * @date 2020年1月13日 下午9:29:42
 *
 */
@Configuration
@EnableAutoConfiguration
@ComponentScan(basePackages = {"com.damon"})
//@SpringBootApplication(scanBasePackages = { "com.damon" })
public class CasApp {
  public static void main(String[] args) {
    SpringApplication.run(CasApp.class, args);
  }
}
认证服务器配置:
package com.damon.config;


import java.util.ArrayList;
import java.util.List;


import javax.sql.DataSource;


import org.springframework.beans.factory.annotation.Autowired;
import org.springframework.beans.factory.annotation.Qualifier;
import org.springframework.context.annotation.Configuration;
import org.springframework.core.env.Environment;
import org.springframework.security.authentication.AuthenticationManager;
import org.springframework.security.crypto.password.PasswordEncoder;
import org.springframework.security.oauth2.config.annotation.configurers.ClientDetailsServiceConfigurer;
import org.springframework.security.oauth2.config.annotation.web.configuration.AuthorizationServerConfigurerAdapter;
import org.springframework.security.oauth2.config.annotation.web.configuration.EnableAuthorizationServer;
import org.springframework.security.oauth2.config.annotation.web.configurers.AuthorizationServerEndpointsConfigurer;
import org.springframework.security.oauth2.config.annotation.web.configurers.AuthorizationServerSecurityConfigurer;
import org.springframework.security.oauth2.provider.token.TokenEnhancer;
import org.springframework.security.oauth2.provider.token.TokenEnhancerChain;
import org.springframework.security.oauth2.provider.token.TokenStore;
import org.springframework.security.oauth2.provider.token.store.JwtAccessTokenConverter;


import com.damon.component.JwtTokenEnhancer;
import com.damon.login.service.LoginService;


/**
 *
 * 认证服务器配置
 * @author Damon
 * @date 2020年1月13日 下午9:03:30
 *
 */
@Configuration
@EnableAuthorizationServer
public class AuthorizationServerConfig extends AuthorizationServerConfigurerAdapter {


    @Autowired
    private PasswordEncoder passwordEncoder;


    @Autowired
    private AuthenticationManager authenticationManager;


    @Autowired
    private LoginService loginService;


    @Autowired
    @Qualifier("jwtTokenStore")
    private TokenStore tokenStore;
    @Autowired
    private JwtAccessTokenConverter jwtAccessTokenConverter;
    @Autowired
    private JwtTokenEnhancer jwtTokenEnhancer;

    @Autowired
    private Environment env;


    @Autowired
    private DataSource dataSource;


    /**
     * 使用密码模式需要配置
     */
    @Override
    public void configure(AuthorizationServerEndpointsConfigurer endpoints) {
        TokenEnhancerChain enhancerChain = new TokenEnhancerChain();
        List<TokenEnhancer> delegates = new ArrayList<>();
        delegates.add(jwtTokenEnhancer); //配置JWT的内容增强器
        delegates.add(jwtAccessTokenConverter);
        enhancerChain.setTokenEnhancers(delegates);
        endpoints.authenticationManager(authenticationManager)//支持 password 模式
                .userDetailsService(loginService)
                .tokenStore(tokenStore) //配置令牌存储策略
                .accessTokenConverter(jwtAccessTokenConverter)
                .tokenEnhancer(enhancerChain);
    }

    /**
     * redis token 方式
     */
    /*@Override
    public void configure(AuthorizationServerEndpointsConfigurer endpoints) throws Exception {
        endpoints.authenticationManager(authenticationManager) //支持 password 模式
                .userDetailsService(loginService)
                .tokenStore(tokenStore);


    }*/


    /**
     * 客户端配置(给谁发令牌)
     * 不同客户端配置不同
     *
     * authorizedGrantTypes 可以包括如下几种设置中的一种或多种:
      authorization_code:授权码类型。需要redirect_uri
      implicit:隐式授权类型。需要redirect_uri
      password:资源所有者(即用户)密码类型。
      client_credentials:客户端凭据(客户端ID以及Key)类型。
      refresh_token:通过以上授权获得的刷新令牌来获取新的令牌。

     accessTokenValiditySeconds:token 的有效期
     scopes:用来限制客户端访问的权限,在换取的 token 的时候会带上 scope 参数,只有在 scopes 定义内的,才可以正常换取 token。
     * @param clients
     * @throws Exception
     * @author Damon
     * @date 2020年1月13日
     *
     */
    @Override
    public void configure(ClientDetailsServiceConfigurer clients) throws Exception {
        clients.inMemory()
                .withClient("admin-web")
                .secret(passwordEncoder.encode("admin-web-123"))
                .accessTokenValiditySeconds(3600)
                .refreshTokenValiditySeconds(864000)//配置刷新token的有效期
                .autoApprove(true) //自动授权配置
                .scopes("all")//配置申请的权限范围
                .authorizedGrantTypes("password", "authorization_code", "client_credentials", "refresh_token")//配置授权模式
                .redirectUris("http://localhost:2001/login")//授权码模式开启后必须指定
                .and()
                .withClient("order-service")
                .secret(passwordEncoder.encode("order-service-123"))
                .accessTokenValiditySeconds(3600)
                .refreshTokenValiditySeconds(864000)//配置刷新token的有效期
                .autoApprove(true) //自动授权配置
                .scopes("all")
                .authorizedGrantTypes("password", "authorization_code", "client_credentials", "refresh_token")//配置授权模式
                .redirectUris("http://localhost:2003/login")//授权码模式开启后必须指定
                //.authorizedGrantTypes("authorization_code", "password", "refresh_token")//配置授权模式:authorization_code授权码模式、密码模式
                ;
    }
    @Override
    public void configure(AuthorizationServerSecurityConfigurer security) {
      security.allowFormAuthenticationForClients();//是允许客户端访问 OAuth2 授权接口,否则请求 token 会返回 401
      security.checkTokenAccess("isAuthenticated()");//是允许已授权用户访问 checkToken 接口
        security.tokenKeyAccess("isAuthenticated()"); // security.tokenKeyAccess("permitAll()");获取密钥需要身份认证,使用单点登录时必须配置,是允许已授权用户获取 token 接口
    }
}
Spring WEBSecurity配置:
package com.damon.config;


import org.springframework.context.annotation.Bean;
import org.springframework.context.annotation.Configuration;
import org.springframework.security.authentication.AuthenticationManager;
import org.springframework.security.config.annotation.authentication.builders.AuthenticationManagerBuilder;
import org.springframework.security.config.annotation.web.builders.HttpSecurity;
import org.springframework.security.config.annotation.web.builders.WebSecurity;
import org.springframework.security.config.annotation.web.configuration.EnableWebSecurity;
import org.springframework.security.config.annotation.web.configuration.WebSecurityConfigurerAdapter;
import org.springframework.security.crypto.bcrypt.BCryptPasswordEncoder;
import org.springframework.security.crypto.password.PasswordEncoder;


/**
 *
 * SpringSecurity配置
 * @author Damon
 * @date 2020年1月13日 下午9:03:55
 *
 */
@Configuration
@EnableWebSecurity
public class SecurityConfig extends WebSecurityConfigurerAdapter {


    @Bean
    public PasswordEncoder passwordEncoder() {
        return new BCryptPasswordEncoder();
    }


    @Bean
    @Override
    public AuthenticationManager authenticationManagerBean() throws Exception {
        return super.authenticationManagerBean();
    }


    @Override
    public void configure(HttpSecurity http) throws Exception {
        http.csrf()
                .disable()
                .authorizeRequests()
                .antMatchers("/oauth/**", "/login/**")//"/logout/**"
                .permitAll()
                .anyRequest()
                .authenticated()
                .and()
                .formLogin()
                .permitAll();
    }

    @Override
    public void configure(WebSecurity web) throws Exception {
        web.ignoring().antMatchers("/css/**", "/js/**", "/plugins/**", "/favicon.ico");
    }
}
资源服务器配置:
package com.damon.config;


import org.springframework.beans.factory.annotation.Autowired;
import org.springframework.context.annotation.Configuration;
import org.springframework.security.config.annotation.web.builders.HttpSecurity;
import org.springframework.security.oauth2.config.annotation.web.configuration.EnableResourceServer;
import org.springframework.security.oauth2.config.annotation.web.configuration.ResourceServerConfigurerAdapter;


/**
 *
 * 资源服务器配置
 * @author Damon
 * @date 2020年1月13日 下午9:03:48
 *
 */
@Configuration
@EnableResourceServer
public class ResourceServerConfig extends ResourceServerConfigurerAdapter {
    @Override
    public void configure(HttpSecurity http) throws Exception {
        http.authorizeRequests()
                .anyRequest()
                .authenticated()
                .and()
                .requestMatchers()
                .antMatchers("/api/**");//配置需要保护的资源路径
                //.antMatchers("/user/**");//配置需要保护的资源路径
    }
}
本次开启了JWT存储token的方式,故,需要加入配置:
package com.damon.config;


import org.springframework.context.annotation.Bean;
import org.springframework.context.annotation.Configuration;
import org.springframework.context.annotation.Primary;
import org.springframework.security.oauth2.provider.token.TokenStore;
import org.springframework.security.oauth2.provider.token.store.JwtAccessTokenConverter;
import org.springframework.security.oauth2.provider.token.store.JwtTokenStore;


import com.damon.component.JwtTokenEnhancer;


/**
 *
 * 使用Jwt存储token的配置
 * @author Damon
 * @date 2020年1月13日 下午9:03:38
 *
 */


@Configuration
public class JwtTokenStoreConfig {


  @Bean
    public TokenStore jwtTokenStore() {
        return new JwtTokenStore(jwtAccessTokenConverter());
    }


    @Bean
    public JwtAccessTokenConverter jwtAccessTokenConverter() {
        JwtAccessTokenConverter accessTokenConverter = new JwtAccessTokenConverter();
        accessTokenConverter.setSigningKey("test_jwt_sign_key");//配置JWT使用的秘钥
        return accessTokenConverter;
    }


    @Bean
    public JwtTokenEnhancer jwtTokenEnhancer() {
        return new JwtTokenEnhancer();
    }
}
Jwt内容增强器:
package com.damon.component;


import org.springframework.security.oauth2.common.DefaultOAuth2AccessToken;
import org.springframework.security.oauth2.common.OAuth2AccessToken;
import org.springframework.security.oauth2.provider.OAuth2Authentication;
import org.springframework.security.oauth2.provider.token.TokenEnhancer;


import java.util.HashMap;
import java.util.Map;


/**
 * Jwt内容增强器
 * @author Damon
 * @date 2020年1月13日 下午9:04:43
 *
 */
public class JwtTokenEnhancer implements TokenEnhancer {
    @Override
    public OAuth2AccessToken enhance(OAuth2AccessToken accessToken, OAuth2Authentication authentication) {
        Map<String, Object> info = new HashMap<>();
        info.put("jwt-enhance", "jwt enhance info");
        ((DefaultOAuth2AccessToken) accessToken).setAdditionalInformation(info);
        return accessToken;
    }
}
到目前为止,主要代码已经贴出来了,如果需要加数据库等,自己可根据需要添加,此处代码不贴了。
接下来看认证主要逻辑:
package com.damon.login.service.impl;


import java.util.List;


import javax.servlet.http.HttpServletRequest;
import javax.servlet.http.HttpServletResponse;


import org.apache.commons.lang3.StringUtils;
import org.slf4j.Logger;
import org.slf4j.LoggerFactory;
import org.springframework.beans.factory.annotation.Autowired;
import org.springframework.security.core.authority.SimpleGrantedAuthority;
import org.springframework.security.core.userdetails.User;
import org.springframework.security.core.userdetails.UserDetails;
import org.springframework.security.core.userdetails.UsernameNotFoundException;
import org.springframework.security.crypto.password.PasswordEncoder;
import org.springframework.security.oauth2.common.OAuth2AccessToken;
import org.springframework.security.oauth2.provider.token.ConsumerTokenServices;
import org.springframework.stereotype.Service;


import com.damon.commons.Response;
import com.damon.constant.Constant;
import com.damon.constant.LoginEnum;
import com.damon.login.dao.UserMapper;
import com.damon.login.model.SysUser;
import com.damon.login.service.LoginService;
import com.damon.utils.IpUtil;
import com.google.common.collect.Lists;


/**
 * @author wangshoufa
 * @date 2018年11月15日 下午12:01:53
 *
 */
@Service
public class LoginServiceImpl implements LoginService {


  Logger logger = LoggerFactory.getLogger(LoginServiceImpl.class);

  @Autowired
    private PasswordEncoder passwordEncoder;

    @Autowired
  private UserMapper userMapper;

    @Autowired
    private HttpServletRequest req;

    /**
     * Auth
     * 登录认证
     * 实际中从数据库获取信息
     * 这里为了做演示,把用户名、密码和所属角色都写在代码里了,正式环境中,这里应该是从数据库或者其他地方根据用户名将加密后的密码及所属角色查出来的。账号 damon ,
     * 密码123456,稍后在换取 token 的时候会用到。并且给这个用户设置 "ROLE_ADMIN" 角色。
     *
     */
    @Override
  public UserDetails loadUserByUsername(String username) throws UsernameNotFoundException {
      logger.info("clientIp is: {} ,username: {}", IpUtil.getClientIp(req), username);
    logger.info("serverIp is: {}", IpUtil.getCurrentIp());
    // 查询数据库操作
    SysUser user = userMapper.getUserByUsername(username);
    if (user == null) {
      logger.error("user not exist");
      throw new UsernameNotFoundException("username is not exist");
      //throw new UsernameNotFoundException("the user is not found");
    }
    else {
      // 用户角色也应在数据库中获取,这里简化
      String role = "";
      if(user.getIsAdmin() == 1) {
        role = "admin";
      }
      List<SimpleGrantedAuthority> authorities = Lists.newArrayList();
      authorities.add(new SimpleGrantedAuthority(role));
      //String password = passwordEncoder.encode("123456");// 123456是密码
      //return new User(username, password, authorities);
      // 线上环境应该通过用户名查询数据库获取加密后的密码
      return new User(username, user.getPassword(), authorities);
    }
  }


  @Override
  public Response<Object> login(String username, String password) {
    // TODO Auto-generated method stub
    return null;
  }


  @Override
  public Response<Object> verify(HttpServletRequest request, String token) {
    // TODO Auto-generated method stub
    return null;
  }


  @Override
  public Response<Object> updatePwd(HttpServletRequest req, String username, String oldPwd, String newPwd) {
    // TODO Auto-generated method stub
    return null;
  }
}
此类中 loadUserByUsername 方法实现了认证过程。
写个接口测试类:
package com.damon.login.controller;


import java.nio.charset.StandardCharsets;


import javax.servlet.http.HttpServletRequest;
import javax.servlet.http.HttpServletResponse;


import org.apache.commons.lang3.StringUtils;
import org.slf4j.Logger;
import org.slf4j.LoggerFactory;
import org.springframework.beans.factory.annotation.Autowired;
import org.springframework.security.core.Authentication;
import org.springframework.security.oauth2.provider.token.ConsumerTokenServices;
import org.springframework.web.bind.annotation.GetMapping;
import org.springframework.web.bind.annotation.RequestMapping;
import org.springframework.web.bind.annotation.RestController;


import com.damon.commons.Response;
import com.damon.constant.Constant;
import com.damon.constant.LoginEnum;
import com.damon.utils.IpUtil;


import cn.hutool.core.util.StrUtil;


import com.damon.login.service.LoginService;


import io.jsonwebtoken.Jwts;
import io.swagger.annotations.Api;
import io.swagger.annotations.ApiOperation;


/**
 *
 * @author Damon
 * @date 2020年1月13日 下午9:35:16
 *
 */
@RestController
@RequestMapping("/api")
@Api(value = "LoginController", description = "登录")
public class LoginController {

  private static final Logger logger = LoggerFactory.getLogger(LoginController.class);


  @Autowired
  private LoginService loginService;

  @Autowired
    private ConsumerTokenServices consumerTokenServices;

    @GetMapping("/getCurrentUser")
    public Object getCurrentUser(Authentication authentication, HttpServletRequest request) {
      logger.debug("start ...");
        String header = request.getHeader("Authorization");
        String token = StrUtil.subAfter(header, "bearer ", false);
        return Jwts.parser()
                .setSigningKey("test_jwt_sign_key".getBytes(StandardCharsets.UTF_8))
                .parseClaimsJws(token)
                .getBody();
    }
}
接下来请求:
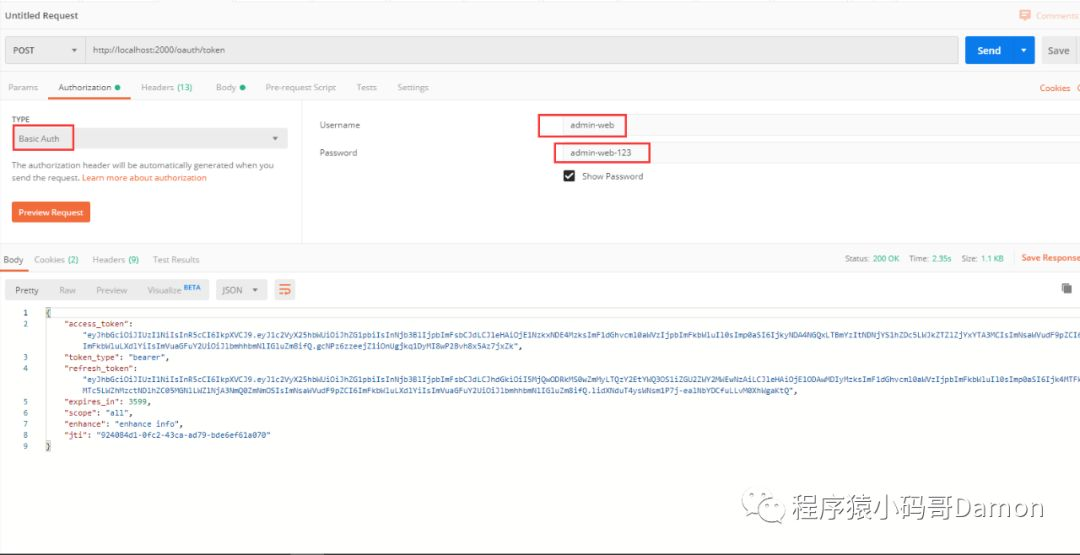
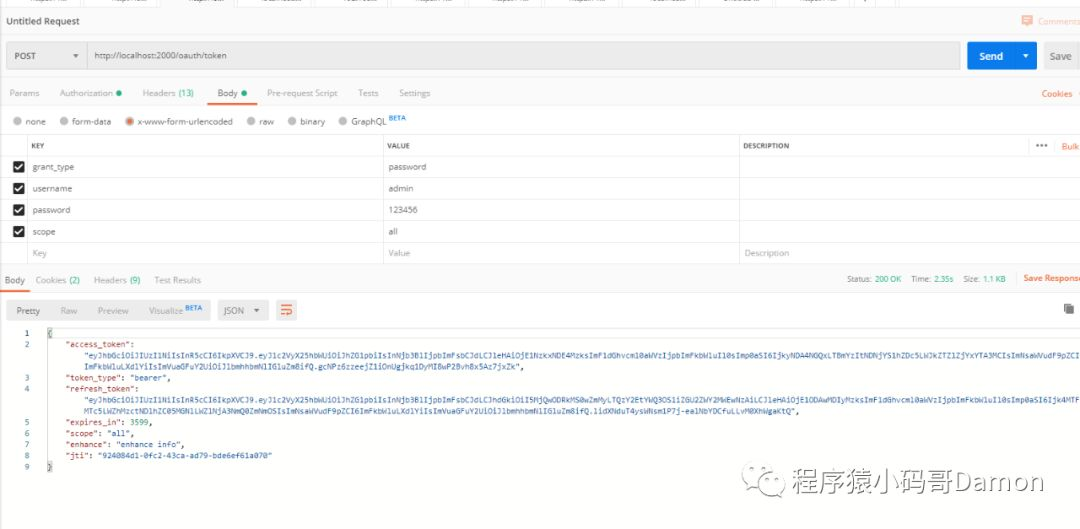
获取token令牌
curl -i -X POST -d "username=admin&password=123456&grant_type=password&client_id=order-service&client_secret=order-service-123" http://localhost:2000/oauth/token
返回:HTTP/1.1 200 OK Cache-Control: no-store X-XSS-Protection: 1; mode=block Pragma: no-cache X-Frame-Options: DENY Date: Wed, 15 Jan 2020 06:06:01 GMT Connection: keep-alive X-Content-Type-Options: nosniff Transfer-Encoding: chunked Content-Type: application/json;charset=UTF-8 { "access_token": "00c3a41b-45bb-4048-8005-34c141c8508f", "token_type": "bearer", "refresh_token": "5a632d3c-22a6-42dd-9faf-f6600aaeca9e", "expires_in": 3599, "scope": "all" }OR postman:
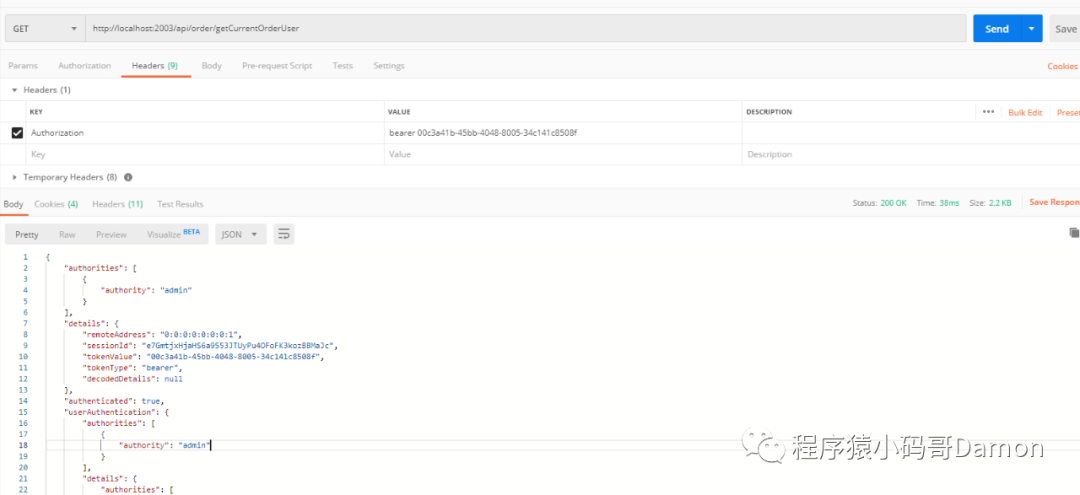
通过令牌访问资源服务器
curl -i -H "Accept: application/json" -H "Authorization:bearer 00c3a41b-45bb-4048-8005-34c141c8508f" -X GET http://localhost:2003/api/order/getCurrentOrderUserOR postman:
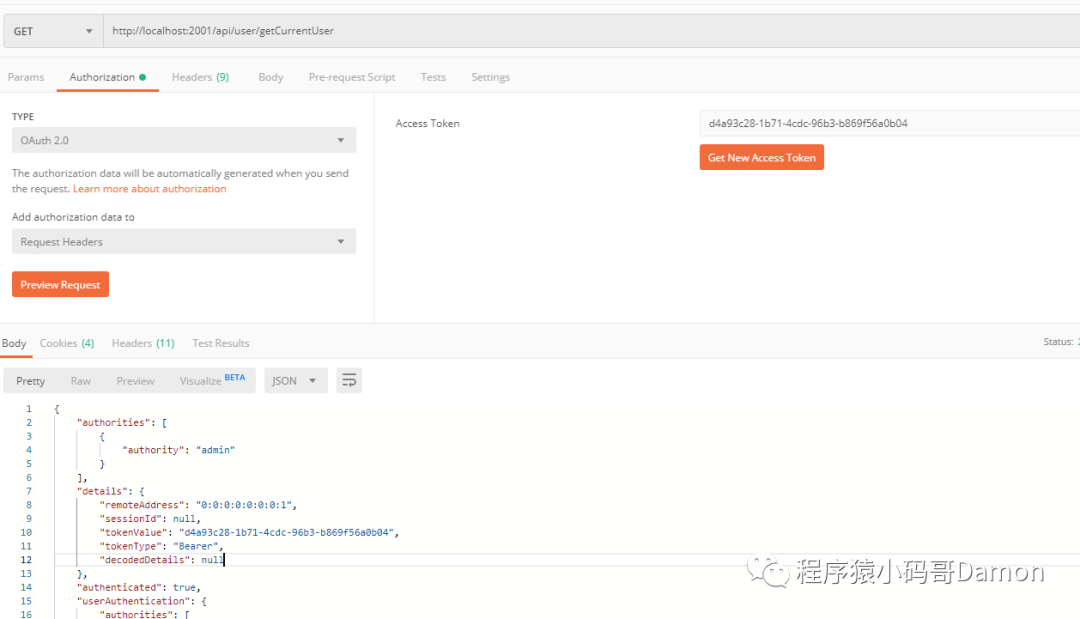
OR Bearer Token
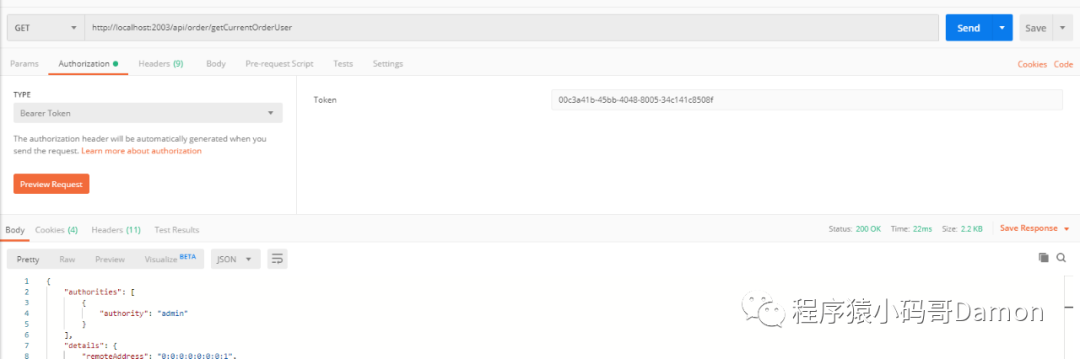
OR Header bearer token
到此,Oauth2的单点登录演示完成了,以上代码如果存在疑问,可以关注我星球或者公众号,留言咨询。


 1076
1076

 被折叠的 条评论
为什么被折叠?
被折叠的 条评论
为什么被折叠?
 到【灌水乐园】发言


