


Minio文件服务集群的搭建
一 准备工作
1、三台机器 配置 vim /etc/hosts
172.16.108.44 minio4
172.16.108.43 minio3
172.16.108.42 minio2
[root@bigdata41 es]# docker --version
Docker version 26.1.4, build 5650f9b
[root@bigdata43 minio]# docker-compose -v
-bash: docker-compose: command not found
如果没有则安装
sudo yum install docker-compose
二、编写docker-compose.yml 文件
整体目录结构如下:
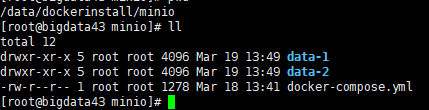
cd /data/dockerinstall 目录
[root@bigdata43 dockerinstall]# mkdir minio
sudo yum install tree 安装tree命令
1、带nginx的minio
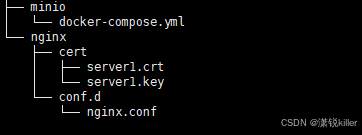
创建相关目录并上传文件
docker-compose.yml
minio3
version: "3"

services:
  minio:
    image: quay.io/minio/minio
    container_name: minio-node3
    hostname: minio3
    expose:
      - "19000"
      - "19001"
    environment:
      - MINIO_ROOT_USER=minio
      - MINIO_ROOT_PASSWORD=minio****
    volumes:
      - ./data-1:/data1
      - ./data-2:/data2
    command: server --console-address ':19001' --address ':19000' http://minio{2...4}/data{1...2}
    privileged: true
    healthcheck:
      test: ["CMD", "curl", "-f", "http://localhost:19000/minio/health/live"]
      interval: 30s
      timeout: 20s
      retries: 3
    extra_hosts:
      - minio2:172.16.108.42
      - minio3:172.16.108.43
      - minio4:172.16.108.44
    restart: always
    network_mode: host

  nginx:
    image: nginx:1.19.2-alpine
    hostname: nginx
    volumes:
      - /data/dockerinstall/nginx/conf.d/nginx.conf:/etc/nginx/nginx.conf:ro
      - /data/dockerinstall/nginx/cert/xxx.com.pem:/etc/nginx/ssl/xxx.com.pem:ro
      - /data/dockerinstall/nginx/cert/xxx.com.key:/etc/nginx/ssl/xxx.com.key:ro
    ports:
      - "9000:9090"
      - "9001:9091"
      - "443:443"
    extra_hosts:
      - minio2:172.16.108.42
      - minio3:172.16.108.43
      - minio4:172.16.108.44
    restart: always
这句话是在 Docker Compose 文件中定义的一个卷 (volume) 映射,用于将宿主机上的文件或目录挂载到容器内。具体来说,这行代码的意思是:
volumes: - 这个关键字表示后面跟着的是一个或多个卷映射。
- ./nginx.conf:/etc/nginx/nginx.conf:ro - 这是一个具体的卷映射配置,其中包含了三个部分:
./nginx.conf - 表示宿主机上的文件路径,即当前目录下的 nginx.conf 文件。
:/etc/nginx/nginx.conf - 表示容器内的文件路径,即将宿主机上的 nginx.conf 文件挂载到容器内的 /etc/nginx/nginx.conf 路径。
:ro - 表示只读权限,意味着挂载到容器内的文件只能被读取而不能被修改。
nginx.conf 文件
user nginx;  # 设置 Nginx 运行的用户为 "nginx"。
worker_processes auto;  # 自动确定工作进程的数量,通常是根据 CPU 核心数来决定。

error_log /var/log/nginx/error.log warn;  # 将错误日志记录到指定路径,并仅记录警告及以上级别的日志。
pid /var/run/nginx.pid;  # 指定 Nginx 进程 ID 文件的路径。

events {
    worker_connections 4096;  # 设置每个工作进程的最大并发连接数。
}

http {
    include /etc/nginx/mime.types;  # 包含 MIME 类型配置文件。
    default_type application/octet-stream;  # 设置默认 MIME 类型。

    log_format main '$remote_addr - $remote_user [$time_local] "$request" '  # 定义访问日志的格式。
                    '$status $body_bytes_sent "$http_referer" '
                    '"$http_user_agent" "$http_x_forwarded_for"';

    access_log /var/log/nginx/access.log main;  # 将访问日志记录到指定路径,并采用上面定义的日志格式。
    sendfile on;  # 启用高效文件传输。
    keepalive_timeout 65;  # 设置保持连接的超时时间。

    upstream adobe {  # 定义了一个名为 "adobe" 的负载均衡组,包含三个服务器。
        server minio2:19000;
        server minio3:19000;
        server minio4:19000;
    }

    upstream console {  # 定义了一个名为 "console" 的负载均衡组,同样包含三个服务器,并使用 ip_hash 进行基于 IP 的会话保持。
        ip_hash;
        server minio2:19001;
        server minio3:19001;
        server minio4:19001;
    }

    # HTTP 服务器块,用于重定向 HTTP 到 HTTPS
    server {
        listen 80;  # 监听 80 端口,用于将 HTTP 请求重定向到 HTTPS。
        server_name 172.16.108.43 file.intel.com;  # 设置服务器名称,这里是 IP 地址。

        return 301 https://$host$request_uri;  # 将 HTTP 请求重定向到 HTTPS。
    }

    # HTTPS 服务器块
    server {
        listen 443 ssl;  # 监听 443 端口,用于 SSL。
        listen [::]:443 ssl;  # 监听 IPv6 地址的 443 端口,用于 SSL。
        server_name 172.16.108.43 file.intel.com;  # 设置服务器名称,这里是 IP 地址。

        #ssl_certificate /etc/nginx/ssl/server1.crt;  # SSL 证书文件路径。
        #ssl_certificate_key /etc/nginx/ssl/server1.key;  # SSL 私钥文件路径。
        ssl_certificate /etc/nginx/ssl/zbintel.com.pem;
        ssl_certificate_key /etc/nginx/ssl/zbintel.com.key;
        ssl_session_timeout 5m;  # SSL 会话缓存的有效时间。
        ssl_protocols TLSv1 TLSv1.1 TLSv1.2;  # 支持的 SSL/TLS 版本。
        ssl_ciphers ECDHE-RSA-AES128-GCM-SHA256:HIGH:!aNULL:!MD5:!RC4:!DHE;  # 支持的加密套件。
        ssl_prefer_server_ciphers on;  # 优先使用服务器端的加密套件列表。

        # To allow special characters in headers
        ignore_invalid_headers off;  # 允许特殊字符出现在 HTTP 头中。
        # Allow any size file to be uploaded.
        # Set to a value such as 1000m; to restrict file size to a specific value
        client_max_body_size 0;  # 允许上传任意大小的文件。
        # To disable buffering
        proxy_buffering off;  # 关闭代理缓冲。
        proxy_request_buffering off;  # 不对请求体进行缓冲。

        location / {  # 定义根路径的处理规则。
            proxy_set_header Host $http_host;  # 设置 Host 头。
            proxy_set_header X-Real-IP $remote_addr;  # 设置客户端真实 IP。
            proxy_set_header X-Forwarded-For $proxy_add_x_forwarded_for;  # 设置客户端 IP 列表。
            proxy_set_header X-Forwarded-Proto $scheme;  # 设置协议类型。

            proxy_connect_timeout 300;  # 设置连接超时时间。
            # Default is HTTP/1, keepalive is only enabled in HTTP/1.1
            proxy_http_version 1.1;  # 使用 HTTP/1.1 版本。
            proxy_set_header Connection "";  # 清空 Connection 头,避免代理服务器使用 close 或者 keep-alive。

            # For WebSocket support
            proxy_set_header Upgrade $http_upgrade;  # 设置升级协议头。
            proxy_set_header Connection "upgrade";  # 设置连接类型为升级。

            chunked_transfer_encoding off;  # 禁用分块传输编码。

            proxy_pass http://adobe;  # 指定代理目标。
        }
    }

    # 另一个服务器块监听 9091 端口
    server {
        listen       9091;
        listen  [::]:9091;  # 监听 IPv6 地址的 9091 端口。
        server_name  172.16.108.43;

        # To allow special characters in headers
        ignore_invalid_headers off;  # 允许特殊字符出现在 HTTP 头中。
        # Allow any size file to be uploaded.
        # Set to a value such as 1000m; to restrict file size to a specific value
        client_max_body_size 0;  # 允许上传任意大小的文件。
        # To disable buffering
        proxy_buffering off;  # 关闭代理缓冲。
        proxy_request_buffering off;  # 不对请求体进行缓冲。

        location / {  # 定义根路径的处理规则。
            proxy_set_header Host $http_host;  # 设置 Host 头。
            proxy_set_header X-Real-IP $remote_addr;  # 设置客户端真实 IP。
            proxy_set_header X-Forwarded-For $proxy_add_x_forwarded_for;  # 设置客户端 IP 列表。
            proxy_set_header X-Forwarded-Proto $scheme;  # 设置协议类型。
            proxy_set_header X-NginX-Proxy true;  # 设置代理标识。

            # This is necessary to pass the correct IP to be hashed
            real_ip_header X-Real-IP;  # 指定使用哪个头作为真实 IP。
            proxy_connect_timeout 300;  # 设置连接超时时间。

            # To support websocket
            proxy_http_version 1.1;  # 使用 HTTP/1.1 版本。
            proxy_set_header Upgrade $http_upgrade;  # 设置升级协议头。
            proxy_set_header Connection "upgrade";  # 设置连接类型为升级。

            chunked_transfer_encoding off;  # 禁用分块传输编码。

            proxy_pass http://console;  # 指定代理目标。
        }
    }

    # 另一个服务器块监听 9090 端口
    server {
        listen       9090;
        listen  [::]:9090;  # 监听 IPv6 地址的 9090 端口。
        server_name  172.16.108.43;

        # To allow special characters in headers
        ignore_invalid_headers off;  # 允许特殊字符出现在 HTTP 头中。
        # Allow any size file to be uploaded.
        # Set to a value such as 1000m; to restrict file size to a specific value
        client_max_body_size 0;  # 允许上传任意大小的文件。
        # To disable buffering
        proxy_buffering off;  # 关闭代理缓冲。
        proxy_request_buffering off;  # 不对请求体进行缓冲。

        location / {  # 定义根路径的处理规则。
            proxy_set_header Host $http_host;  # 设置 Host 头。
            proxy_set_header X-Real-IP $remote_addr;  # 设置客户端真实 IP。
            proxy_set_header X-Forwarded-For $proxy_add_x_forwarded_for;  # 设置客户端 IP 列表。
            proxy_set_header X-Forwarded-Proto $scheme;  # 设置协议类型。

            proxy_connect_timeout 300;  # 设置连接超时时间。
            # Default is HTTP/1, keepalive is only enabled in HTTP/1.1
            proxy_http_version 1.1;  # 使用 HTTP/1.1 版本。
            proxy_set_header Connection "";  # 清空 Connection 头,避免代理服务器使用 close 或者 keep-alive。
            chunked_transfer_encoding off;  # 禁用分块传输编码。

            proxy_pass http://adobe;  # 指定代理目标。
        }
    }
}
当修改niginx.conf 文档后 想重启nginx配置时
cd /data/dockerinstall/minio
步骤 1:检查 Nginx 配置语法
在重启前,确保新配置无语法错误:
docker-compose exec nginx nginx -t

步骤 2:重启 Nginx 容器
任选以下 一种 方式重启:
方式 1:直接重启容器(短暂中断服务)
docker-compose restart nginx
方式 2:热重载配置(不中断服务)
docker-compose exec nginx nginx -s reload
![]()
步骤 3:验证配置生效
docker-compose ps
检查容器状态:

查看日志:
docker-compose logs nginx

访问服务:
通过浏览器或 curl 测试域名或 IP 是否正常响应。
----------------------------------------------------------------------------------------------------------------
1、不带nginx的minio
minio2
version: "3"
services:
  minio:
    image: quay.io/minio/minio
    container_name: minio-node2
    hostname: minio2
    expose:
      - "19000"
      - "19001"
    environment:
      - MINIO_ROOT_USER=minio
      - MINIO_ROOT_PASSWORD=minio****
    volumes:
      - ./data-1:/data1
      - ./data-2:/data2
    command: server --console-address ':19001' --address ':19000' http://minio{2...4}/data{1...2}
    privileged: true
    healthcheck:
      test: ["CMD", "curl", "-f", "http://localhost:19000/minio/health/live"]
      interval: 30s
      timeout: 20s
      retries: 3
    extra_hosts:
      - minio2:172.16.108.42
      - minio3:172.16.108.43
      - minio4:172.16.108.44
    restart: always
    network_mode: host
minio4
version: "3"
services:
  minio:
    image: quay.io/minio/minio
    container_name: minio-node4
    hostname: minio4
    expose:
      - "19000"
      - "19001"
    environment:
      - MINIO_ROOT_USER=minio
      - MINIO_ROOT_PASSWORD=minio****
    volumes:
      - ./data-1:/data1
      - ./data-2:/data2
    command: server --console-address ':19001' --address ':19000' http://minio{2...4}/data{1...2}
    privileged: true
    healthcheck:
      test: ["CMD", "curl", "-f", "http://localhost:19000/minio/health/live"]
      interval: 30s
      timeout: 20s
      retries: 3
    extra_hosts:
      - minio2:172.16.108.42
      - minio3:172.16.108.43
      - minio4:172.16.108.44
    restart: always
    network_mode: host
分别在42,43,44上创建目录和上传相关配置文件
然后分别启动 43,42,44
docker-compose up -d
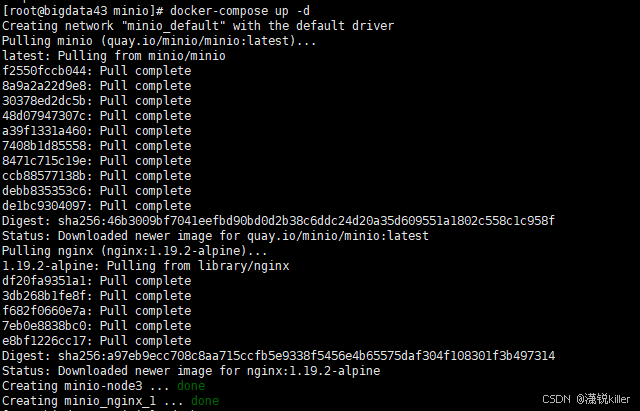
docker ps


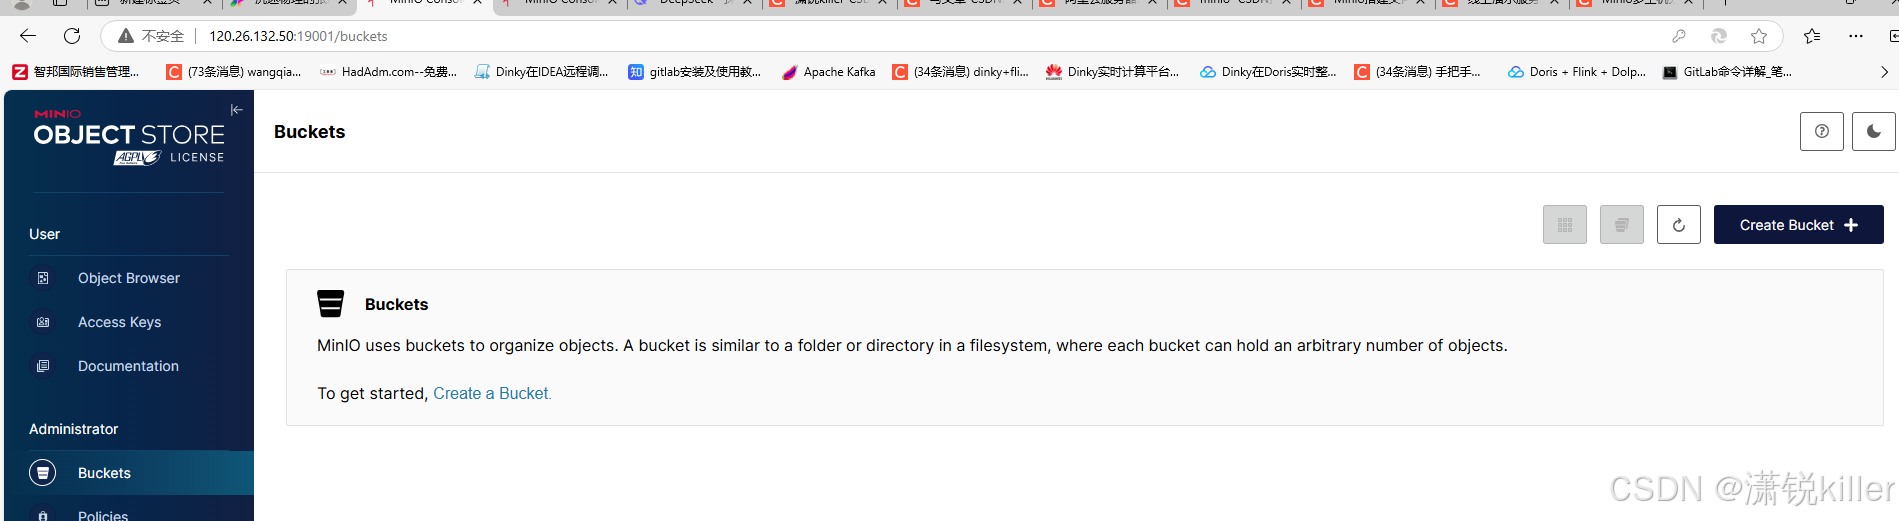
curl 172.16.108.43:19001 页面已经有了

----------------------------------------------
具体步骤:
1、创建Bucket
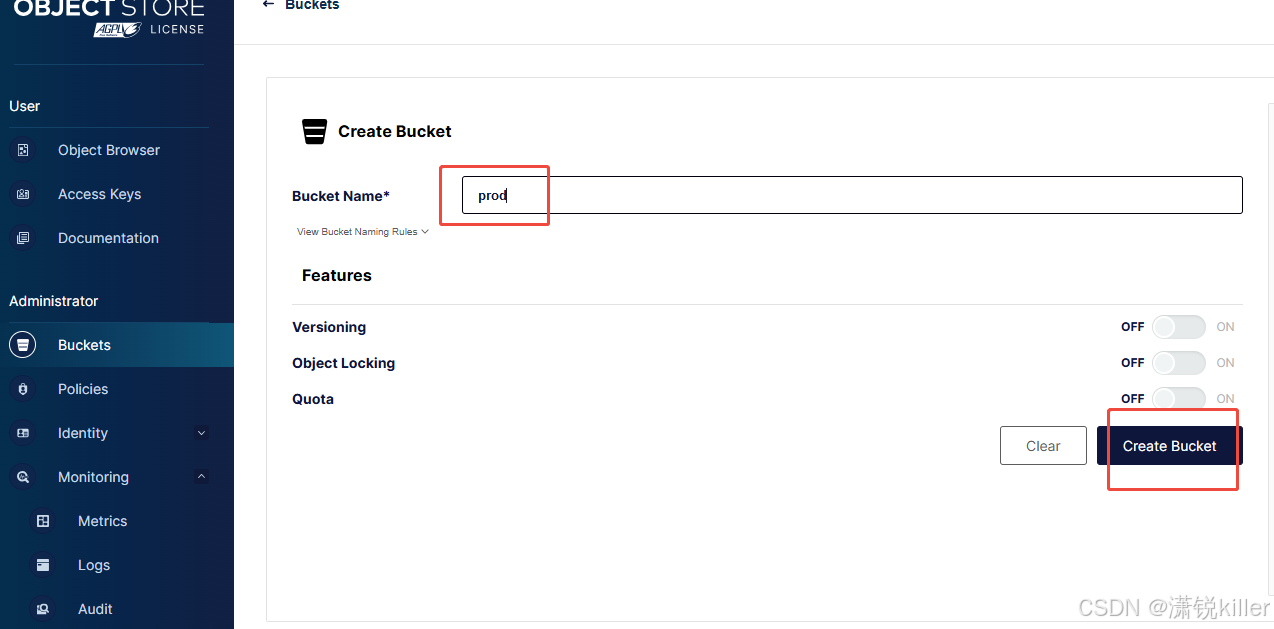
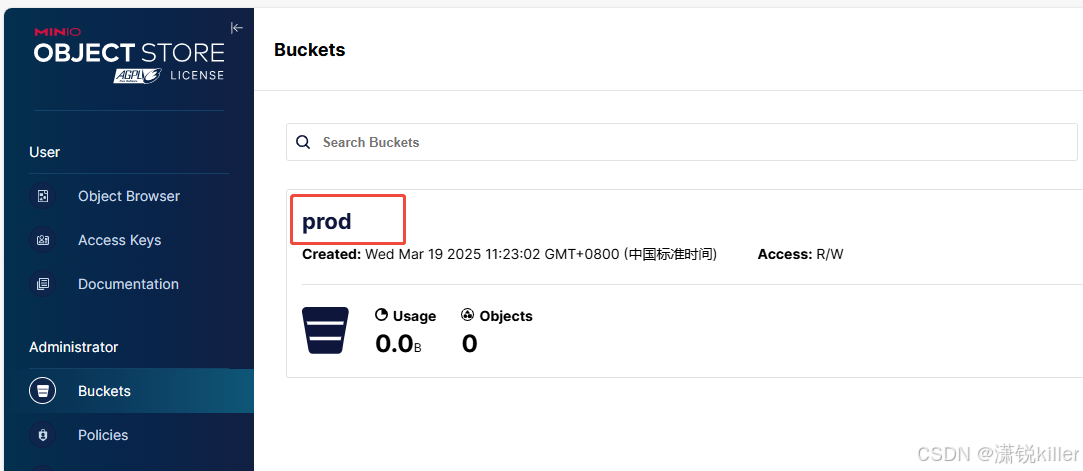
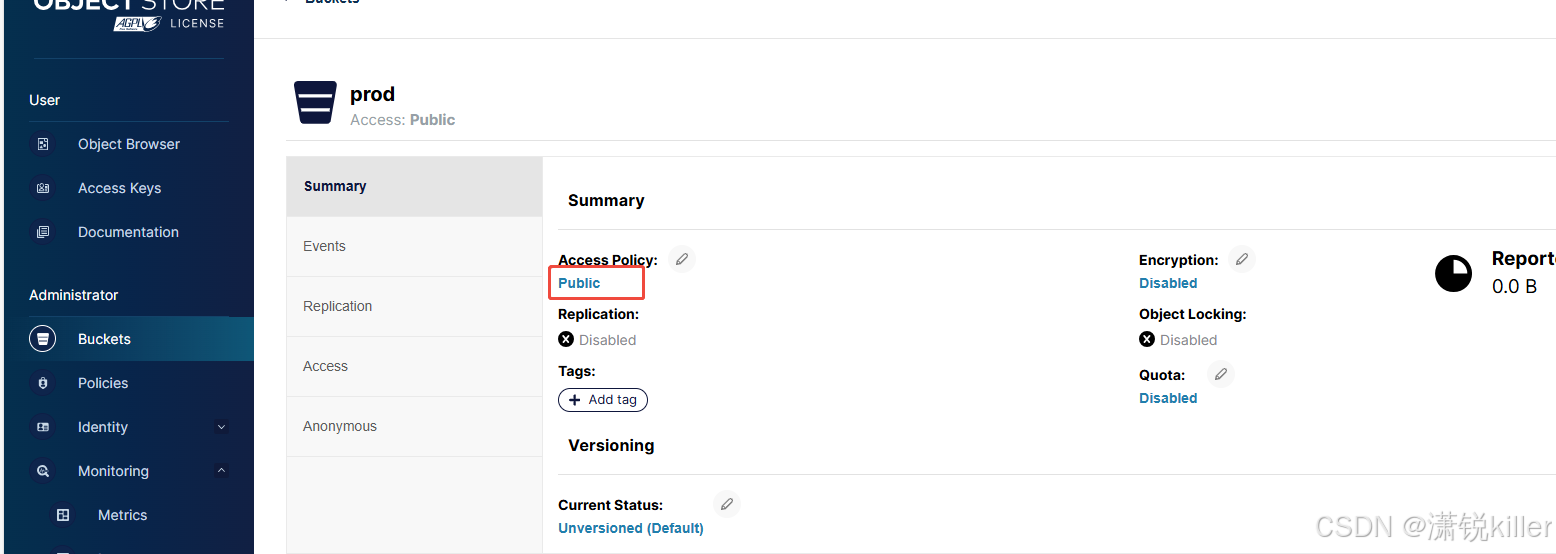
--------------------------------------------------------------------------------------------------------
需要同步原有minio的文件到新的minio集群上
使用 mc mirror 命令(Minio Client)
这是Minio官方推荐的工具,支持增量同步、校验和一致性检查。
安装 Minio Client (mc)
从Minio官网下载并安装 mc,确保其可执行权限:
cd /data/dockerinstall/
wget https://dl.min.io/client/mc/release/linux-amd64/mc
chmod +x mc
mv mc /usr/local/bin/
配置集群别名
添加源集群和目标集群的别名(以别名 source 和 target 为例):
-
配置集群别名
添加源集群和目标集群的别名(以别名source和target为例):mc alias set source http://source-minio-server:9000 ACCESS_KEY SECRET_KEY mc alias set target http://target-minio-server:9000 ACCESS_KEY SECRET_KEY

![]()
mc alias set source http://192.168.1.245:19000 minio minio******
mc alias set target http://192.168.1.243:19000 minio minio******
执行同步(单向镜像)
使用 mc mirror 同步整个桶或特定路径
mc mirror --overwrite --remove source/bucket-name target/bucket-name
-
--overwrite: 覆盖目标端同名文件。 -
--remove: 删除目标端多余的文件(保持严格一致)。
mc mirror --overwrite --remove source/prod target/prod // prod 为 bucket-name![]()
mc mirror --overwrite --remove source/knowledge target/knowledge
![]()


 2298
2298

 被折叠的 条评论
为什么被折叠?
被折叠的 条评论
为什么被折叠?
 到【灌水乐园】发言


