 Nacos部署与应用:单机配置、服务注册与配置中心集成


 本文详细介绍了Nacos的单机部署、作为服务注册中心在支付和订单项目中的使用、配置中心功能以及集群配置,包括Windows服务部署步骤。
1.单机部署
1.1 官网
https://nacos.io/zh-cn/index.html
https://github.com/alibaba/Nacos
1.2.版本说明
https://github.com/alibaba/spring-cloud-alibaba/wiki/%E7%89%88%E6%9C%AC%E8%AF%B4%E6%98%8E
| Spring Cloud Alibaba Version | Spring Cloud Version | Spring Boot Version |
|---|---|---|
|
2.2.10-RC1* |
Spring Cloud Hoxton.SR12 |
2.3.12.RELEASE |
|
2.2.9.RELEASE |
Spring Cloud Hoxton.SR12 |
2.3.12.RELEASE |
|
2.2.8.RELEASE |
Spring Cloud Hoxton.SR12 |
2.3.12.RELEASE |
|
2.2.7.RELEASE |
Spring Cloud Hoxton.SR12 |
2.3.12.RELEASE |
|
2.2.6.RELEASE |
Spring Cloud Hoxton.SR9 |
2.3.2.RELEASE |
Nacos 版本关系, 2.2.6.RELEASE是1.x版本及以下,单机没体现主要是集群需要配置grpc端口号
1.3.下载地址
https://github.com/alibaba/nacos/releases/tag/2.2.0
1.4.安装
解压安装包,直接运行bin目录下,默认账号密码都是nacos,命令运行成功后直接访问http://localhost:8848/nacos,结果页面
startup.cmd -m standalone
1.5 mysql为存储
修改配置文件application.properties
spring.datasource.platform=mysql

### Count of DB:
db.num=1

### Connect URL of DB:
db.url.0=jdbc:mysql://192.168.2.18:3306/nacos?characterEncoding=utf8&connectTimeout=1000&socketTimeout=3000&autoReconnect=true&useUnicode=true&useSSL=false&serverTimezone=UTC
db.user.0=root
db.password.0=root

### Connection pool configuration: hikariCP
db.pool.config.connectionTimeout=30000
db.pool.config.validationTimeout=10000
db.pool.config.maximumPoolSize=20
db.pool.config.minimumIdle=2
startup.cmd 启动即可
2.做为服务注册中心
2.1 支付项目
1) 父POM
2.2.6.RELEASE是2.x和1.x版本的分界线,2集群时必须配置grpc的端口映射
 <dependency>
                <groupId>com.alibaba.cloud</groupId>
                <artifactId>spring-cloud-alibaba-dependencies</artifactId>
                <version>2.2.10-RC1</version>
                <type>pom</type>
                <scope>import</scope>
</dependency>
2) POM
 <!--nacos-->
<dependency>
            <groupId>com.alibaba.cloud</groupId>
            <artifactId>spring-cloud-starter-alibaba-nacos-discovery</artifactId>
</dependency>
3) YML
server:
  port: 9001

spring:
  application:
    name: nacos-payment-provider
  cloud:
    nacos:
      discovery:
        server-addr: localhost:8848 #配置Nacos地址
4) 主程序
@EnableDiscoveryClient
@SpringBootApplication
public class PaymentMain9001 {
    public static void main(String[] args) {
        SpringApplication.run(PaymentMain9001.class,args);
    }
}
2.2 订单项目
1) POM
 <dependency>
        <groupId>com.alibaba.cloud</groupId>
        <artifactId>spring-cloud-starter-alibaba-nacos-discovery</artifactId>
</dependency>
2) YML
spring:
  application:
    name: order-nacos-service
  cloud:
    nacos:
      discovery:
        server-addr: localhost:8848
3) 主程序
@EnableDiscoveryClient
@SpringBootApplication
public class OrderNacosMain {

    public static void main(String[] args) {
        SpringApplication.run(OrderNacosMain.class, args);
    }
}
4) 业务类
ApplicationContextBean
@Configuration
public class ApplicationContextBean {

    @Bean
    @LoadBalanced
    public RestTemplate getRestTemplate()
    {
        return new RestTemplate();
    }
}
OrderNacosController
@RestController
public class OrderController {

    @Resource
    private RestTemplate restTemplate;

    private String serverURL = "http://nacos-payment-service";

    @GetMapping(value = "/payment/get/{id}")
    public String paymentInfo(@PathVariable("id") Long id)
    {
        return restTemplate.getForObject(serverURL+"/payment/get/"+id,String.class);
    }

}
3.做为参数配置中心
3.1 POM
<dependency>
    <groupId>com.alibaba.cloud</groupId>
    <artifactId>spring-cloud-starter-alibaba-nacos-config</artifactId>
</dependency>
3.2 YOM
1) bootstrap.yml
此文件不写,yaml格式无法加载
spring:
  profiles:
    active: dev
  cloud:
    nacos:
      discovery:
        server-addr: localhost:8848
      config:
        server-addr: localhost:8848
        file-extension: yaml
2) application.yml
server:
  port: 8001
spring:
  application:
    name: nacos-payment-service
3.3 业务类
@RestController
@RefreshScope
public class ConfigClientController
{
    @Value("${config.info}")
    private String configInfo;

    @GetMapping("/config/info")
    public String getConfigInfo() {
        return configInfo;
    }
}
通过 Spring Cloud 原生注解@RefreshScope 实现配置自动更新
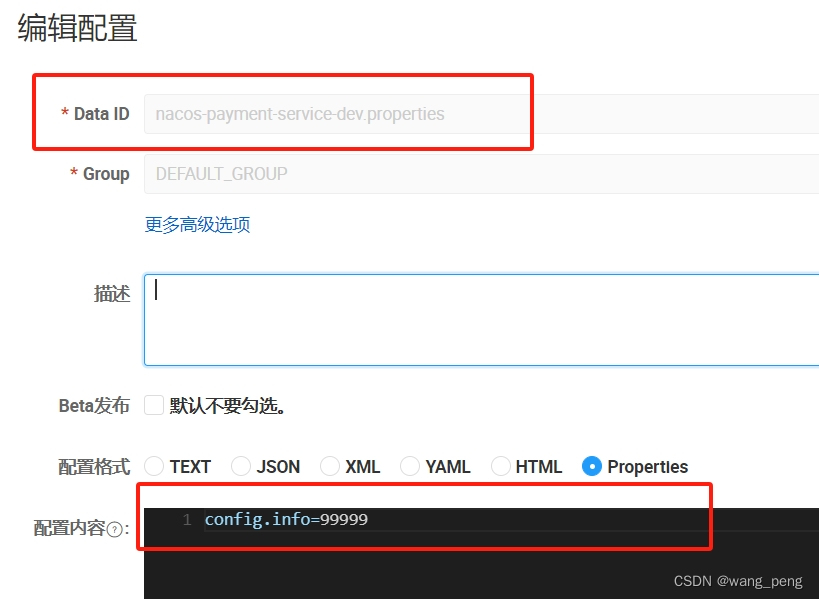
3.4 Nacos中添加配置信息
1) 配置规格
${prefix}-${spring.profiles.active}.${file-extension}
2) 说明
prefix默认为spring.application.name的值,也可以通过配置项spring.cloud.nacos.config.prefix来配置spring.profiles.active即为当前环境对应的 profilefile-exetension为配置内容的数据格式,可以通过配置项spring.cloud.nacos.config.file-extension来配置,官网上说目前只支持properties和yaml类型,但我的版本只有properties成功过
3) 配置新增
4.集群配置
4.1 单机配置
修改配置配置文件cluster.conf
192.168.2.93:8840
192.168.2.93:8850
192.168.2.93:8860
4.2 nginx 配置
tream{
   upstream nacos-cluster-tcp{
	   server 192.168.2.18:9840;
	   server 192.168.2.18:9850;
	   server 192.168.2.18:9860;
  }

  server{
	listen 9848;
	proxy_pass nacos-cluster-tcp;
  }
}

http {
    include       mime.types;
    default_type  application/octet-stream;


    sendfile        on;
    #tcp_nopush     on;

    #keepalive_timeout  0;
    keepalive_timeout  65;

    #gzip  on;

	upstream nacos-cluster{
	  server 192.168.2.18:8840;
	  server 192.168.2.18:8850;
	  server 192.168.2.18:8860;
	}

    server {
        listen       8848;
        server_name  localhost;

        #charset koi8-r;

        #access_log  logs/host.access.log  main;

        location / {
            root   html;
            index  index.html index.htm;
        }

		location /nacos {
	        proxy_pass http://nacos-cluster;
        }

        #error_page  404              /404.html;

        # redirect server error pages to the static page /50x.html
        #
        error_page   500 502 503 504  /50x.html;
        location = /50x.html {
            root   html;
        }

    }

}
4.3 程序bootstrap.yml
spring:
  profiles:
    active: dev
  cloud:
    nacos:
      discovery:
        server-addr: 192.168.2.18:8848
      config:
        server-addr: 192.168.2.18:8848
        file-extension: yaml
5.windows服务部署
5.1 WinSW相关详见,这里只说关键
https://blog.youkuaiyun.com/wang_peng/article/details/136066840
5.2 修改startup.cmd
set MODE="standalone"
5.3 nacos-service.xml内容
<service>

  <!-- ID of the service. It should be unique across the Windows system-->
  <id>nacos-service</id>

  <!-- 服务名 -->
  <name>nacos-service</name>

  <!-- 服务说明 -->
  <description>This service is a service nacos-service</description>

  <!-- 应启动的可执行文件的路径 -->
  <executable>startup.cmd</executable>

  <!-- 服务启动模式 Automatic:自动 -->
  <startmode>Automatic</startmode>

  <!-- 日志位置,为当前路径logs文件夹下 -->
  <logpath>logs</logpath>

</service>
5.4 install.bat文件内容
cd %~dp0
nacos-service install
nacos-service start
pause
5.5 unstall.bat文件内容
cd %~dp0
nacos-service stop
nacos-service uninstall
pause
5.6 最后目录结构
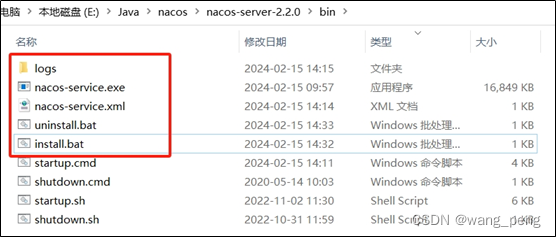
5.7 安装执行install.bat,
我看网上有些帖子说按这思路失败了,那就得分析具体问题,反正我这成功。


 5万+
5万+

 被折叠的 条评论
为什么被折叠?
被折叠的 条评论
为什么被折叠?
 到【灌水乐园】发言


