


nginx 的安装
下载地址: http://nginx.org/download/nginx-1.4.2.tar.gz
安装准备: nginx依赖于pcre库,要先安装pcre
yum install pcre pcre-devel
cd /usr/local/src/
wget http://nginx.org/download/nginx-1.4.2.tar.gz
tar zxvf nginx-1.4.2.tar.gz
cd nginx-1.4.2
./configure --prefix=/usr/local/nginx
make && make install
启动:
cd /ulsr/local/nginx, 看到如下4个目录
./
…conf 配置文件
… html 网页文件
…logs 日志文件
…sbin 主要二进制程序
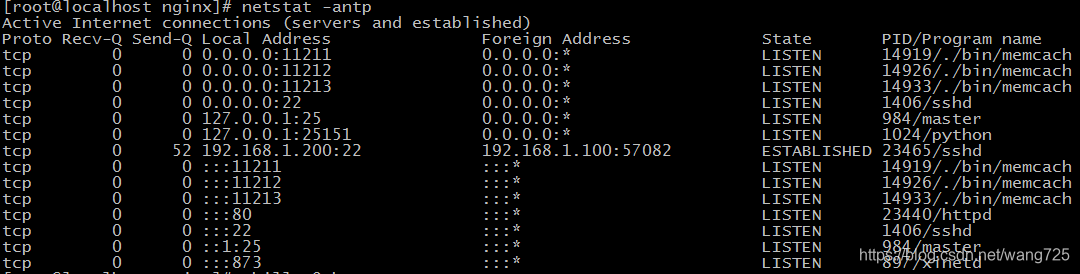
[root@localhost nginx]# ./sbin/nginx
nginx: [emerg] bind() to 0.0.0.0:80 failed (98: Address already in use)
…
nginx: [emerg] bind() to 0.0.0.0:80 failed (98: Address already in use)
nginx: [emerg] still could not bind()
不能绑定80端口,80端口已经被占用
(有时是自己装了apache,nginx等,还有更多情况是操作系统自带了apache并作为服务启动)
解决: 把占用80端口的软件或服务关闭即可.
Nginx的信号控制

具体语法:
Kill -信号选项 nginx的主进程号
Kill -HUP 4873
Kill -信号控制 cat /xxx/path/log/nginx.pid
Kil; -USR1 cat /xxx/path/log/nginx.pid
Nginx配置段
// 全局区
worker_processes 1; // 有1个工作的子进程,可以自行修改,但太大无益,因为要争夺CPU,一般设置为 CPU数*核数
Event {
// 一般是配置nginx连接的特性
// 如1个word能同时允许多少连接
worker_connections 1024; // 这是指 一个子进程最大允许连1024个连接
}
http { //这是配置http服务器的主要段
Server1 { // 这是虚拟主机段
        Location {  //定位,把特殊的路径或文件再次定位 ,如image目录单独处理
        }             /// 如.php单独处理

 }

 Server2 {
 }
}
例子1: 基于域名的虚拟主机
server {
    listen 80;  #监听端口
    server_name a.com; #监听域名

    location / {
            root /var/www/a.com;   #根目录定位
            index index.html;
    }
}
例子2: 基于端口的虚拟主机配置
server {
    listen 8080;
    server_name 192.168.1.204;

    location / {
            root /var/www/html8080;
            index index.html;
    }
}
日志管理
我们观察nginx的server段,可以看到如下类似信息
#access_log logs/host.access.log main;
这说明 该server, 它的访问日志的文件是 logs/host.access.log ,
使用的格式”main”格式.
除了main格式,你可以自定义其他格式.
main格式是什么?
log_format main '$remote_addr -
r
e
m
o
t
e
u
s
e
r
[
remote_user [
remoteuser[time_local] “KaTeX parse error: Expected 'EOF', got '#' at position 16: request" ' #̲ …status
b
o
d
y
b
y
t
e
s
s
e
n
t
"
body_bytes_sent "
bodybytessent"http_referer” ’
# ‘“
h
t
t
p
u
s
e
r
a
g
e
n
t
"
"
http_user_agent" "
httpuseragent""http_x_forwarded_for”’;
main格式是我们定义好一种日志的格式,并起个名字,便于引用.
以上面的例子, main类型的日志,记录的 remote_addr… http_x_forwarded_for等选项.
1: 日志格式 是指记录哪些选项
默认的日志格式: main
log_format main '$remote_addr -
r
e
m
o
t
e
u
s
e
r
[
remote_user [
remoteuser[time_local] “KaTeX parse error: Double superscript at position 40: … '̲status
b
o
d
y
b
y
t
e
s
s
e
n
t
"
body_bytes_sent "
bodybytessent"http_referer” ’
‘“
h
t
t
p
u
s
e
r
a
g
e
n
t
"
"
http_user_agent" "
httpuseragent""http_x_forwarded_for”’;
如默认的main日志格式,记录这么几项
远程IP- 远程用户/用户时间 请求方法(如GET/POST) 请求体body长度 referer来源信息
http-user-agent用户代理/蜘蛛 ,被转发的请求的原始IP
http_x_forwarded_for:在经过代理时,代理把你的本来IP加在此头信息中,传输你的原始IP
2: 声明一个独特的log_format并命名
log_format  mylog '$remote_addr- "$request" '
                 '$status $body_bytes_sent "$http_referer" '
                    '"$http_user_agent" "$http_x_forwarded_for"';
在下面的server/location,我们就可以引用 mylog
在server段中,这样来声明
Nginx允许针对不同的server做不同的Log ,(有的web服务器不支持,如lighttp)
access_log logs/access_8080.log mylog;
声明log log位置 log格式;
实际应用: shell+定时任务+nginx信号管理,完成日志按日期存储
分析思路:
凌晨00:00:01,把昨天的日志重命名,放在相应的目录下
再USR1信息号控制nginx重新生成新的日志文件
具体脚本:
#!/bin/bash
base_path=’/usr/local/nginx/logs’
log_path=
(
d
a
t
e
−
d
y
e
s
t
e
r
d
a
y
+
"
d
a
y
=
(date -d yesterday +"%Y%m") day=
(date−dyesterday+"day=(date -d yesterday +"%d")
mkdir -p
b
a
s
e
p
a
t
h
/
base_path/
basepath/log_path
mv $base_path/access.log
b
a
s
e
p
a
t
h
/
base_path/
basepath/log_path/access_$day.log
#echo
b
a
s
e
p
a
t
h
/
base_path/
basepath/log_path/access_$day.log
kill -USR1 cat /usr/local/nginx/logs/nginx.pid
定时任务
Crontab 编辑定时任务
01 00 * * * /xxx/path/b.sh 每天0时1分(建议在02-04点之间,系统负载小)
location 语法
location 有”定位”的意思, 根据Uri来进行不同的定位.
在虚拟主机的配置中,是必不可少的,location可以把网站的不同部分,定位到不同的处理方式上.
比如, 碰到.php, 如何调用PHP解释器? --这时就需要location
location 的语法
location [=||*|^~] patt {
}
中括号可以不写任何参数,此时称为一般匹配
也可以写参数
因此,大类型可以分为3种
location = patt {} [精准匹配]
location patt{} [一般匹配]
location ~ patt{} [正则匹配]
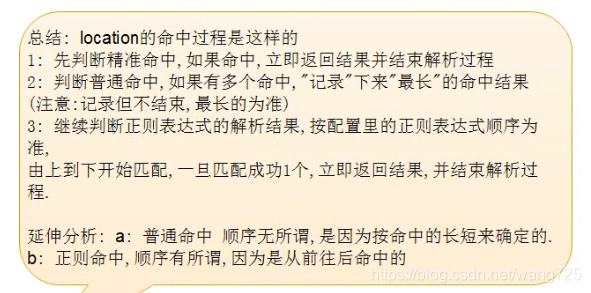
如何发挥作用?:
首先看有没有精准匹配,如果有,则停止匹配过程.
location = patt {
config A
}
如果 $uri == patt,匹配成功,使用configA
location = / {
root /var/www/html/;
index index.htm index.html;
}
location / {
root /usr/local/nginx/html;
index index.html index.htm;
}
如果访问 http://xxx.com/
定位流程是
1: 精准匹配中 ”/” ,得到index页为 index.htm
2: 再次访问 /index.htm , 此次内部转跳uri已经是”/index.htm” ,
根目录为/usr/local/nginx/html
3: 最终结果,访问了 /usr/local/nginx/html/index.htm
再来看,正则也来参与.
location / {
root /usr/local/nginx/html;
index index.html index.htm;
}
location ~ image {
root /var/www/image;
index index.html;
}
如果我们访问 http://xx.com/image/logo.png
此时, “/” 与”/image/logo.png” 匹配
同时,”image”正则 与”image/logo.png”也能匹配,谁发挥作用?
正则表达式的成果将会使用.
图片真正会访问 /var/www/image/logo.png
location / {
root /usr/local/nginx/html;
index index.html index.htm;
}
location /foo {
root /var/www/html;
index index.html;
}
我们访问 http://xxx.com/foo
对于uri “/foo”, 两个location的patt,都能匹配他们
即 ‘/’能从左前缀匹配 ‘/foo’, ‘/foo’也能左前缀匹配’/foo’,
此时, 真正访问 /var/www/html/index.html
原因:’/foo’匹配的更长,因此使用之.;
rewrite 重写
重写中用到的指令
if (条件) {} 设定条件,再进行重写
set #设置变量
return #返回状态码
break #跳出rewrite
rewrite #重写
If 语法格式
If 空格 (条件) {
重写模式
}
条件又怎么写?
答:3种写法
1: “=”来判断相等, 用于字符串比较
2: “~” 用正则来匹配(此处的正则区分大小写)
~* 不区分大小写的正则
3: -f -d -e来判断是否为文件,为目录,是否存在.
例子:
        if  ($remote_addr = 192.168.1.100) {
            return 403;
        }
if (KaTeX parse error: Expected '}', got 'EOF' at end of input: … rewrite ^.* /ie.htm;
break; #(不break会循环重定向)
}
         if (!-e $document_root$fastcgi_script_name) {
            rewrite ^.*$ /404.html break;
        }
        注, 此处还要加break,
以 xx.com/dsafsd.html这个不存在页面为例,
我们观察访问日志, 日志中显示的访问路径,依然是GET /dsafsd.html HTTP/1.1
提示: 服务器内部的rewrite和302跳转不一样.
跳转的话URL都变了,变成重新http请求404.html, 而内部rewrite, 上下文没变,
就是说 fastcgi_script_name 仍然是 dsafsd.html,因此 会循环重定向.
set 是设置变量用的, 可以用来达到多条件判断时作标志用.
达到apache下的 rewrite_condition的效果
如下: 判断IE并重写,且不用break; 我们用set变量来达到目的
if ($http_user_agent ~* msie) {
set $isie 1;
}
        if ($fastcgi_script_name = ie.html) {
            set $isie 0;
        }

        if ($isie 1) {
            rewrite ^.*$ ie.html;
        }
Rewrite语法
Rewrite 正则表达式 定向后的位置 模式
Goods-3.html ---->Goods.php?goods_id=3
goods-([\d]+).html —> goods.php?goods_id =$1
location /ecshop {
index index.php;
rewrite goods-([\d]+).html$ /ecshop/goods.php?id=KaTeX parse error: Expected 'EOF', got '\d' at position 22: …rite article-([\̲d̲]+)\.html /ecshop/article.php?id=$1;
rewrite category-(\d+)-b(\d+).html /ecshop/category.php?id=$1&brand=$2;
rewrite category-(\d+)-b(\d+)-min(\d+)-max(\d+)-attr([\d.]+).html /ecshop/category.php?id=$1&brand=$2&price_min=$3&price_max=$4&filter_attr=$5;
rewrite category-(\d+)-b(\d+)-min(\d+)-max(\d+)-attr([\d+.])-(\d+)-([-]+)-([-]+).html /ecshop/category.php?id=$1&brand=$2&price_min=$3&price_max=$4&filter_attr=$5&page=$6&sort=$7&order=$8;
}
注意:用url重写时, 正则里如果有”{}”,正则要用双引号包起来
nginx+php的编译
apache一般是把php当做自己的一个模块来启动的.
而nginx则是把http请求变量(如get,user_agent等)转发给 php进程,即php独立进程,与nginx进行通信. 称为 fastcgi运行方式.
因此,为apache所编译的php,是不能用于nginx的.
注意: 我们编译的PHP 要有如下功能:
连接mysql, gd, ttf, 以fpm(fascgi)方式运行
./configure --prefix=/usr/local/fastphp
–with-mysql=mysqlnd
–enable-mysqlnd
–with-gd
–enable-gd-native-ttf
–enable-gd-jis-conv
–enable-fpm
编译完毕后:
1:
nginx+php的配置比较简单,核心就一句话----
把请求的信息转发给9000端口的PHP进程,
让PHP进程处理 指定目录下的PHP文件.
如下例子:
location ~ .php$ {
root html;
fastcgi_pass 127.0.0.1:9000;
fastcgi_index index.php;
fastcgi_param SCRIPT_FILENAME
d
o
c
u
m
e
n
t
r
o
o
t
document_root
documentrootfastcgi_script_name;
include fastcgi_params;
}
1:碰到php文件,
2: 把根目录定位到 html,
3: 把请求上下文转交给9000端口PHP进程,
4: 并告诉PHP进程,当前的脚本是
d
o
c
u
m
e
n
t
r
o
o
t
document_root
documentrootfastcgi_scriptname
(注:PHP会去找这个脚本并处理,所以脚本的位置要指对)
网页内容的压缩编码与传输速度优化
我们观察news.163.com的头信息
请求:
Accept-Encoding:gzip,deflate,sdch
响应:
Content-Encoding:gzip
Content-Length:36093
再把页面另存下来,观察,约10W字节,实际传输的36093字节
原因-------就在于gzip压缩上.
原理:
浏览器—请求----> 声明可以接受 gzip压缩 或 deflate压缩 或compress 或 sdch压缩
从http协议的角度看–请求头 声明 acceopt-encoding: gzip deflate sdch (是指压缩算法,其中sdch是google倡导的一种压缩方式,目前支持的服务器尚不多)
服务器–>回应—把内容用gzip方式压缩---->发给浏览器
浏览<-----解码gzip-----接收gzip压缩内容----
推算一下节省的带宽:
假设 news.163.com PV 2亿
210^8 * 910^4 字节 ==
210^8 * 9 * 10^4 * 10^-9 = 12K*G = 18T
节省的带宽是非常惊人的
gzip配置的常用参数
gzip on|off; #是否开启gzip
gzip_buffers 32 4K| 16 8K #缓冲(压缩在内存中缓冲几块? 每块多大?)
gzip_comp_level [1-9] #推荐6 压缩级别(级别越高,压的越小,越浪费CPU计算资源)
gzip_disable #正则匹配UA 什么样的Uri不进行gzip
gzip_min_length 200 # 开始压缩的最小长度(再小就不要压缩了,意义不在)
gzip_http_version 1.0|1.1 # 开始压缩的http协议版本(可以不设置,目前几乎全是1.1协议)
gzip_proxied # 设置请求者代理服务器,该如何缓存内容
gzip_types text/plain application/xml # 对哪些类型的文件用压缩 如txt,xml,html ,css
gzip_vary on|off # 是否传输gzip压缩标志
注意:
图片/mp3这样的二进制文件,不必压缩
因为压缩率比较小, 比如100->80字节,而且压缩也是耗费CPU资源的.
比较小的文件不必压缩,
nginx的缓存设置 提高网站性能
对于网站的图片,尤其是新闻站, 图片一旦发布, 改动的可能是非常小的.我们希望 能否在用户访问一次后, 图片缓存在用户的浏览器端,且时间比较长的缓存.
可以, 用到 nginx的expires设置 .
nginx中设置过期时间,非常简单,
在location或if段里,来写.
格式 expires 30s;
expires 30m;
expires 2h;
expires 30d;
(注意:服务器的日期要准确,如果服务器的日期落后于实际日期,可能导致缓存失效)
另: 304 也是一种很好的缓存手段
原理是: 服务器响应文件内容是,同时响应etag标签(内容的签名,内容一变,他也变), 和 last_modified_since 2个标签值
浏览器下次去请求时,头信息发送这两个标签, 服务器检测文件有没有发生变化,如无,直接头信息返回 etag,last_modified_since
浏览器知道内容无改变,于是直接调用本地缓存.
这个过程,也请求了服务器,但是传着的内容极少.
对于变化周期较短的,如静态html,js,css,比较适于用这个方式
nginx反向代理服务器+负载均衡
用nginx做反向代理和负载均衡非常简单,
支持两个用法 1个proxy, 1个upstream,分别用来做反向代理,和负载均衡
以反向代理为例, nginx不自己处理php的相关请求,而是把php的相关请求转发给apache来处理.

----这不就是传说的”动静分离”,动静分离不是一个严谨的说法,叫反向代理比较规范.
反向代理后端如果有多台服务器,自然可形成负载均衡,
但proxy_pass如何指向多台服务器?
把多台服务器用 upstream指定绑定在一起并起个组名,
然后proxy_pass指向该组
默认的均衡的算法很简单,就是针对后端服务器的顺序,逐个请求.
也有其他负载均衡算法,如一致性哈希,需要安装第3方模块.
(自行预习nginx第3方模块的安装,以安装ngx_http_upstream_consistent_hash为例)
反向代理导致了后端服务器的IP,为前端服务器的IP,而不是客户真正的IP,怎么办?
location中设置
proxy_set_header X-Forwarded-for $remote_addr
作业及下周实验课程
1:在虚拟机上装3个端口的nginx服务器
2:装ecshop/discuz,并做url重写
3: 利用3个端口的服务器,来实现简单的负载均衡.
下周实验:
1:数据 企业名称/电话/简介 等信息 约2500-3000万条
2: 服务器 4台, 2G/4核(1) 8G/双核(3)
3: 目标 3000PV
设计: 服务器的架构图, 包括nginx/mysql/php/memcached的分布.
每人要出一个设计方案


 2425
2425

 被折叠的 条评论
为什么被折叠?
被折叠的 条评论
为什么被折叠?
 到【灌水乐园】发言


