


目录
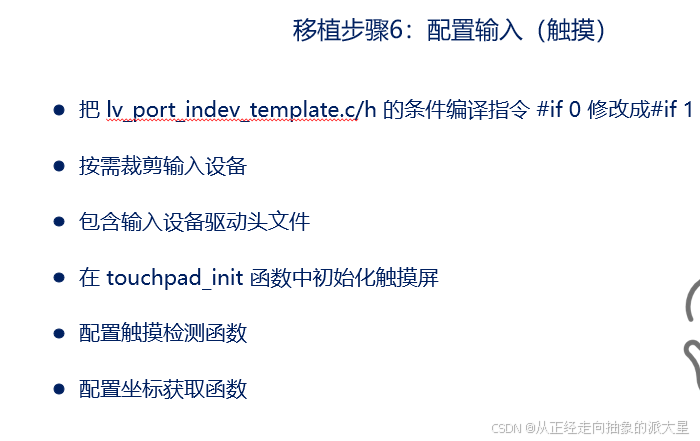
1、把 lv_port_disp_template.c/h 的条件编译指令 #if 0 修改成 #if 1
2、在lv_port_disp_template.c配置屏幕的宽与高
3、lv_port_disp_template.c配置屏幕初始化函数:
4、lv_port_disp_template.c配置颜色填充函数(LVGL通过此函数进行绘制)

一、源码获取
途径1:LVGL官网,https://lvgl.io
途径2:LVGL的GitHub仓库,https://github.com/lvgl/lvgl
二、剪切源码
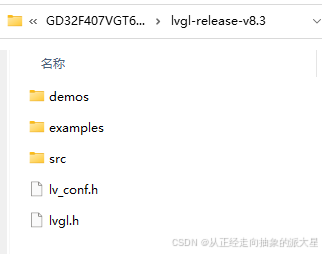
将lv_conf_template.h修改成lv_conf.h,并保留如下:
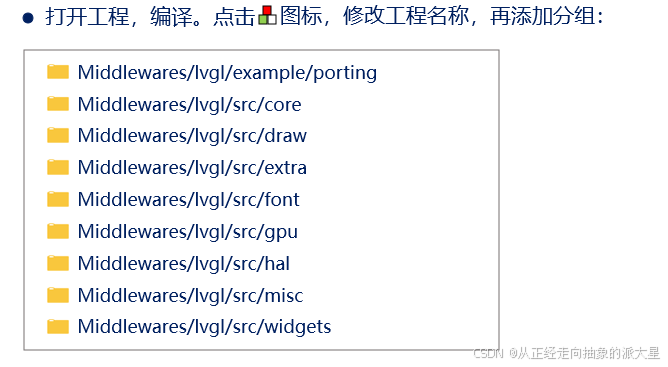
三、文件夹建立与源码复制
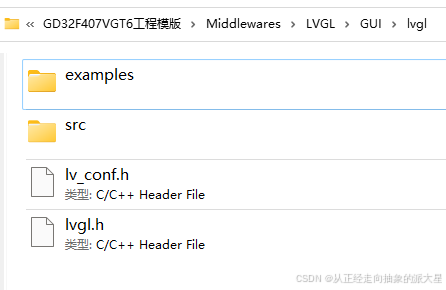
在工程模板下新建.\Middlewares\LVGL\GUI\lvgl并将修剪后的lvgl-release-v8.3文件夹下的除了demo文件夹的其他文件夹复制到此处。
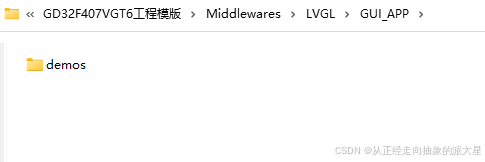
新建.\Middlewares\LVGL\GUI_APP文件夹并将修剪后的lvgl-release-v8.3文件夹下的demo文件夹复制到此处。
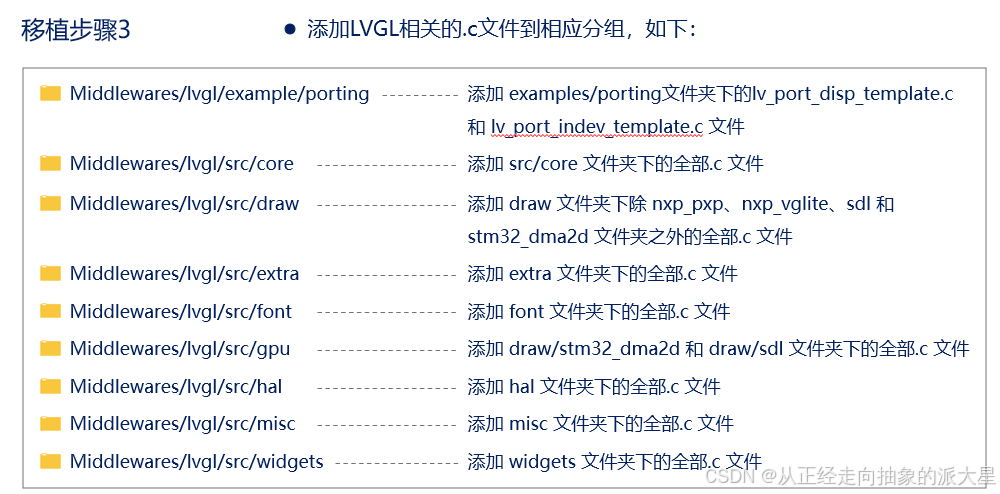
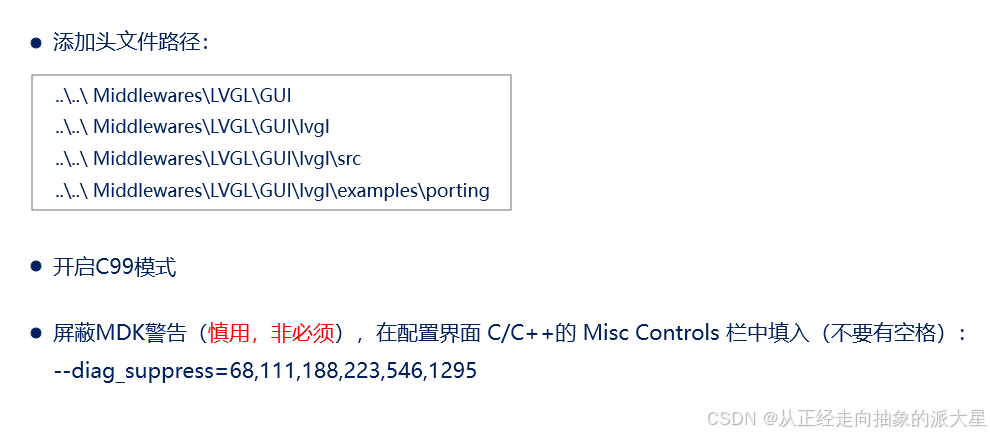
四、代码移植
配置屏幕显示:
1、把 lv_port_disp_template.c/h 的条件编译指令 #if 0 修改成 #if 1
2、在lv_port_disp_template.c配置屏幕的宽与高
/*********************
 *      DEFINES
 *********************/
#define MY_DISP_HOR_RES    LCD_W
#define MY_DISP_VER_RES    LCD_H
#ifndef MY_DISP_HOR_RES
    #warning Please define or replace the macro MY_DISP_HOR_RES with the actual screen width, default value 320 is used for now.
    #define MY_DISP_HOR_RES    320
#endif

#ifndef MY_DISP_VER_RES
    #warning Please define or replace the macro MY_DISP_HOR_RES with the actual screen height, default value 240 is used for now.
    #define MY_DISP_VER_RES    240
#endif3、lv_port_disp_template.c配置屏幕初始化函数:
/**********************
 *   STATIC FUNCTIONS
 **********************/

/*Initialize your display and the required peripherals.*/
static void disp_init(void)
{
    /*You code here*/
	LCD_Init();
}
4、lv_port_disp_template.c配置颜色填充函数(LVGL通过此函数进行绘制)
/*Flush the content of the internal buffer the specific area on the display
 *You can use DMA or any hardware acceleration to do this operation in the background but
 *'lv_disp_flush_ready()' has to be called when finished.*/
static void disp_flush(lv_disp_drv_t * disp_drv, const lv_area_t * area, lv_color_t * color_p)
{

		// 调用 LCD_Fill 填充单个像素
		LCD_Color_Fill(area->x1, area->y1, area->x2, area->y2, (u16 *)color_p);


    // 通知 LVGL 刷新完成
    lv_disp_flush_ready(disp_drv);
}


/*********************************LCD.C***************************************/

/******************************************************************************
      函数说明:在指定区域填充颜色
      入口数据:xsta,ysta   起始坐标
                xend,yend   终止坐标
								color       要填充的颜色
      返回值:  无
******************************************************************************/
void LCD_Fill(u16 xsta,u16 ysta,u16 xend,u16 yend,u16 color)
{
	u16 i,j;
	LCD_Address_Set(xsta,ysta,xend-1,yend-1);//设置显示范围
	for(i=ysta;i<yend;i++)
	{
		for(j=xsta;j<xend;j++)
		{
			LCD_WR_DATA(color);
		}
	}
}


 /******************************************************************************
      函数说明:在指定区域内填充颜色缓冲区
      入口数据:xsta, ysta   起始坐标
                xend, yend   终止坐标
                color        颜色缓冲区指针
      返回值:  无
******************************************************************************/
void LCD_Color_Fill(u16 xsta, u16 ysta, u16 xend, u16 yend, u16 *color)
{
    u16 i, j;
    u16 width = xend - xsta + 1;  // 计算区域宽度
    u16 height = yend - ysta + 1; // 计算区域高度

    // 设置显示范围
    LCD_Address_Set(xsta, ysta, xend - 1, yend - 1);

    // 遍历每一行
    for (i = 0; i < height; i++)
    {
        // 遍历每一列
        for (j = 0; j < width; j++)
        {
            // 写入颜色数据
            LCD_WR_DATA(color[i * width + j]);
        }
    }
}
5、配置显示缓存方案:
显示缓冲区是 LVGL 的核心缓存,用于存储屏幕的像素数据。LVGL 支持以下几种显示缓冲区配置:
(1) 单缓冲区(Single Buffer)
工作原理:只有一个缓冲区,LVGL 直接在该缓冲区中绘制图形,然后刷新到屏幕上。
优点:内存占用少。
缺点:渲染和刷新不能同时进行,可能导致屏幕撕裂。
适用场景:资源有限的系统,对性能要求不高的场景。
(2) 双缓冲区(Double Buffer)
工作原理:有两个缓冲区,LVGL 在一个缓冲区中绘制图形,同时另一个缓冲区的内容被刷新到屏幕上。
优点:避免屏幕撕裂,渲染更流畅。
缺点:内存占用较多(需要两倍于屏幕分辨率的缓冲区)。
适用场景:对性能要求较高的场景,如动画或视频播放。
(3) 部分缓冲区(Partial Buffer)
工作原理:只分配部分屏幕大小的缓冲区(例如 1/4 屏幕大小),LVGL 分块渲染和刷新。
优点:内存占用较少,同时避免屏幕撕裂。
缺点:需要更复杂的逻辑来管理分块渲染。
适用场景:内存有限但仍需流畅渲染的场景。
void lv_port_disp_init(void)
{
    /*-------------------------
     * Initialize your display
     * -----------------------*/
    disp_init();

    /*-----------------------------
     * Create a buffer for drawing
     *----------------------------*/

    /**
     * LVGL requires a buffer where it internally draws the widgets.
     * Later this buffer will passed to your display driver's `flush_cb` to copy its content to your display.
     * The buffer has to be greater than 1 display row
     *
     * There are 3 buffering configurations:
     * 1. Create ONE buffer:
     *      LVGL will draw the display's content here and writes it to your display
     *
     * 2. Create TWO buffer:
     *      LVGL will draw the display's content to a buffer and writes it your display.
     *      You should use DMA to write the buffer's content to the display.
     *      It will enable LVGL to draw the next part of the screen to the other buffer while
     *      the data is being sent form the first buffer. It makes rendering and flushing parallel.
     *
     * 3. Double buffering
     *      Set 2 screens sized buffers and set disp_drv.full_refresh = 1.
     *      This way LVGL will always provide the whole rendered screen in `flush_cb`
     *      and you only need to change the frame buffer's address.
     */

    /* Example for 1) */
    static lv_disp_draw_buf_t draw_buf_dsc_1;
    static lv_color_t buf_1[MY_DISP_HOR_RES*10 ];                          /*A buffer for 10 rows*/
    lv_disp_draw_buf_init(&draw_buf_dsc_1, buf_1, NULL, MY_DISP_HOR_RES*10 );   /*Initialize the display buffer*/

//    /* Example for 2) */
//    static lv_disp_draw_buf_t draw_buf_dsc_2;
//    static lv_color_t buf_2_1[MY_DISP_HOR_RES * 10];                        /*A buffer for 10 rows*/
//    static lv_color_t buf_2_2[MY_DISP_HOR_RES * 10];                        /*An other buffer for 10 rows*/
//    lv_disp_draw_buf_init(&draw_buf_dsc_2, buf_2_1, buf_2_2, MY_DISP_HOR_RES * 10);   /*Initialize the display buffer*/

//    /* Example for 3) also set disp_drv.full_refresh = 1 below*/
//    static lv_disp_draw_buf_t draw_buf_dsc_3;
//    static lv_color_t buf_3_1[MY_DISP_HOR_RES * MY_DISP_VER_RES];            /*A screen sized buffer*/
//    static lv_color_t buf_3_2[MY_DISP_HOR_RES * MY_DISP_VER_RES];            /*Another screen sized buffer*/
//    lv_disp_draw_buf_init(&draw_buf_dsc_3, buf_3_1, buf_3_2,
// MY_DISP_VER_RES * LV_VER_RES_MAX); /*Initialize the display buffer*/6、提供时基
(1)添加定时器驱动
// 初始化定时器
void timer_con_init(void)//120MHZ---1ms
{
    // 启用定时器时钟
    rcu_periph_clock_enable(RCU_TIMER2);

    // 定时器基本配置
    timer_parameter_struct timer_initpara;
    timer_struct_para_init(&timer_initpara);
    timer_initpara.prescaler         = 1499;              // 预分频器
    timer_initpara.alignedmode       = TIMER_COUNTER_EDGE;   // 边沿对齐模式
    timer_initpara.counterdirection  = TIMER_COUNTER_UP;     // 向上计数
    timer_initpara.period            = 79;             // 自动重装载值
    timer_initpara.clockdivision     = TIMER_CKDIV_DIV1;     // 时钟分频
    timer_initpara.repetitioncounter = 0;                   // 重复计数器
    timer_init(TIMER2, &timer_initpara);

    // 使能定时器更新中断
    timer_interrupt_enable(TIMER2, TIMER_INT_UP);

    // 配置 NVIC
    nvic_irq_enable(TIMER2_IRQn, 0, 0);

    // 使能定时器
    timer_enable(TIMER2);
}(2)在定时器中断函数(回调)中调用:lv_tick_inc(x);
//这个x是指xms进入一次,如果为2ms进入一次这个中断,那么这个参数就为2
 #include "lvgl.h"

// 定时器中断服务函数
void TIMER2_IRQHandler(void)        // 每 1ms 进入一次中断
{
    if (timer_interrupt_flag_get(TIMER2, TIMER_INT_FLAG_UP) != RESET) {
        // 清除中断标志
        timer_interrupt_flag_clear(TIMER2, TIMER_INT_FLAG_UP);
				lv_tick_inc(1);

    }
}
7、测试代码
(1)头文件添加
#include"timer.h"
#include "lvgl.h"
#include "lv_port_disp_template.h"
#include "lv_port_indev_template.h"
(2)初始化定时器、LVGL库、输入输出设备:
timer_con_init();
lv_init();
lv_port_disp_init();
lv_port_indev_init();
(3)在while中每隔5ms调用一次lv_timer_handler();
	while(1)
	{
		delay_ms(5);
		lv_timer_handler();
}(4)编写测试代码
lv_obj_t* switch_obj = lv_switch_create(lv_scr_act());
lv_obj_set_size(switch_obj, 60, 30);
lv_obj_align(switch_obj, LV_ALIGN_CENTER, 0, 0);
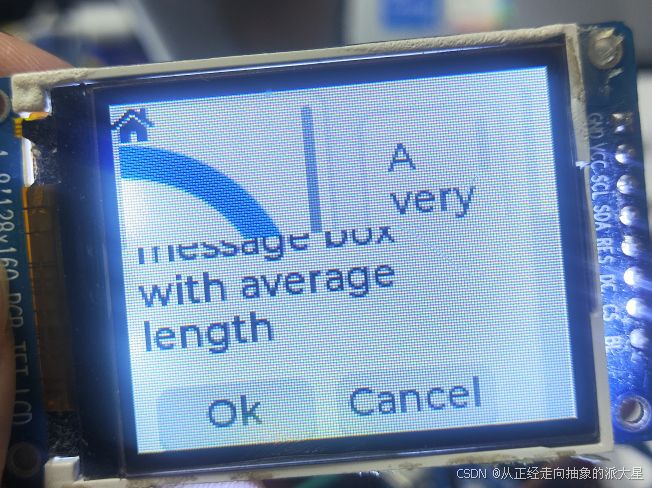
如果想进行官方例程测试(如lv_demo_stress();):
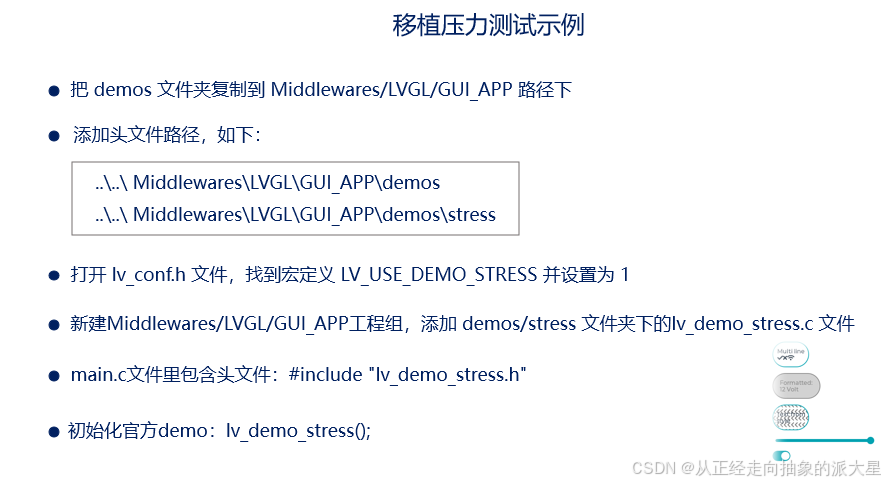
#include "gd32f4xx.h"
#include <stdio.h>
#include "systick.h"
#include"lcd.h"
#include"lcd_init.h"
#include"timer.h"
#include "lvgl.h"
#include "lv_port_disp_template.h"
#include "lv_port_indev_template.h"
int main(void)
{
	delay_init();
	timer_con_init();
	usart_ini(115200);
	printf("start\r\n");
	lv_init();
	lv_port_disp_init();
//	lv_port_indev_init();
    lv_demo_stress();
	while(1)
	{
		delay_ms(5);
		lv_timer_handler();
	}
}
五、输入配置
屏幕如有输入要求进行如下配置:
六、在FreeRTOS项目基础上移植LVGL
步骤与无操作系统一样,唯一不一样的是时基配置:
裸机使用的是定时器提供时基,而有RTOS也可以这样,但更好方案是以freertos心跳为为时基:
,在lv_conf.h中进行如下更改:
/*Use a custom tick source that tells the elapsed time in milliseconds.
 *It removes the need to manually update the tick with `lv_tick_inc()`)*/
#define LV_TICK_CUSTOM 1
#if LV_TICK_CUSTOM
    #define LV_TICK_CUSTOM_INCLUDE  "FreeRTOS.h"         /*Header for the system time function*/
    #define LV_TICK_CUSTOM_SYS_TIME_EXPR (xTaskGetTickCount())    /*Expression evaluating to current system time in ms*/
    /*If using lvgl as ESP32 component*/
    // #define LV_TICK_CUSTOM_INCLUDE "esp_timer.h"
    // #define LV_TICK_CUSTOM_SYS_TIME_EXPR ((esp_timer_get_time() / 1000LL))
#endif   /*LV_TICK_CUSTOM*/
七、其他
lv_conf.h帧率设置:
/*Default display refresh period. LVG will redraw changed areas with this period time*/
#define LV_DISP_DEF_REFR_PERIOD 30      /*[ms]*/

/*Input device read period in milliseconds*/
#define LV_INDEV_DEF_READ_PERIOD 5     /*[ms]*/

// 定义显示刷新周期
#define LV_DISP_DEF_REFR_PERIOD 16  /* 16ms,约 60 FPS */

// 定义输入设备读取周期
#define LV_INDEV_DEF_READ_PERIOD 2  /* 2ms,快速响应 */
解决屏幕撕裂BUG:
解决办法1:
//将MY_DISP_HOR_RES*10更改成MY_DISP_HOR_RES*1


//    /* Example for 1) */
    static lv_disp_draw_buf_t draw_buf_dsc_1;
    static lv_color_t buf_1[MY_DISP_HOR_RES*10 ];                          /*A buffer for 10 rows*/
    lv_disp_draw_buf_init(&draw_buf_dsc_1, buf_1, NULL, MY_DISP_HOR_RES*1);   /*Initialize the display buffer*/
解决方案2:
//更改缓存模式
//    /* Example for 1) */
    static lv_disp_draw_buf_t draw_buf_dsc_1;
//    static lv_color_t buf_1[MY_DISP_HOR_RES*10 ];                          /*A buffer for 10 rows*/
//    lv_disp_draw_buf_init(&draw_buf_dsc_1, buf_1, NULL, MY_DISP_HOR_RES*10);   /*Initialize the display buffer*/

    /* Example for 2) */
    static lv_disp_draw_buf_t draw_buf_dsc_2;
    static lv_color_t buf_2_1[MY_DISP_HOR_RES * 10];                        /*A buffer for 10 rows*/
    static lv_color_t buf_2_2[MY_DISP_HOR_RES * 10];                        /*An other buffer for 10 rows*/
    lv_disp_draw_buf_init(&draw_buf_dsc_2, buf_2_1, buf_2_2, MY_DISP_HOR_RES * 10);   /*Initialize the display buffer*/


 749
749

 被折叠的 条评论
为什么被折叠?
被折叠的 条评论
为什么被折叠?
 到【灌水乐园】发言


