


web3多重签名交易
Web3 中的多重签名交易(Multisig Transaction)解析
Web3 里的多重签名交易(Multisig Transaction),是指一笔区块链交易并非由单个私钥的签名来决定能否执行,而是需要多个独立私钥共同签名授权。
这是一种极具代表性的安全增强机制,在钱包管理、DAO(去中心化自治组织)治理、金库管理以及团队共管资产等众多场景中得到了广泛应用。
🚀 多重签名(Multisig)究竟是什么?
简单来讲:
一笔资金的动用,需要 2~3 个甚至更多人共同签字确认。
举例说明:
- 共管钱包场景:3 个合伙人共同管理一个钱包。
- 签名门槛设置:设定为**至少 2 人同意(即 2/3 签名)**才可进行转账操作。
- 系统验证机制:系统会自动验证是否达到预设的签名门槛(threshold)。
- 执行结果判定:若达到门槛,交易将执行;否则,资产不会发送。
这一机制有效避免了单点风险,即避免了因一个人丢失私钥或私钥被黑客攻击,而导致资金损失的情况。
🔐 多重签名结构(以以太坊为例)
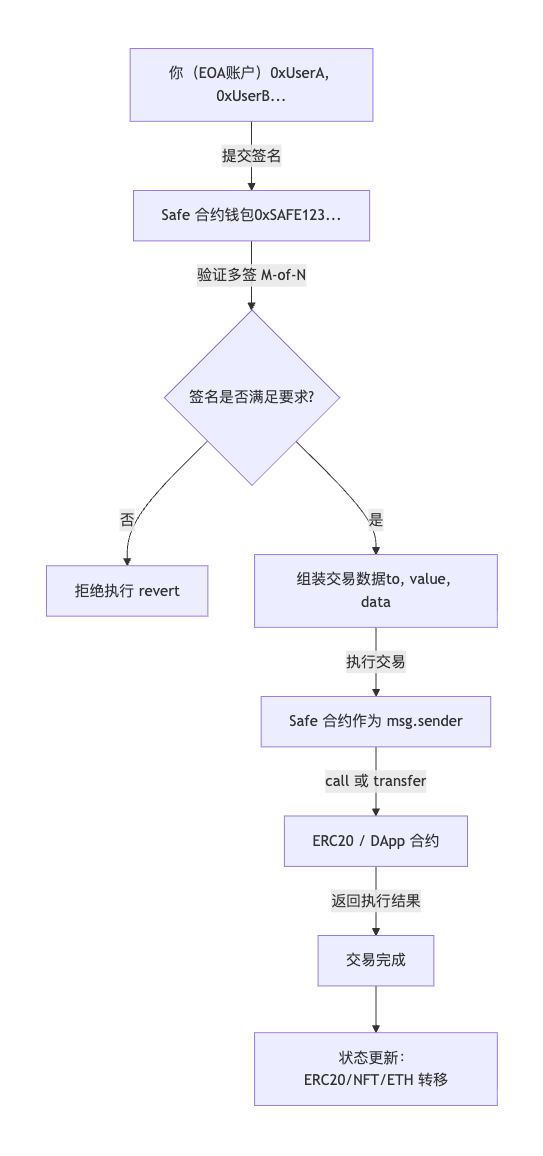
在以太坊上,常用的多重签名实现方式是智能合约式 Multisig,例如 Gnosis Safe。其具体结构和工作流程如下:
- owners:一组地址列表,代表拥有签名权限的各方。
- threshold:签名门槛,即达成交易所需的最少签名数量。
- 交易发起与编码:当发起交易时,交易内容会被编码为一个“交易体”。
- 签名过程:每个 owner 使用自己的私钥对交易体进行签名。
- 合约验证:智能合约验证收到的签名数量是否达到预设的 threshold。
- 执行判定:若达到 threshold,交易执行;若未达到,交易拒绝。
需注意,多重签名本质上是在智能合约的内部逻辑中实现的,并非链上原生支持的特性。
🧩 为什么需要多重签名?
下表通过对比单签钱包和多重签名钱包,清晰展示了多重签名的优势:
| 风险 | 单签钱包 | 多重签名钱包 |
|---|---|---|
| 私钥丢失 | 资产无法找回,面临永久损失风险 | 多钥冗余设计,不会全部丢失,降低资产损失风险 |
| 私钥泄露 | 资产瞬间被盗,损失难以挽回 | 单钥泄露无法直接导致资产被盗,需多方批准才能执行交易 |
| 团队资产管理 | 安全性较低,易出现内部管理问题 | 透明度高,可实现多人共管,提升团队资产管理安全性 |
| DAO 治理 | 不支持,无法满足 DAO 去中心化治理需求 | 是 DAO 的基础模块,助力实现去中心化、透明化治理 |
由此可见,多重签名能够有效解决团队管理资产、防范黑客攻击与盗窃、实现治理流程透明化等痛点问题。
🛠 在 EVM 链上如何进行多签?
在 EVM 链上实施多重签名的流程通常如下:
- 创建 Multisig 合约:选择合适的工具(如 Safe)创建一个多重签名合约。
- 设置参数:设定 owners(拥有签名权限的地址列表)和 threshold(签名门槛)。
- 发起交易:发起一笔转账或执行合约调用的交易。
- 生成交易哈希:合约生成该笔交易的唯一哈希值。
- 独立签名:每个 owner 使用自己的私钥对交易进行独立签名。
- 提交签名:发起“执行交易”请求,将所有签名打包并提交至合约。
- 验证与执行:合约验证签名数量,若满足 threshold,则执行交易;否则拒绝。
📌 常见 Multisig 应用场景
- DAO 金库管理:用于管理价值数千万的资金,实现多人共管,保障资金安全。
- L1 / L2 跨链桥管理员:确保跨链操作的安全性和可靠性,防止资金在跨链过程中出现损失。
- 交易所冷钱包:采用多重签名机制,增强冷钱包的安全性,降低私钥泄露风险。
- Web3 项目团队资金:方便团队成员共同管理项目资金,提高资金使用的透明度和安全性。
- NFT 项目 mint 权限控制:通过多重签名控制 NFT 的铸造权限,防止未经授权的铸造行为。
- 高额资金的安全保管:为高额资金提供更高级别的安全保障,降低资金被盗风险。
🧭 多重签名交易与普通交易的区别是什么?
下表从多个维度对比了单签交易和多重签名交易的特点:
| 项目 | 单签交易 | 多重签名交易 |
|---|---|---|
| 私钥数量 | 仅需 1 个私钥 | 需要多个独立私钥共同签名 |
| 验证方 | 由链的 ECDSA 算法进行验证 | 由智能合约逻辑进行验证 |
| 执行过程 | 立即执行,无需额外授权 | 需要多次签名后统一执行,确保多方同意 |
| 安全性 | 相对较低,易受单点风险影响 | 极高,通过多重验证降低风险 |
| 透明度 | 一般,交易信息相对不透明 | 签名和执行过程均可审计,透明度高 |
多重签名的流程
python 实现一个简单的多重签名交易
- 一个简单的 Solidity 多签合约(可部署),使用 ECDSA 验签并要求签名按地址严格递增以防重放/重复。
- 一个Python 脚本(web3.py + eth-account + py-solc-x),包含:编译、部署合约、用多个私钥对交易签名、把签名打包并调用合约执行交易。
- 逐步说明与注意事项,便于你在本地(Anvil / Ganache / Hardhat 节点)直接跑通。
假设你本地运行的以太坊节点地址为 http://127.0.0.1:8545(Anvil / Ganache 常用)。如果不同,把 RPC_URL 改成你的节点即可。
首先创建一个合约文件,保存到contracts/MultiSigWallet.sol
// SPDX-License-Identifier: MIT
pragma solidity ^0.8.18;

/// Simple multisig wallet that verifies Ethereum signed messages.
/// Owners must be unique and signatures must be provided in strictly increasing address order
contract SimpleMultiSig {
    address[] public owners;
    mapping(address => bool) public isOwner;
    uint256 public threshold;
    uint256 public nonce;

    event ExecuteTransaction(address indexed to, uint256 value, bytes data, uint256 nonce);
    event Deposit(address indexed sender, uint256 value);

    constructor(address[] memory _owners, uint256 _threshold) {
        require(_owners.length > 0, "owners required");
        require(_threshold > 0 && _threshold <= _owners.length, "invalid threshold");

        for (uint i = 0; i < _owners.length; i++) {
            address owner = _owners[i];
            require(owner != address(0), "invalid owner");
            require(!isOwner[owner], "owner not unique");
            isOwner[owner] = true;
            owners.push(owner);
        }
        threshold = _threshold;
    }

    // Allow contract to hold ETH
    receive() external payable {
        emit Deposit(msg.sender, msg.value);
    }

    // Computes the message hash that owners must sign (keccak256)
    function getMessageHash(address to, uint256 value, bytes memory data, uint256 _nonce) public pure returns (bytes32) {
        // we hash the calldata too; use keccak256(data) to handle variable length
        return keccak256(abi.encodePacked(to, value, keccak256(data), _nonce));
    }

    // Prefix to mimic eth_sign (EIP-191)
    function getEthSignedMessageHash(bytes32 messageHash) public pure returns (bytes32) {
        // "\x19Ethereum Signed Message:\n32" + messageHash
        return keccak256(abi.encodePacked("\x19Ethereum Signed Message:\n32", messageHash));
    }

    // Execute transaction if enough valid signatures provided.
    // signatures: concatenated (r (32) || s (32) || v (1)) for each signer, in order of signer addresses (strictly increasing)
    function executeTransaction(address to, uint256 value, bytes calldata data, bytes calldata signatures) external {
        bytes32 messageHash = getMessageHash(to, value, data, nonce);
        bytes32 ethSignedMessageHash = getEthSignedMessageHash(messageHash);

        uint256 sigCount = signatures.length / 65;
        require(sigCount >= threshold, "not enough signatures");

        address lastRecovered = address(0);
        uint256 offset = 0;
        uint256 validSignatures = 0;

        for (uint i = 0; i < sigCount; i++) {
            bytes32 r;
            bytes32 s;
            uint8 v;

            // extract r, s, v
            assembly {
                r := calldataload(add(signatures.offset, offset))
                s := calldataload(add(signatures.offset, add(offset, 32)))
                v := byte(0, calldataload(add(signatures.offset, add(offset, 64))))
            }

            offset += 65;

            // ecrecover returns address(0) on failure
            address recovered = ecrecover(ethSignedMessageHash, v, r, s);
            require(recovered != address(0), "invalid signature");
            require(isOwner[recovered], "not owner");
            require(recovered > lastRecovered, "signatures not strictly ordered or duplicate"); // enforce strict order to prevent duplicates
            lastRecovered = recovered;
            validSignatures++;

            if (validSignatures == threshold) break; // early exit when threshold met
        }

        require(validSignatures >= threshold, "threshold not met");

        nonce += 1;

        // execute call
        (bool success, ) = to.call{value: value}(data);
        require(success, "tx execution failed");

        emit ExecuteTransaction(to, value, data, nonce - 1);
    }

    // Helpers: get owners count
    function getOwners() external view returns (address[] memory) {
        return owners;
    }
}
安装相关的库
pip install web3 eth-account py-solc-x
# 先导入需要的包
from web3 import Web3
from eth_account import Account
from eth_account.messages import encode_defunct

RPC_URL = "http://127.0.0.1:8545"      # 改成你的 RPC
CHAIN_ID = 31337                       # 本地节点常用 1337/31337/1 等,根据节点调整
GAS = 3_000_000
w3 = Web3(Web3.HTTPProvider(RPC_URL))
assert w3.is_connected()
# --- compile Solidity (py-solc-x) ---
from solcx import compile_source, install_solc

install_solc("0.8.18")
<Version('0.8.18')>
simple_multisig_source = open("contracts/MultiSigWallet.sol", "r", encoding="utf-8").read()

compiled = compile_source(
    simple_multisig_source,
    output_values=["abi", "bin"],
    solc_version="0.8.18"
)

contract_id, contract_interface = compiled.popitem()
abi = contract_interface["abi"]
bytecode = contract_interface["bin"]
# --- 选择三个测试账户(您可以使用本地节点账户或生成临时账户) ---
# 为了演示,我们创建了三个临时账户,并从节点的第一个账户(必须拥有以太币)中为其充值(这里我使用了Anvil的测试账户)
acct0 = w3.eth.accounts[0]
acct1 = w3.eth.account.create()  # 所有者1
acct2 = w3.eth.account.create()  # 所有者2
acct3 = w3.eth.account.create()  # 所有者3
owners = [acct1.address, acct2.address, acct3.address]
threshold = 2
print("Owner addresses:", owners)
print("Threshold:", threshold)
Owner addresses: ['0xcD57A2da868DaD6d1A26660C32BFfAFA0eBF9b32', '0x1dD2D95820f25a28fd8352671eFcC9324b90Bd3a', '0x796109581b5B339DdCa42c860b4F8dC21f7A0AB7']
Threshold: 2
# 从节点的“矿工费”账户中为所有者账户充值(假设节点已解锁账户或已预先充值)
funder = w3.eth.accounts[0]

def fund_address(to_addr, amount_wei=Web3.to_wei(1, "ether")):
    tx = {
        "from": funder,
        "to": to_addr,
        "value": amount_wei,
        "gas": 21000,
        "nonce": w3.eth.get_transaction_count(funder),
    }
    tx_hash = w3.eth.send_transaction(tx)
    w3.eth.wait_for_transaction_receipt(tx_hash)

for addr in owners:
    fund_address(addr)
# 部署合约
SimpleMultiSig = w3.eth.contract(abi=abi, bytecode=bytecode)

# Build transaction with deployer = funder
construct_txn = SimpleMultiSig.constructor(owners, threshold).build_transaction({
    "from": funder,
    "nonce": w3.eth.get_transaction_count(funder),
    "gas": GAS,
    "gasPrice": w3.eth.gas_price,
    "chainId": CHAIN_ID
})

tx_hash = w3.eth.send_transaction(construct_txn)
tx_receipt = w3.eth.wait_for_transaction_receipt(tx_hash)
ms_address = tx_receipt.contractAddress
print("MultiSig deployed at:", ms_address)
MultiSig deployed at: 0x8A791620dd6260079BF849Dc5567aDC3F2FdC318
ms_contract = w3.eth.contract(address=ms_address, abi=abi)
# --- 准备一个由多重签名执行的交易 ---
to = w3.to_checksum_address(w3.eth.accounts[1])  # 目标:将资金发送至第二个节点账户
value = Web3.to_wei(0.1, "ether")
data = b""  # 空的参数数据
nonce = ms_contract.functions.nonce().call()
print("合约nonce:", nonce)
合约nonce: 0
# # 计算消息哈希值(与 Solidity 中的 getMessageHash 方法相同)
# Solidity: keccak256(abi.encodePacked(to, value, keccak256(data), nonce))
data_hash = w3.keccak(data)
packed = Web3.solidity_keccak(
    ["address", "uint256", "bytes32", "uint256"],
    [to, value, data_hash, nonce]
)
message_hash = packed  # 32 bytes

# 现在创建以太坊签名消息(与 Solidity 中的 getEthSignedMessageHash 方法相同)
# 我们必须对前缀消息进行签名(使用 eth_sign 或 personal_sign 功能)
message = encode_defunct(message_hash)
# 使用所有者的私钥进行签名(我们有 acct1、acct2、acct3 这三个对象)
sig1 = Account.sign_message(message, private_key=acct1.key)
sig2 = Account.sign_message(message, private_key=acct2.key)
sig3 = Account.sign_message(message, private_key=acct3.key)
# 现在按照地址严格递增的顺序创建签名组合
# 我们必须按地址对签名者进行排序,并按照此顺序将签名组合起来。
sigs = []
pairs = [
    (acct1.address, sig1),
    (acct2.address, sig2),
    (acct3.address, sig3)
]
pairs_sorted = sorted(pairs, key=lambda p: bytes.fromhex(p[0][2:]))  # sort by address bytes
print("Sorted signers:", [p[0] for p in pairs_sorted])
Sorted signers: ['0x1dD2D95820f25a28fd8352671eFcC9324b90Bd3a', '0x796109581b5B339DdCa42c860b4F8dC21f7A0AB7', '0xcD57A2da868DaD6d1A26660C32BFfAFA0eBF9b32']
for addr, sig in pairs_sorted:
    # signature bytes r(32) + s(32) + v(1)
    r = sig.r.to_bytes(32, byteorder="big")
    s = sig.s.to_bytes(32, byteorder="big")
    v = bytes([sig.v])
    sigs.append(r + s + v)

signatures_concatenated = b"".join(sigs)
# 在执行过程中,我们只需要阈值签名。从已排序的列表中选取前 `threshold` 个签名。
signatures_for_submit = signatures_concatenated[:65 * threshold]
# 提交执行交易的调用
tx = ms_contract.functions.executeTransaction(to, value, data, signatures_for_submit).build_transaction({
    "from": funder,
    "nonce": w3.eth.get_transaction_count(funder),
    "gas": GAS,
    "gasPrice": w3.eth.gas_price,
    "chainId": CHAIN_ID
})

tx_hash = w3.eth.send_transaction(tx)
receipt = w3.eth.wait_for_transaction_receipt(tx_hash)
print("Execute tx receipt:", receipt)
Execute tx receipt: AttributeDict({'type': 0, 'status': 0, 'cumulativeGasUsed': 75409, 'logs': [], 'logsBloom': HexBytes('0x00000000000000000000000000000000000000000000000000000000000000000000000000000000000000000000000000000000000000000000000000000000000000000000000000000000000000000000000000000000000000000000000000000000000000000000000000000000000000000000000000000000000000000000000000000000000000000000000000000000000000000000000000000000000000000000000000000000000000000000000000000000000000000000000000000000000000000000000000000000000000000000000000000000000000000000000000000000000000000000000000000000000000000000000000000000'), 'transactionHash': HexBytes('0x05d3535b51dedbe1b217eabd0fe6936a26512c6f4332551bd0ba1286bd288c00'), 'transactionIndex': 0, 'blockHash': HexBytes('0x9e0469bf50dc5a1670bb199811b03abf4bfc5167f7e8fa694df798a3a1cf265f'), 'blockNumber': 11, 'gasUsed': 75409, 'effectiveGasPrice': 1270799468, 'blobGasPrice': 1, 'from': '0xf39Fd6e51aad88F6F4ce6aB8827279cffFb92266', 'to': '0x8A791620dd6260079BF849Dc5567aDC3F2FdC318', 'contractAddress': None})
说明与注意事项(关键点)
- 签名格式要一致:上面合约里我们用了
getEthSignedMessageHash(相当于eth_sign/personal_sign前缀)。在 Python 用eth_account.messages.encode_defunct来创建与之匹配的签名。两边的前缀必须一致,否则签名验证失败。 - 签名顺序与防重放:合约要求签名提供者地址是严格递增 (
recovered > lastRecovered) 来避免重复使用同一签名或顺序混乱导致的双计数。这是一种常用技巧,也可以用 bitmap 或 usedSignature mapping。 - 签名数据的构造:合约对
data先做了keccak256(data),以处理可变长度。Python 端必须一样计算。 - 阈值(threshold):合约要求
sigCount >= threshold,并在循环里早停到阈值以节省 gas。 - 签名长度:每个签名 65 bytes (r=32 | s=32 | v=1)。Python 端要把
r+s+v串联。 - 资金来源:在 demo 中用
funder(节点第一个账户)来发起部署和最终的executeTransaction调用;合约会把 ETH 从自己余额转出(合约必须有足够 ETH)。你可以在部署后先给合约转点 ETH(通过send_transaction到合约地址)用于支付要转出去的 value。 - 本地测试工具:推荐使用 Anvil 或 Ganache/Hardhat,方便快速获取 unlocked accounts / pre-funded accounts,调试时不用签名 tx(或者可以使用私钥直接发送 raw tx)。


 846
846

 被折叠的 条评论
为什么被折叠?
被折叠的 条评论
为什么被折叠?
 到【灌水乐园】发言


