


一、安装
1,wget http://download.redis.io/releases/redis-5.0.0.tar.gz
2,tar –xvf redis-5.0.0.tar.gz
3,cd redis-5.0.0
4,make
5,make install
这就安装完成了,这个流程基本是不会报错的,我安装过了就不截图了。
执行redis-server -v出现如下结果表示安装完成了
![]()
二、启动
1,写配置文件
//绑定主机地址

bind 192.168.1.105

//关闭保护模式
protected-mode no

//设置后台运行
daemonize yes

//设置端口,最好不要用默认的6379,总有刁民想搞你的
port 6370

//设置日志文件位置
logfile /var/log/redis.log

//设置持久化文件存储位置
dir /root/redis-5.0.0/data/

//设置密码,也可以不设置,我被黑客搞过,所以还是设置一个
requirepass tianqi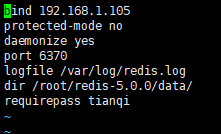
然后执行redis-server redis_6370.conf启动redis,ps -ef | grep redis查看,服务已经起来了
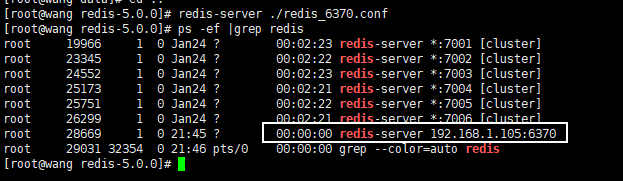
使用redis-cli -h 192.168.1.105 -p 6370即可连接到,-a是密码,没设置密码可以不加这个

如果只是学习一下redis的安装及命令到这就可以了,然后就各种set和get,下面是如何使用java程序连接到阿里云的单体redis
2,修改阿里云的安全组

3,写程序了,使用springboot整合redis
pom依赖
    <properties>
          <project.build.sourceEncoding>UTF-8</project.build.sourceEncoding>
          <maven.compiler.source>1.8</maven.compiler.source>
          <maven.compiler.target>1.8</maven.compiler.target>
    </properties>
    <dependencies>
        <dependency>
            <groupId>org.springframework.boot</groupId>
            <artifactId>spring-boot-starter-data-redis</artifactId>
            <version>2.1.4.RELEASE</version>
        </dependency>
        <dependency>
            <groupId>org.apache.commons</groupId>
            <artifactId>commons-pool2</artifactId>
            <version>2.5.0</version>
        </dependency>
        <dependency>
            <groupId>com.fasterxml</groupId>
            <artifactId>jackson-xml-databind</artifactId>
            <version>0.6.0</version>
        </dependency>
    </dependencies>
配置类
package redis.study.config;

import org.springframework.cache.annotation.CachingConfigurerSupport;
import org.springframework.cache.interceptor.KeyGenerator;
import org.springframework.context.annotation.Bean;
import org.springframework.context.annotation.Configuration;
import org.springframework.data.redis.connection.RedisConnectionFactory;
import org.springframework.data.redis.core.RedisTemplate;
import org.springframework.data.redis.serializer.GenericJackson2JsonRedisSerializer;

import java.util.Arrays;

@Configuration
public class redisConfig extends CachingConfigurerSupport {
    @Bean
    public RedisTemplate<String,Object> getRedisTemplate(RedisConnectionFactory redisConnectionFactory){
        RedisTemplate<String,Object> redisTemplate = new RedisTemplate<String, Object>();
        redisTemplate.setConnectionFactory(redisConnectionFactory);
        GenericJackson2JsonRedisSerializer serializer = new GenericJackson2JsonRedisSerializer();
        redisTemplate.setDefaultSerializer(serializer);
        return redisTemplate;
    }
    @Bean
    @Override
    public KeyGenerator keyGenerator(){
        return (target,method,objects) -> {
            StringBuilder sb = new StringBuilder();
            sb.append(target.getClass().getName()).append(method.getName()).append(Arrays.toString(objects));
            return sb.toString();
        };
    }
}
yml配置文件
server:
  port: 8001
  servlet:
    context-path: /
spring:
  redis:
    host: 这里写你的公网IP
    port: 6370
    password: tianqi    #没有密码这里可以空着,pasword:
    database: 0
    jedis:
      pool:
        #连接池最大连接数默认是8
        max-active: 1000
        #连接池最大阻塞时间,-1表示无限制,默认-1
        max-wait: -1
        #连接池最大空闲数,默认8
        max-idle: 10
        #连接池最小空闲数,默认0
        min-idle: 10
测试类
package mytest.RedisTest;

import org.junit.Test;
import org.junit.runner.RunWith;
import org.springframework.beans.factory.annotation.Autowired;
import org.springframework.boot.test.context.SpringBootTest;
import org.springframework.data.redis.core.RedisTemplate;
import org.springframework.test.context.junit4.SpringRunner;
import redis.Application;

@SpringBootTest(classes = Application.class)
@RunWith(SpringRunner.class)
public class Test1 {
    @Autowired
    RedisTemplate redisTemplate;
    @Test
    public void test1(){
        Long aLong = redisTemplate.opsForList().leftPush("jinlong", "wang");
        System.out.println(redisTemplate.opsForList().rightPop("jinlong"));
        //System.out.println(aLong);
    }
}
结果

如果连接不了,timeout的话
1,看看公网IP写错了吗,ping一下
2,配置文件中的内网IP是对的吗,可能有几个,可以试试到底是哪一个
3,保护模式关了吗protected-mode no
4,防火墙关了吗
这就是redis整个安装部署到连接使用的过程了,有错误的话欢迎指出,有疑问可以下方提出,谢谢!


 4366
4366

 被折叠的 条评论
为什么被折叠?
被折叠的 条评论
为什么被折叠?
 到【灌水乐园】发言


