


 本文介绍了如何使用谷歌的gRPC框架进行远程服务调用。首先新建了一个maven项目,接着定义了服务并编写了test.proto文件。通过maven插件将.proto文件转换为Java代码,并设置为生成源代码目录。然后详细阐述了如何编写服务器(MyServer)和客户端(MyClient)代码。最后,讲解了三种请求方式:阻塞、Future和回调,分别展示了不同类型的调用方法。
远程服务调用是微服务中重要一环,谷歌的gRPC是一个优秀的框架,今天就来学习一下基本用法。
新建maven项目
pom.xml
<dependencies>
        <dependency>
            <groupId>io.grpc</groupId>
            <artifactId>grpc-all</artifactId>
            <version>1.5.0</version>
        </dependency>
    </dependencies>
    <build>
        <extensions>
            <extension>
                <groupId>kr.motd.maven</groupId>
                <artifactId>os-maven-plugin</artifactId>
                <version>1.4.1.Final</version>
            </extension>
        </extensions>
        <plugins>
            <plugin>
                <groupId>org.xolstice.maven.plugins</groupId>
                <artifactId>protobuf-maven-plugin</artifactId>
                <version>0.5.0</version>
                <configuration>
                    <protocArtifact>com.google.protobuf:protoc:3.3.0:exe:${os.detected.classifier}
                    </protocArtifact>
                    <pluginId>grpc-java</pluginId>
                    <pluginArtifact>io.grpc:protoc-gen-grpc-java:1.5.0:exe:${os.detected.classifier}
                    </pluginArtifact>
                    <!--*.proto文件目录-->
                    <protoSourceRoot>src/main/resources</protoSourceRoot>
                </configuration>
                <executions>
                    <execution>
                        <goals>
                            <goal>compile</goal>
                            <goal>compile-custom</goal>
                        </goals>
                    </execution>
                </executions>
            </plugin>
        </plugins>
    </build>
定义服务
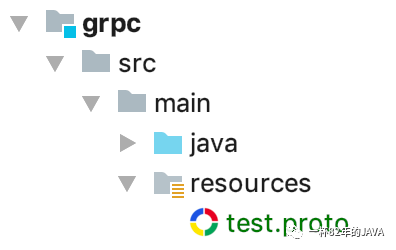
新建文件 src/main/resources/test.proto
syntax = "proto3";
option java_multiple_files = true;
option java_package = "com.acupt.grpc.proto";
option java_outer_classname = "HelloProto";
package com.acupt.grpc;
service HelloService {
    rpc hello (InvokeRequest) returns (InvokeResponse) {
    }
}
message InvokeRequest {
    string name = 1;
}
message InvokeResponse {
    string msg = 1;
}
构建
使用maven插件根据.proto文件生成Java代码,插件已在pom.xml中配置,只需执行命令:
mvn install
构建完成后可以在target中找到生成的Java代码,用这些代码可以实现gRPC远程调用。
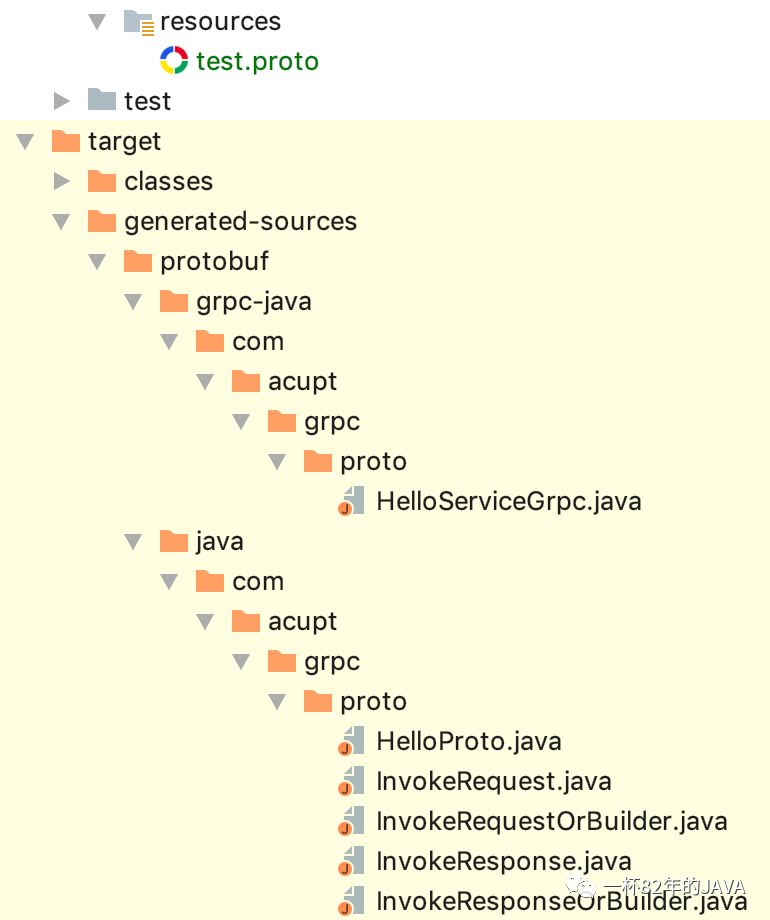
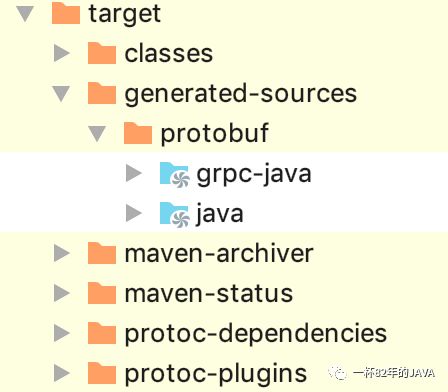
但在项目中还无法直接引用上面的类,右键 -> Mark Directory as -> Generated Sources Root

现在就可以在项目中引用了
代码
3个类
package com.acupt.grpc;
import com.acupt.grpc.proto.HelloServiceGrpc;
import com.acupt.grpc.proto.InvokeRequest;
import com.acupt.grpc.proto.InvokeResponse;
import io.grpc.stub.StreamObserver;
/**
 * 服务实现类
 */
public class HelloService extends HelloServiceGrpc.HelloServiceImplBase {
    @Override
    public void hello(InvokeRequest request, StreamObserver<InvokeResponse> responseObserver) {
        System.out.println("request -> " + request);
        String name = request.getName();//自定义的字段名 name
        InvokeResponse response = InvokeResponse.newBuilder()
                .setMsg("hello," + name)//自定义的字段名 msg
                .build();
        responseObserver.onNext(response);
        responseObserver.onCompleted();
    }
}
package com.acupt.grpc;
import io.grpc.Server;
import io.grpc.ServerBuilder;
import java.io.IOException;
/**
* 服务提供方
*
* @author liujie
*/
public class MyServer {
public static void main(String[] args) throws IOException, InterruptedException {
int port = 50051;
Server server = ServerBuilder.forPort(port)
.addService(new HelloService())
.build()
.start();
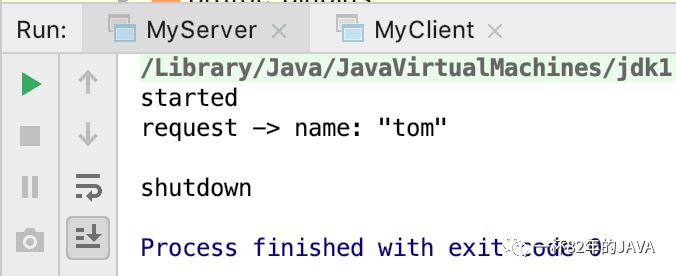
System.out.println("started");
Thread.sleep(1000 * 60 * 2);
server.shutdown();
System.out.println("shutdown");
}
}package com.acupt.grpc;
import com.acupt.grpc.proto.HelloServiceGrpc;
import com.acupt.grpc.proto.InvokeRequest;
import com.acupt.grpc.proto.InvokeResponse;
import io.grpc.Channel;
import io.grpc.ManagedChannelBuilder;
/**
* 服务调用方
*/
public class MyClient {
public static void main(String[] args) {
InvokeRequest request = InvokeRequest.newBuilder().setName("tom").build();
Channel channel = ManagedChannelBuilder.forAddress("localhost", 50051).usePlaintext(true).build();
        HelloServiceGrpc.HelloServiceBlockingStub blockingStub = HelloServiceGrpc.newBlockingStub(channel);
        InvokeResponse response = blockingStub.hello(request);
        System.out.println(response.getMsg());
}
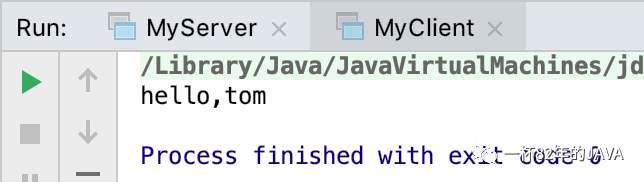
}先启动MyServer,成功启动后再启动MyClient
请求方式
1.阻塞
同步请求,接口返回前是阻塞的。
HelloServiceGrpc.HelloServiceBlockingStub blockingStub = HelloServiceGrpc.newBlockingStub(channel);
InvokeResponse response = blockingStub.hello(request);
System.out.println(response.getMsg());2.Future
调用后返回guava包里继承了Future的接口ListenableFuture(增加了listener支持),可以控制超时时间。
        HelloServiceGrpc.HelloServiceFutureStub futureStub = HelloServiceGrpc.newFutureStub(channel);
        ListenableFuture<InvokeResponse> future = futureStub.hello(request);
        future.addListener(
                () -> System.out.println("listener 1"),
                command -> {
                    System.out.println("execute 1 " + command);
                    command.run();
                });
        future.addListener(
                () -> System.out.println("listener 2"),
                command -> {
                    System.out.println("execute 2 " + command);
                    command.run();
                });
        System.out.println(future.get(10, TimeUnit.SECONDS));
3.回调
调用接口传入回调函数,调用后马上返回。
        MyClient.done = false;
        HelloServiceGrpc.HelloServiceStub stub = HelloServiceGrpc.newStub(channel);
        stub.hello(request, new StreamObserver<InvokeResponse>() {
            @Override
            public void onNext(InvokeResponse value) {
                System.out.println("onNext " + value);
            }
            @Override
            public void onError(Throwable t) {
                System.out.println("onError " + t.getMessage());
                t.printStackTrace();
                MyClient.done = true;
            }
            @Override
            public void onCompleted() {
                System.out.println("onCompleted");
                MyClient.done = true;
            }
        });
        while (!MyClient.done) {
            Thread.sleep(1000);
        }


 3021
3021

 被折叠的 条评论
为什么被折叠?
被折叠的 条评论
为什么被折叠?
 到【灌水乐园】发言


