


Amazon Q Developer是亚马逊云科技推出的一款专为专业开发者设计的人工智能助手,旨在提升代码开发和管理的效率。其主要功能包括代码生成、调试、故障排除、安全漏洞扫描等,提供一站式的代码服务。
往期文章分享了关于Amazon Q的入门配置技巧与快速实践指南,本期文章将继续分享Amazon Q如何加速构建云基础设施以及如何集成企业代码库(见次条文章)。
构造符合生产需要的VPC
(Virtual Private Cloud)
VPC是一个虚拟网络服务,允许用户在云上创建隔离的网络环境,自定义IP地址范围、配置路由和设置网络网关,实现资源的安全隔离与灵活管理。当用户第一次使用亚马逊云科技服务时,每个Region都会有一个默认的VPC,通常包含3个公开子网,然而这样的VPC通常无法满足应用架构的生产需要,如良好的网络隔离性和安全性等要求。创建一个符合生产要求的VPC并非易事,它需要专业的网络规划能力,同时还要熟悉亚马逊云科技控制台的操作。而有了Amazon Q Developer,这项工作会变得非常简单。
架构
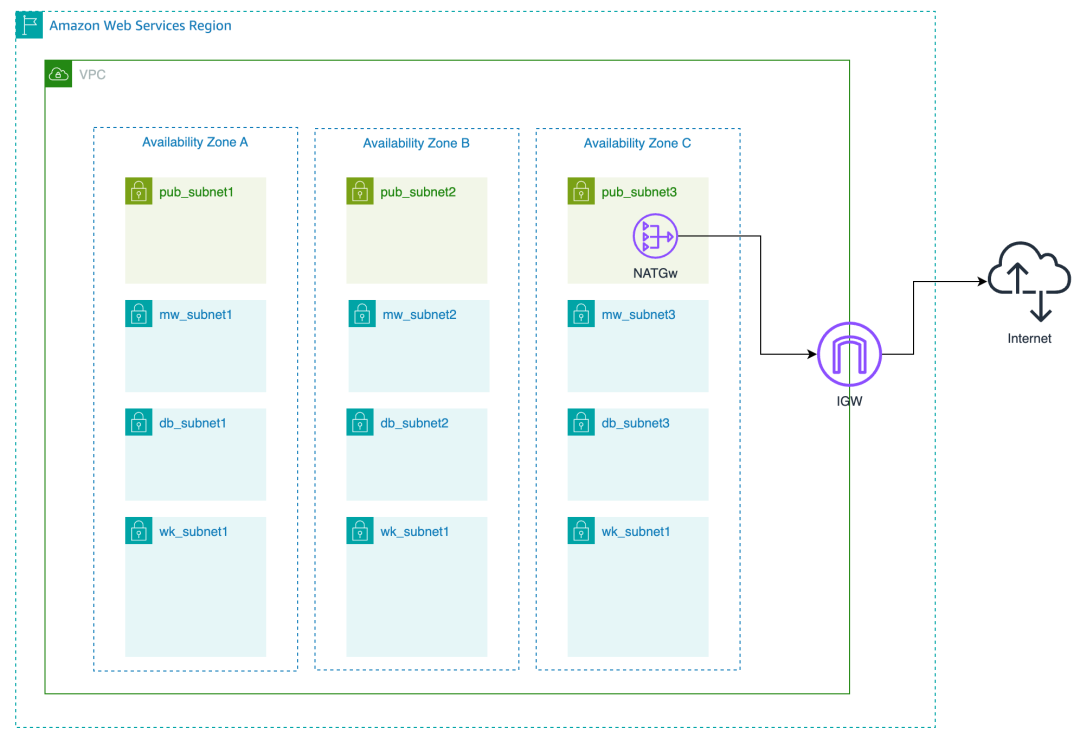
一个符合生产需要的VPC架构,通常如下图所示。
需求描述
3个可用区(AZ),满足工作负载对跨可用区(AZ)网络高可用的需要。
每个可用区(AZ)内均有一个公开子网,方便面向公网的跳板机,和负载均衡器等必须放在公开子网里的资源的硬性要求。
每个可用区(AZ)内均需要规划多个不同用途的私有子网,分别用来为工作负载,数据库,以及中间件预留分配足够的IP地址。同时,每类子网都规划了不同的IP容量,以充分利用资源,并为将来扩容留出足够的余量。
另外,所有私有子网的工作负载,都有访问公网的需要,以便于满足对外发送数据的需要,或者操作系统升级等联网需求。
传统方法
需手工在控制台创建,但在这种方式下,开发者必须理解所有细节,不但工作量大,而且很容易出错。
现代方法
可以利用亚马逊云科技提供的CDK,用IaC(Infrastructure as Code)的方式通过创建 CDK代码工程,来创建和维护资源。
优点:IaC方式的优点是以代码为基础设施描述的唯一来源,利于追溯变更,可以一键部署、一键销毁,非常符合DevOps的开发与运维模式,是当代普遍采用的管理基础设施的重要技术手段。
缺点:CDK代码本身有较大的学习成本,当开发者具体为不同资源进行编码的时候,熟悉每一个资源的编码细节是必须的工作,为此,在实际编码的过程中,开发者不得不经常查阅开发手册,亦是十分耗时费力。
Amazon Q Developer的方式
可以以自然语言的交互形式,快速协助开发者生成CDK资源创建代码,可以大大降低开发者必须深入细节才能编写高质量CDK代码所必须消耗的精力和时间。
开发者与运维人员仅需对架构有较为高层的认知,即可快速命令Amazon Q编写出高质量的CDK代码。
Amazon Q Developer实践
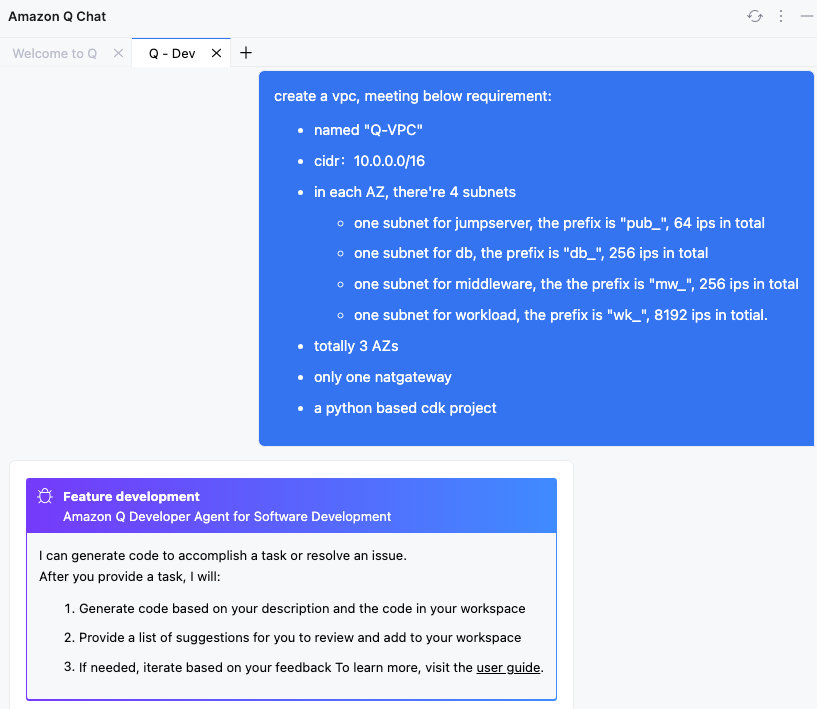
将需求以自然语言描述如下。
create a vpc, meeting below requirement:
- named "Q-VPC"
- cidr:10.0.0.0/16
- in each AZ, there're 4 subnets.
  - one subnet for jumpserver, the prefix is "pub_", 64 ips in total.
  - one subnet for db, the prefix is "db_", 256 ips in total.
  - one subnet for middleware, the the prefix is "mw_", 256 ips in total
  - one subnet for workload, the prefix is "wk_", 8192 ips in totial.
- totally 3 AZs.
- only one natgateway.
- a python based cdk project.
左右滑动查看完整示意
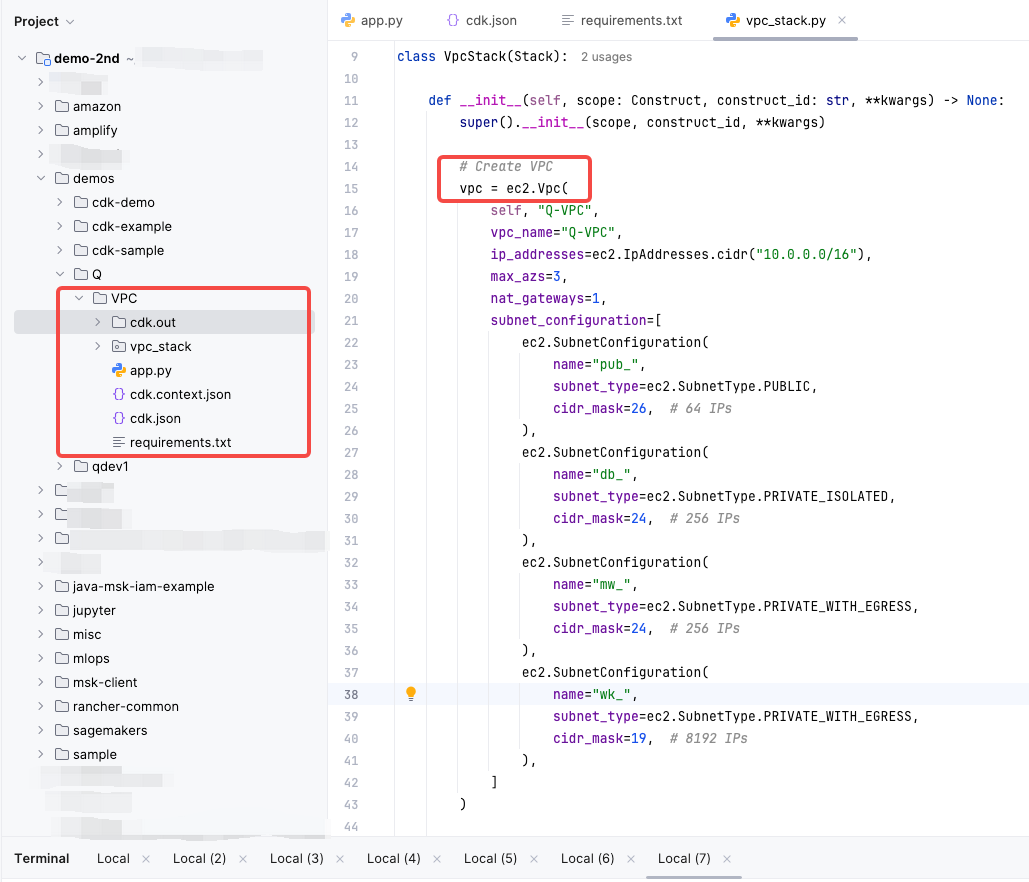
使用Amazon Q里的Chat Window里,输入上述提示词,Amazon Q将会返回详细的代码建议,如下图所示。
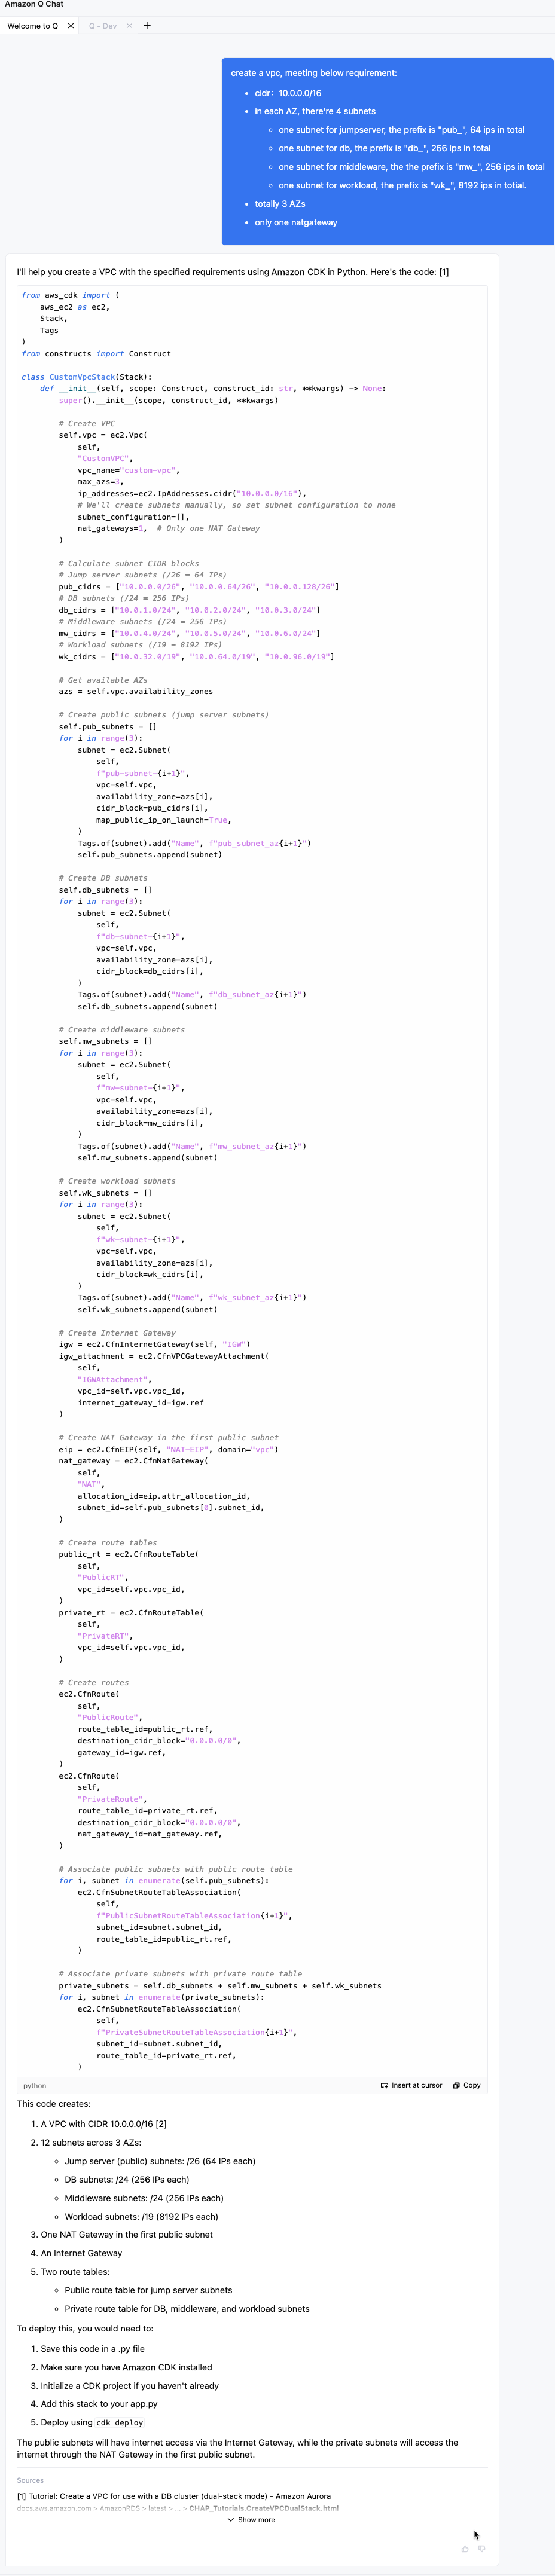
可以看到Amazon Q可以很好地理解需求,并精准的计算出了每个子网的掩码,要知道在过去要做到这一点,开发者要自己去计算才能设计得出来。
开发者可以充分利用这种和Amazon Q的“交谈”机制,不断审视Amazon Q的输出,进而不断进行代码的修正或变更,往往这个交谈的过程会持续多次,直至最终形成比较满意的结果。
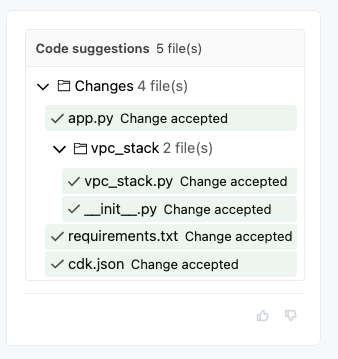
通过反复对话,得到了最终满足需要的提示词后,即可在Chat窗口里输入/dev并回车,使Amazon Q进入Agent模式,然后将上一个步骤的最终提示词输入后并回车,Amazon Q将真正进行编码工作,在指定的目录里创建出建议的CDK代码,如下图所示。
执行cdk deploy进行代码部署,并打开控制台进行验证,如下图所示。
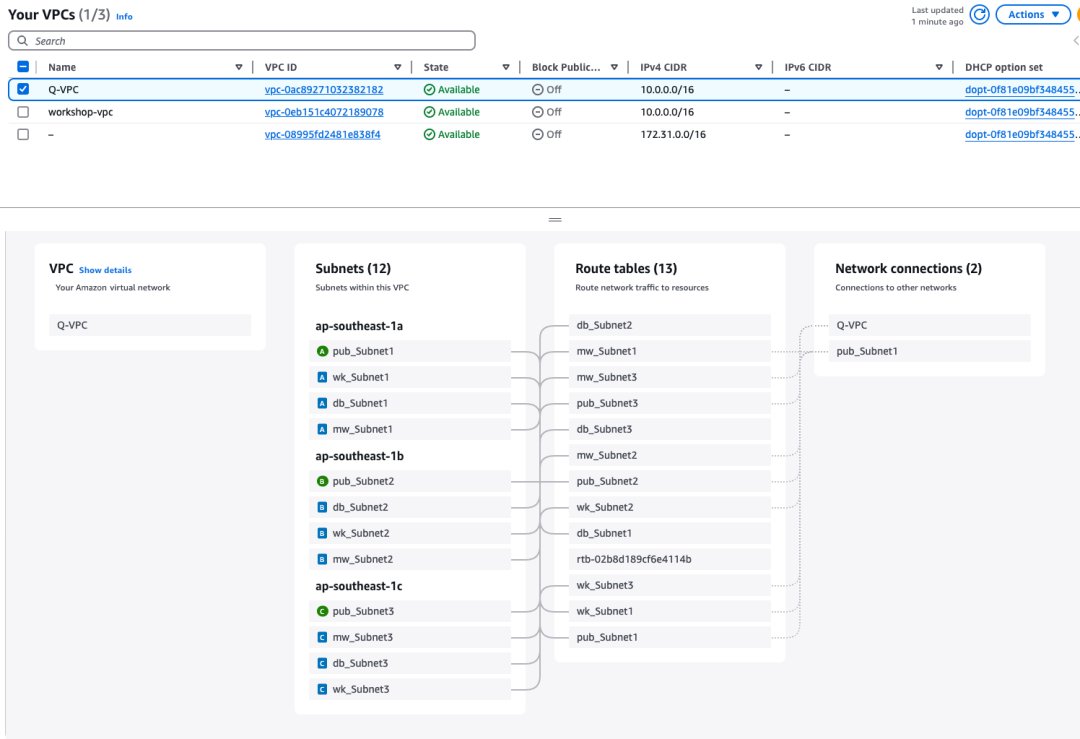

可以很清晰地看到,CDK精准地创建了满足要求的资源,一个基本满足生产需要的VPC网络便搭建成功了。
结论
Amazon Q仅用几轮自然语言对话,即可创建满足复杂要求的亚马逊云科技云资源的创建要求,大大提升了工作效率。
构造CDN
(Amazon CloudFront+Amazon S3)
快速构造一个内容分发网络。
架构

需求描述
创建一个Amazon S3 bucket(私有),作为静态资源存储,本例为一个文本文件。
创建Amazon CloudFront,并配置源站为Amazon S3。
用户通过输入Amazon CloudFront distribution的URL,即可下载文本文件。
传统方法
全部操作都需要手工在控制台创建,不但繁琐而且容易出现错误,并且操作都是一次性的,无法再次复用。
现代方法
利用亚马逊云科技提供的CDK来创建Amazon CloudFront和Amazon S3,并编写CDK代码来满足上述需求。但每个亚马逊云科技云资源的CDK具体编写代码都有不同,需要翻阅开发文档,或者寻找类似的样例代码去进行修改、并需要反复调试,效率很低,费时费力。
Amazon Q Developer的方式
用自然语言的方式交代给Amazon Q,让后者去处理所有细节,编写出准确、高效的CDK代码。
Amazon Q Developer实践
用自然语言,将需求描述如下。
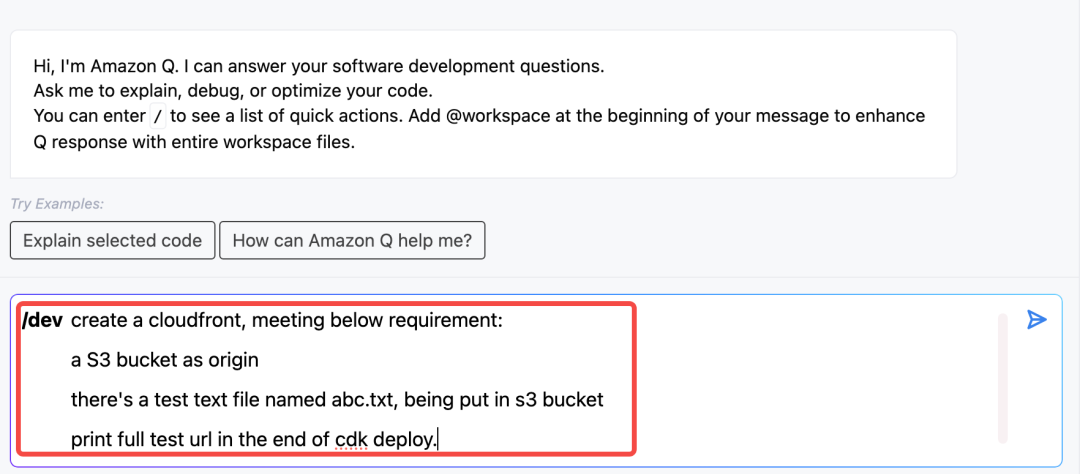
create a cloudfront, meeting below requirement:
- a S3 bucket as origin
- there's a test text file named abc.txt, being put in s3 bucket
- print full test url in the end of cdk deploy.
左右滑动查看完整示意
创建一个目录,例如cf-s3,并使用IDE(本例为 IntelliJ IDEA)。对于本例,由于任务的复杂度比较低,所以可以尝试直接用/dev功能(Agent),在Amazon Q里的Chat Window里,先键入/dev,然后输入上述提示词,如下图所示。
Amazon Q将询问代码创建的位置,选择刚才新创建的目录后,点击Retry后Amazon Q开始工作,然后点击Accept all,即可创建一个标准的CDK工程,完整结构如下图所示。
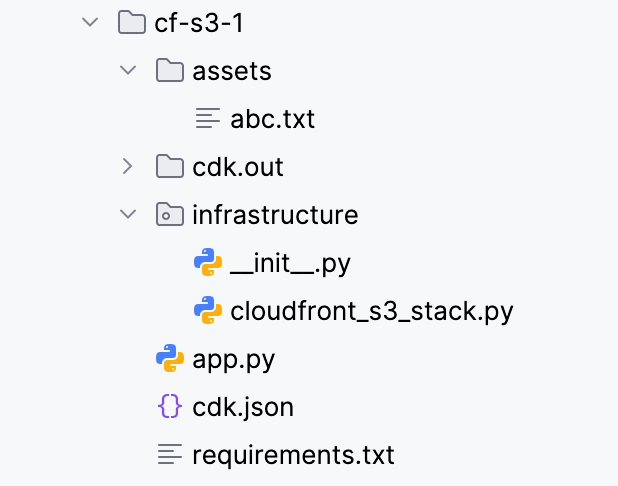
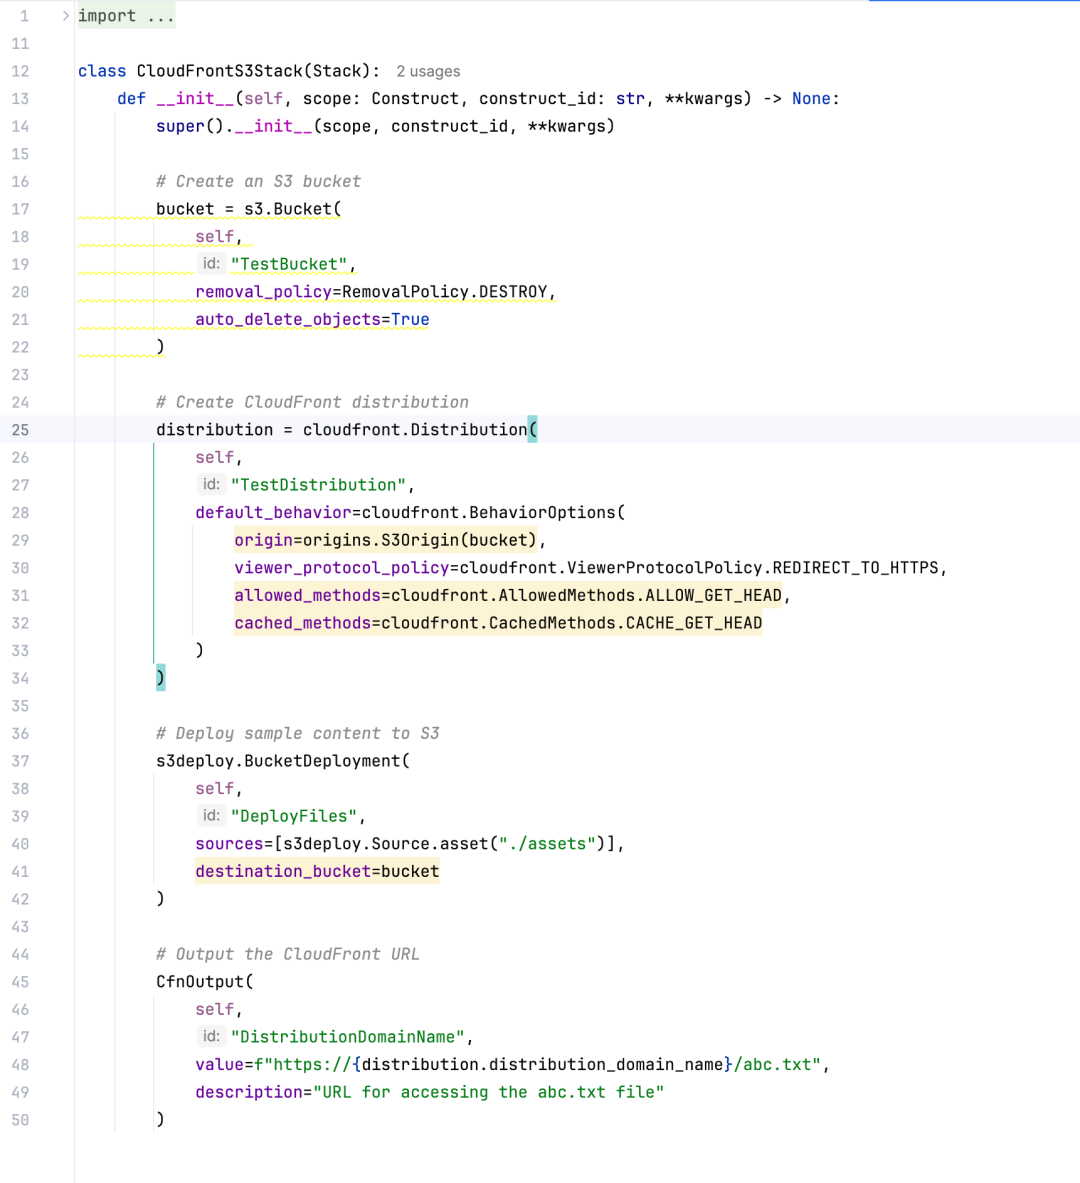
可以看到Amazon Q很好地理解了需求,包括创建好了测试所需要的文本文件(含内容),CDK关键代码如下图所示。
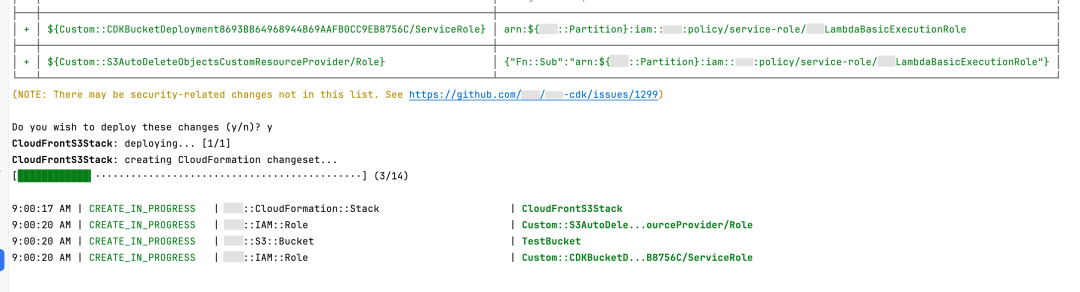
执行cdk deploy进行代码部署,如下图所示。
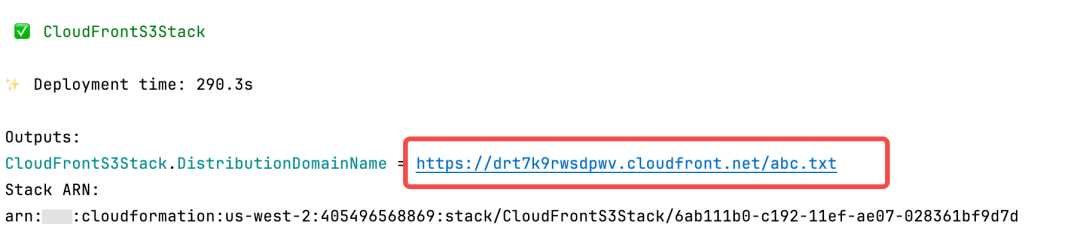
部署结束之后,CDK打印出来了完整的测试所需要的Amazon CloudFront distribution的URL,如下图所示。
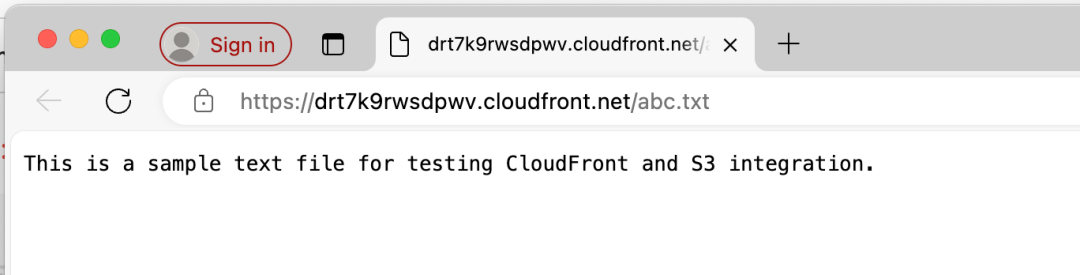
粘贴这个URL到浏览器中进行测试,如下图所示。
结论
寥寥几行描述,Amazon Q便完成了内容分发网络的CDK代码编写。虽然这个用例相对简单,但用Amazon Q来实现,毫无疑问会更简单!
构造经典的Amazon Serverless后端应用
本例将展示在Amazon Q的助力之下,如何快速实现一个经典的Amazon Serverless后端,该后端包含Amazon API Gateway+Amazon Lambda+Amazon DynamoDB,且Amazon API Gateway上提供的RestAPI需要经过Amazon Cognito鉴权才能正常访问。
架构
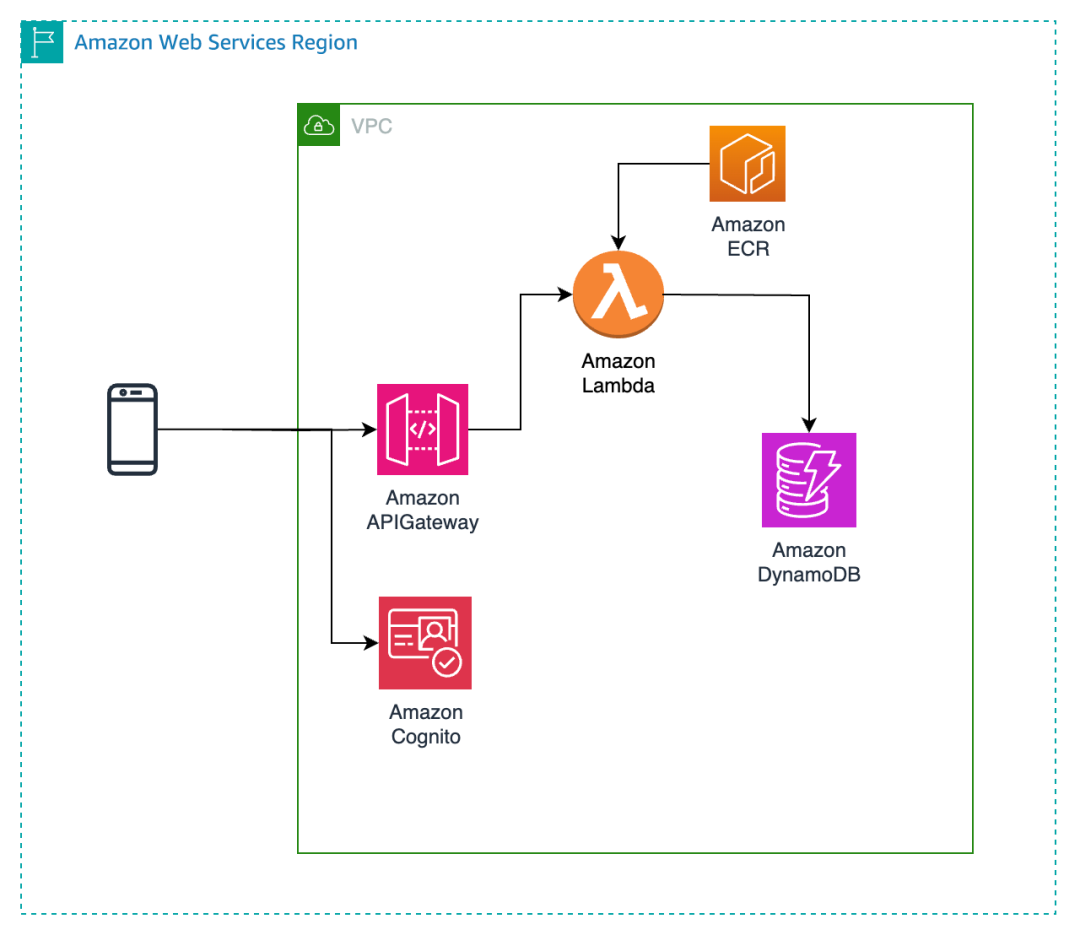
需求描述
创建一个受到Amazon Cognito鉴权保护的Amazon API Gateway。
Amazon API Gateway对接Amazon Lambda,后者来实现真正的业务需求。
创建一个Docker Image作为实际实现的Amazon Lambda,并在代码中实现对Amazon DynamoDB的CRUD操作。
编写测试代码测试上述接口(模拟真实客户端的行为)。
传统方法
全部操作都需要手工在控制台创建,繁琐程度超过前两个用例所需总和的数倍,即使是经验丰富亚马逊云科技从业人士,也要花费很多时间来进行调整和验证。
Amazon Q Developer的方式
用自然语言的方式交给Amazon Q来处理,简化所有流程,快速直达结果。
Amazon Q Developer实践
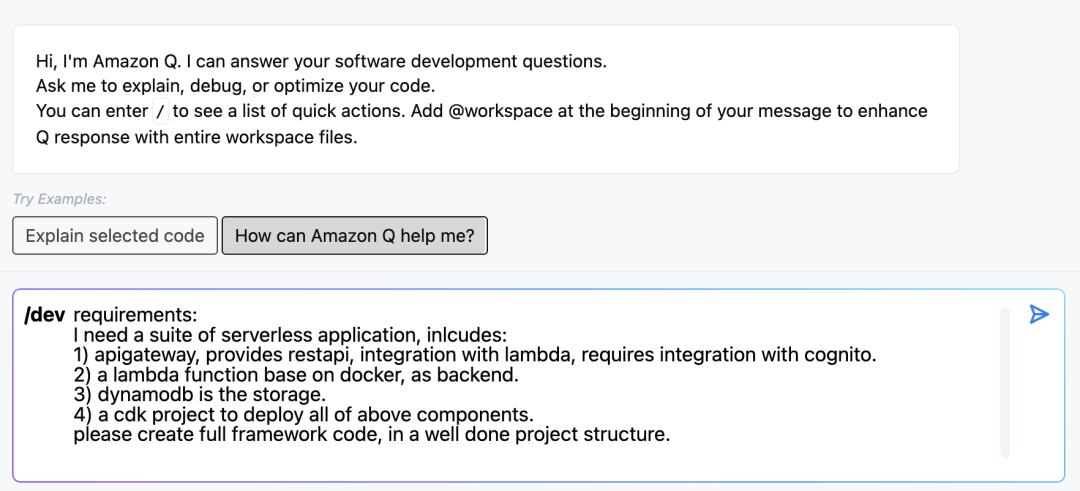
用自然语言将需求描述如下(请注意,本次提示词较上两次更加贴近于高层业务而非技术细节)。
requirements:
I need a suite of serverless application, includes:
1) apigateway, provides restapi, integration with lambda, requires integration with cognito.
2) a lambda function base on docker, as backend.
3) dynamodb is the storage.
4) a cdk project to deploy all of above components.
please create full framework code, in a well done project structure.
左右滑动查看完整示意
创建一个目录,例如qdev,并使用IDE(本例为 IntelliJ IDEA)尝试直接使用/dev功能(Agent),在Amazon Q里的Chat Window里,先键入/dev,然后输入上述提示词,如下图所示。
Amazon Q将询问代码位置,选择刚才新创建的目录后,点击Retry后Amazon Q开始工作,然后点击Accept all,即可创建一个标准的CDK工程,完整结构如下图所示。
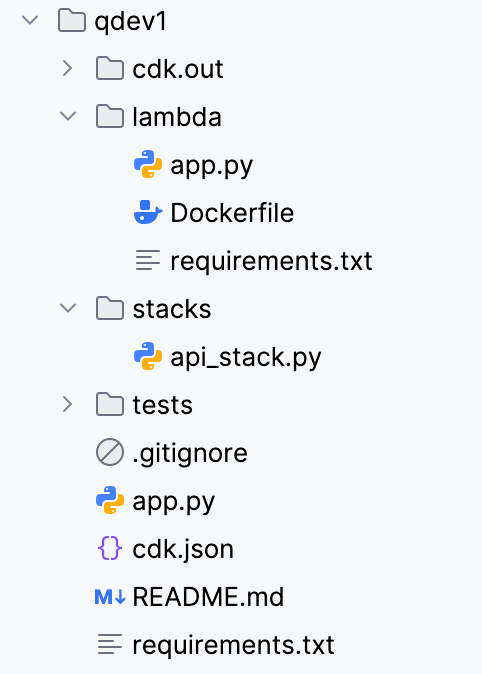
可以看到Amazon Q很好地理解了需求,完全依照要求创建了CDK工程,其中最关键的创建亚马逊云科技云资源的代码如下所示。
from aws_cdk import (
    Stack,
    aws_apigateway as apigateway,
    aws_lambda as lambda_,
    aws_dynamodb as dynamodb,
    aws_cognito as cognito,
    aws_iam as iam,
    Duration,
    RemovalPolicy
)
from constructs import Construct


class ApiStack(Stack):
    def __init__(self, scope: Construct, construct_id: str, **kwargs) -> None:
        super().__init__(scope, construct_id, **kwargs)


        # Create Cognito User Pool
        user_pool = cognito.UserPool(
            self, "UserPool",
            self_sign_up_enabled=True,
            auto_verify=cognito.AutoVerifiedAttrs(email=True),
            standard_attributes=cognito.StandardAttributes(
                email=cognito.StandardAttribute(required=True, mutable=True)
            )
        )


        # Create Cognito App Client
        client = user_pool.add_client("app-client",
            auth_flows=cognito.AuthFlow(user_password=True)
        )


        # Create DynamoDB table
        table = dynamodb.Table(
            self, "ItemsTable",
            partition_key=dynamodb.Attribute(
                name="id",
                type=dynamodb.AttributeType.STRING
            ),
            removal_policy=RemovalPolicy.DESTROY,
            billing_mode=dynamodb.BillingMode.PAY_PER_REQUEST
        )


        # Create Lambda function using Docker
        backend_function = lambda_.DockerImageFunction(
            self, "BackendFunction",
            code=lambda_.DockerImageCode.from_image_asset("./lambda"),
            memory_size=1024,
            timeout=Duration.seconds(30),
            architecture=lambda_.Architecture.ARM_64,
            environment={
                "DYNAMODB_TABLE": table.table_name
            }
        )


        backend_function.role.add_managed_policy(
            iam.ManagedPolicy.from_aws_managed_policy_name("AmazonBedrockFullAccess"))


        # Grant Lambda function permissions to access DynamoDB
        table.grant_read_write_data(backend_function)


        # Create API Gateway with Cognito Authorizer
        api = apigateway.RestApi(
            self, "ServerlessApi",
            rest_api_name="Serverless API",
            description="Serverless API with Cognito authentication"
        )


        authorizer = apigateway.CognitoUserPoolsAuthorizer(
            self, "ApiAuthorizer",
            cognito_user_pools=[user_pool]
        )


        api.root.add_method(
            "ANY",
            apigateway.LambdaIntegration(backend_function),
            authorizer=authorizer,
            authorization_type=apigateway.AuthorizationType.COGNITO
        )


        items = api.root.add_resource("items")
        items.add_method(
            "ANY",
            apigateway.LambdaIntegration(backend_function),
            authorizer=authorizer,
            authorization_type=apigateway.AuthorizationType.COGNITO
        )


        items.add_resource("{proxy+}").add_method(
            "ANY",
            apigateway.LambdaIntegration(backend_function),
            authorizer=authorizer,
            authorization_type=apigateway.AuthorizationType.COGNITO
        )
左右滑动查看完整示意
仔细阅读这段CDK代码,可以清晰地看到所有资源的创建,以及复杂的关联关系的建立,还有各种Amazon IAM授权,都被Amazon Q以CDK的形式处理得十分妥当,这无疑大大简化了开发者的负担。
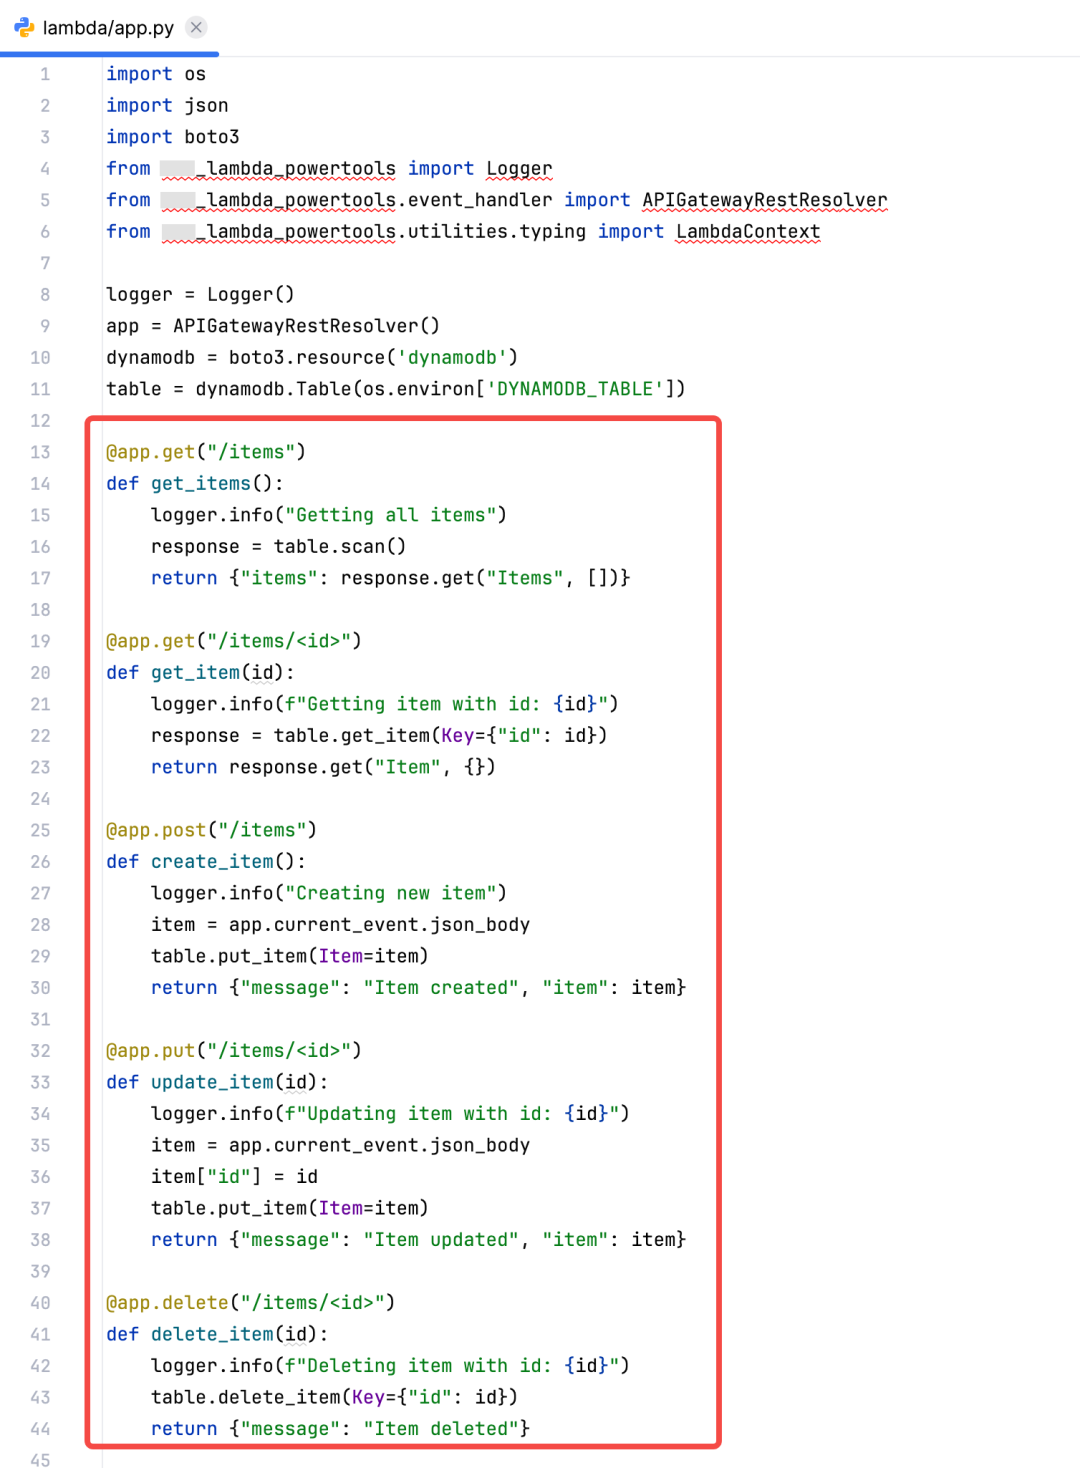
另外,Amazon Q还提供了关键的Amazon Lambda实现代码,甚至自动编写了用于测试的一个名为items的RestAPI作为样例,展示了完整的CRUD过程,如图所示。
执行cdk deploy来进行代码部署(过程与前两个例子一致,此处从略),创建的资源如下图所示。
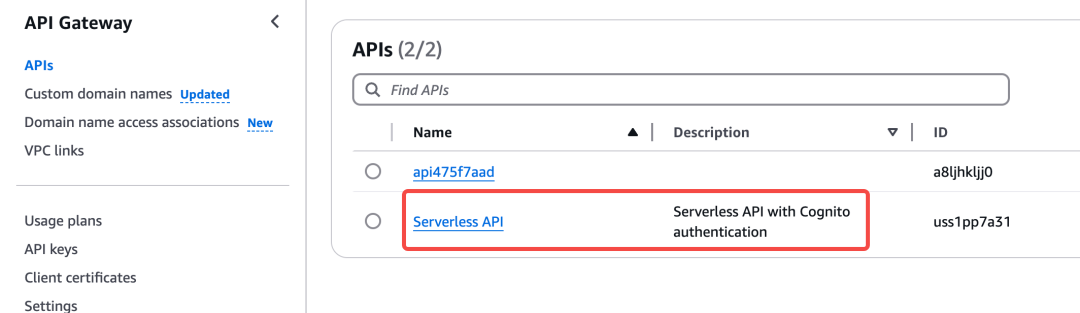
Amazon API Gateway资源
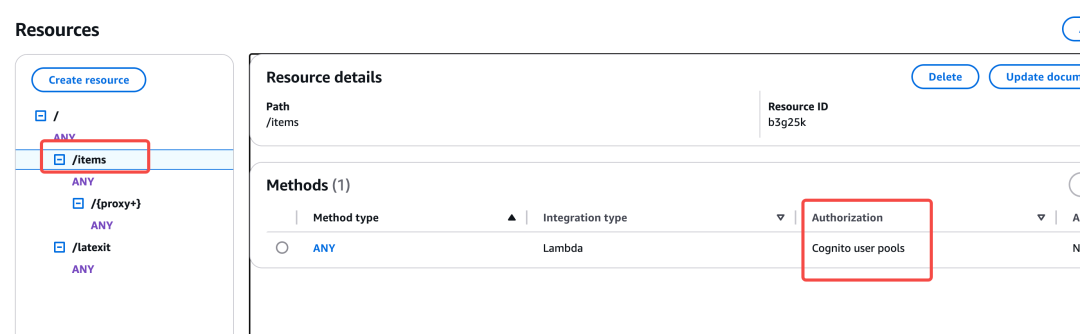
受到Amazon Cognito保护的/items接口
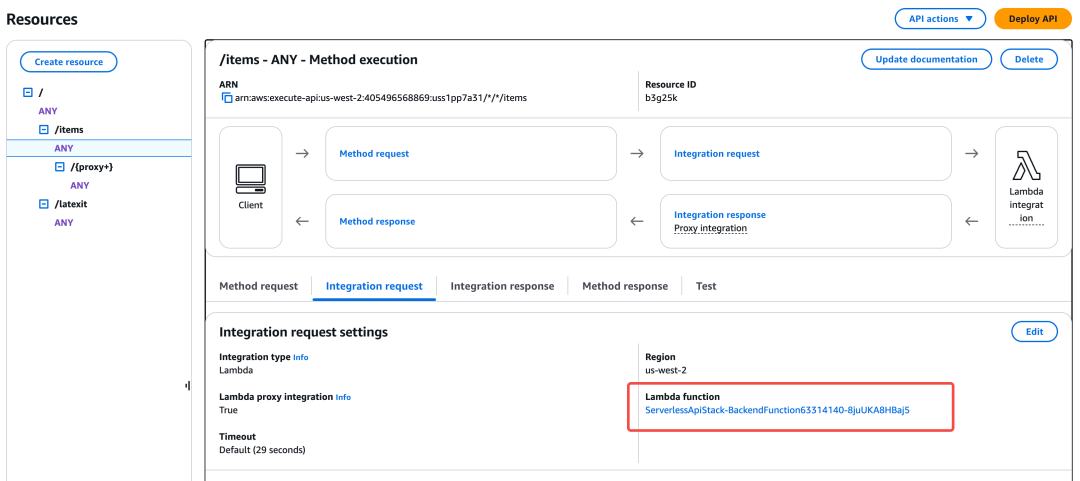
关联到Amazon Lambda作为后端
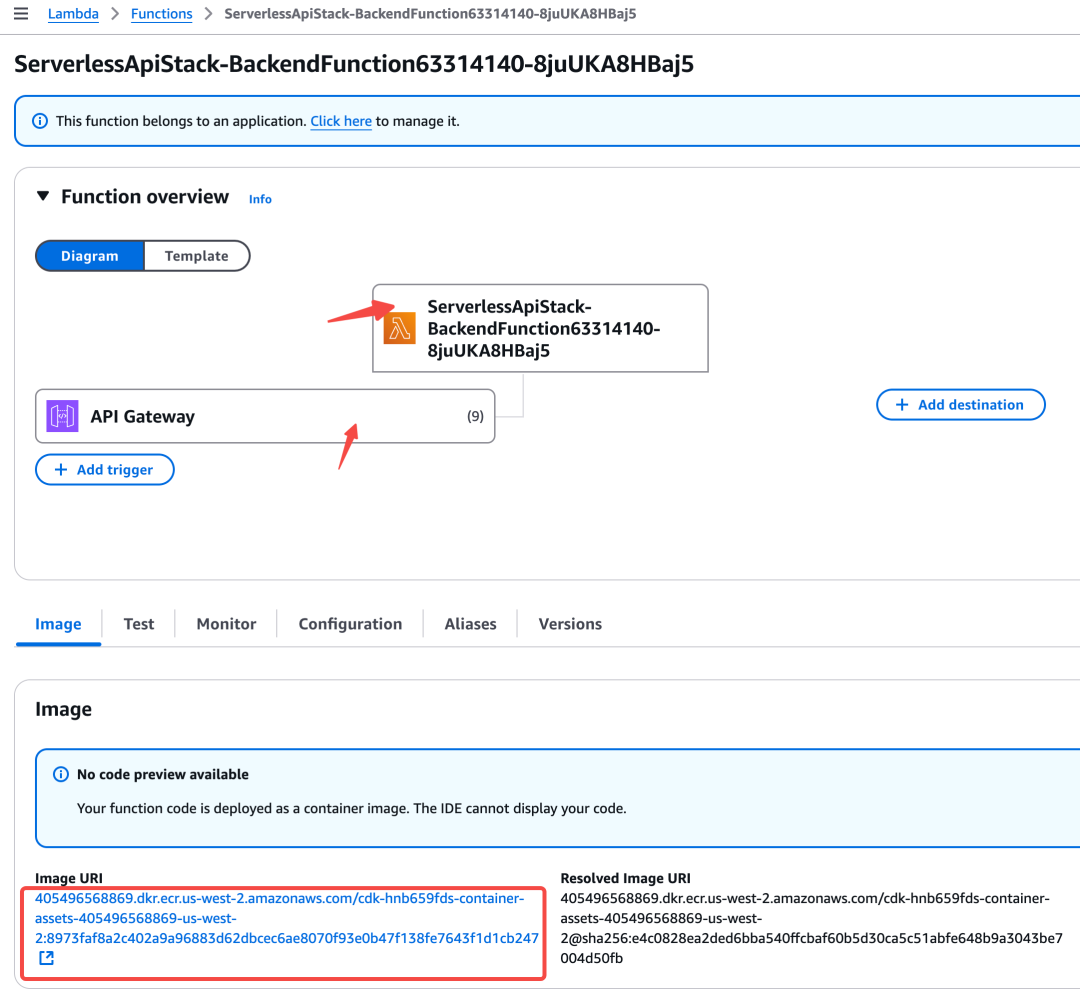
Docker Image类型的Amazon Lambda
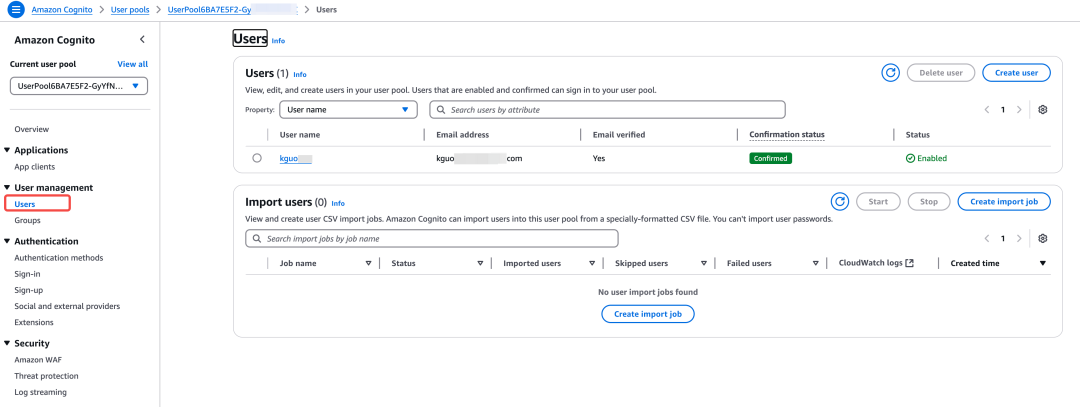
为了方便测试,手动在Amazon Cognito里创建一个用户(模拟signup)。进入对应的Amazon Cognito UserPool 中,选择User,点击“Create User”来创建用户,如下图所示。
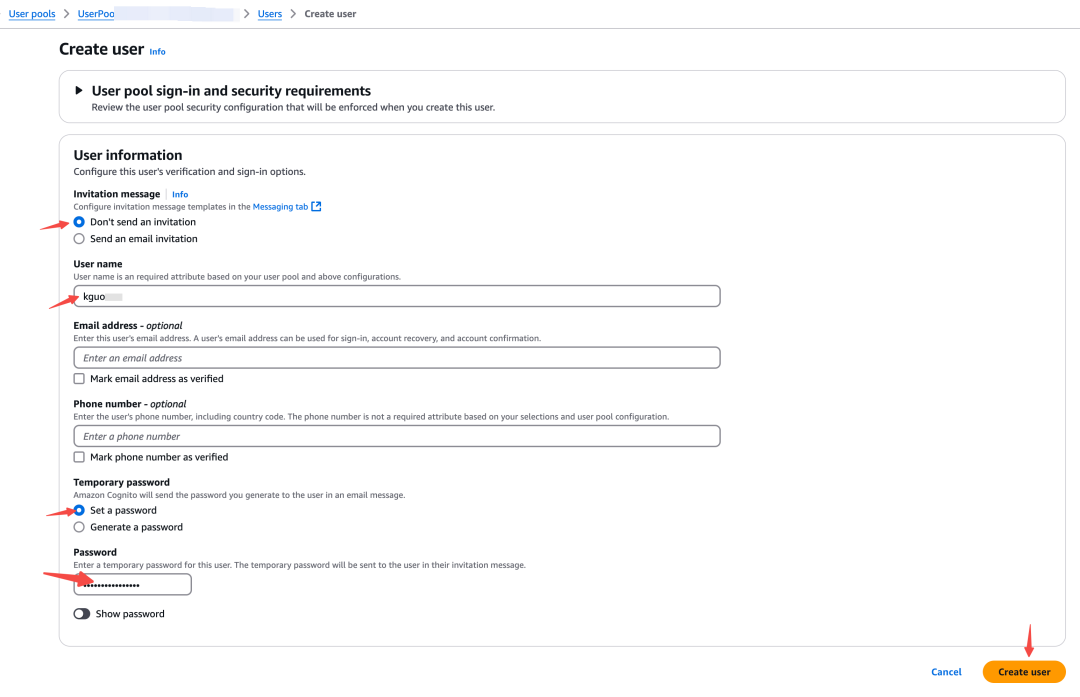
创建用户成功后,效果如下图所示,请务必记录初始密码。测试程序第一次登录后会要求用该密码登录,且会要求修改密码,该初始密码仅能用一次。
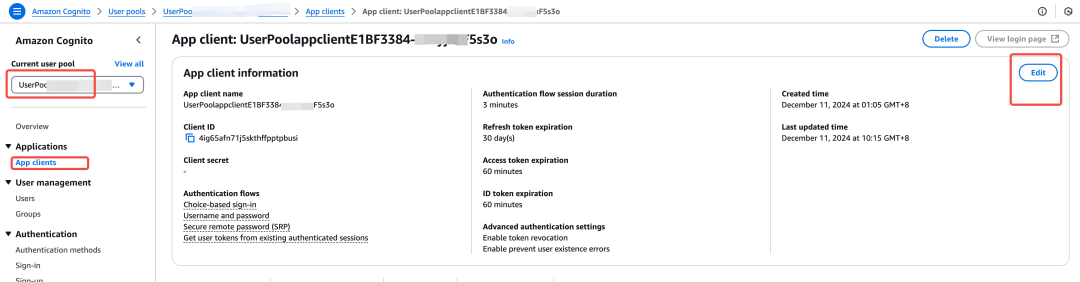
还要对App Client的鉴权方式进行一下配置,调整Authentication flows的选项,如下图所示。

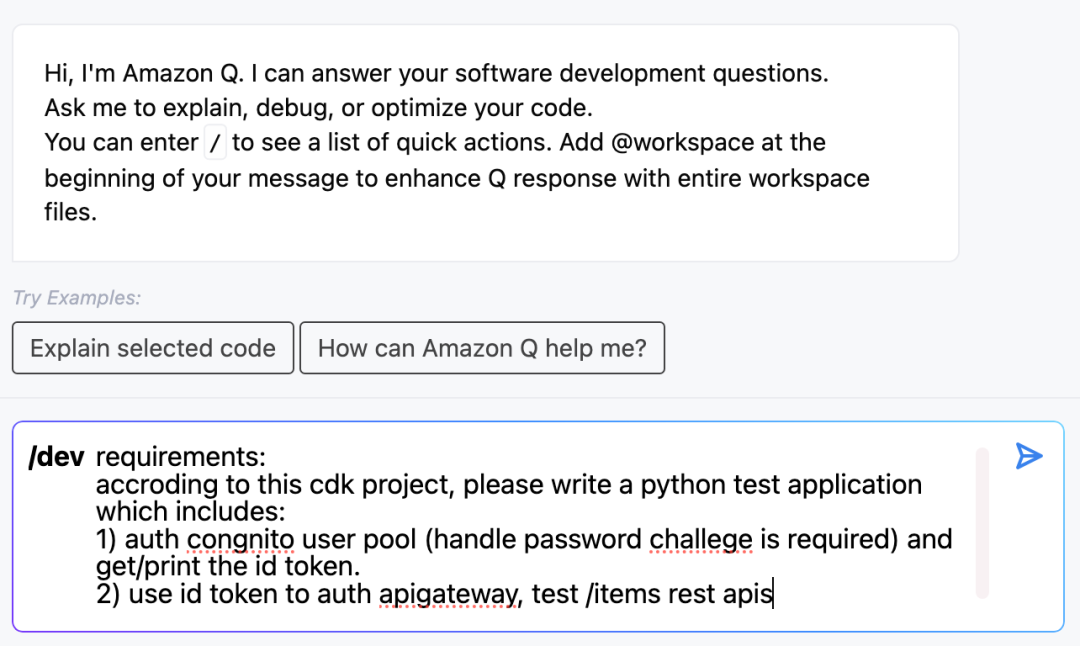
在CDK工程中,创建一个tests的目录,再次使用Amazon Q编写测试代码,来模拟从鉴权到调用所有API的全部过程,提示词如下。
requirements:
accroding to this cdk project, please write a python test application which includes:
1) auth congnito user pool (handle password challege is required) and get/print the id token.
2) use id token to auth apigateway, test /items rest apis
左右滑动查看完整示意
Amazon Q Developer将创建如下代码。
import boto3
import os
import requests
from botocore.exceptions import ClientError


def check_pro_status(custom_attrs):
    """Check if user is pro and return paid status"""
    try:
        # Check if custom:pro exists and its value
        if 'custom:pro' not in custom_attrs:
            paid = False
        else:
            paid = custom_attrs['custom:pro'].lower() == 'yes'


        return {
            'paid': paid,
            'custom_attributes': custom_attrs
        }


    except Exception as e:
        print(f"Error checking pro status: {e}")
        raise


def test_api_with_cognito_auth():
    # First get the Cognito access token
    # Initialize Cognito Identity Provider client
    cognito_idp = boto3.client('cognito-idp')

    # Replace these with your actual values
    USER_POOL_ID = os.getenv('COGNITO_USER_POOL_ID')
    CLIENT_ID = os.getenv('COGNITO_CLIENT_ID')
    USERNAME = os.getenv('COGNITO_USERNAME')
    PASSWORD = os.getenv('COGNITO_PASSWORD')

    try:
        # Attempt to authenticate
        auth_response = cognito_idp.initiate_auth(
            AuthFlow='USER_PASSWORD_AUTH',
            ClientId=CLIENT_ID,
            AuthParameters={
                'USERNAME': USERNAME,
                'PASSWORD': PASSWORD
            }
        )

        # Check if password needs to be changed
        if auth_response.get('ChallengeName') == 'NEW_PASSWORD_REQUIRED':
            print("Password change required...")

            # Respond to the challenge with a new password
            new_password = 'NewPassword123!'  # Replace with desired new password
            challenge_response = cognito_idp.respond_to_auth_challenge(
                ClientId=CLIENT_ID,
                ChallengeName='NEW_PASSWORD_REQUIRED',
                Session=auth_response['Session'],
                ChallengeResponses={
                    'USERNAME': USERNAME,
                    'NEW_PASSWORD': new_password
                }
            )

            # Get the tokens from the challenge response
            tokens = challenge_response['AuthenticationResult']
            access_token = tokens['AccessToken']
            print("Password changed successfully!")

        else:
            # Get the tokens from the initial auth response
            tokens = auth_response['AuthenticationResult']
            access_token = tokens['AccessToken']
            id_token = tokens['IdToken']

        print(f"Access Token: {access_token}")
        print(f"ID Token: {id_token}")
        #create a new function to get custome attributes
        response = cognito_idp.get_user(
            AccessToken=access_token
        )
        pro = False
        custom_attrs = response['UserAttributes']
        if 'custom:pro' not in custom_attrs:
            pro = False
        else:
            pro = custom_attrs['custom:pro'].lower() == 'yes'


        if pro:
            print("User is pro")
        else:
            print("User is not pro")

        # Now use the access token to call the API
        api_url = os.getenv('API_ENDPOINT')
        headers = {
            'Content-Type': 'application/json'
        }
        headers = {
            'Authorization': f'Bearer {access_token}',
            'Content-Type': 'application/json'
        }
        headers = {
            'Authorization': f'Bearer {id_token}',
            'Content-Type': 'application/json'
        }
        # Test GET /items endpoint
        response = requests.get(f"{api_url}/items", headers=headers)
        assert response.status_code == 200
        items = response.json().get('items', [])
        assert isinstance(items, list)

        # Test POST /items endpoint
        test_item = {
            "id": "test-item-1",
            "name": "Test Item",
            "description": "This is a test item"
        }
        response = requests.post(f"{api_url}/items", headers=headers, json=test_item)
        assert response.status_code == 200
        assert response.json()['message'] == "Item created"

        # Test GET /items/<id> endpoint
        response = requests.get(f"{api_url}/items/test-item-1", headers=headers)
        assert response.status_code == 200
        assert response.json()['id'] == "test-item-1"

        # Test PUT /items/<id> endpoint
        updated_item = {
            "name": "Updated Test Item",
            "description": "This is an updated test item"
        }
        response = requests.put(f"{api_url}/items/test-item-1", headers=headers, json=updated_item)
        assert response.status_code == 200
        assert response.json()['message'] == "Item updated"

        # Test DELETE /items/<id> endpoint
        response = requests.delete(f"{api_url}/items/test-item-1", headers=headers)
        assert response.status_code == 200
        assert response.json()['message'] == "Item deleted"
        print(response.status_code)
        print(response.json())


    except ClientError as e:
        print(f"Authentication error: {str(e)}")
        raise


if __name__ == '__main__':
    test_api_with_cognito_auth()
左右滑动查看完整示意
浏览代码可以观察到Amazon Q Developer非常完美地进行了Amazon Cognito UserPool的鉴权,甚至可以在第一次运行需要修改密码的场景,会提示用户修改密码,大大节约了常规调试同样功能所需要的时间开销。
运行测试代码,观察结果(从略)。
结论
开发者利用Amazon Q Developer的强大能力,前后仅需10几行自然语言描述,即可完成相当复杂的Serverless资源创建和配置,并可以帮助开发者轻松编写测试代码验证业务接口的可用性,对工作效率的提升,令人叹为观止。
总结
本文以创建与维护亚马逊云科技云资源作为主要内容,提供了简单易懂、图文并茂的实际代码用例,对AmazonQ Develop如何能够加速亚马逊云科技云资源开发的具体操作过程进行了详细描述。
本条技巧分享到此,后续将持续推出更多关于使用Amazon Q的实用技巧,敬请关注!
本篇作者

Kelvin Guo
亚马逊云科技资深解决方案架构师。主要技术方向为MLOps、DevOps、容器、数据分析。拥有20多年软件开发、项目管理、敏捷思想落地、工程效能咨询和落地经验。

汪其香
亚马逊云科技解决方案架构师,负责基于亚马逊云科技云服务的架构咨询和设计实现,具有丰富的解决客户实际问题的经验,同时热衷于生成式AI、深度学习的研究与应用。
诚邀您参与「云上探索实验室」,扫描下方二维码,立即体验Amazon Q Developer,开启您的极简开发之旅!


星标不迷路,开发更极速!
关注后记得星标「亚马逊云开发者」
听说,点完下面4个按钮
就不会碰到bug了!

点击阅读原文查看博客!获得更详细内容!


 9467
9467

 被折叠的 条评论
为什么被折叠?
被折叠的 条评论
为什么被折叠?
 到【灌水乐园】发言


