


 本文详细介绍Spring框架中集合类型的bean注入方法,包括List、Set、Map和Properties等类型的配置与使用。并通过实例演示了如何在JavaCollection类中设置这些集合属性。
这篇文章主要介绍了详解Java的Spring框架中bean的注入集合,Spring是Java的SSH三大web开发框架之一,需要的朋友可以参考下
使用value属性和使用<property>标签的ref属性在你的bean配置文件中的对象引用,这两种情况下可以处理单值到一个bean,如果你想通过多元值,如Java Collection类型List, Set, Map 及 Properties。要处理这种情况,Spring提供了四种类型的如下集合的配置元素:
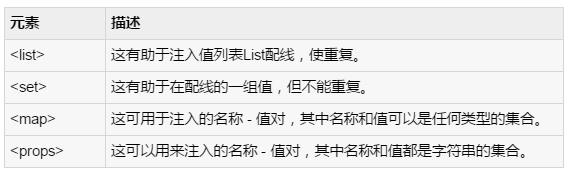
可以使用<list> 或<set> 来连接任何实现java.util.Collection或数组。
会遇到两种情况(a)将收集的直接的值及(b)传递一个bean的引用作为集合的元素之一。
例子:
我们使用Eclipse IDE,然后按照下面的步骤来创建一个Spring应用程序:
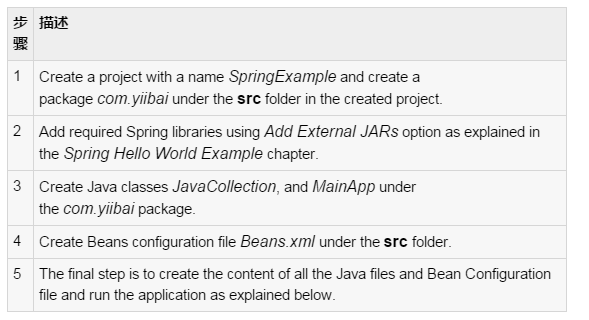
这里是JavaCollection.java文件的内容:
|
1
2
3
4
5
6
7
8
9
10
11
12
13
14
15
16
17
18
19
20
21
22
23
24
25
26
27
28
29
30
31
32
33
34
35
36
37
38
39
40
41
42
43
44
45
46
47
48
49
50
|
package
com.yiibai;
import
java.util.*;
public
class
JavaCollection {
List addressList;
Set addressSet;
Map addressMap;
Properties addressProp;
// a setter method to set List
public
void
setAddressList(List addressList) {
this
.addressList = addressList;
}
// prints and returns all the elements of the list.
public
List getAddressList() {
System.out.println(
"List Elements :"
+ addressList);
return
addressList;
}
// a setter method to set Set
public
void
setAddressSet(Set addressSet) {
this
.addressSet = addressSet;
}
// prints and returns all the elements of the Set.
public
Set getAddressSet() {
System.out.println(
"Set Elements :"
+ addressSet);
return
addressSet;
}
// a setter method to set Map
public
void
setAddressMap(Map addressMap) {
this
.addressMap = addressMap;
}
// prints and returns all the elements of the Map.
public
Map getAddressMap() {
System.out.println(
"Map Elements :"
+ addressMap);
return
addressMap;
}
// a setter method to set Property
public
void
setAddressProp(Properties addressProp) {
this
.addressProp = addressProp;
}
// prints and returns all the elements of the Property.
public
Properties getAddressProp() {
System.out.println(
"Property Elements :"
+ addressProp);
return
addressProp;
}
}
|
以下是MainApp.java文件的内容:
|
1
2
3
4
5
6
7
8
9
10
11
12
13
14
15
16
17
18
|
package
com.yiibai;
import
org.springframework.context.ApplicationContext;
import
org.springframework.context.support.ClassPathXmlApplicationContext;
public
class
MainApp {
public
static
void
main(String[] args) {
ApplicationContext context =
new
ClassPathXmlApplicationContext(
"Beans.xml"
);
JavaCollection jc=(JavaCollection)context.getBean(
"javaCollection"
);
jc.getAddressList();
jc.getAddressSet();
jc.getAddressMap();
jc.getAddressProp();
}
}
|
以下是配置文件beans.xml文件里面有配置的集合的所有类型:
|
1
2
3
4
5
6
7
8
9
10
11
12
13
14
15
16
17
18
19
20
21
22
23
24
25
26
27
28
29
30
31
32
33
34
35
36
37
38
39
40
41
42
43
44
45
46
47
48
49
50
51
52
53
|
<?
xml
version
=
"1.0"
encoding
=
"UTF-8"
?>
xsi:schemaLocation="http://www.springframework.org/schema/beans
<!-- Definition for javaCollection -->
<
bean
id
=
"javaCollection"
class
=
"com.yiibai.JavaCollection"
>
<!-- results in a setAddressList(java.util.List) call -->
<
property
name
=
"addressList"
>
<
list
>
<
value
>INDIA</
value
>
<
value
>Pakistan</
value
>
<
value
>USA</
value
>
<
value
>USA</
value
>
</
list
>
</
property
>
<!-- results in a setAddressSet(java.util.Set) call -->
<
property
name
=
"addressSet"
>
<
set
>
<
value
>INDIA</
value
>
<
value
>Pakistan</
value
>
<
value
>USA</
value
>
<
value
>USA</
value
>
</
set
>
</
property
>
<!-- results in a setAddressMap(java.util.Map) call -->
<
property
name
=
"addressMap"
>
<
map
>
<
entry
key
=
"1"
value
=
"INDIA"
/>
<
entry
key
=
"2"
value
=
"Pakistan"
/>
<
entry
key
=
"3"
value
=
"USA"
/>
<
entry
key
=
"4"
value
=
"USA"
/>
</
map
>
</
property
>
<!-- results in a setAddressProp(java.util.Properties) call -->
<
property
name
=
"addressProp"
>
<
props
>
<
prop
key
=
"one"
>INDIA</
prop
>
<
prop
key
=
"two"
>Pakistan</
prop
>
<
prop
key
=
"three"
>USA</
prop
>
<
prop
key
=
"four"
>USA</
prop
>
</
props
>
</
property
>
</
bean
>
</
beans
>
|
创建源代码和bean配置文件完成后,让我们运行应用程序。如果应用程序一切顺利,这将打印以下信息:
|
1
2
3
4
|
List Elements :[INDIA, Pakistan, USA, USA]
Set Elements :[INDIA, Pakistan, USA]
Map Elements :{1=INDIA, 2=Pakistan, 3=USA, 4=USA}
Property Elements :{two=Pakistan, one=INDIA, three=USA, four=USA}
|
注入Bean引用:
下面bean定义将帮助您了解如何注入bean的引用作为集合的元素之一。甚至可以混合引用和值都在一起,如下图所示:
|
1
2
3
4
5
6
7
8
9
10
11
12
13
14
15
16
17
18
19
20
21
22
23
24
25
26
27
28
29
30
31
32
33
34
35
36
37
38
39
40
|
<?
xml
version
=
"1.0"
encoding
=
"UTF-8"
?>
xsi:schemaLocation="http://www.springframework.org/schema/beans
<!-- Bean Definition to handle references and values -->
<
bean
id
=
"..."
class
=
"..."
>
<!-- Passing bean reference for java.util.List -->
<
property
name
=
"addressList"
>
<
list
>
<
ref
bean
=
"address1"
/>
<
ref
bean
=
"address2"
/>
<
value
>Pakistan</
value
>
</
list
>
</
property
>
<!-- Passing bean reference for java.util.Set -->
<
property
name
=
"addressSet"
>
<
set
>
<
ref
bean
=
"address1"
/>
<
ref
bean
=
"address2"
/>
<
value
>Pakistan</
value
>
</
set
>
</
property
>
<!-- Passing bean reference for java.util.Map -->
<
property
name
=
"addressMap"
>
<
map
>
<
entry
key
=
"one"
value
=
"INDIA"
/>
<
entry
key
=
"two"
value-ref
=
"address1"
/>
<
entry
key
=
"three"
value-ref
=
"address2"
/>
</
map
>
</
property
>
</
bean
>
</
beans
>
|
使用上面的bean定义,需要定义这样一种方式,他们应该能够处理的参考,以及setter方法。
注入null和空字符串的值
如果需要传递一个空字符串作为值,如下所示:
|
1
2
3
|
<bean id=
"..."
class
=
"exampleBean"
>
<property name=
"email"
value=
""
/>
</bean>
|
前面的例子等同于Java代码: exampleBean.setEmail("")
如果需要传递一个null值,如下所示:
|
1
2
3
|
<bean id=
"..."
class
=
"exampleBean"
>
<property name=
"email"
><
null
/></property>
</bean>
|
前面的例子等同于Java代码:exampleBean.setEmail(null)


 749
749

 被折叠的 条评论
为什么被折叠?
被折叠的 条评论
为什么被折叠?
 到【灌水乐园】发言


