


 本文通过实战演示OAuth2.0授权码模式的工作流程,包括客户端如何获取授权码(code),并以此交换访问令牌(accesstoken),最终使用accesstoken请求资源服务器的数据。
前言
前面的理解OAuth2.0认证与客户端授权码模式详解,我们大致了解了Oauth2.0授权模式四种的授权码模式,清楚了授权码模式的大致流程。这里简单的模拟一下基于授权码模式的客户端和服务端代码实现(这里服务端包含的验证服务端和资源服务端,都是在同一个应用中)。
回顾大致授权流程
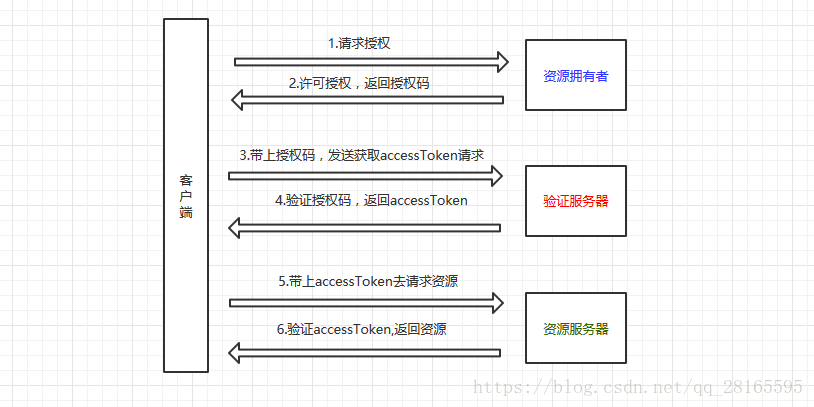
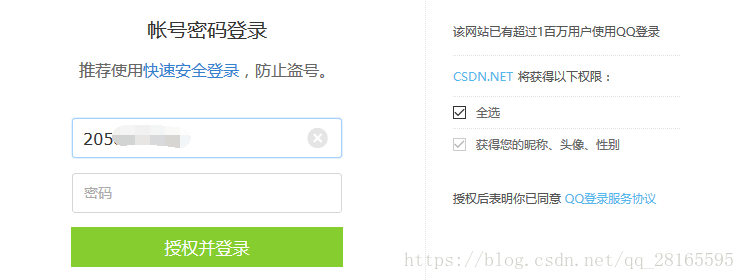
- 图中步骤1,请求授权,例如我们要登录csdn,这里我们想用qq账号登录,这时候就需要腾讯开放平台进行授权,具体操作如下图
这里简单模拟,在客户端web项目中构造一个oauth的客户端请求对象(OAuthClientRequest),在此对象中携带客户端信息(clientId、accessTokenUrl、response_type、redirectUrl),将此信息放入http请求中,重定向到服务端。 - 上图步骤2,在服务端web项目中接受第一步传过来的request,从中获取客户端信息,可以自行验证信息的可靠性。同时构造一个oauth的code授权许可对象(OAuthAuthorizationResponseBuilder),并在其中设置授权码code,将此对象传回客户端。
- 上图步骤3,在在客户端web项目中接受第二步的请求request,从中获得code。同时构造一个oauth的客户端请求对象(OAuthClientRequest),此次在此对象中不仅要携带客户端信息(clientId、accessTokenUrl、clientSecret、GrantType、redirectUrl),还要携带接受到的code。再构造一个客户端请求工具对象(oAuthClient),这个工具封装了httpclient,用此对象将这些信息以post的方式请求到服务端,目的是为了让服务端返回资源访问令牌。
- 上图步骤4,在服务端web项目中接受第三步传过来的request,从中获取客户端信息和code,并自行验证。再按照自己项目的要求生成访问令牌(accesstoken),同时构造一个oauth响应对象(OAuthASResponse),携带生成的访问指令(accesstoken),返回给第三步中客户端的oAuthClient。oAuthClient接受响应之后获取accesstoken。
- 上图步骤5,此时客户端web项目中已经有了从服务端返回过来的accesstoken,那么在客户端构造一个服务端资源请求对象(OAuthBearerClientRequest),在此对象中设置服务端资源请求URI,并携带上accesstoken。再构造一个客户端请求工具对象(oAuthClient),用此对象去服务端靠accesstoken换取资源。
- 上图步骤6,在服务端web项目中接受第五步传过来的request,从中获取accesstoken并自行验证。之后就可以将客户端请求的资源返回给客户端了。
客户端代码
<span style="color:#000000"><code><span style="color:#880000">/**
*<span style="color:#4f4f4f"> @ClassName</span>: ClientController
*<span style="color:#4f4f4f"> @Description</span>: Oauth客户端
*<span style="color:#4f4f4f"> @author</span> qinhaihai
*<span style="color:#4f4f4f"> @date</span> 2018年5月24日
*
 */</span>
<span style="color:#9b859d">@Controller</span>
<span style="color:#9b859d">@RequestMapping</span>(<span style="color:#009900">"/clientController"</span>)
<span style="color:#000088">public</span> <span style="color:#000088">class</span> <span style="color:#4f4f4f">ClientController</span>{
    String clientId = <span style="color:#000088">null</span>;
    String clientSecret = <span style="color:#000088">null</span>;
    String accessTokenUrl = <span style="color:#000088">null</span>;
    String userInfoUrl = <span style="color:#000088">null</span>;
    String redirectUrl = <span style="color:#000088">null</span>;
    String response_type = <span style="color:#000088">null</span>;
    String code= <span style="color:#000088">null</span>;

    <span style="color:#880000">//提交申请code的请求,对应上图中的步骤一</span>
    <span style="color:#9b859d">@RequestMapping</span>(<span style="color:#009900">"/requestServerCode"</span>)
    <span style="color:#000088">public</span> String <span style="color:#009900">requestServerCode</span>(HttpServletRequest request, HttpServletResponse response)
            <span style="color:#000088">throws</span> OAuthProblemException{
        clientId = <span style="color:#009900">"clientId"</span>;
        accessTokenUrl = <span style="color:#009900">"responseCode"</span>;
        redirectUrl = <span style="color:#009900">"http://localhost:8081/oauthclient01/clientController/callbackCode"</span>;
        response_type = <span style="color:#009900">"code"</span>;
        String requestUrl = <span style="color:#000088">null</span>;
        <span style="color:#000088">try</span> {
            <span style="color:#880000">//构建oauth的请求。设置授权服务地址(accessTokenUrl)、clientId、response_type、redirectUrl</span>
            OAuthClientRequest accessTokenRequest = OAuthClientRequest
            .authorizationLocation(accessTokenUrl)
            .setResponseType(response_type)
            .setClientId(clientId)
            .setRedirectURI(redirectUrl)
            .buildQueryMessage();
            requestUrl = accessTokenRequest.getLocationUri();
            System.out.println(<span style="color:#009900">"获取授权码方法中的requestUrl的值----"</span>+requestUrl);
        } <span style="color:#000088">catch</span> (OAuthSystemException e) {
            e.printStackTrace();
        }
        <span style="color:#000088">return</span> <span style="color:#009900">"redirect:http://localhost:8082/oauthserver/"</span>+requestUrl ;
    }

    <span style="color:#880000">//接受客户端返回的code,提交申请access token的请求,对应上图中的步骤三</span>
    <span style="color:#9b859d">@RequestMapping</span>(<span style="color:#009900">"/callbackCode"</span>)
    <span style="color:#000088">public</span> Object <span style="color:#009900">toLogin</span>(HttpServletRequest request) <span style="color:#000088">throws</span> OAuthProblemException{
        clientId = <span style="color:#009900">"clientId"</span>;
        clientSecret = <span style="color:#009900">"clientSecret"</span>;
        accessTokenUrl=<span style="color:#009900">"http://localhost:8082/oauthserver/responseAccessToken"</span>;
        userInfoUrl = <span style="color:#009900">"userInfoUrl"</span>;
        redirectUrl = <span style="color:#009900">"http://localhost:8081/oauthclient01/clientController/accessToken"</span>;
        HttpServletRequest httpRequest = (HttpServletRequest) request;
        OAuthClient oAuthClient = <span style="color:#000088">new</span> OAuthClient(<span style="color:#000088">new</span> URLConnectionClient());
        <span style="color:#000088">try</span> {
            OAuthClientRequest accessTokenRequest = OAuthClientRequest
                .tokenLocation(accessTokenUrl)
                    .setGrantType(GrantType.AUTHORIZATION_CODE)
                    .setClientId(clientId)
                    .setClientSecret(clientSecret)
                    .setCode(httpRequest.getParameter(<span style="color:#009900">"code"</span>))
                    .setRedirectURI(redirectUrl)
                    .buildQueryMessage();
            <span style="color:#880000">//去服务端请求access token,并返回响应</span>
            OAuthAccessTokenResponse oAuthResponse = oAuthClient.accessToken(accessTokenRequest, OAuth.HttpMethod.POST);
            <span style="color:#880000">//获取服务端返回过来的access token </span>
            String accessToken = oAuthResponse.getAccessToken();
            <span style="color:#880000">//查看access token是否过期</span>
            <span style="color:#880000">//Long expiresIn = oAuthResponse.getExpiresIn();</span>
            <span style="color:#000088">return</span> <span style="color:#009900">"redirect:http://localhost:8081/oauthclient01/clientController/accessToken?accessToken="</span>+accessToken;
        } <span style="color:#000088">catch</span> (OAuthSystemException e) {
            e.printStackTrace();
        }
        <span style="color:#000088">return</span> <span style="color:#000088">null</span>;
    }

    <span style="color:#880000">//接受服务端传回来的access token,由此token去请求服务端的资源(用户信息等),对应上图中的步骤五</span>
    <span style="color:#9b859d">@RequestMapping</span>(<span style="color:#009900">"/accessToken"</span>)
    <span style="color:#000088">public</span> ModelAndView <span style="color:#009900">accessToken</span>(String accessToken) {
        userInfoUrl = <span style="color:#009900">"http://localhost:8082/oauthserver/userInfo"</span>;
        OAuthClient oAuthClient = <span style="color:#000088">new</span> OAuthClient(<span style="color:#000088">new</span> URLConnectionClient());
        <span style="color:#000088">try</span> {
            OAuthClientRequest userInfoRequest = <span style="color:#000088">new</span> OAuthBearerClientRequest(userInfoUrl)
            .setAccessToken(accessToken).buildQueryMessage();
            OAuthResourceResponse resourceResponse = oAuthClient.resource(userInfoRequest, OAuth.HttpMethod.GET, OAuthResourceResponse.class);
            String username = resourceResponse.getBody();
            ModelAndView modelAndView = <span style="color:#000088">new</span> ModelAndView(<span style="color:#009900">"usernamePage"</span>);
            modelAndView.addObject(<span style="color:#009900">"username"</span>, username);
            <span style="color:#000088">return</span> modelAndView;
        } <span style="color:#000088">catch</span> (OAuthSystemException e) {
            e.printStackTrace();
        } <span style="color:#000088">catch</span> (OAuthProblemException e) {
            e.printStackTrace();
        }
        <span style="color:#000088">return</span> <span style="color:#000088">null</span>;
    }
}</code></span>
服务端代码
<span style="color:#000000"><code><span style="color:#880000">/**
*<span style="color:#4f4f4f"> @ClassName</span>: AuthorizeController
*<span style="color:#4f4f4f"> @Description</span>: 服务端授权Controller
*<span style="color:#4f4f4f"> @author</span> aiqinhai
*<span style="color:#4f4f4f"> @date</span> 2018年5月24日 下午10:00:01
*/</span>
<span style="color:#9b859d">@Controller</span>
<span style="color:#000088">public</span> <span style="color:#000088">class</span> <span style="color:#4f4f4f">AuthorizeController</span>{
    <span style="color:#880000">//向客户端返回授权许可码 code,对应上图中的步骤二</span>
    <span style="color:#9b859d">@RequestMapping</span>(<span style="color:#009900">"/responseCode"</span>)
    <span style="color:#000088">public</span> Object <span style="color:#009900">responseCode</span>(Model model,HttpServletRequest request){
      <span style="color:#000088">try</span> {
      <span style="color:#880000">//构建OAuth 授权请求  </span>
      OAuthAuthzRequest oauthRequest = <span style="color:#000088">new</span> OAuthAuthzRequest(request);
      System.out.println(<span style="color:#009900">"授权服务器获取的clientID----"</span>+oauthRequest.getClientId());
      System.out.println(<span style="color:#009900">"返回类型----"</span>+oauthRequest.getResponseType());
      System.out.println(<span style="color:#009900">"重定向地址---"</span>+oauthRequest.getRedirectURI());
      <span style="color:#000088">if</span>(oauthRequest.getClientId()!=<span style="color:#000088">null</span>&&oauthRequest.getClientId()!=<span style="color:#009900">""</span>){
        <span style="color:#880000">//设置授权码  </span>
        String authorizationCode = <span style="color:#009900">"authorizationCode"</span>;
        <span style="color:#880000">//进行OAuth响应构建</span>
        OAuthASResponse.OAuthAuthorizationResponseBuilder builder =
        OAuthASResponse.authorizationResponse(request, HttpServletResponse.SC_FOUND);
        <span style="color:#880000">//设置授权码</span>
        builder.setCode(authorizationCode);
        <span style="color:#880000">//得到到客户端重定向地址</span>
        String redirectURI = oauthRequest.getParam(OAuth.OAUTH_REDIRECT_URI);
        <span style="color:#880000">//构建响应</span>
        <span style="color:#000088">final</span> OAuthResponse response = builder.location(redirectURI).
                buildQueryMessage();
        String responceUri =response.getLocationUri();
        System.out.println(<span style="color:#009900">"redirectURI是----"</span>+redirectURI);
        System.out.println(<span style="color:#009900">"responceUri是----"</span>+responceUri);
        <span style="color:#880000">//根据OAuthResponse返回ResponseEntity响应</span>
        HttpHeaders headers = <span style="color:#000088">new</span> HttpHeaders();
        <span style="color:#000088">try</span> {
            headers.setLocation(<span style="color:#000088">new</span> URI(responceUri));
          } <span style="color:#000088">catch</span> (URISyntaxException e) {
            <span style="color:#880000">// TODO Auto-generated catch block</span>
            e.printStackTrace();
          }
        <span style="color:#000088">return</span> <span style="color:#009900">"redirect:"</span>+responceUri;
        }
    } <span style="color:#000088">catch</span> (OAuthSystemException e) {
        e.printStackTrace();
    } <span style="color:#000088">catch</span> (OAuthProblemException e) {
        e.printStackTrace();
    }
    <span style="color:#000088">return</span> <span style="color:#000088">null</span>;
    }
}</code></span>
上面的responseCode,对应了上图的步骤二,返回authorizationCode授权码到客户端。
<span style="color:#000000"><code><span style="color:#880000">/**
 *
*<span style="color:#4f4f4f"> @ClassName</span>: AccessTokenController
*<span style="color:#4f4f4f"> @Description</span>: 根据授权码生成accessToken
*<span style="color:#4f4f4f"> @author</span> aiqinlhai
*<span style="color:#4f4f4f"> @date</span> 2018年5月24日
 */</span>
<span style="color:#9b859d">@Controller</span>
<span style="color:#000088">public</span> <span style="color:#000088">class</span> <span style="color:#4f4f4f">AccessTokenController</span> {

    <span style="color:#880000">//获取客户端的code码,向客户端返回access token</span>
    <span style="color:#9b859d">@RequestMapping</span>(value=<span style="color:#009900">"/responseAccessToken"</span>,method = RequestMethod.POST)
    <span style="color:#000088">public</span> HttpEntity <span style="color:#009900">token</span>(HttpServletRequest request){
        OAuthIssuer oauthIssuerImpl=<span style="color:#000088">null</span>;
        OAuthResponse response=<span style="color:#000088">null</span>;
        <span style="color:#880000">//构建OAuth请求  </span>
          <span style="color:#000088">try</span> {
            OAuthTokenRequest oauthRequest = <span style="color:#000088">new</span> OAuthTokenRequest(request);
            String authCode = oauthRequest.getParam(OAuth.OAUTH_CODE);
            System.out.println(<span style="color:#009900">"客户端传过来的授权码是----"</span>+authCode);
            String clientSecret = oauthRequest.getClientSecret();
            <span style="color:#000088">if</span>(clientSecret!=<span style="color:#000088">null</span>||clientSecret!=<span style="color:#009900">""</span>){
                <span style="color:#880000">//生成Access Token</span>
                oauthIssuerImpl = <span style="color:#000088">new</span> OAuthIssuerImpl(<span style="color:#000088">new</span> MD5Generator());
                <span style="color:#000088">final</span> String accessToken = oauthIssuerImpl.accessToken();
                System.out.println(accessToken);
                <span style="color:#880000">//生成OAuth响应</span>
                response = OAuthASResponse
                .tokenResponse(HttpServletResponse.SC_OK)
                .setAccessToken(accessToken)
                .buildJSONMessage();
            }
          <span style="color:#880000">//根据OAuthResponse生成ResponseEntity</span>
            <span style="color:#000088">return</span> <span style="color:#000088">new</span> ResponseEntity<String>(response.getBody(),
                    HttpStatus.valueOf(response.getResponseStatus()));
        } <span style="color:#000088">catch</span> (OAuthSystemException e) {
            <span style="color:#880000">// TODO Auto-generated catch block</span>
            e.printStackTrace();
        } <span style="color:#000088">catch</span> (OAuthProblemException e) {
            <span style="color:#880000">// TODO Auto-generated catch block</span>
            e.printStackTrace();
        }
        <span style="color:#000088">return</span> <span style="color:#000088">null</span>;
    }
}</code></span>
上面的代码对应上图的步骤4,验证客户端的授权码,并返回accessToken。
<span style="color:#000000"><code><span style="color:#880000">/**
 *
* @ClassName: UserInfoController
* @Description: 根据客户端的accessToken来返回用户信息到客户端
* @author aiqinhai
* @date 2018年5月24
 */</span>
@Controller
public class UserInfoController {
    @RequestMapping(<span style="color:#009900">"/userInfo"</span>)
    public HttpEntity<String> userInfo(HttpServletRequest request)
            throws OAuthSystemException{
        try {
            //获取客户端传来的OAuth资源请求
            OAuthAccessResourceRequest oauthRequest = new
                    OAuthAccessResourceRequest(request, ParameterStyle<span style="color:#009900">.QUERY</span>)<span style="color:#880000">;</span>
            //获取Access Token
              String accessToken = oauthRequest<span style="color:#009900">.getAccessToken</span>()<span style="color:#880000">;  </span>
              System<span style="color:#009900">.out</span><span style="color:#009900">.println</span>(<span style="color:#009900">"从客户端获取的accessToken----"</span>+accessToken)<span style="color:#880000">;</span>
              //验证Access Token
              if (accessToken==null||accessToken==<span style="color:#009900">""</span>) {
              // 如果不存在/过期了,返回未验证错误,需重新验证
              OAuthResponse oauthResponse = OAuthRSResponse
              <span style="color:#009900">.errorResponse</span>(HttpServletResponse<span style="color:#009900">.SC</span>_UNAUTHORIZED)
              <span style="color:#009900">.setError</span>(OAuthError<span style="color:#009900">.ResourceResponse</span><span style="color:#009900">.INVALID</span>_TOKEN)
              <span style="color:#009900">.buildHeaderMessage</span>()<span style="color:#880000">;  </span>
              HttpHeaders headers = new HttpHeaders()<span style="color:#880000">;  </span>
              headers<span style="color:#009900">.add</span>(OAuth<span style="color:#009900">.HeaderType</span><span style="color:#009900">.WWW</span>_AUTHENTICATE,
              oauthResponse<span style="color:#009900">.getHeader</span>(OAuth<span style="color:#009900">.HeaderType</span><span style="color:#009900">.WWW</span>_AUTHENTICATE))<span style="color:#880000">;  </span>
              return new ResponseEntity<String>(headers, HttpStatus<span style="color:#009900">.UNAUTHORIZED</span>)<span style="color:#880000">;  </span>
              }
              //这里没有从数据库查询了,简单指定为<span style="color:#009900">"aiqinhai"</span>
              String username=<span style="color:#009900">"aiqinhai"</span><span style="color:#880000">;</span>
              return new ResponseEntity<String>(username, HttpStatus<span style="color:#009900">.OK</span>)<span style="color:#880000">;  </span>
        } catch (OAuthProblemException e) {
          // TODO Auto-generated catch block
          e<span style="color:#009900">.printStackTrace</span>()<span style="color:#880000">;</span>
          //检查是否设置了错误码
          String errorCode = e<span style="color:#009900">.getError</span>()<span style="color:#880000">;  </span>
          if (OAuthUtils<span style="color:#009900">.isEmpty</span>(errorCode)) {
            OAuthResponse oauthResponse = OAuthRSResponse
           <span style="color:#009900">.errorResponse</span>(HttpServletResponse<span style="color:#009900">.SC</span>_UNAUTHORIZED)
           <span style="color:#009900">.buildHeaderMessage</span>()<span style="color:#880000">;  </span>
            HttpHeaders headers = new HttpHeaders()<span style="color:#880000">;  </span>
            headers<span style="color:#009900">.add</span>(OAuth<span style="color:#009900">.HeaderType</span><span style="color:#009900">.WWW</span>_AUTHENTICATE,
            oauthResponse<span style="color:#009900">.getHeader</span>(OAuth<span style="color:#009900">.HeaderType</span><span style="color:#009900">.WWW</span>_AUTHENTICATE))<span style="color:#880000">;  </span>
            return new ResponseEntity<String>(headers, HttpStatus<span style="color:#009900">.UNAUTHORIZED</span>)<span style="color:#880000">;  </span>
          }
          OAuthResponse oauthResponse = OAuthRSResponse
           <span style="color:#009900">.errorResponse</span>(HttpServletResponse<span style="color:#009900">.SC</span>_UNAUTHORIZED)
           <span style="color:#009900">.setError</span>(e<span style="color:#009900">.getError</span>())
           <span style="color:#009900">.setErrorDescription</span>(e<span style="color:#009900">.getDescription</span>())
           <span style="color:#009900">.setErrorUri</span>(e<span style="color:#009900">.getUri</span>())
           <span style="color:#009900">.buildHeaderMessage</span>()<span style="color:#880000">;  </span>
          HttpHeaders headers = new HttpHeaders()<span style="color:#880000">;  </span>
          headers<span style="color:#009900">.add</span>(OAuth<span style="color:#009900">.HeaderType</span><span style="color:#009900">.WWW</span>_AUTHENTICATE,
            oauthResponse<span style="color:#009900">.getHeader</span>(OAuth<span style="color:#009900">.HeaderType</span><span style="color:#009900">.WWW</span>_AUTHENTICATE))<span style="color:#880000">;  </span>
          return new ResponseEntity<String>(HttpStatus<span style="color:#009900">.BAD</span>_REQUEST)<span style="color:#880000">;  </span>
        }
    }
}</code></span>
上段代码对应上图中的步骤6,验证accessToken,返回用户请求资源,这里简单用username来模拟用户请求的资源。
服务端控制台输出如下 
相关依赖jar包
客户端依赖jar包
<span style="color:#000000"><code><span style="color:#006666"><<span style="color:#4f4f4f">dependency</span>></span>
<span style="color:#006666"><<span style="color:#4f4f4f">groupId</span>></span>org.apache.oltu.oauth2<span style="color:#006666"></<span style="color:#4f4f4f">groupId</span>></span>
<span style="color:#006666"><<span style="color:#4f4f4f">artifactId</span>></span>org.apache.oltu.oauth2.client<span style="color:#006666"></<span style="color:#4f4f4f">artifactId</span>></span>
<span style="color:#006666"><<span style="color:#4f4f4f">version</span>></span>0.31<span style="color:#006666"></<span style="color:#4f4f4f">version</span>></span>
<span style="color:#006666"></<span style="color:#4f4f4f">dependency</span>></span></code></span>
服务端依赖jar包
<span style="color:#000000"><code> <span style="color:#006666"><<span style="color:#4f4f4f">dependency</span>></span>
      <span style="color:#006666"><<span style="color:#4f4f4f">groupId</span>></span>org.apache.oltu.oauth2<span style="color:#006666"></<span style="color:#4f4f4f">groupId</span>></span>
      <span style="color:#006666"><<span style="color:#4f4f4f">artifactId</span>></span>org.apache.oltu.oauth2.authzserver<span style="color:#006666"></<span style="color:#4f4f4f">artifactId</span>></span>
      <span style="color:#006666"><<span style="color:#4f4f4f">version</span>></span>0.31<span style="color:#006666"></<span style="color:#4f4f4f">version</span>></span>
  <span style="color:#006666"></<span style="color:#4f4f4f">dependency</span>></span>
  <span style="color:#006666"><<span style="color:#4f4f4f">dependency</span>></span>
      <span style="color:#006666"><<span style="color:#4f4f4f">groupId</span>></span>org.apache.oltu.oauth2<span style="color:#006666"></<span style="color:#4f4f4f">groupId</span>></span>
      <span style="color:#006666"><<span style="color:#4f4f4f">artifactId</span>></span>org.apache.oltu.oauth2.resourceserver<span style="color:#006666"></<span style="color:#4f4f4f">artifactId</span>></span>
      <span style="color:#006666"><<span style="color:#4f4f4f">version</span>></span>0.31<span style="color:#006666"></<span style="color:#4f4f4f">version</span>></span>
 <span style="color:#006666"></<span style="color:#4f4f4f">dependency</span>></span> </code></span>


 1204
1204

 被折叠的 条评论
为什么被折叠?
被折叠的 条评论
为什么被折叠?
 到【灌水乐园】发言


