


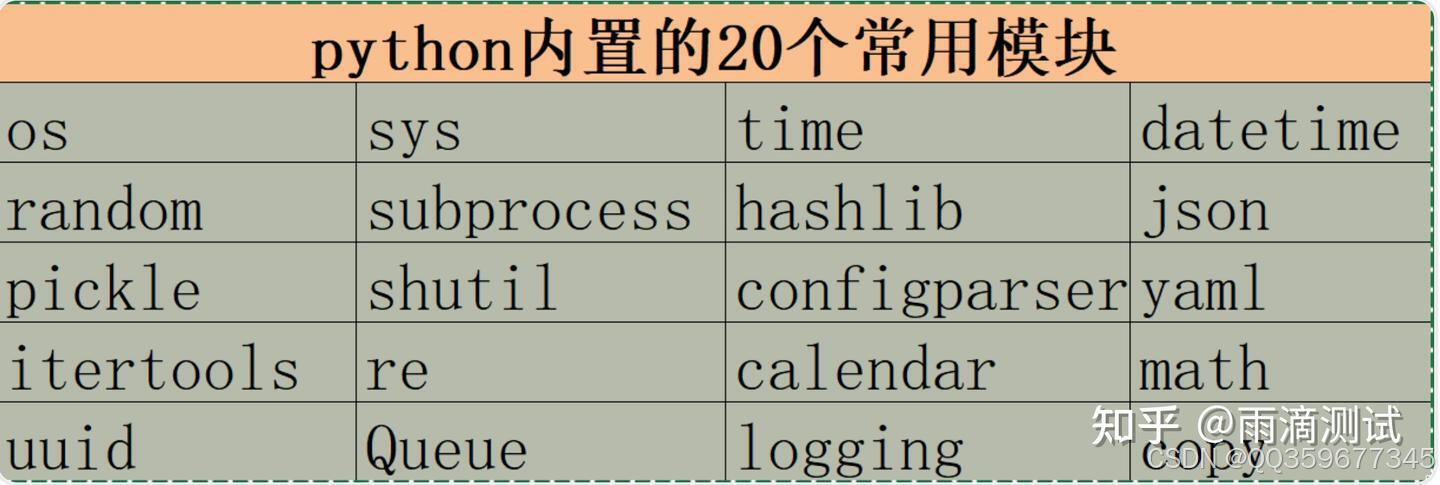
1.os
1.1 作用
主要是和操作系统相关的一个模块,如可以进行文件/目录的创建、删除等
1.2 导入
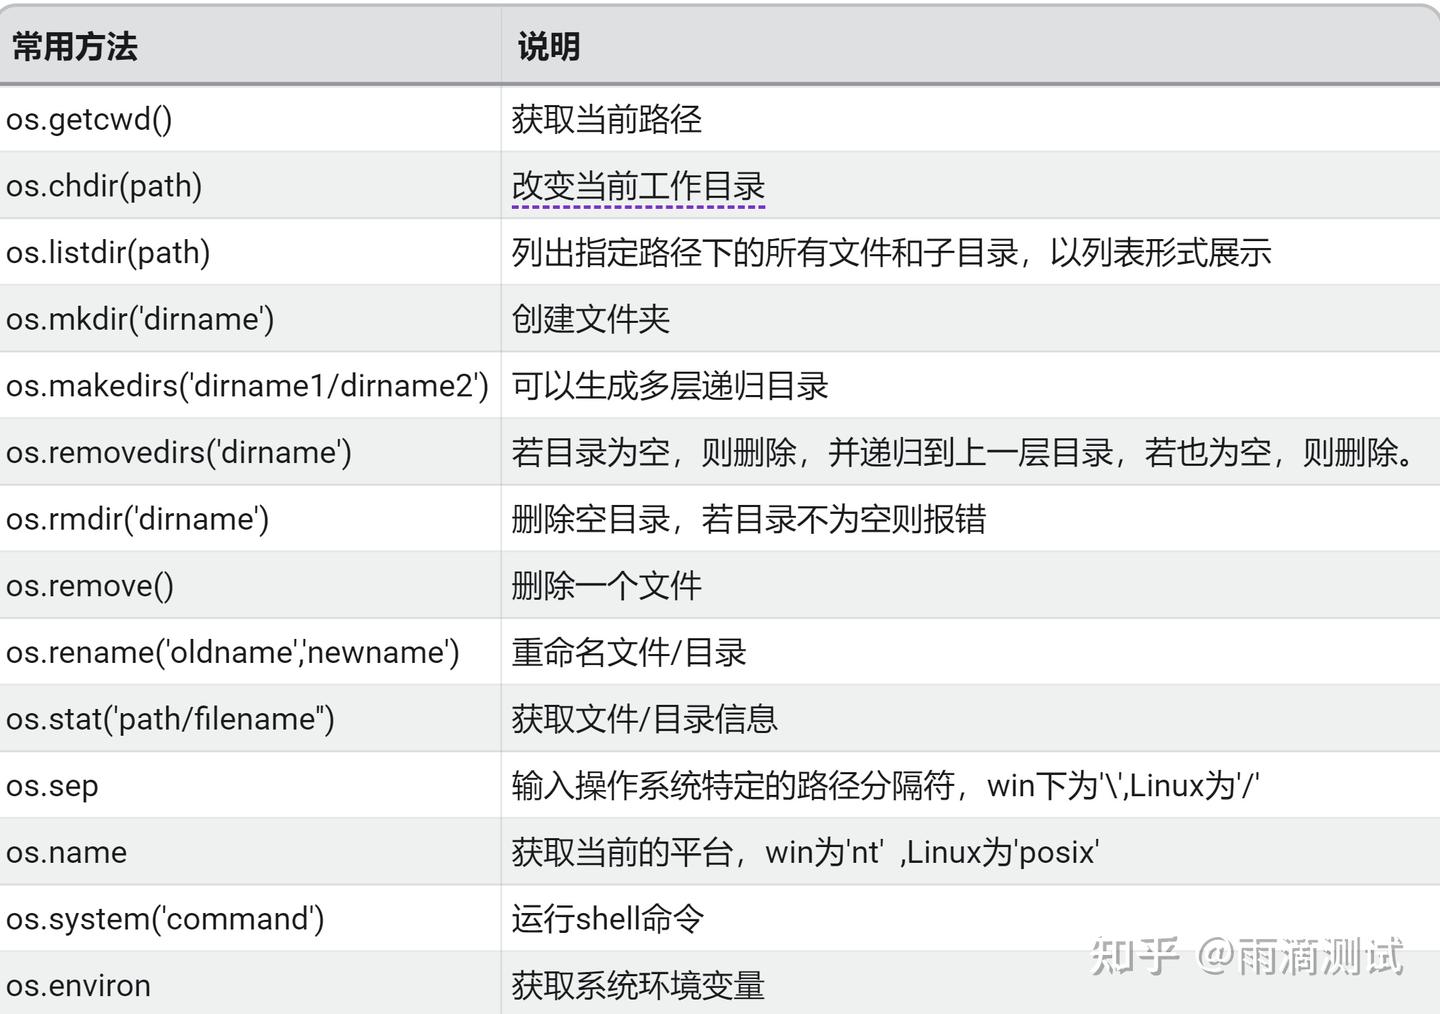
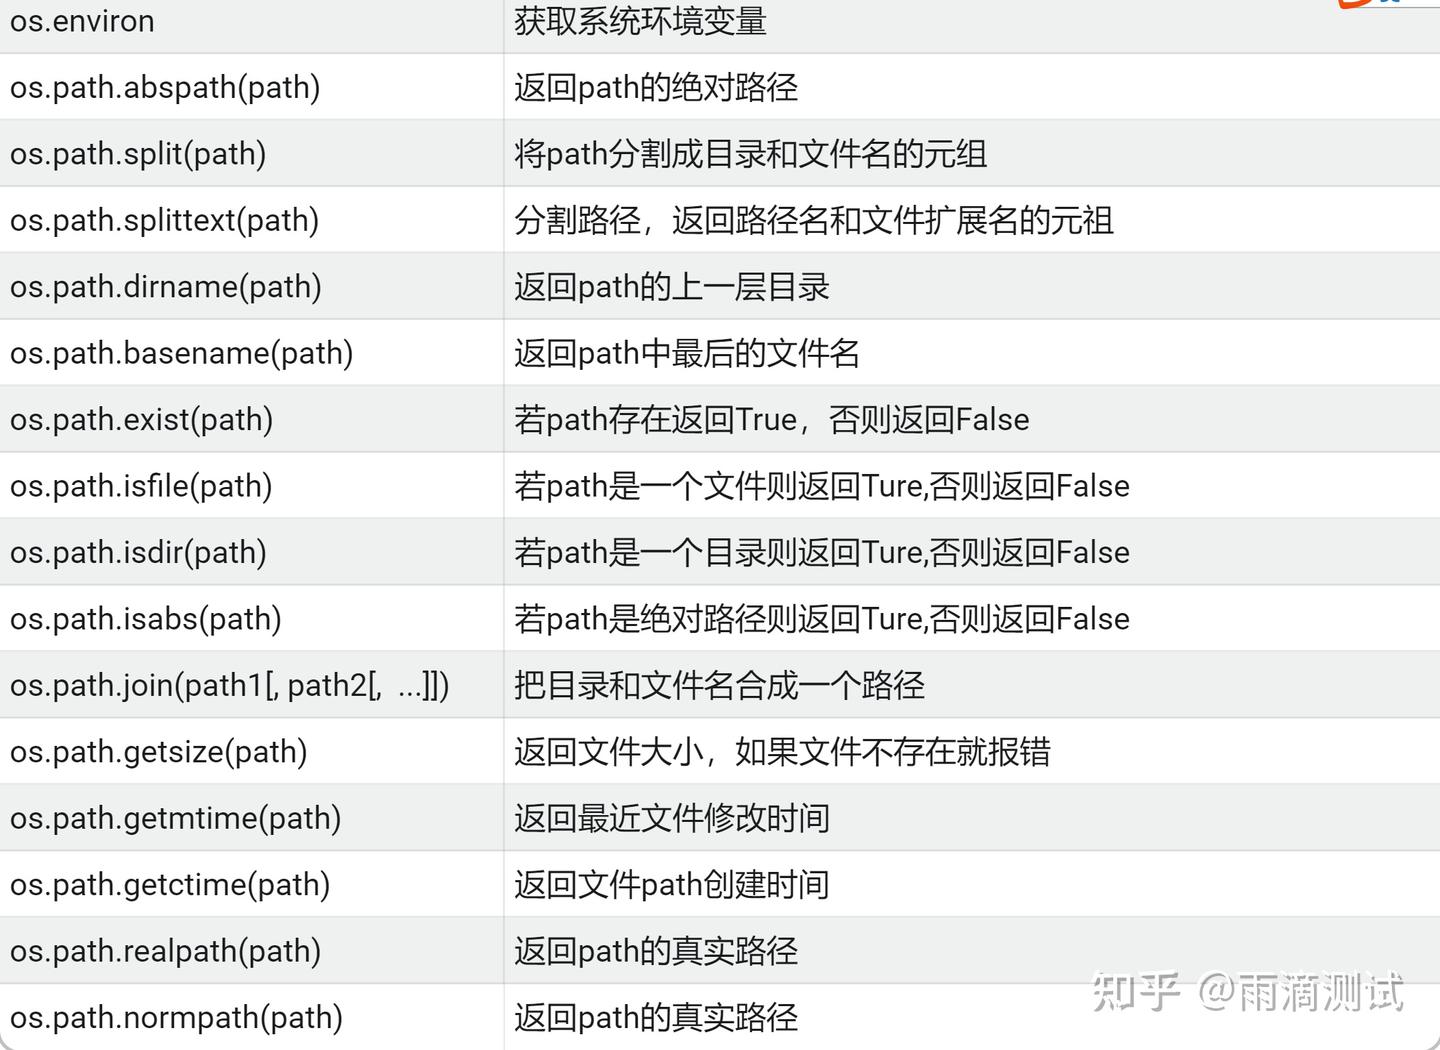
import os1.3 常用方法及说明
1.4 示例
import os
print(os.getcwd()) #获取当前路径 ,输出:E:\project\demo_mod
print(os.listdir()) #列出当前目录下的所有文件和目录 ,输出:['.idea', 'abc.txt', 'demo_os.py']
os.mkdir("aaa") #创建文件夹aaa
os.rmdir("aaa") #删除空目录aaa
os.makedirs("abc/bcd") #创建多层文件夹abc/bcd
os.removedirs("abc/bcd") #删除多层多文件abc/bcd
print(os.stat('abc.txt')) # 输出 :os.stat_result(st_mode=33206, st_ino=562949953424572, st_dev
print(os.path.abspath(".")) # 返回当前路径的绝对路径 ,输出 :E:\project\demo_mod
os.path.exists(r"E:\project\demo01") # 判断path是否存在 ,输出:False
os.path.isfile("abc.txt") # 判断abc.txt是文件 ,输出:True
print(os.path.split(r"E:\project\demo_mod\abc.txt")) # ('E:\\project\\demo_mod', 'abc.txt')
print(os.path.dirname(r"E:\project\demo_mod\abc.txt")) # E:\project\demo_mod2.sys
2.1 作用
针对python解释器相关的变量和方法2.2 导入
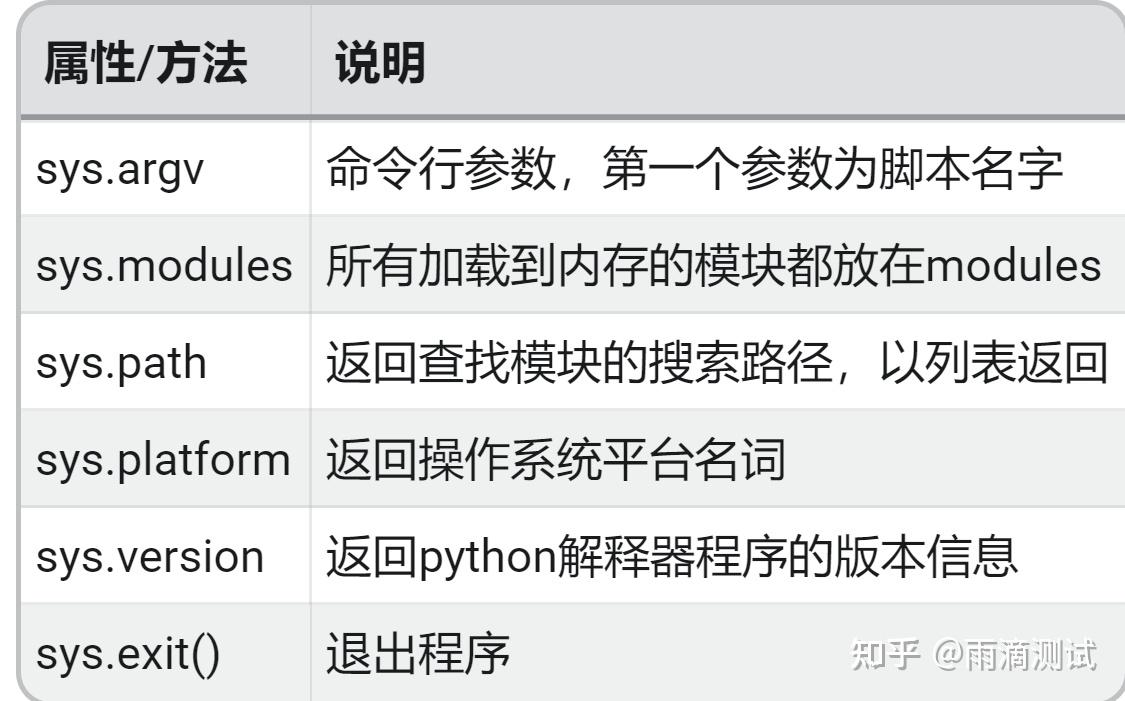
import sys2.3 常用方法及说明
2.4 示例
import sys
print("获取默认第一个参数:",sys.argv)
print("获取系统路径:",sys.path)
print("获取当前平台:",sys.platform)
print("获取当前版本:",sys.version)
#返回:
获取默认第一个参数: ['E:/project/demo_mod/demo02_sys.py']
获取系统路径: ['E:\\project\\demo_mod', 'E:\\project\\demo_mod', 'C:\\python36\\python36.zip', 'C:\\python36\\DLLs', 'C:\\python36\\lib', 'C:\\python36', 'C:\\python36\\lib\\site-packages']
获取当前平台: win32
获取当前版本: 3.6.4 (v3.6.4:d48eceb, Dec 19 2017, 06:04:45) [MSC v.1900 32 bit (Intel)3.time
3.1 作用
和时间相关的模块3.2 导入
import time3.3 常用方法及说明
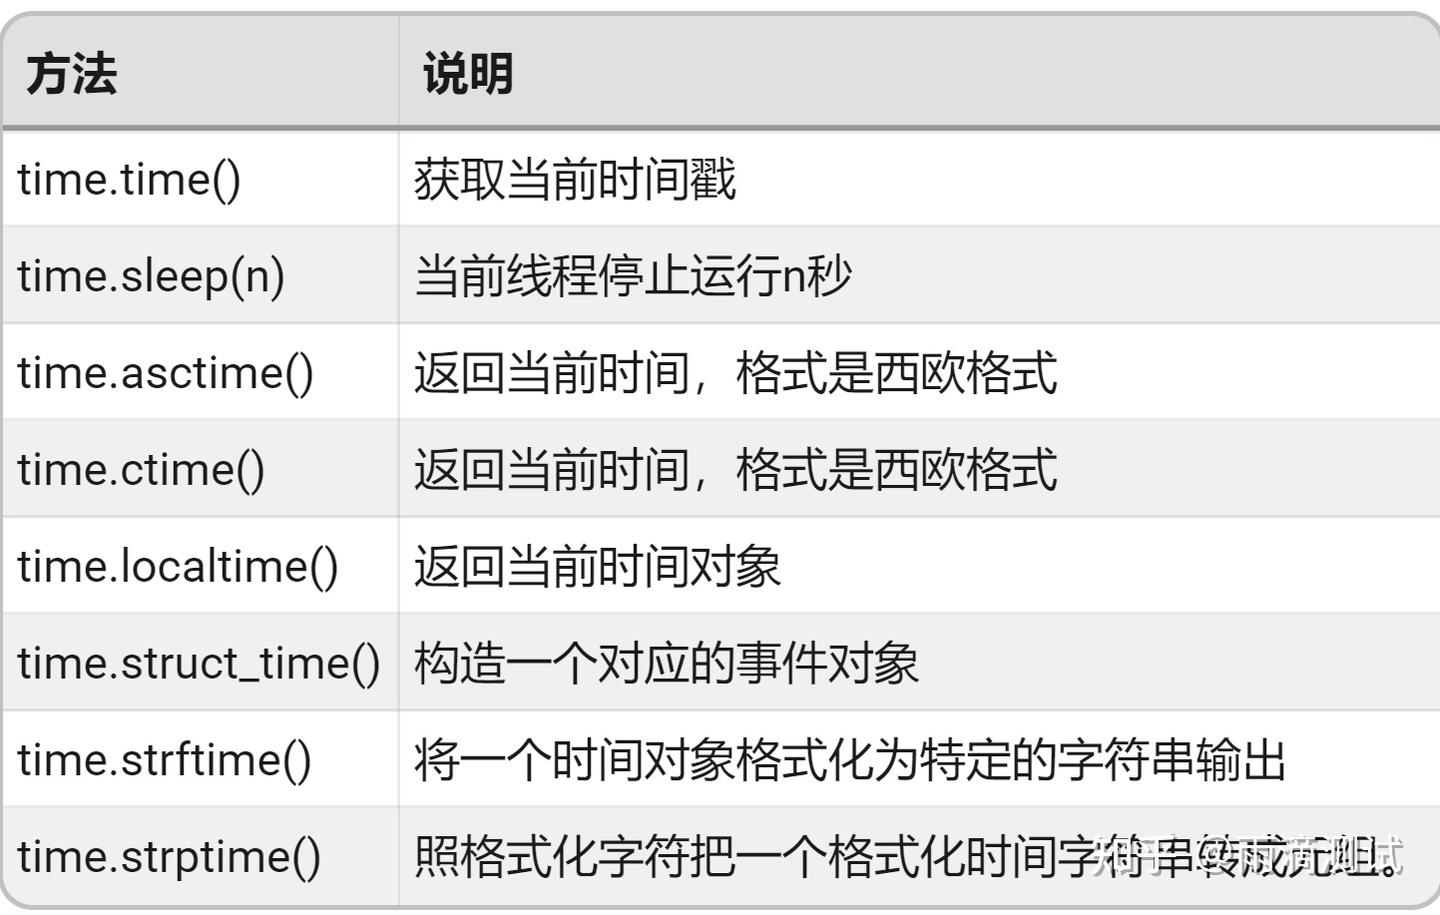
3.4 示例
import time
print("获取当前时间戳:",time.time())
print("返回当前时间,西欧格式:",time.ctime())
print("返回当前时间对象:",time.localtime())
time.sleep(2) #睡眠2s
print("返回格式化后的时间:",time.strftime("%Y-%m-%d %X", time.localtime()))
print("将格式化的时间转化成时间对象,元祖形式:",time.strptime('2010-8-11 7:26:16', '%Y-%m-%d %X'))
#返回:
获取当前时间戳: 1634373068.0492582
返回当前时间,西欧格式: Sat Oct 16 16:31:08 2021
返回当前时间对象: time.struct_time(tm_year=2021, tm_mon=10, tm_mday=16, tm_hour=16, tm_min=31, tm_sec=8, tm_wday=5, tm_yday=289, tm_isdst=0)
返回格式化后的时间: 2021-10-16 16:31:10
将格式化的时间转化成时间对象,元祖形式: time.struct_time(tm_year=2010, tm_mon=8, tm_mday=11, tm_hour=7, tm_min=26, tm_sec=16, tm_wday=2, tm_yday=223, tm_isdst=-1)4.datetime
4.1 作用
关于时间和日期的模块 ,这里面有几个常用的类,包括:- date : 日期类
- time : 时间类
- datetime : 日期和时间的类 ,相当于前面的两个类
- datedelta : 时间间隔
4.2 导入
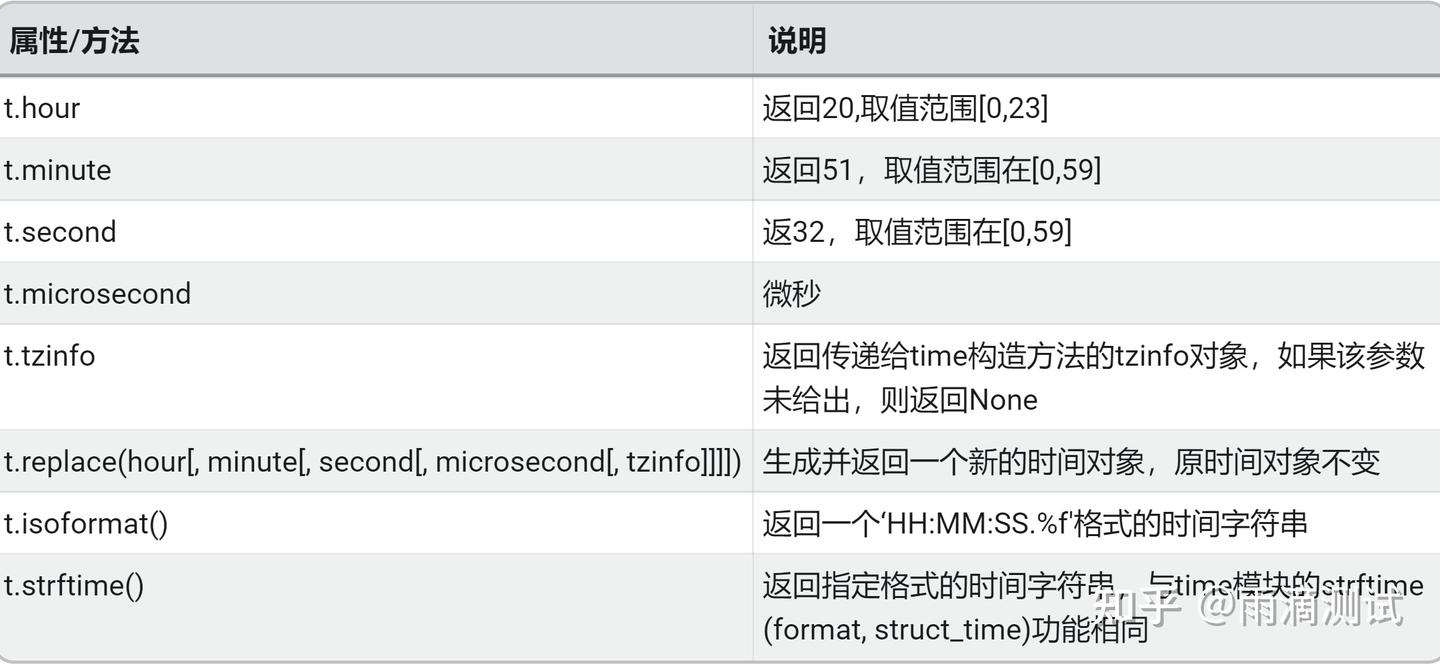
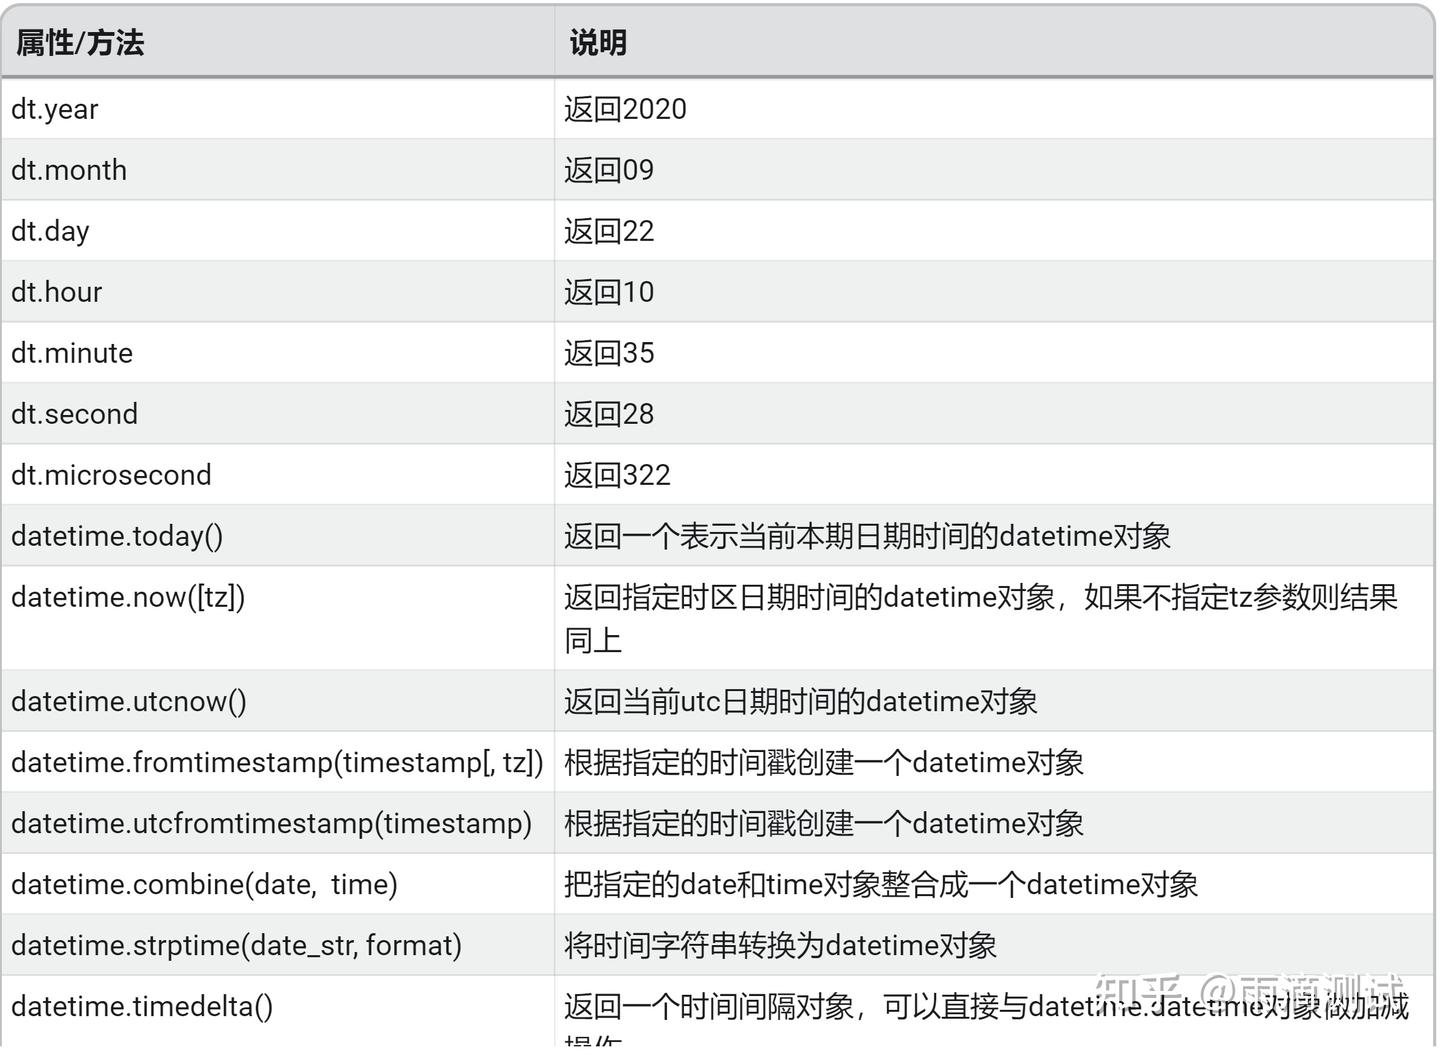
4.3 常用方法及说明
 from datetime import date
 d = date(date(2020,11,20))
下面表格中的d就是上面的日期对象
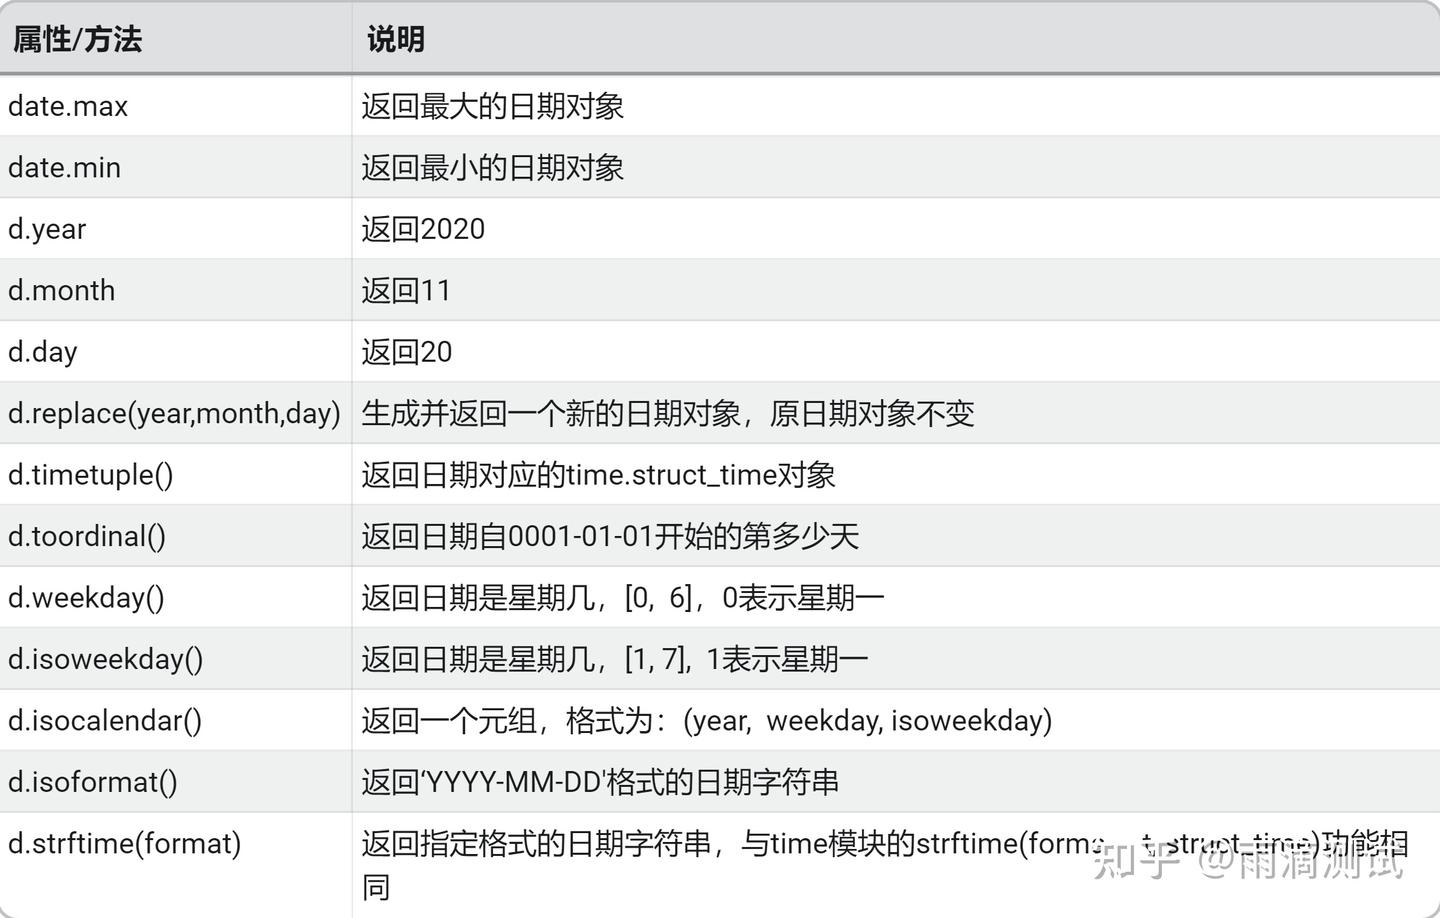
 from datetime import time
 t = time(20,51,32)
下面表格中的t就是上面的时间对象
 from datetime import datetime
 dt = datetime(2020,09,22,10,35,28,322)
下面表格中的dt就是上面的日期时间对象
4.4 示例
date示例
from datetime import date
now = date(2021, 10, 16)
tomorrow = now.replace(day = 17)
print('今天日期:', date.today())
print('今天日期:', now,)
print('明天日期:', tomorrow)
print("日期的元祖", now.timetuple())
print('返回星期几,0代表星期一:', now.weekday())
print('返回星期几,1代表星期一:', now.isoweekday())
print( '返回一个元祖', now.isocalendar())
print( '返回日期字符串:', now.isoformat())
print( '返回格式化的日期:', now.strftime("%Y-%m-%d"))
#输出:
今天日期: 2021-10-16
今天日期: 2021-10-16
明天日期: 2021-10-17
日期的元祖 time.struct_time(tm_year=2021, tm_mon=10, tm_mday=16, tm_hour=0, tm_min=0, tm_sec=0, tm_wday=5, tm_yday=289, tm_isdst=-1)
返回星期几,0代表星期一: 5
返回星期几,1代表星期一: 6
返回一个元祖 (2021, 41, 6)
返回日期字符串: 2021-10-16
返回格式化的日期: 2021-10-16time示例
from datetime import time
t1 = time(17,25,15)
print("显示小时:",t1.hour)
print("显示分钟:",t1.minute)
print("显示秒:",t1.second)
print("显示微秒:",t1.microsecond)
tm1 = t1.replace(minute=32)
print("替换后时间:",tm1)
print('返回时间字符串:', t1.isoformat())
print('返回格式化后的时间字符串', t1.strftime("%X"))
#输出:
显示小时: 17
显示分钟: 25
显示秒: 15
显示微秒: 0
替换后时间: 17:32:15
返回时间字符串: 17:25:15
返回格式化后的时间字符串 17:25:15datetime示例
from datetime import datetime
print('最大时间:', datetime.max)
print('最小时间:', datetime.min)
print('今天时间,精确到微秒:', datetime.today())
print('现在时间,精确到微秒::', datetime.now())
print("格式化日期:",datetime.strftime(datetime.now(),"%y-%m-%d %H:%M:%S"))
#输出 :
最大时间: 9999-12-31 23:59:59.999999
最小时间: 0001-01-01 00:00:00
今天时间,精确到微秒: 2021-10-16 17:41:08.807900
现在时间,精确到微秒:: 2021-10-16 17:41:08.807900
格式化日期: 21-10-16 17:41:08timedelta示例
from datetime import timedelta,datetime
dt = datetime.now()
#日期减一天
dt1 = dt + timedelta(days=-1) #昨天
dt2 = dt - timedelta(days=1) #昨天
dt3 = dt + timedelta(days=1) #明天
delta_obj = dt3-dt
print("当前日期-1:",dt1)
print("当前日期-1:",dt2)
print("当前日期+1:",dt3)
print("相差几天:",delta_obj)
#输出:
当前日期-1: 2021-10-15 17:45:39.574903
当前日期-1: 2021-10-15 17:45:39.574903
当前日期+1: 2021-10-17 17:45:39.574903
相差几天: 1 day, 0:00:005.random
5.1 作用
用于生成随机数5.2 导入
import random5.3 常用方法及说明
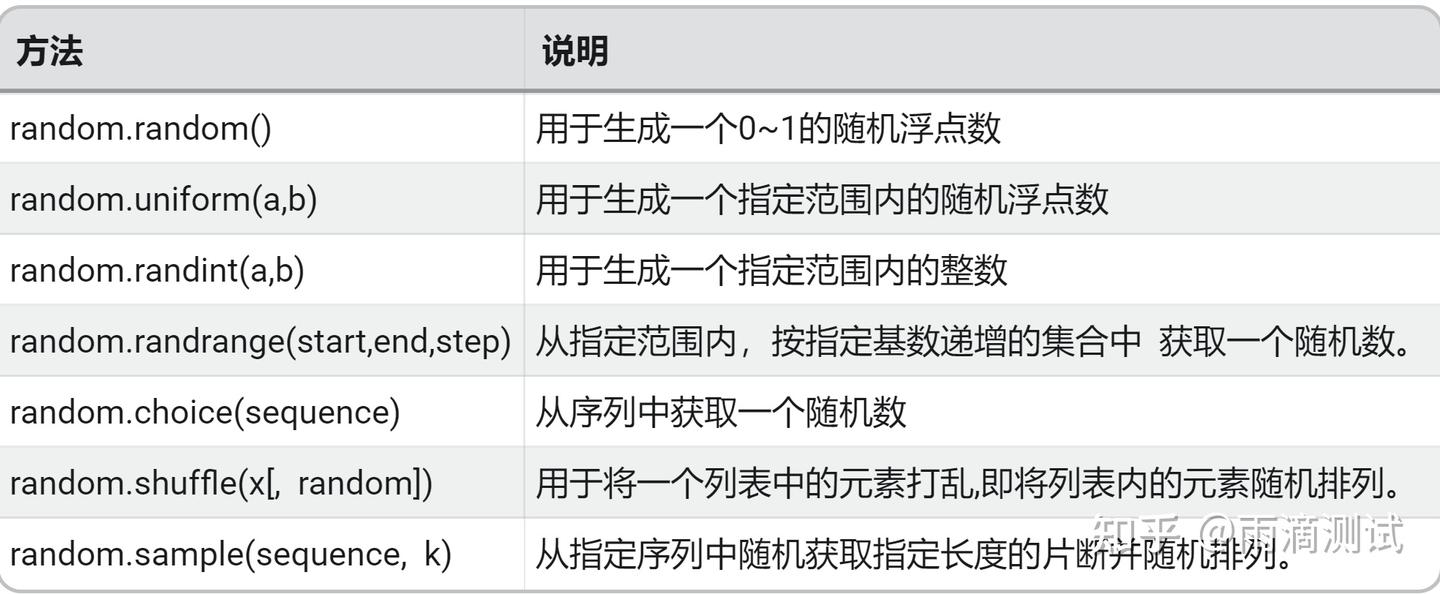
5.4 示例
import random
print("生成一个0~1的随机数:",random.random())
print("生成一个指定范围内的随机数:",random.uniform(1,10))
print("生成一个指定范围的随机整数:",random.randint(1,100))
print("生成指定集合,然后随机生成一个数:",random.randrange(1,5,1))
print("从列表中随机拿一个数:",random.choice(['a','b','c','d']))
print("指定的长度中随机排序",random.sample(['a','b','c','d'],3))
lst = [1,3,46,33,'a','b','c','d']
random.shuffle(lst)
print("列表被打乱后随机排序",lst)
#输出:
生成一个0~1的随机数: 0.06636579979518498
生成一个指定范围内的随机数: 7.29403347010388
生成一个指定范围的随机整数: 93
生成指定集合,然后随机生成一个数: 3
从列表中随机拿一个数: c
指定的长度中随机排序 ['d', 'b', 'a']
列表被打乱后随机排序 ['a', 3, 46, 'b', 1, 'c', 33, 'd']6.subprocess
6.1 作用
执行系统命令6.2 导入
import subprocess6.3 常用方法及说明
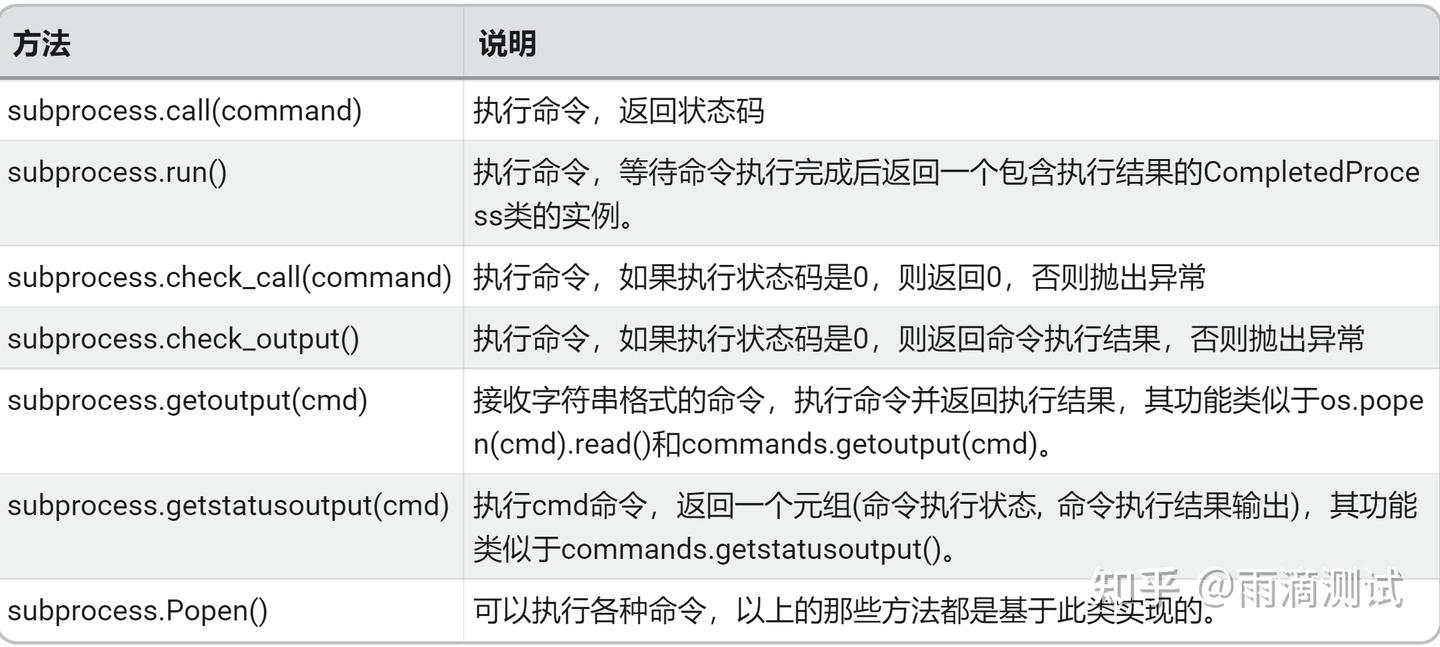
6.4 示例
import subprocess
# 查看当前目录下的文件 ,以下三条命令必须指定shell参数 ,否则会报错
subprocess.run(["dir"],shell=True)
subprocess.run(["java","-version"])
subprocess.call("dir",shell=True)
subprocess.check_call("dir",shell=True)
# 以下两条方法专门就是执行shell命令的 。
subprocess.getoutput("dir")
subprocess.getstatusoutput("dir")
#输出 :以上都可以返回命令执行后的结果7.hashlib
7.1 作用
用于加密相关的操作7.2 导入
import hashlib7.3 常用方法及说明
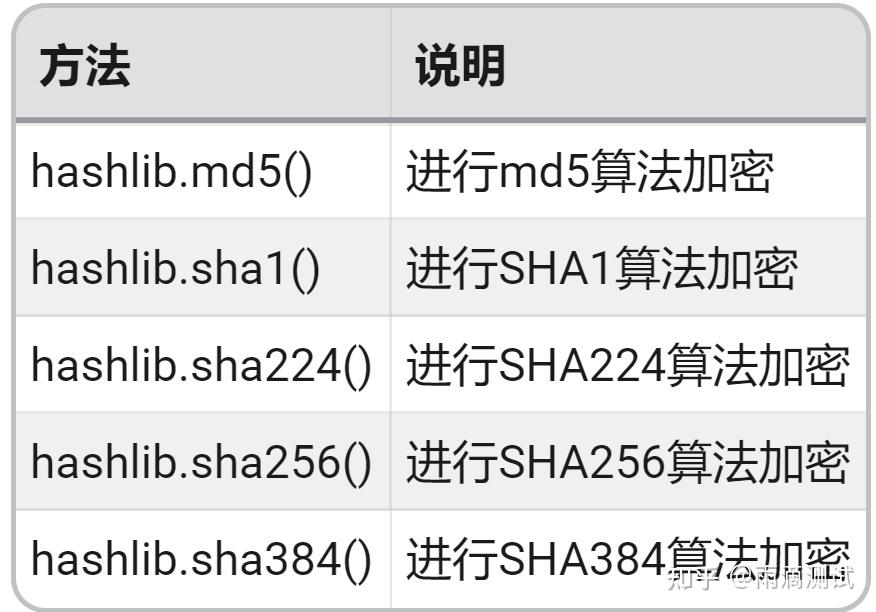
7.4 示例
import hashlib
m1 = hashlib.md5('hello python'.encode(encoding='utf-8')) # 构建MD5对象
print(m1.hexdigest()) # 结果为: e5d3024684c9be1dd3f6114ecc8bbdddc
sh224 = hashlib.sha224("hello python".encode('utf-8'))
print(sh224.hexdigest())
sh256 = hashlib.sha256("hello python".encode('utf-8'))
print(sh256.hexdigest())
sh384 = hashlib.sha384("hello python".encode('utf-8'))
print(sh384.hexdigest())
#结果输出:
e53024684c9be1dd3f6114ecc8bbdddc
7f78ad20eff5afc21166e6a5e22962a2819bd28d335ba95ff414b3f5
373a23512f9531ad49ec6ad43ecdda58df01e59d9ec5812d601fd05cc53345d3
eaf44aabb38c34ff948e714b9c3c08f3fed996d74fc9f1225d7368ccb386465df272e55912041921eddf13b51aff833c8.json
8.1 作用
编码或解码json对象8.2 导入
import json8.3 常用方法及说明
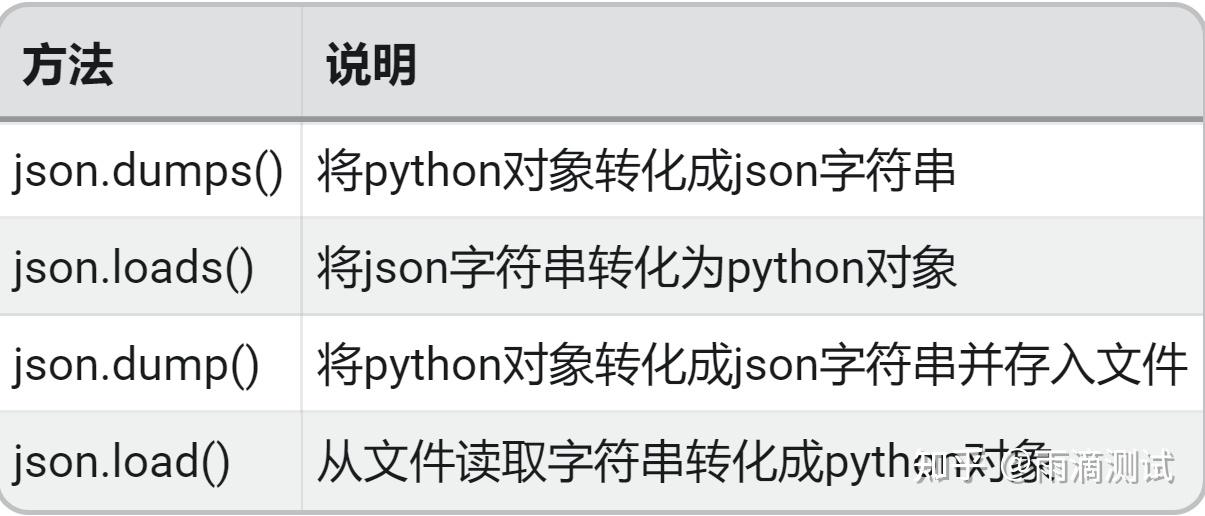
8.4 示例
import json
# 1.字符串(json) --> 字典
color = '{"1":"red","2":"green","3":"blue","4":"black"}'
color_dict = json.loads(color)
print("color_dict:",color_dict)
# 2.字典 --> json
color_json = json.dumps(color_dict)
print("color_json:",color_json)
# 3.(json)文件 --> 字典
with open("color.json") as f:
dt = json.load(f)
print("dt:",dt)
# 4.dict --> (json)文件
with open("color1.json","w") as f1:
json.dump(dt,f1) #将python字典数据写入color1.json
#输出 :
color_dict: {'1': 'red', '2': 'green', '3': 'blue', '4': 'black'}
color_json: {"1": "red", "2": "green", "3": "blue", "4": "black"}
dt: {'1': 'red', '2': 'green', '3': 'blue', '4': 'black'}9.pickle
9.1 作用
用于序列化的模块9.2 导入
import pickle9.3 常用方法及说明
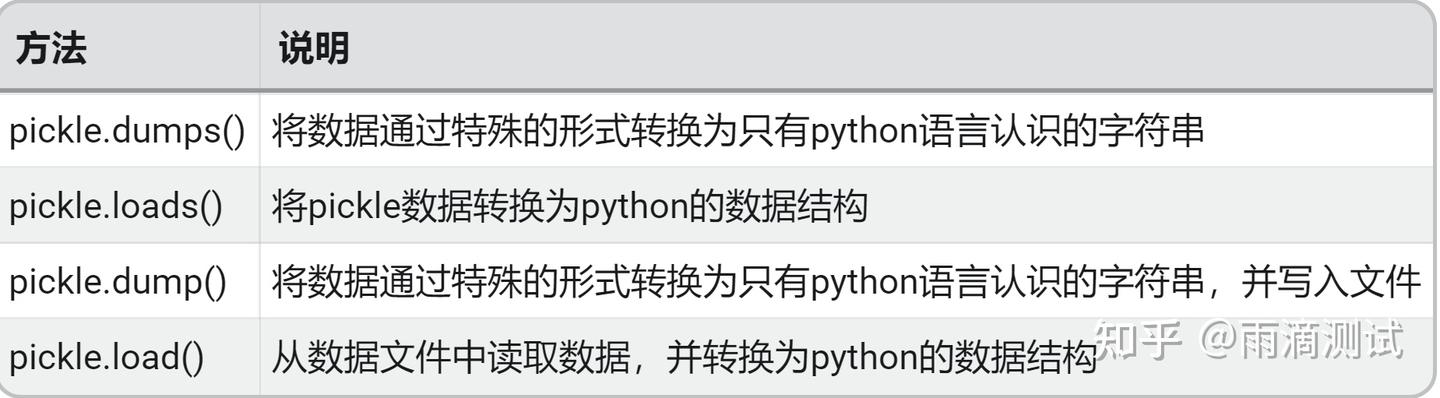
9.4 示例
import pickle
# 1.序列化
color = ["red","green","blue","black"]
color_byte = pickle.dumps(color)
print("color_byte:",color_byte)
# 反序列化即字节转列表(python数据类型)
color_obj = pickle.loads(color_byte)
print("color_obj:",color_obj)
class Person():
def __init__(self,name,age):
self.name = name
self.age = age
p = Person('zhangsan',21)
# 3.持久化到文件
with open("color.txt","wb") as f:
dt = pickle.dump(p,f)
# 4. 从文件读取数据
with open("color.txt","rb") as f:
p_data = pickle.load(f)
print(p_data)
#输出 :
color_byte: b'\x80\x03]q\x00(X\x03\x00\x00\x00redq\x01X\x05\x00\x00\x00greenq\x02X\x04\x00\x00\x00blueq\x03X\x05\x00\x00\x00blackq\x04e.'
color_obj: ['red', 'green', 'blue', 'black']
<__main__.Person object at 0x03A4B050>10.shutil
10.1 作用
主要用于文件或目录的复制或归档的操作10.2 导入
import shutil10.3 常用方法及说明
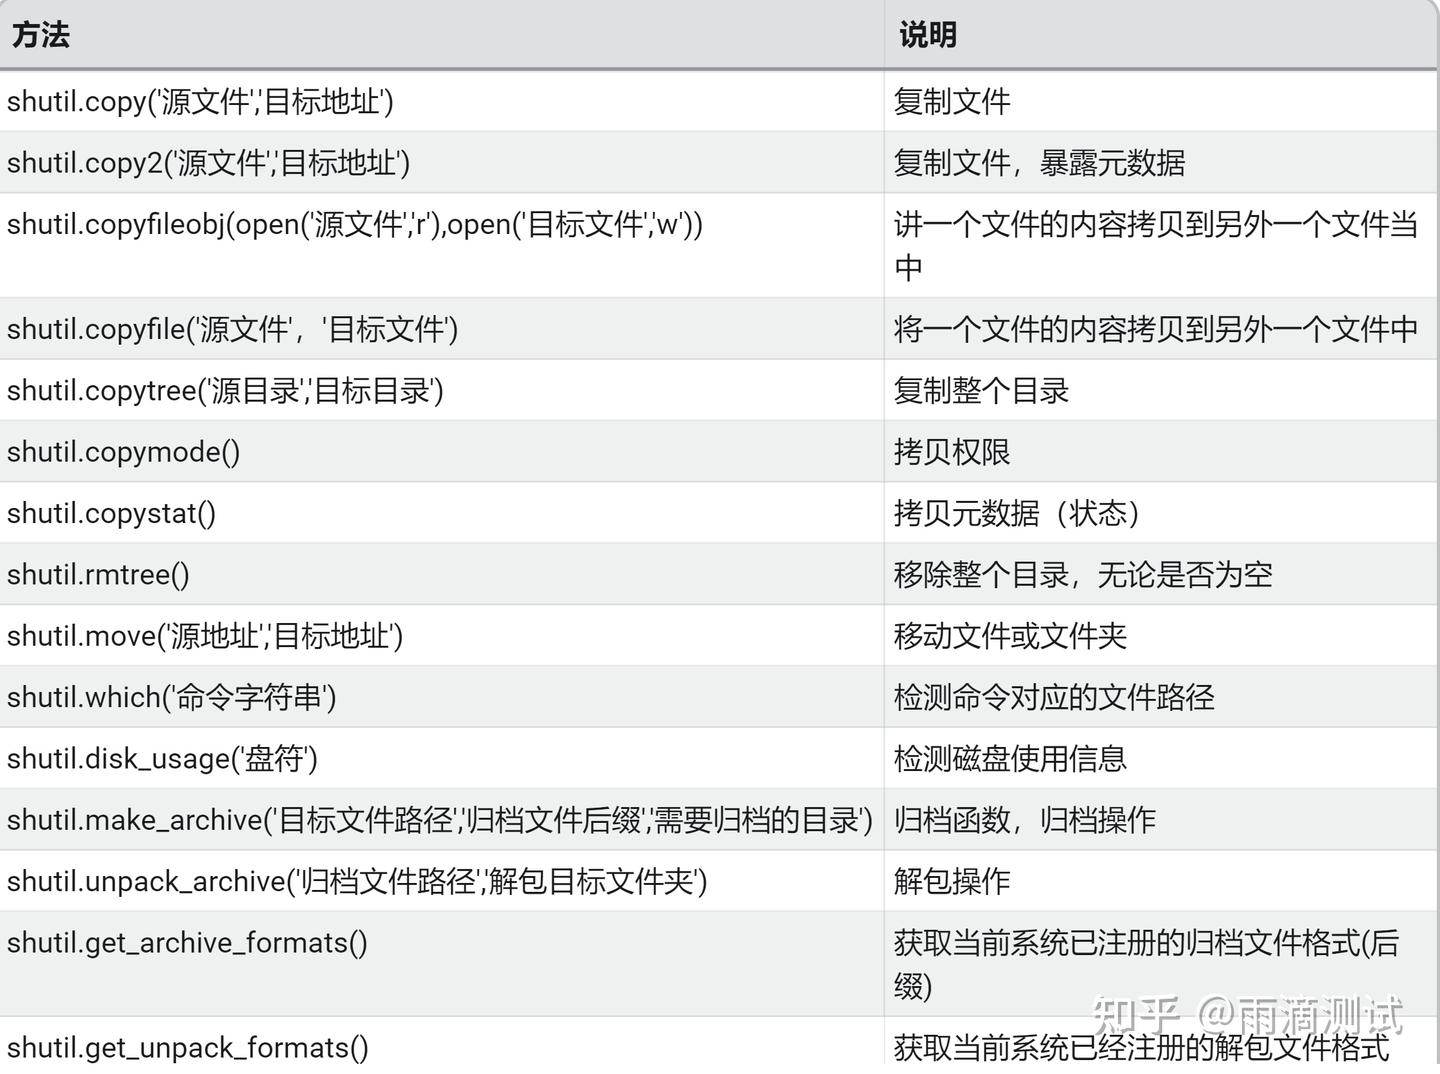
10.4 示例
import shutil
shutil.copy('abc.txt','bcd.txt')
shutil.copy2('abc.txt','ddd.txt')
# 基于文件流的复制,目标文件必须存在
with open("abc.txt","rb") as f ,open("ddd.txt","wb") as s:
shutil.copyfileobj(f,s)
shutil.copyfile('abc.txt','acc.txt') # 目标文件无须存在
shutil.copymode('abc.txt','acc.txt') # 仅拷贝权限,内容,组,用户均不变,目标文件必须存在
# 文件夹压缩,不可压缩文件
shutil.make_archive("a1","zip","E:\project\demo2801")
# 备注 :以上都直接形成文件11.configparser
11.1 作用
读写配置文件11.2 导入
import configparser1.3 常用方法及说明

11.4 示例
配置项生成和读取
import configparser
conf = configparser.ConfigParser()
# === 1.创建配置项====
def write_conf():
conf['mysql'] = {
"host" : "192.169.10.68",
"port" : "3306",
"user" : "root",
"password" : "123456"
}
with open('config.ini','w',encoding='utf-8') as f:
conf.write(f)
"""
调用write_conf()将生成config.ini文件,文件内容如下:
[mysql]
host = 192.169.10.68
port = 3306
user = root
password = 123456
"""
# ====2.读取配置项======
# 通过read读取到config.ini中的数据
conf.read('config.ini',encoding='utf-8')
print("ini内所有的section,以列表形式返回:",conf.sections())
for k,v in conf.items('mysql'):
print(k,v)
"""
通过conf.items()循环后返回如下:
host 192.169.10.68
port 3306
user root
password 123456
"""
# 使用options获取某个section中所有的键
print(conf.options('mysql')) #返回:['host', 'port', 'user', 'password']
# 使用get获取某个键对应的值
print("获取port的值:",conf.get("mysql","port")) #返回:3306
配置项的新增、修改、删除
import configparser
conf = configparser.ConfigParser()
conf.read('config.ini')
# 添加新配置项
def add_config():
'''
要新增的内容
[api]
name = /user/login
method = 'get'
body = {'username':'admin','password':'123456'}
'''
conf.add_section('api')
conf.set('api','name','/user/login')
conf.set('api','method','get')
conf.set('api','body',"{'username':'admin','password':'123456'}")
with open('config.ini','w') as f:
conf.write(f)
# add_config() #只需运行一次
# 修改配置项
conf.set('api','method','post')
with open('config.ini', 'w') as f:
conf.write(f)
# 删除配置项
conf.remove_option('api','body')
conf.remove_section('api')
with open('config.ini', 'w') as f:
conf.write(f)12.yaml
12.1 作用
进行yaml格式的读取和转化12.2 导入
import yaml12.3 常用方法及说明
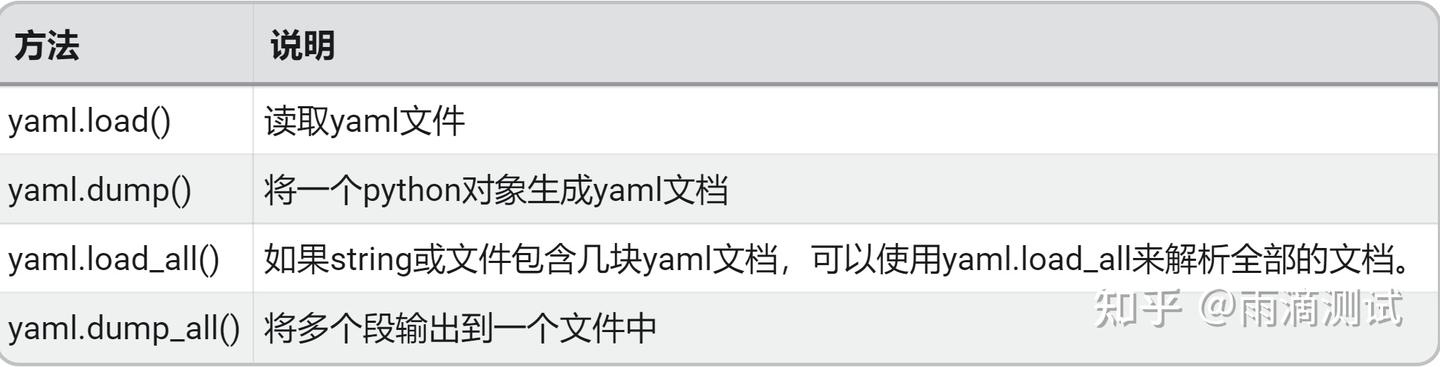
12.4 示例
import yaml
"""
文件名:sutdent.yaml
文件内容:
name: zhangsan
age: 37
lower student:
name: lisi
age: 25
higher student:
- name: wangwu
age: 35
- name1: zhaoliu
age1: 42
"""
# 1.load方法,读取yaml文件,
with open('sutdent.yaml') as f:
res = yaml.load(f,Loader=yaml.FullLoader)
print("读取结果:",res)
# 2.dump ,将一个python对象生成yaml格式
dct = {'a':'python','b':'java'}
res1 = yaml.dump(dct)
print(res1)
# 3.load_all ,将文件包含的几块Yaml读取出来
fl = '''
---
name: tony
age: 20
---
name: lisy
age: 29
'''
res2 = yaml.load_all(fl,Loader=yaml.FullLoader)
for data in res2:
print(data)
# 4.将多段输出到yaml文件
obj1 = {"name": "James", "age": 20}
obj2 = ["Lily", 19]
with open(r'a.yaml', 'w') as f:
yaml.dump_all([obj1, obj2], f)
"""
输出到文件如下:
age: 20
name: James
---
- Lily
- 19
"""
# 输出:
读取结果: {'name': 'zhangsan', 'age': 37, 'lower student': {'name': 'lisi', 'age': 25}, 'higher student': [{'name': 'wangwu', 'age': 35}, {'name1': 'zhaoliu', 'age1': 42}]}
a: python
b: java
{'name': 'tony', 'age': 20}
{'name': 'lisy', 'age': 29}13.itertools
13.1 作用
用来产生不同类型迭代器13.2 导入
import itertools13.3 常用方法及说明
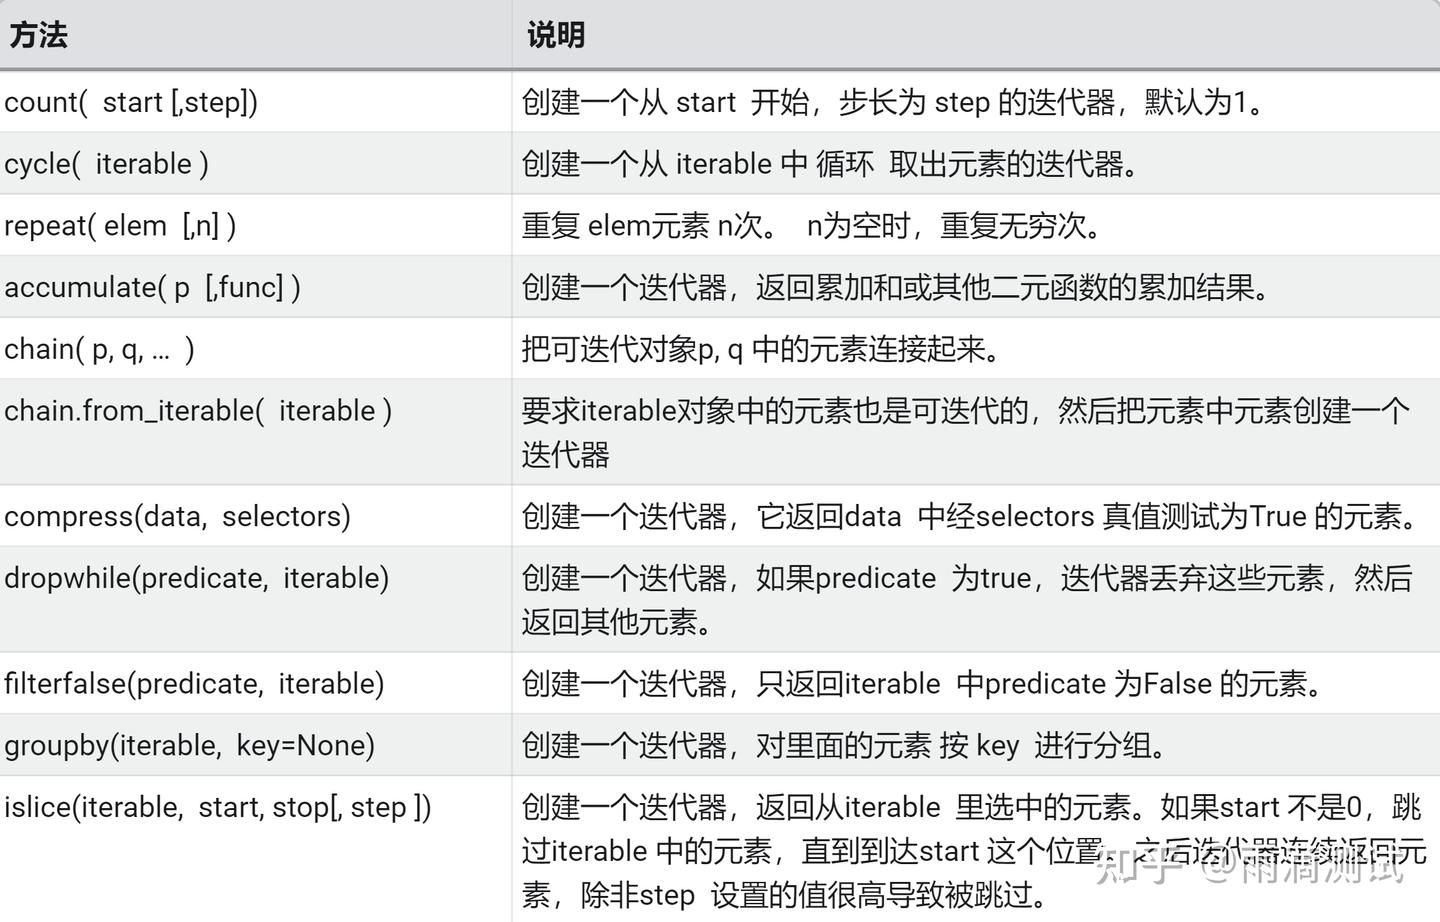
13.4 示例
无限迭代器
import itertools
# 无限迭代器
# 1. count(start,step)
"""
start : 开始索引
step : 步长
"""
for i in itertools.count(1,2):
if i > 8:
break
print("i =", i)
"""
i = 1
i = 3
i = 5
i = 7
"""
# 2. cycle("abc") # 无限重复abc
sum = 0
for i in itertools.cycle("123"):
print(i,end=" ")
if sum > 10:
break
sum += int(i)
print()
# 输出 :1 2 3 1 2 3 1
# 3.repeat(obj,times)
"""
obj : 循环的对象
times : 循环的次数
"""
for x in itertools.repeat("hello",2):
print(x,end=" ")
print()
#输出 :hello hello合并与筛选迭代器
import itertools
# 迭代器合并
# 1. chain(p,q) : 将多个可迭代对象分别处理,可将多个序列处理为单个序列
"""
p , q 都是可迭代对象
"""
for i in itertools.chain("hello","python"):
print(i,end=" ")
print()
"""
输出 :h e l l o p y t h o n
"""
# 2. chain.from_iterable(iterable) # 这里相当于将一个迭代器的元素都拿来进行返回
for i in itertools.chain.from_iterable(["hello","python"]):
print(i,end=" ")
print()
# 输出 :h e l l o p y t h o n
# 筛选序列 :
# 1.compress(data,selector)
"""
data:一个可以用来迭代的数据。
selector:选择器,用来对data进行筛选。
生成一个筛选之后的迭代器,筛选规则为,当selector的第i个值为真,则保留data的第i个值,否则去除data的第i个值
"""
for x in itertools.compress('ABCDEF', [1, 0, 1, 0, 1, 1]):
print(x,end=" ")
print()
# 2.dropwhile(predicate, iterable)
"""
predicate:一个判断函数,该函数返回值类型为bool。
iterable:可迭代对象。
"""
#去除小于3的数
for i in itertools.dropwhile(lambda x:x<3,[1,2,3,4,5]):
print(i,end=" ")
print()
#输出 : 3 4 5
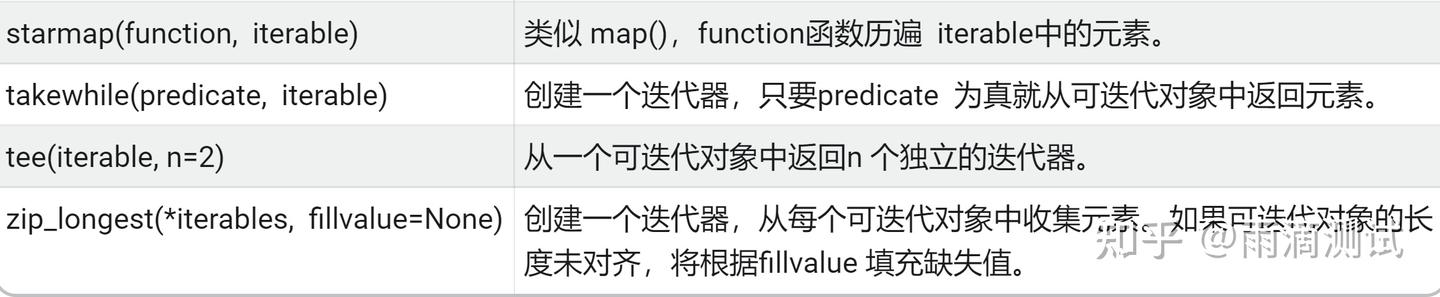
# 3. takewhile(predicate, iterable)
"""
创建一个迭代器,只要 predicate 为真就从可迭代对象中返回元素。
"""
for i in itertools.takewhile(lambda x: x > 5, [7, 6, 32, 3, 6, 5]):
print(i,end=" ")
print()
# 输出 :[7, 6, 32]14.re
14.1 作用
正则匹配 ,需要说明的是,使用这个模块需要懂得一些正则表达式相关的知识 。14.2 导入
import re14.3 常用方法及说明
14.4 示例
import re
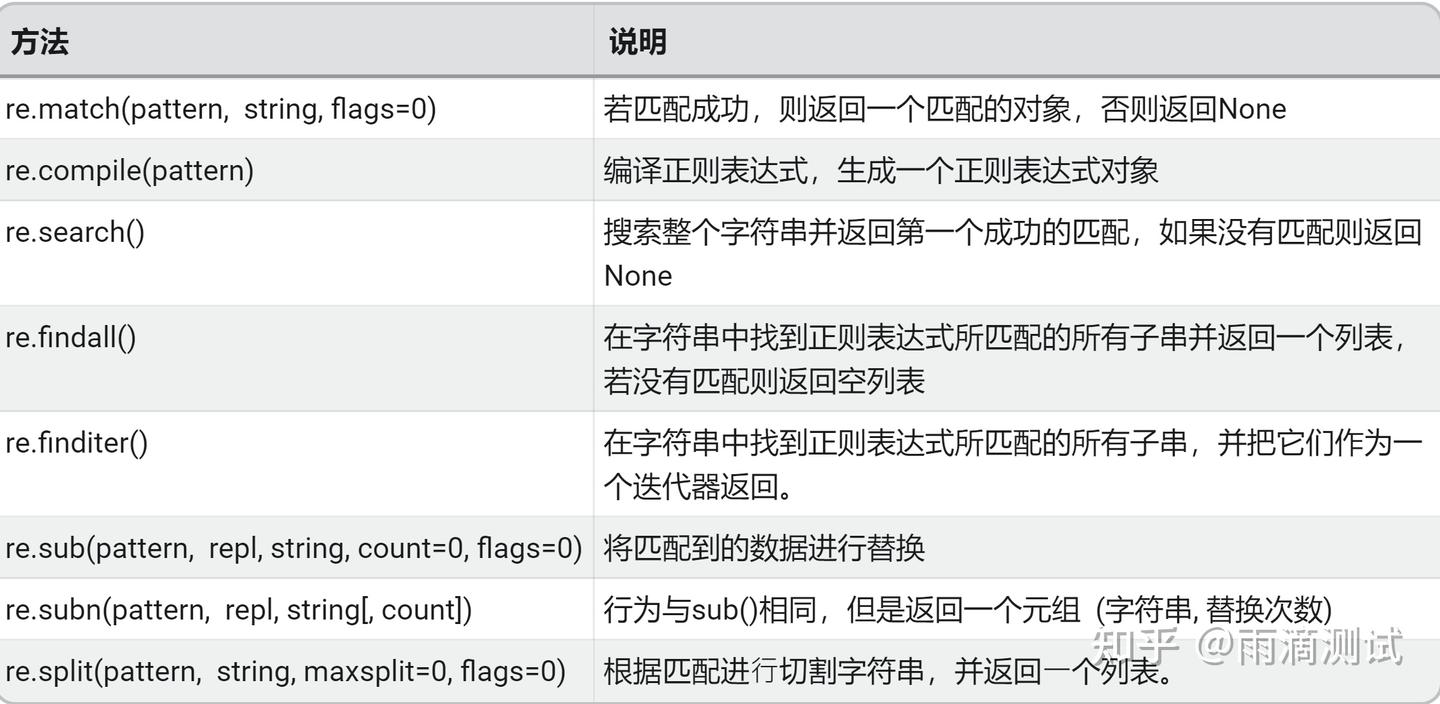
# 1.match(pattern,string,flags=0)
"""
从字符串的开头进行匹配, 匹配成功就返回一个匹配对象,匹配失败就返回None
若匹配到,通过调用group()方法得到匹配的字符串并返回
"""
print("匹配到的字符串为:",re.match("ac","acd").group())
# 输出 :匹配到的字符串为: ac
# 2.search(pattern,string,flags=0)
"""
搜索整个字符串去匹配第一个并返回,未匹配成功返回None
若匹配到,通过调用group()方法得到匹配的字符串并返回
"""
print("匹配到的字符串为:",re.search("ac","ddacd").group())
# 输出 :匹配到的字符串为: ac
# 3. findall(pattern, string, flags=0)
"""
match和search均用于匹配单值,即:只能匹配字符串中的一个,如果想要匹配到字符串中所有符合条件的元素,则需要使用 findall。
"""
print("匹配到的字符串为:",re.findall("ac","dacdacd"))
#输出:匹配到的字符串为: ['ac', 'ac']
# 4. sub(pattern,repl,string,count=0,flags=0)
"""
替换匹配成功的指定位置字符串
"""
res = re.sub('\d','py','doc.2.exe.3.xls')
print("替换数字为py:",res)
#输出 :替换数字为py: doc.py.exe.py.xls
# 5.split(pattern,string,maxsplit=0,flags=0)
"""
根据正则匹配分割字符串
"""
res1=re.split('a','a1bcd')
print("分割字符得到:",res1)
#输出 :['', '1bcd']
# 6.compile()
"""
python代码最终会被编译为字节码,之后才被解释器执行。
在模式匹配之前,正在表达式模式必须先被编译成regex对象,
预先编译可以提高性能,re.compile()就是用于提供此功能
"""
obj=re.compile('\d{3}')
ret=obj.search('abcd123edee')
print(ret.group())
#输出 :123
# 7.group()与groups()
"""
匹配对象的两个主要方法:
group() 返回所有匹配对象,或返回某个特定子组,如果没有子组,返回全部匹配对象
groups() 返回一个包含唯一或所有子组的的元组,如果没有子组,返回空元组
"""
15.calendar
15.1 作用
提供了和日历相关的方法15.2 导入
import calendar15.3 常用方法及说明
15.4 示例
import calendar
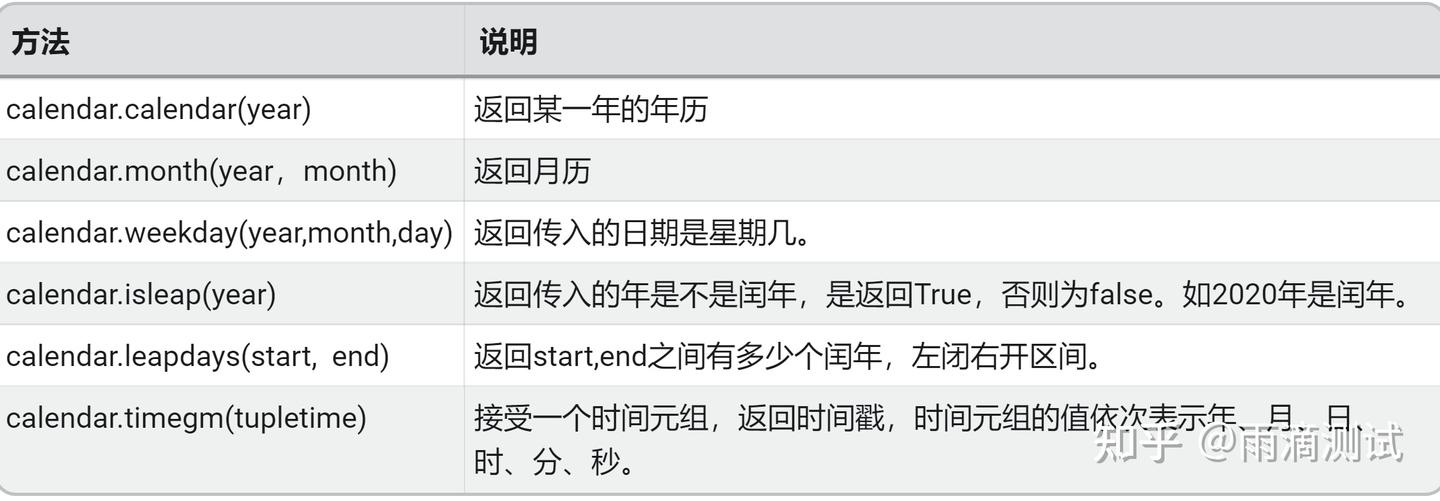
print("calendar(years)返回某一年的日历:") # calendar.prcal(2021)同样也可以实现此功能
print(calendar.calendar(2021))
""" 输出 :
2021
January February March
Mo Tu We Th Fr Sa Su Mo Tu We Th Fr Sa Su Mo Tu We Th Fr Sa Su
1 2 3 1 2 3 4 5 6 7 1 2 3 4 5 6 7
4 5 6 7 8 9 10 8 9 10 11 12 13 14 8 9 10 11 12 13 14
11 12 13 14 15 16 17 15 16 17 18 19 20 21 15 16 17 18 19 20 21
18 19 20 21 22 23 24 22 23 24 25 26 27 28 22 23 24 25 26 27 28
25 26 27 28 29 30 31 29 30 31
April May June
Mo Tu We Th Fr Sa Su Mo Tu We Th Fr Sa Su Mo Tu We Th Fr Sa Su
1 2 3 4 1 2 1 2 3 4 5 6
5 6 7 8 9 10 11 3 4 5 6 7 8 9 7 8 9 10 11 12 13
12 13 14 15 16 17 18 10 11 12 13 14 15 16 14 15 16 17 18 19 20
19 20 21 22 23 24 25 17 18 19 20 21 22 23 21 22 23 24 25 26 27
26 27 28 29 30 24 25 26 27 28 29 30 28 29 30
31
July August September
Mo Tu We Th Fr Sa Su Mo Tu We Th Fr Sa Su Mo Tu We Th Fr Sa Su
1 2 3 4 1 1 2 3 4 5
5 6 7 8 9 10 11 2 3 4 5 6 7 8 6 7 8 9 10 11 12
12 13 14 15 16 17 18 9 10 11 12 13 14 15 13 14 15 16 17 18 19
19 20 21 22 23 24 25 16 17 18 19 20 21 22 20 21 22 23 24 25 26
26 27 28 29 30 31 23 24 25 26 27 28 29 27 28 29 30
30 31
October November December
Mo Tu We Th Fr Sa Su Mo Tu We Th Fr Sa Su Mo Tu We Th Fr Sa Su
1 2 3 1 2 3 4 5 6 7 1 2 3 4 5
4 5 6 7 8 9 10 8 9 10 11 12 13 14 6 7 8 9 10 11 12
11 12 13 14 15 16 17 15 16 17 18 19 20 21 13 14 15 16 17 18 19
18 19 20 21 22 23 24 22 23 24 25 26 27 28 20 21 22 23 24 25 26
25 26 27 28 29 30 31 29 30 27 28 29 30 31
"""
print("firstweekday()返回每周的起始日:",calendar.firstweekday()) # 输出 :0
print("isleap()返回是否是闰年:",calendar.isleap(2016), calendar.isleap(2017)) # True ,False
print("leapdays()返回两年之间的闰年总数:",calendar.leapdays(2000, 2013)) # 2000, 2004, 2008
print("month()返回某年某月的日历:",calendar.month(2021, 10)) # calendar.prmonth(2021, 10) 同样的效果
"""October 2021
Mo Tu We Th Fr Sa Su
1 2 3
4 5 6 7 8 9 10
11 12 13 14 15 16 17
18 19 20 21 22 23 24
25 26 27 28 29 30 31
"""
print("calendar.monthcalendar()返回装着某年某月日历的二维列表:")
print(calendar.monthcalendar(2021, 1))
print("calendar.monthrange()返回包含了两个整数的元组,分别是某年某月第一天是周几,该月有多少天:")
print(calendar.monthrange(2021, 1)) # 返回(4, 31),4表示该月第一天为周五,31表示该月有31天
print("setfirstweekday()设置一周的起始日期码,默认一周第一天为0,即周一:")
calendar.setfirstweekday(1)
print(calendar.firstweekday()) # 返回1
print("weekday()返回某年某月某日是周几:",calendar.weekday(2021, 1, 25)) # 返回 :0
16.math
16.1 作用
可以对数值进行数学运算16.2 导入
import math16.3 常用方法及说明
16.4 示例
import math
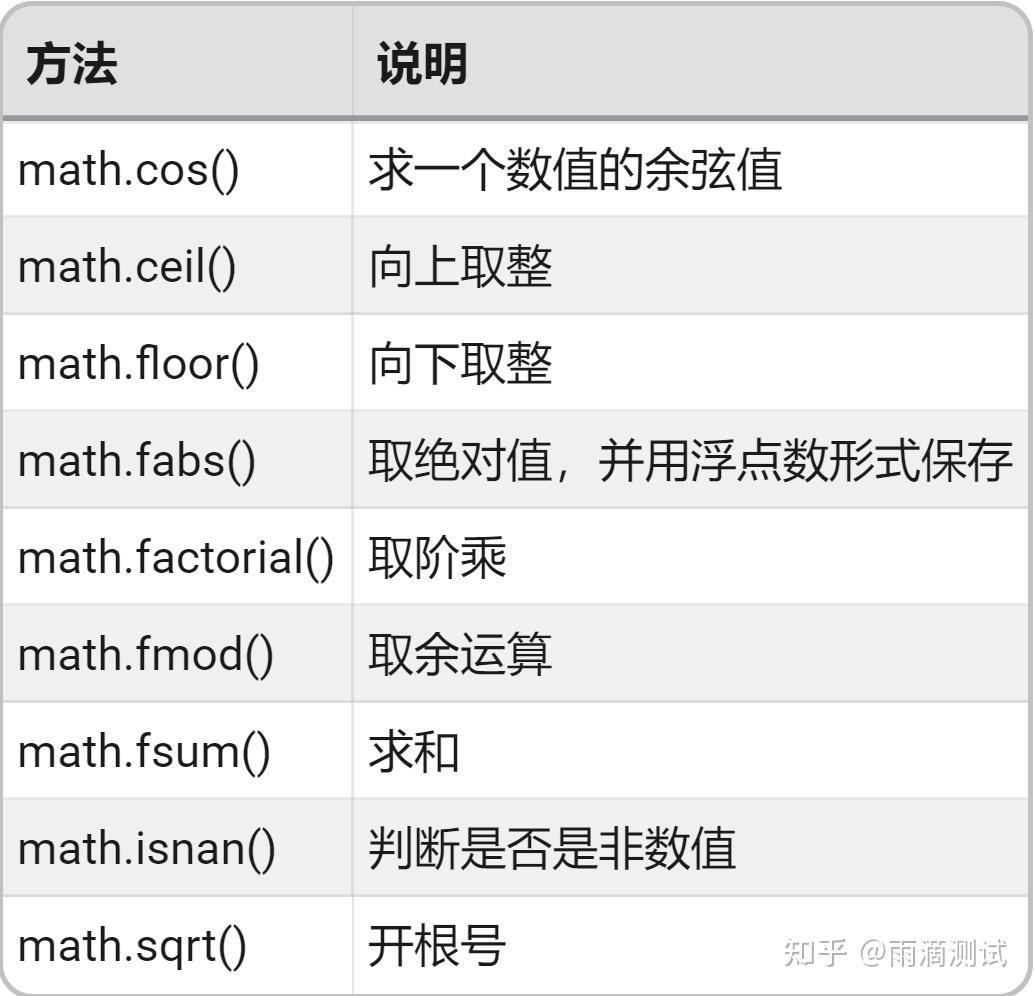
# 1.常量
print("返回PI的值:",math.pi)
print("返回e的值:",math.e)
# 2. 基本运算
print("次方运算:",math.pow(5, 2)) # 结果 : 25
print("开方运算:",math.sqrt(64)) # 结果 :8.0
print("对数运算:",math.log(100, 10)) # 结果 :2.0
print("返回已2为底x的对数:",math.log2(3)) # 结果 :1.584962500721156
print("返回以10为底x的对数:",math.log10(1000)) # 结果 :3.0
print("求和:",math.fsum([3,4,5])) # 结果 : 12
print("取余运算:",math.fmod(8, 3)) # 结果 : 2.0
print("向上取整:",math.ceil(8.3)) # 结果 : 9
print("向下取整:",math.floor(8.3)) # 结果 : 817.uuid
17.1 作用
通用唯一识别码17.2 导入
import uuid17.3 常用方法及说明

17.4 示例
import uuid
name = "python"
print(uuid.uuid1())
print(uuid.uuid5(uuid.NAMESPACE_URL,name))
print(uuid.uuid3(uuid.NAMESPACE_DNS,name))
print(uuid.uuid4())
#输出:
fd582a14-31a7-11ec-ace4-84c5a65bdcfd
344979f2-3e10-505c-89bf-2d5c0fefed8d
c9f8b609-b81e-3c95-8188-914324e741c8
c7e3d006-16ff-4110-8b70-7678feb3638718.Queue
18.1 作用
提供了同步的、线程安全的队列类18.2 导入
from queue import Queue18.3 常用方法及说明
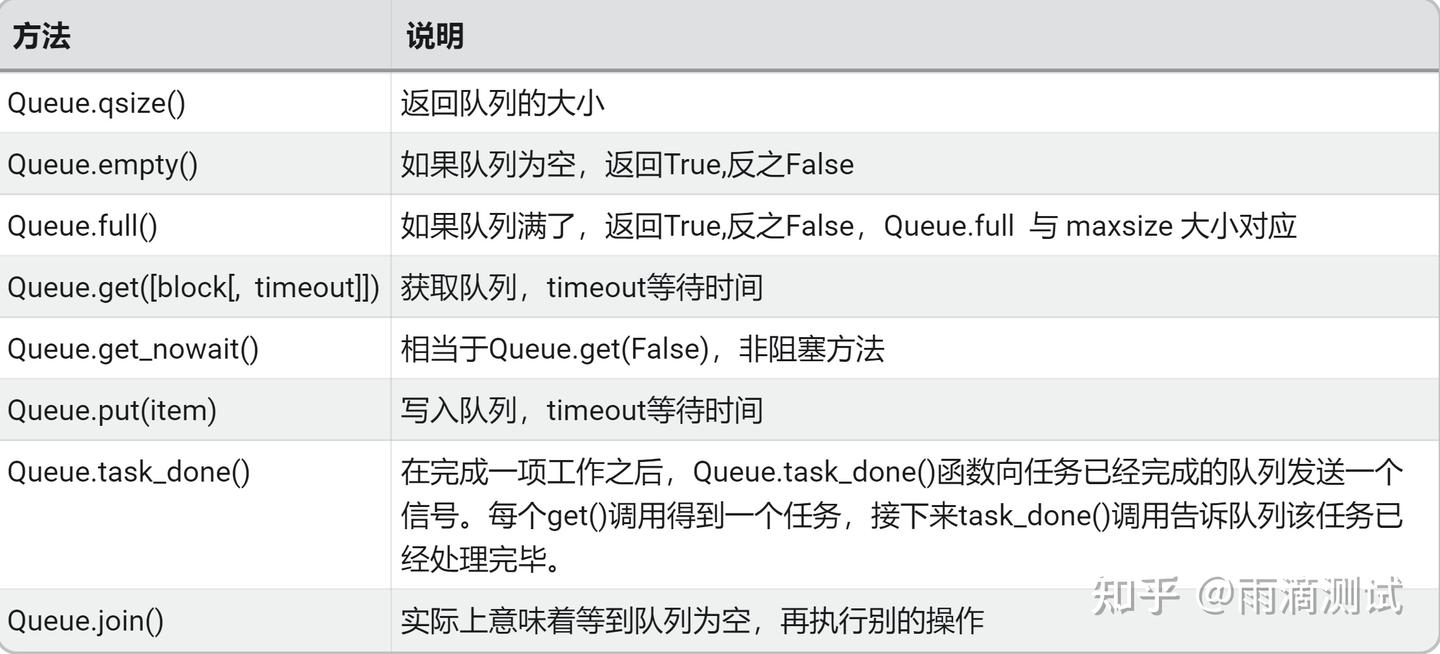
18.4 示例
from queue import Queue
q = Queue(maxsize=5)
# 向队列写入元素
q.put('a')
q.put('b')
q.put('c')
q.put('d')
q.put('e')
print("返回队列的大小:",q.qsize())
if q.full(): # 判断队列是否满了
for x in range(5):
print(q.get()) # 获取元素
else:
print("为空判断:",q.empty())19.logging
19.1 作用
提供日志的包19.2 导入
import logging19.3 常用方法及说明
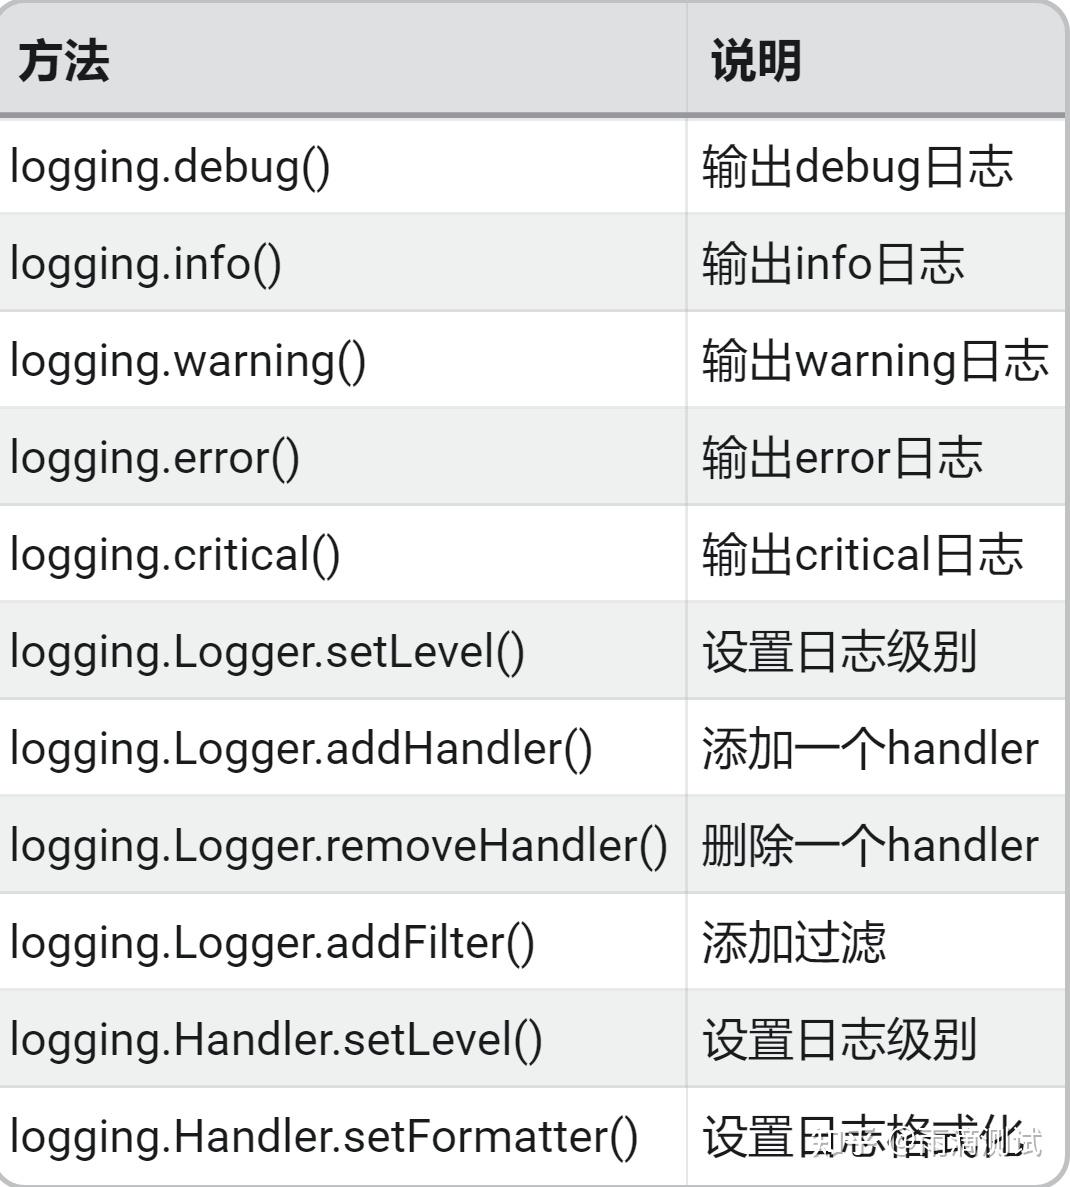
19.4 示例
import logging
# 创建日志对象,日志器
logger = logging.getLogger(__name__)
# 设置日志级别
logger.setLevel(level=logging.DEBUG)
# 设置日志输出文件
handler = logging.FileHandler('my.log')
# 设置日志格式,创建格式化器
formatter = logging.Formatter(
fmt='%(asctime)s | %(levelname)s | %(name)s | %(message)s',
datefmt='%Y-%m-%d %H:%M:%S'
)
# 给文件对象设置格式化器
handler.setFormatter(formatter)
# 文件对象加入日志器
logger.addHandler(handler)
# 记录日志信息
logger.debug("debug日志")
logger.info("info日志")
logger.warning("warning日志")
logger.error("error日志")
logger.critical("critical日志")
#输出到文件的格式:
2021-10-20 22:47:39 | DEBUG | __main__ | debug日志
2021-10-20 22:47:39 | INFO | __main__ | info日志
2021-10-20 22:47:39 | WARNING | __main__ | warning日志
2021-10-20 22:47:39 | ERROR | __main__ | error日志
2021-10-20 22:47:39 | CRITICAL | __main__ | critical日志20.copy
20.1 作用
拷贝数据类型20.2 导入
import copy20.3 常用方法及说明
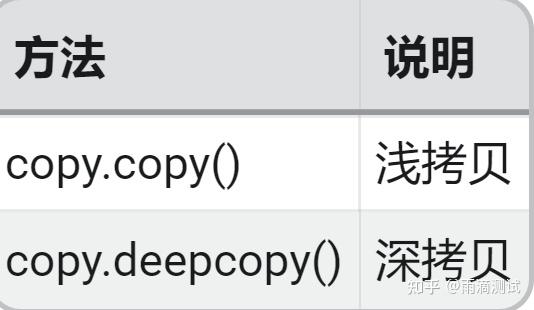
20.4 示例
import copy
lst1 = ["a",1,["b",2]]
# 1.使用copy()进行浅拷贝。
lst2 = copy.copy(lst1)
lst3 = copy.deepcopy(lst1)
print("两个列表的值是否相等:",lst2 == lst3) # 返回 :True
print("是否是同一对象:",lst2 is lst3) # 返回 :False
lst1[2][0] = "c"
print(lst2) # 返回: ['a', 1, ['c', 2]] ,和lst1的最新值保持一致
print(lst3) # 返回: ['a', 1, ['b', 2]] ,和lst1的原来值保持一致
来源:来源


 被折叠的 条评论
为什么被折叠?
被折叠的 条评论
为什么被折叠?
 到【灌水乐园】发言


