 提升效率的Python自动化脚本分享


我已经使用 Python 近 5 年了,但仍然吸引我并激励我进行更多研究的一件事是它的自动化能力。在过去的 1 年里,我一直在探索 Python 的自动化方面,并发现了一些很棒的 Python 包、事实和有趣的脚本。在这篇博客中,我将分享一些我每天使用的自动化脚本,这些脚本提高了我的工作效率和绩效。
1.Speakify
我喜欢读书,但讨厌自己读书,我更喜欢听书。这个自动化脚本对我来说是救星,我经常用它来听 PDF 和 c将它们转换成有声读物以便稍后收听。

是的!这就是我正在享受有声读物的样子😎
import PyPDF2
import pyttsx3

# Open the PDF file (Enter Path To Your PDF)
file = open('story.pdf', 'rb')
readpdf = PyPDF2.PdfReader(file)

# Initialize text-to-speech engine
speaker = pyttsx3.init()
rate = speaker.getProperty('rate')   # Get current speaking rate
speaker.setProperty('rate', 200)

volume = speaker.getProperty('volume')
speaker.setProperty('volume', 1)  # Set volume level (0.0 to 1.0)

# Get and set a different voice
voices = speaker.getProperty('voices')
for voice in voices:
    if "english" in voice.name.lower() and "us" in voice.name.lower():
        speaker.setProperty('voice', voice.id)
        break
# Iterate over each page in the PDF
for pagenumber in range(len(readpdf.pages)):
    # Extract text from the page
    page = readpdf.pages[pagenumber]
    text = page.extract_text()

    # Use the speaker to read the text
    # speaker.say(text)
    # speaker.runAndWait()

# Save the last extracted text to an audio file (if needed)
speaker.save_to_file(text, 'story.mp3')
speaker.runAndWait()

# Stop the speaker
speaker.stop()

# Close the PDF file
file.close()
实际应用
- 视障人士无障碍服务:提供书面内容的音频版本,帮助视障人士轻松获取信息。
- 随时随地学习:允许用户在通勤或锻炼时收听文章或教科书。
- 语言学习:通过提供文本的音频版本帮助语言学习者提高听力技能。
- 教育:为学生提供阅读材料的音频版本,以提供更灵活的学习选择。
2.选项卡龙卷风
在编写此脚本之前,我习惯将自己感兴趣的内容添加到书签中,以便第二天阅读,但几周后,我发现我的书签架一天比一天大,而且我每天都很难找到新书签。所以我想出了一个 Python 式的方法来解决这个问题。使用此自动化脚本,我只需复制并粘贴所有链接,然后单击即可打开它们。

只需单击一下即可!
import webbrowser
with open('links.txt') as file:
    links = file.readlines()
    for link in links:
        webbrowser.open('link')
应用
提高工作效率:需要查看多个工作相关网站的专业人士可以简化他们的日常工作,专注于内容而不是打开链接的过程。
学习和发展:在线学习者可以一次打开所有课程材料、文章和资源,使他们的学习更有效率。
3.PicFetcher
收集大量图像数据是计算机视觉项目的一个关键挑战。正如吴恩达所指出的,拥有一个大数据集可能比使用的特定算法更重要。高质量的数据对于提高机器学习模型的性能和准确性至关重要。这个自动化脚本让您可以在几分钟内以最少的编码工作量从网络上下载一定数量的图像,从而使该过程变得更容易。
# Importing the necessary module and function
from simple_image_download import simple_image_download as simp

# Creating a response object
response = simp.simple_image_download

## Keyword
keyword = "Dog"

# Downloading images
try:
    response().download(keyword, 20)
    print("Images downloaded successfully.")
except Exception as e:
    print("An error occurred:", e)
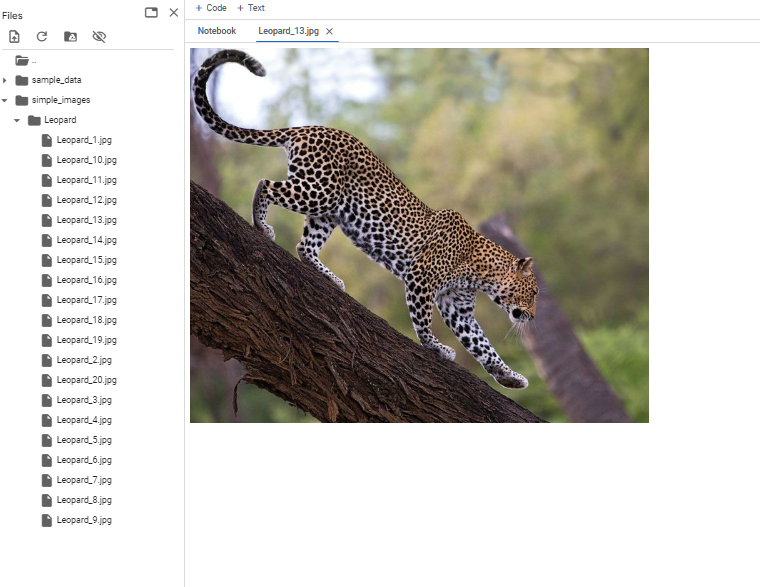
脚本输出——作者截取的截图
应用
- 构建计算机视觉数据集、横幅图像内容创建、营销活动、学术研究等等。
4. PyInspector
每位开发人员都知道,在 Python 代码中查找错误是一件非常令人沮丧的事情,他们经常会陷入错误之网。编写干净高效的代码至关重要,但手动分析代码质量可能非常困难。此自动化脚本使用 Pylint 和 Flake8 包来彻底检查您的代码,将其与编码标准进行比较,并找出逻辑错误。它可确保您的代码遵循行业最佳实践并保持无错误。
import os
import subprocess

def analyze_code(directory):
    # List Python files in the directory
    python_files = [file for file in os.listdir(directory) if file.endswith('.py')]

    if not python_files:
        print("No Python files found in the specified directory.")
        return

    # Analyze each Python file using pylint and flake8
    for file in python_files:
        print(f"Analyzing file: {file}")
        file_path = os.path.join(directory, file)

        # Run pylint
        print("\nRunning pylint...")
        pylint_command = f"pylint {file_path}"
        subprocess.run(pylint_command, shell=True)

        # Run flake8
        print("\nRunning flake8...")
        flake8_command = f"flake8 {file_path}"
        subprocess.run(flake8_command, shell=True)

if __name__ == "__main__":
    directory = r"C:\Users\abhay\OneDrive\Desktop\Part7"
    analyze_code(directory)
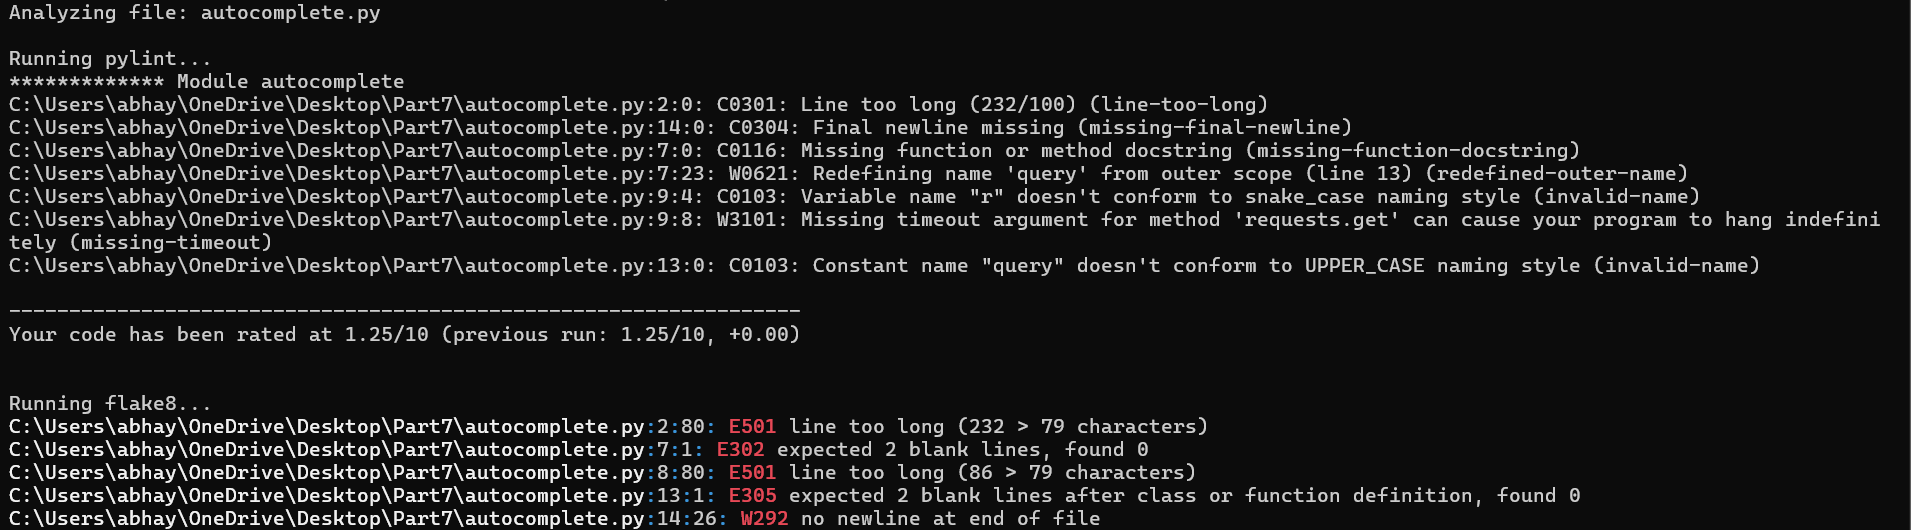
脚本输出——分析我的一个旧脚本的质量
5. 数据假人
无论您是需要样本数据来测试模型的数据科学家,还是只想用随机信息填写不必要的表格,这个 Python 自动化脚本都非常有用。它生成看起来逼真但完全是人工的数据集,非常适合测试、开发和模拟目的。此工具可以快速创建姓名、电子邮件、电话号码等,为各种数据生成需求提供多功能解决方案。
import pandas as pd
from faker import Faker
import random

fake = Faker()

def generate_fake_data(num_entries=10):
    data = []

    for _ in range(num_entries):
        entry = {
            "Name": fake.name(),
            "Address": fake.address(),
            "Email": fake.email(),
            "Phone Number": fake.phone_number(),
            "Date of Birth": fake.date_of_birth(minimum_age=18, maximum_age=65).strftime("%Y-%m-%d"),
            "Random Number": random.randint(1, 100),
            "Job Title": fake.job(),
            "Company": fake.company(),
            "Lorem Ipsum Text": fake.text(),
        }
        data.append(entry)

    return pd.DataFrame(data)

if __name__ == "__main__":
    num_entries = 10  # You can adjust the number of entries you want to generate
    fake_data_df = generate_fake_data(num_entries)


## Dataframe with Fake Data
fake_data_df

上述脚本的输出
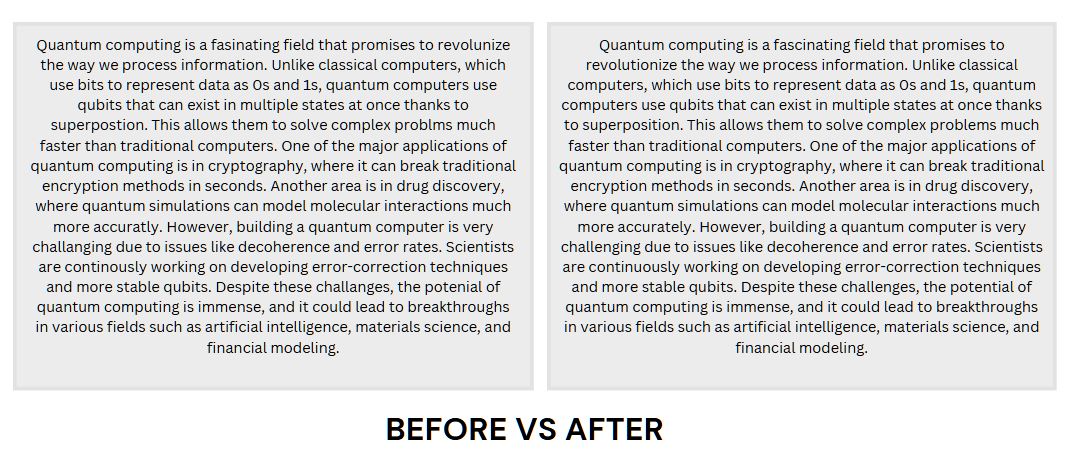
6.BgBuster
这个自动化脚本已经成为我日常工具包中必不可少的一部分。作为一名作家,我经常处理图像,而且经常需要没有背景的图像。虽然有许多在线工具可用于此任务,但我担心我的图像在互联网上的隐私和安全。这个 Python 脚本利用 rembg 包在本地删除图像背景,确保我的照片保持安全和私密。

我第一次发现这个 Python 脚本时的真实反应 — Tenot GIF
from rembg import remove
from PIL import Image

## Path for input and output image
input_img = 'spidy.jpg'
output_img = 'spidy_rmbg.png'

## loading and removing background
inp = Image.open(input_img)
output = remove(inp)

## Saving background removed image to same location as input image
output.save(output_img)


之前与之后 — BgBuster 实际运行 — 作者截取的输出截图
7.记忆伴侣
我经常需要在专心工作时记住重要任务。为了解决这个问题并提高工作效率,我使用 Python 开发了 MemoryMate,它是我的数字记忆辅助工具。它会在指定时间后向我发送带有自定义消息的提醒,以确保我按时完成任务。MemoryMate 显著提高了我的工作效率,并帮助我始终如一地按时完成任务。最好的部分是它简单、易于复制且非常有用。
from win10toast import ToastNotifier
import time

toaster = ToastNotifier()

def set_reminder():
    reminder_header = input("What would you like me to remember?\n")
    related_message = input("Related Message:\n")
    time_minutes = float(input("In how many minutes?\n"))

    time_seconds = time_minutes * 60

    print("Setting up reminder...")
    time.sleep(2)
    print("All set!")

    time.sleep(time_seconds)

    toaster.show_toast(
        title=f"{reminder_header}",
        msg=f"{related_message}",
        duration=10,
        threaded=True
    )

    while toaster.notification_active():
        time.sleep(0.005)

if __name__ == "__main__":
    set_reminder()
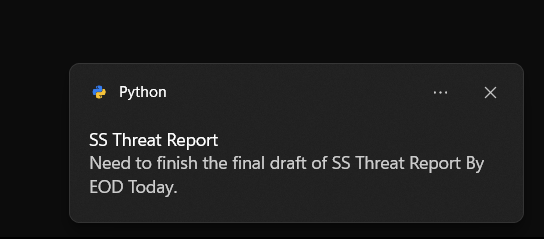
脚本输出
您是否知道,在 Python 中,您可以使用像 999**999 这样的极大整数执行计算而不会出现溢出错误,因为 Python 会自动对大数使用“大整数”类型。
8.MonitorMax😎
系统资源监控对于显示各种系统资源的实时利用率至关重要。对于需要跟踪系统性能、识别瓶颈并确保高效资源管理的用户、系统管理员和开发人员来说,这是一个非常宝贵的工具。此 Python 自动化脚本可帮助监控 CPU、GPU、电池和内存使用情况,并在任何资源使用情况超过安全阈值时生成警报。

不用担心我们的脚本会密切关注一切
import psutil
import time
from win10toast import ToastNotifier

# Initialize the ToastNotifier object
toaster = ToastNotifier()

# Set the threshold values for CPU usage, memory usage, GPU usage, and battery level
cpu_threshold = 40  # Percentage
memory_threshold = 40  # Percentage
gpu_threshold = 40  # Percentage
battery_threshold = 100  # Percentage

# Infinite loop to continuously monitor system resources
while True:
    try:
        # Get system resource information
        cpu_usage = psutil.cpu_percent(interval=1)
        memory_usage = psutil.virtual_memory().percent
        gpu_usage = psutil.virtual_memory().percent
        battery = psutil.sensors_battery()

        # Check CPU usage
        if cpu_usage >= cpu_threshold:
            message = f"CPU usage is high: {cpu_usage}%"
            toaster.show_toast("Resource Alert", message, duration=10)

        # Check memory usage
        if memory_usage >= memory_threshold:
            message = f"Memory usage is high: {memory_usage}%"
            toaster.show_toast("Resource Alert", message, duration=10)

        # Check GPU usage
        if gpu_usage >= gpu_threshold:
            message = f"GPU usage is high: {gpu_usage}%"
            toaster.show_toast("Resource Alert", message, duration=10)

        # Check battery level
        if battery is not None and battery.percent <= battery_threshold and not battery.power_plugged:
            message = f"Battery level is low: {battery.percent}%"
            toaster.show_toast("Battery Alert", message, duration=10)

        # Wait for 5 minutes before checking the resources again
        time.sleep(300)

    except Exception as e:
        print("An error occurred:", str(e))
        break

输出 — 资源警报 — 作者截取的屏幕截图
应用:
该脚本可用于日常场景,如玩游戏、运行本地服务器、本地训练 DL 模型等。通过跟踪所有资源,您可以确保您的脚本或任务使用最佳内存,如果没有,您可以相应地进行优化。资源监视器仪表板(您可以使用 Tkinter 创建仪表板以获取类似于任务栏的实时资源图,并添加通知和高内存使用率声音警报)。
9. EmailBlitz
处理批量电子邮件通信可能具有挑战性,无论是营销活动、新闻通讯还是组织更新。此 Python 自动化脚本可让您轻松批量发送电子邮件,从而使任务变得更容易。它简化了通信流程,使您可以同时联系大量收件人,并确保及时高效地传递消息。此脚本非常适合营销人员、管理员或任何需要发送大量电子邮件的人,它可以提高工作效率、节省时间并有助于在您的通信中保持个性化。
import smtplib
from email.message import EmailMessage
import pandas as pd

def send_email(remail, rsubject, rcontent):
    email = EmailMessage()                          ## Creating a object for EmailMessage
    email['from'] = 'The Pythoneer Here'            ## Person who is sending
    email['to'] = remail                            ## Whom we are sending
    email['subject'] = rsubject                     ## Subject of email
    email.set_content(rcontent)                     ## content of email
    with smtplib.SMTP(host='smtp.gmail.com',port=587)as smtp:
        smtp.ehlo()                                 ## server object
        smtp.starttls()                             ## used to send data between server and client
        smtp.login(SENDER_EMAIL,SENDER_PSWRD)       ## login id and password of gmail
        smtp.send_message(email)                    ## Sending email
        print("email send to ",remail)              ## Printing success message


if __name__ == '__main__':
    df = pd.read_excel('list.xlsx')
    length = len(df)+1

    for index, item in df.iterrows():
        email = item[0]
        subject = item[1]
        content = item[2]

        send_email(email,subject,content)
10. ClipSaver
您是否曾经发现自己在处理多个文本片段,却忘记了自己复制的内容?想象一下,有一个工具可以跟踪您全天复制的所有内容。这个 Python 自动化脚本就是这样做的。它监控您复制的所有内容,并在一个时尚的图形界面中无缝存储每个文本片段。不再需要搜索无尽的标签并冒着丢失宝贵信息的风险——这个脚本让一切井井有条,易于访问。
import tkinter as tk
from tkinter import ttk
import pyperclip

def update_listbox():
    new_item = pyperclip.paste()
    if new_item not in X:
        X.append(new_item)
        listbox.insert(tk.END, new_item)
        listbox.insert(tk.END, "----------------------")
    listbox.yview(tk.END)
    root.after(1000, update_listbox)

def copy_to_clipboard(event):
    selected_item = listbox.get(listbox.curselection())
    if selected_item:
        pyperclip.copy(selected_item)

X = []

root = tk.Tk()
root.title("Clipboard Manager")
root.geometry("500x500")
root.configure(bg="#f0f0f0")

frame = tk.Frame(root, bg="#f0f0f0")
frame.pack(padx=10, pady=10)

label = tk.Label(frame, text="Clipboard Contents:", bg="#f0f0f0")
label.grid(row=0, column=0)

scrollbar = tk.Scrollbar(root)
scrollbar.pack(side=tk.RIGHT, fill=tk.Y)

listbox = tk.Listbox(root, width=150, height=150, yscrollcommand=scrollbar.set)
listbox.pack(pady=10)
scrollbar.config(command=listbox.yview)

update_listbox()

listbox.bind("<Double-Button-1>", copy_to_clipboard)

root.mainloop()
脚本输出 — ClipSaver — 作者创建的 GIF
您是否知道保存代码文件时 .py 扩展名并不重要?
…………..
您可以使用任何类型的扩展来保存您的 Python 文件,无论是哪种
.cow,.cat或者.mango.如果您的脚本有效,它都会运行并提供您期望的输出。
11. BriefBot
我喜欢每天阅读文章、研究论文和新闻出版物,我知道很多人都有这个习惯。然而,找时间阅读完整的文章可能很困难。这个 Python 自动化脚本通过使用神经网络来生成快速摘要,解决了这个问题。它利用网络抓取来提取文章内容,并将其输入到预先训练的模型中,该模型会生成摘要,从而节省时间并让您更轻松地了解最新信息。
from transformers import BartForConditionalGeneration, BartTokenizer
import requests
from bs4 import BeautifulSoup

## Function to summarize article
def summarize_article(article_text, max_length=150):
    model_name = "facebook/bart-large-cnn"
    tokenizer = BartTokenizer.from_pretrained(model_name)
    model = BartForConditionalGeneration.from_pretrained(model_name)

    inputs = tokenizer.encode("summarize: " + article_text, return_tensors="pt", max_length=1024, truncation=True)
    summary_ids = model.generate(inputs, max_length=max_length, min_length=50, length_penalty=2.0, num_beams=4, early_stopping=True)

    summary = tokenizer.decode(summary_ids[0], skip_special_tokens=True)
    return summary

## Function to scrape content of the aricle
def scrape_webpage(url):
    try:
        headers = { "User-Agent": "Mozilla/5.0 (Windows NT 10.0; Win64; x64) AppleWebKit/537.36 (KHTML, like Gecko) Chrome/58.0.3029.110 Safari/537.3"} ##
        response = requests.get(url, headers=headers)
        response.raise_for_status()
        soup = BeautifulSoup(response.text, 'html.parser')
        all_text = soup.get_text(separator='\n', strip=True)
        return all_text
    except requests.exceptions.RequestException as e:
        print(f"Error: {e}")
        return None

if __name__ == "__main__":
    webpage_url = "https://thehackernews.com/2024/07/new-ransomware-group-exploiting-veeam.html" ## Sample URL for Testing The Script
    webpage_text = scrape_webpage(webpage_url)

    if webpage_text:
        summary = summarize_article(webpage_text)
        print("\nSummarized Article:")
        print(summary)
    else:
        print("Webpage scraping failed.")

摘要文章 — BriefBot 输出 — 作者截图
12.SpellGuard
无论我们的英语水平有多高,在撰写冗长的报告、文章或研究论文时,我们都会犯拼写和语法错误。在人工智能时代,许多强大的 Python 软件包可以帮助纠正这些错误,并为您的工作提供完善的校对。此 Python 脚本利用人工智能来检测和纠正拼写和语法错误,确保您的写作清晰、准确且专业。
## Installing Library
!pip install lmproof

## Importing Library
import lmproof as lm

## Function for proofreading
def Proofread(text):
    proof = lm.load("en")
    error_free_text = proof.proofread(text)
    return error_free_text

## Sample Text
TEXT = '' ## Place sample Text here

## Function Call
Print(Proofread(TEXT))
脚本输出
13. 链接状态
拥有一个博客网站对于许多作家来说仍然是一个梦想。确保所有链接正常运行对于维护专业且用户友好的博客至关重要。断开的链接会让读者感到沮丧并损害您网站的可信度。此 Python 自动化脚本可让您轻松检查多个 URL 的网络连接。通过定期监控您的 URL,此脚本可确保您的链接始终处于活动状态并正常运行,从而增强您网站的可靠性和用户体验。
import csv
import requests
import pprint

def get_status(website):
    try:
        status = requests.get(website).status_code
        return "Working" if status == 200 else "Error 404"
    except:
        return "Connection Failed!!"

def main():
    with open("sites.txt", "r") as fr:
        websites = [line.strip() for line in fr]

    web_status_dict = {website: get_status(website) for website in websites}

    pprint.pprint(web_status_dict)

    # Write results to CSV file
    with open("web_status.csv", "w", newline='') as csvfile:
        fieldnames = ["Website", "Status"]
        writer = csv.DictWriter(csvfile, fieldnames=fieldnames)

        writer.writeheader()
        for website, status in web_status_dict.items():
            writer.writerow({"Website": website, "Status": status})

        print("Data Uploaded to CSV File!!")

if __name__ == "__main__":
    main()
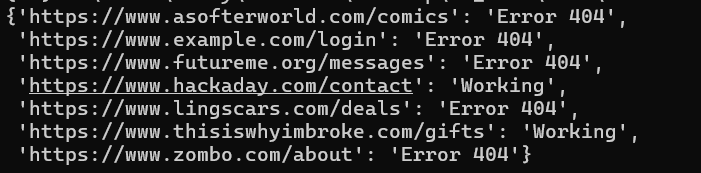
脚本输出
您可以将中文字符串保存为 Python 中的变量名称。
例如:金竹戈女日 = “Hello World”
14.每日文摘
了解您所在城市、州、国家或世界的最新动态非常重要,但我们繁忙的日程安排常常使我们没有时间阅读新闻。此自动化脚本通过从 Google 新闻中抓取热门新闻并大声朗读给您听,解决了这个问题。无论您是开始新的一天还是在旅途中,此脚本都能确保您轻松了解最新新闻。
import pyttsx3
import requests

engine = pyttsx3.init('sapi5')
voices = engine.getProperty('voices')
engine.setProperty('voice', voices[0].id)

def speak(audio):
    engine.say(audio)
    engine.runAndWait()

def trndnews():
    url = " http://newsapi.org/v2/top-headlines?country=us&apiKey=GET_YOUR_OWN"
    page = requests.get(url).json()
    article = page["articles"]
    results = []
    for ar in article:
        results.append(ar["title"])
    for i in range(len(results)):
        print(i + 1, results[i])
    speak(results)

trndnews()

''' Run The Script To Get The Top Headlines From USA'''
15.QRGenie
的受欢迎程度二维码自从人们开始使用它们发送和接收付款后,二维码的使用量就一路飙升。如今,它们被用来分享社交链接、秘密消息、优惠券代码等。这个 Python 自动化脚本可以帮助您使用您选择的数据创建自定义二维码,让您轻松分享信息并打动您的受众。
import qrcode

def generate_qr_code(link, filename):
    """Generates a QR code for the given link and saves it as filename."""

    qr = qrcode.QRCode(
        version=1,
        error_correction=qrcode.constants.ERROR_CORRECT_L,
        box_size=10,
        border=4,
    )
    qr.add_data(link)
    qr.make(fit=True)

    img = qr.make_image(fill_color="black", back_color="white")
    img.save("profile.png")

if __name__ == "__main__":
    generate_qr_code("https://abhayparashar31.medium.com/", "Profile.png")
    print(f"QR code saved successfully!!")

生成的二维码 — 尝试一下 😉
16. ShrinkLink
我每天都要处理大量链接,有些我会保存,有些我会与读者分享。我最不喜欢链接的地方是它们太长,这很烦人,而且难以阅读。此自动化脚本通过使用外部 API 将长 URL 转换为短且易于管理的链接,有效地解决了这个问题。
import pyshorteners
def generate_short_url(long_url):
  s = pyshorteners.Shortener()
  return s.tinyurl.short(long_url)

long_url = input('Paste Long URl \n')
short_url = generate_short_url(long_url)
print(short_url)

17. CaptureIt
无论您是游戏玩家、影响者、艺术家还是开发者,屏幕录制软件对于记录您的活动都是必不可少的。然而,许多现有的解决方案成本高昂或施加了水印和时间限制等限制。这个 Python 自动化脚本提供了一个简单的屏幕录制解决方案,没有水印、时间限制和可自定义的屏幕窗口选项。
import cv2
import numpy as np
import pyautogui

SCREEN_SIZE = tuple(pyautogui.size())
fourcc = cv2.VideoWriter_fourcc('M','J','P','G')
fps = 12.0
record_seconds = 20
out = cv2.VideoWriter("video.mp4", fourcc, fps, SCREEN_SIZE)

for _ in range(int(record_seconds * fps)):
    img = pyautogui.screenshot(region=(0, 0, 500, 900))
    frame = np.array(img)
    frame = cv2.cvtColor(frame, cv2.COLOR_BGR2RGB)
    out.write(frame)
    cv2.imshow("video frame", frame)
    if cv2.waitKey(1) == ord("q"):
        break

cv2.destroyAllWindows()
out.release()
奖励
H2ORiminder
这个自动化脚本是一个简单但功能强大的程序,旨在提醒用户定期喝水以保持水分。对于那些长时间坐在电脑前或日程繁忙而忘记喝足够水的人来说,这是一个非常有用的工具。这个脚本通过鼓励定期喝水来促进健康的习惯,这对于保持整体健康和幸福至关重要。
import time
from plyer import notification

if __name__ == "__main__":
    while True:
        notification.notify(
            title="Please Drink Water",
            message="The U.S. National Academies of Sciences, Engineering, and Medicine determined that an adequate daily fluid intake is: About 15.5 cups (3.7 liters) of fluids a day for men. About 11.5 cups (2.7 liters) of fluids a day for women. Keep Drinking Water !!!",
            app_icon="./Desktop-drinkWater-Notification/icon.ico",
            timeout=12
        )
        time.sleep(1800)  ## Change it according to your water breaks!!!


 2544
2544

 被折叠的 条评论
为什么被折叠?
被折叠的 条评论
为什么被折叠?
 到【灌水乐园】发言


