


随时随地阅读更多技术实战干货,获取项目源码、学习资料,请关注源代码社区公众号(ydmsq666)

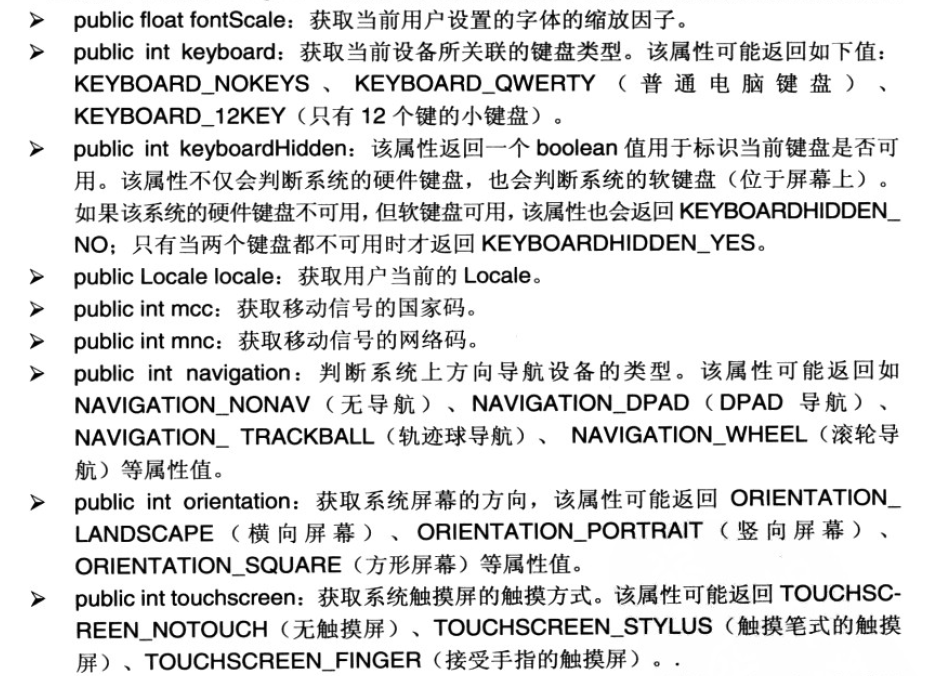
Configuration类专门描述手机设备上的配置信息,这些配置信息既包括用户特定的配置项,也包括系统的动态设备配置。通过调用Activity的getResources().getConfiguration()方法获得Configuration对象,然后就可以使用下面常用属性来获取系统的配置信息:
下面通过一个简单实例来演示其中几个属性的使用,代码如下:
Activity:
package com.lovo;

import android.app.Activity;
import android.content.res.Configuration;
import android.os.Bundle;
import android.view.View;
import android.view.View.OnClickListener;
import android.widget.Button;
import android.widget.EditText;

/**
 * 获取系统设置
 *
 *
 */
public class ConfigActivity extends Activity {
	private EditText editText1;
	private EditText editText2;
	private EditText editText3;
	private EditText editText4;

	@Override
	protected void onCreate(Bundle savedInstanceState) {
		super.onCreate(savedInstanceState);
		setContentView(R.layout.config_main);
		// 获得EditText系列组件对象
		editText1 = (EditText) findViewById(R.id.config_main_editText1);
		editText2 = (EditText) findViewById(R.id.config_main_editText2);
		editText3 = (EditText) findViewById(R.id.config_main_editText3);
		editText4 = (EditText) findViewById(R.id.config_main_editText4);
		// 获取Button组件实例
		Button btn = (Button) findViewById(R.id.config_main_btn);
		btn.setOnClickListener(new OnClickListener() {

			@Override
			public void onClick(View v) {
				// 获得系统的Configuration对象
				Configuration config = getResources().getConfiguration();
				// 获得屏幕方向
				String screen = config.orientation == Configuration.ORIENTATION_LANDSCAPE ? "横屏"
						: "竖屏";
				editText1.setText(screen);
				// 获得移动信号的网络码
				String mncCode = config.mnc + "";
				editText2.setText(mncCode);
				// 获得系统上方向导航的设备类型
				String naviName = config.navigation == Configuration.NAVIGATION_NONAV ? "没有方向控制"
						: config.navigation == Configuration.NAVIGATION_WHEEL ? "滚轮控制方向"
								: config.navigation == Configuration.NAVIGATION_DPAD ? "方向键控制方向"
										: "轨迹球控制方向";
				editText3.setText(naviName);
				// 获得系统触摸屏的触摸方式
				String touchName = config.touchscreen == Configuration.TOUCHSCREEN_NOTOUCH ? "无触摸屏"
						: config.touchscreen == Configuration.TOUCHSCREEN_STYLUS ? "触摸笔式的触摸屏"
								: "接受手指的触摸屏";
				editText4.setText(touchName);
			}
		});
	}

}
布局XML:
<?xml version="1.0" encoding="utf-8"?>
<LinearLayout xmlns:android="http://schemas.android.com/apk/res/android"
    android:layout_width="match_parent"
    android:layout_height="match_parent"
    android:layout_gravity="center_horizontal"
    android:orientation="vertical" >

    <EditText
        android:id="@+id/config_main_editText1"
        android:layout_width="match_parent"
        android:layout_height="wrap_content"
        android:text="显示屏幕方向" />

    <EditText
        android:id="@+id/config_main_editText2"
        android:layout_width="match_parent"
        android:layout_height="wrap_content"
        android:text="显示移动网络代号" />

    <EditText
        android:id="@+id/config_main_editText3"
        android:layout_width="match_parent"
        android:layout_height="wrap_content"
        android:text="显示手机方向控制设备" />

    <EditText
        android:id="@+id/config_main_editText4"
        android:layout_width="match_parent"
        android:layout_height="wrap_content"
        android:text="显示触摸屏触摸方式" />

    <Button
        android:id="@+id/config_main_btn"
        android:layout_width="wrap_content"
        android:layout_height="wrap_content"
        android:text="获取手机信息" />

</LinearLayout>
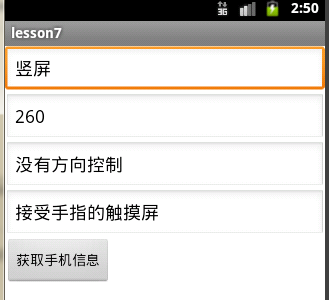
附上图片效果:
获取手机信息前:

获取手机信息后:


 7153
7153

 被折叠的 条评论
为什么被折叠?
被折叠的 条评论
为什么被折叠?
 到【灌水乐园】发言


