


 本文提供了一种在Redhat7环境下安装RabbitMQ的详细步骤,包括安装Erlang、配置Yum源、下载安装RabbitMQ服务器,并启动服务。在安装过程中,需要注意关闭SELinux和firewall。最后,还介绍了如何启用web管理界面并设置用户权限。
Rabbitmq安装攻略
关于Rabbitmq的安装方法,直白说就是先装erlang,再装rabbitmq,但是很多人依然费心费力。
本文以redhat7环境为例,提供一种方法解决大家的痛苦(其实就是搬运自官网https://www.rabbitmq.com/download.html,其中redhat linux见https://www.rabbitmq.com/install-rpm.html,只是官网一方面是英文,需要从中挑选步骤,另一方面大家转载的有各种错误)。
验证日期:2021年1月5日
注意事项:
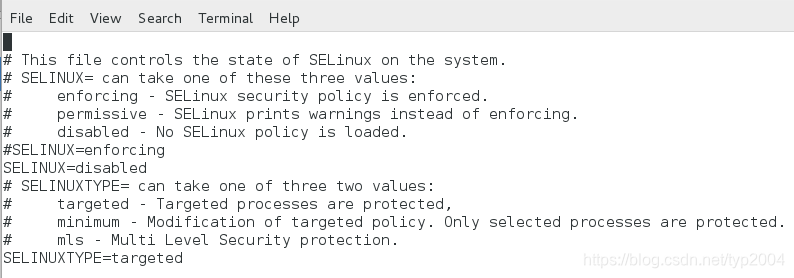
SELinux会阻止RabbitMQ绑定到端口。需要关闭SELinux,否则节点将无法启动。
firewall也需要关闭,否则会阻止节点和CLI工具相互通信。
设置命令:
[root@localhost roo]# vi /etc/sysconfig/selinux
[root@localhost roo]# systemctl stop firewalld
[root@localhost roo]# systemctl disable firewalld
检查命令:
[roo@localhost ~]$ getenforce
Disabled
[roo@localhost ~]$ systemctl status firewalld
● firewalld.service - firewalld - dynamic firewall daemon
Loaded: loaded (/usr/lib/systemd/system/firewalld.service; disabled; vendor preset: enabled)
Active: inactive (dead)
Docs: man:firewalld(1)
一、安装Erlang
Install Erlang
Before installing RabbitMQ, you must install a supported version of Erlang/OTP. There are three commonly used sources for Erlang packages on RPM-based distributions.
- Team RabbitMQ produces a package stripped down to only provide those components needed to run RabbitMQ. It might be easiest to use if installing Erlang's dependencies is proving difficult.
点击a package跳转到Erlang的配置安装页面 https://github.com/rabbitmq/erlang-rpm
To use the most recent version on CentOS 7 / Redhat 7:
[root@~]# vim /etc/yum.repos.d/rabbitmq_erlang.repo
# In /etc/yum.repos.d/rabbitmq_erlang.repo
[rabbitmq_erlang]
name=rabbitmq_erlang
baseurl=https://packagecloud.io/rabbitmq/erlang/el/7/$basearch
repo_gpgcheck=1
gpgcheck=1
enabled=1
# PackageCloud's repository key and RabbitMQ package signing key
gpgkey=https://packagecloud.io/rabbitmq/erlang/gpgkey
       https://dl.bintray.com/rabbitmq/Keys/rabbitmq-release-signing-key.asc
sslverify=1
sslcacert=/etc/pki/tls/certs/ca-bundle.crt
metadata_expire=300

[rabbitmq_erlang-source]
name=rabbitmq_erlang-source
baseurl=https://packagecloud.io/rabbitmq/erlang/el/7/SRPMS
repo_gpgcheck=1
gpgcheck=0
enabled=1
# PackageCloud's repository key and RabbitMQ package signing key
gpgkey=https://packagecloud.io/rabbitmq/erlang/gpgkey
       https://dl.bintray.com/rabbitmq/Keys/rabbitmq-release-signing-key.asc
sslverify=1
sslcacert=/etc/pki/tls/certs/ca-bundle.crt
metadata_expire=300
To install the package (安装命令):
yum install erlang结尾看到提示信息
Installed:
erlang.x86_64 0:23.2.1-1.el7
Complete!
输入命令 erl 可以看到安装已成功。
二、安装rabbitmq-server
1、下载rabbitmq-server
- Installing the package using Yum repositories on Package Cloud or Bintray (this option is highly recommended)
选择Bintray 路线,跳转到下面 https://www.rabbitmq.com/install-rpm.html#bintray :
Using Bintray Yum Repository
A Yum repository with RabbitMQ packages is available from Bintray. The package page provides a repository setup help section.
点击跳转到新页面,底部有:
rabbitmq-server-3.8.9-1.el7.noarch.rpm
Size: 14.81 MB
sha256: 8d8c7ee0ab52ba04355476da3d0421584a8eea8147c04e33ecde39212f98454e
下载 rabbitmq-server的rpm安装包。
2、安装
2.1
In order to use the Yum repository, a .repo file (e.g. rabbitmq.repo) has to be added under the /etc/yum.repos.d/ directory
[root@~]# vim /etc/yum.repos.d/rabbitmq.repo
On CentOS 7 the baseurl line would be slightly different(直接完全拷贝即可,x不用修改):
[bintray-rabbitmq-server]
name=bintray-rabbitmq-rpm
baseurl=https://dl.bintray.com/rabbitmq/rpm/rabbitmq-server/v3.8.x/el/7/
gpgcheck=0
repo_gpgcheck=0
enabled=1
2.2
After downloading the server package, issue the following command as 'root':
rpm --import https://github.com/rabbitmq/signing-keys/releases/download/2.0/rabbitmq-release-signing-key.asc

yum install rabbitmq-server-3.8.9-1.el7.noarch.rpm
结尾看到提示信息
rabbitmq-server.noarch 0:3.8.9-1.el7
Complete!
三、启动rabbitmq-server
[root@localhost ~]#service rabbitmq-server start
提示:Redirecting to /bin/systemctl start rabbitmq-server.service
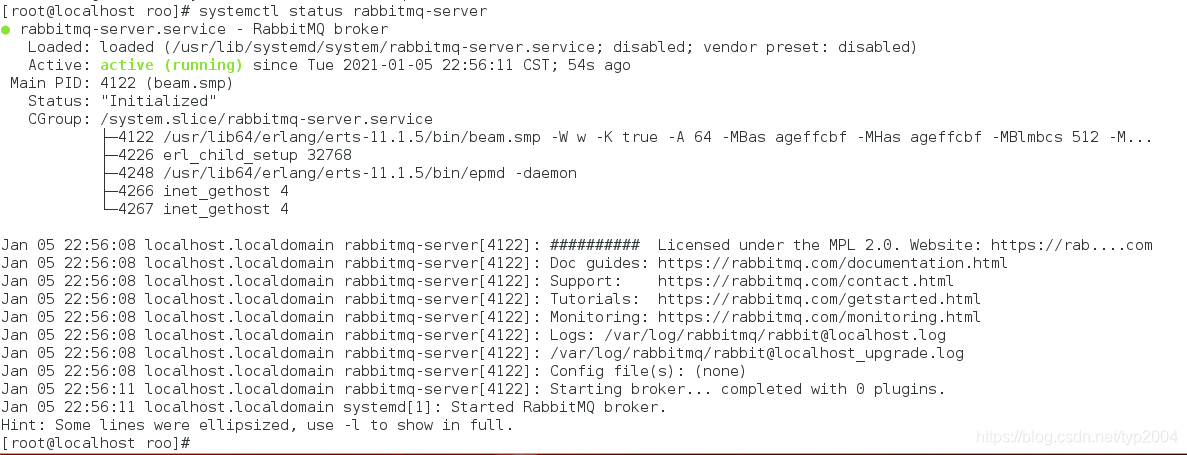
至此完毕,恭喜!
最后的大招:如果你是之前失败了n次,到这次又报“Failed to start RabbitMQ broker”之类的错误,请找一个没有装过这些东西的干净的系统,重来即可。
如果想通过web界面进行管理
[root@localhost roo]# rabbitmq-plugins enable rabbitmq_management #开启web插件
[root@localhost roo]# service rabbitmq-server restart
[root@localhost roo]# rabbitmqctl add_user admin admin #添加用户admin,密码admin
[root@localhost roo]# rabbitmqctl set_user_tags admin administrator #设置admin为管理员
rabbitmqctl set_permissions -p / admin ".*" ".*" ".*" #设置admin可远程登录
检查状态:
[root@localhost roo]# rabbitmqctl status
Status of node rabbit@localhost ...
Runtime
OS PID: 5963
OS: Linux
Uptime (seconds): 1076
Is under maintenance?: false
RabbitMQ version: 3.8.9
Node name: rabbit@localhost
Erlang configuration: Erlang/OTP 23 [erts-11.1.5] [source] [64-bit] [smp:1:1] [ds:1:1:10] [async-threads:64] [hipe]
Erlang processes: 444 used, 1048576 limit
Scheduler run queue: 1
Cluster heartbeat timeout (net_ticktime): 60
Plugins
Enabled plugin file: /etc/rabbitmq/enabled_plugins
Enabled plugins:
* rabbitmq_management
* amqp_client
* rabbitmq_web_dispatch
* cowboy
* cowlib
* rabbitmq_management_agent
Data directory
Node data directory: /var/lib/rabbitmq/mnesia/rabbit@localhost
Raft data directory: /var/lib/rabbitmq/mnesia/rabbit@localhost/quorum/rabbit@localhost
Config files
Log file(s)
* /var/log/rabbitmq/rabbit@localhost.log
* /var/log/rabbitmq/rabbit@localhost_upgrade.log
Alarms
(none)
Memory
Total memory used: 0.0834 gb
Calculation strategy: rss
Memory high watermark setting: 0.4 of available memory, computed to: 0.7308 gb
code: 0.0279 gb (31.25 %)
other_proc: 0.0255 gb (28.5 %)
allocated_unused: 0.016 gb (17.89 %)
other_system: 0.0124 gb (13.84 %)
other_ets: 0.0032 gb (3.61 %)
plugins: 0.0022 gb (2.41 %)
atom: 0.0014 gb (1.6 %)
mgmt_db: 0.0005 gb (0.54 %)
binary: 0.0001 gb (0.14 %)
mnesia: 0.0001 gb (0.09 %)
metrics: 0.0001 gb (0.07 %)
msg_index: 0.0 gb (0.03 %)
connection_other: 0.0 gb (0.02 %)
quorum_ets: 0.0 gb (0.02 %)
connection_channels: 0.0 gb (0.0 %)
connection_readers: 0.0 gb (0.0 %)
connection_writers: 0.0 gb (0.0 %)
queue_procs: 0.0 gb (0.0 %)
queue_slave_procs: 0.0 gb (0.0 %)
quorum_queue_procs: 0.0 gb (0.0 %)
reserved_unallocated: 0.0 gb (0.0 %)
File Descriptors
Total: 2, limit: 32671
Sockets: 0, limit: 29401
Free Disk Space
Low free disk space watermark: 0.05 gb
Free disk space: 11.2644 gb
Totals
Connection count: 0
Queue count: 0
Virtual host count: 1
Listeners
Interface: [::], port: 15672, protocol: http, purpose: HTTP API
Interface: [::], port: 25672, protocol: clustering, purpose: inter-node and CLI tool communication
Interface: [::], port: 5672, protocol: amqp, purpose: AMQP 0-9-1 and AMQP 1.0
[root@localhost roo]#
利用admin/admin登录,注意端口是15672,页面如下:


 3929
3929

 被折叠的 条评论
为什么被折叠?
被折叠的 条评论
为什么被折叠?
 到【灌水乐园】发言


