


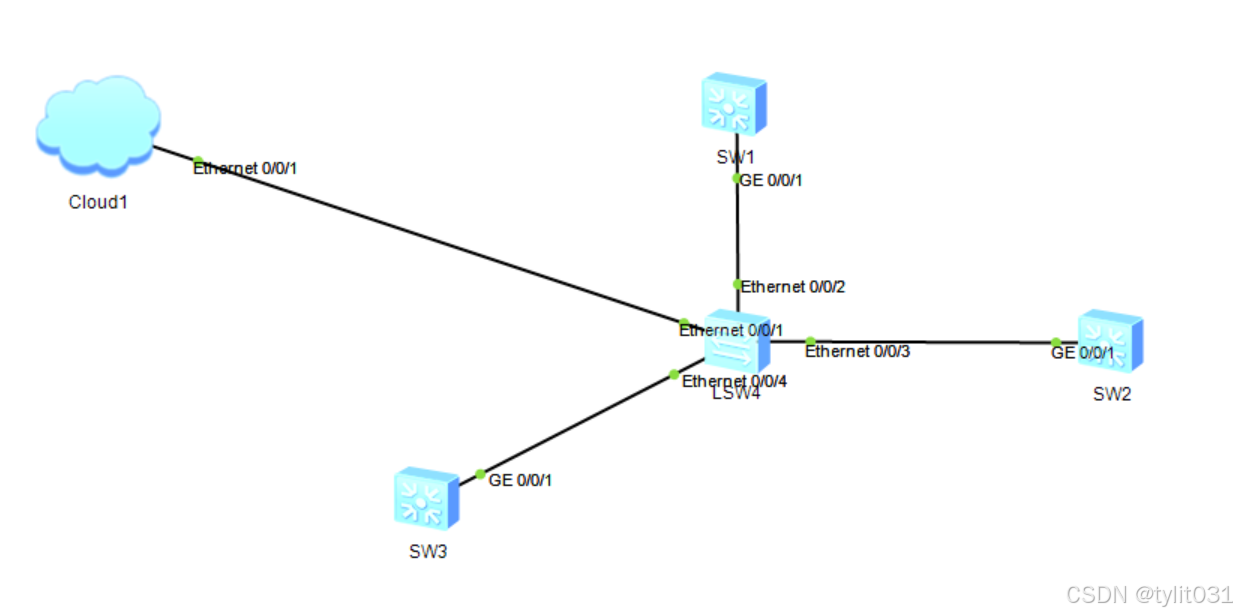
第一期介绍了如何编写Python脚本实现SSH连接,本期沿用拓扑。
基于Linux服务器的Python脚本实现局域网交换机运维①
实验目的
通过FTP连接到三台交换机,下载备份文件“vrp_config.zip”到本地。由于每个交换机的文件都叫这个,所以下载到本地之后要进行改名,名字为IP_config.zip。
在Desktop下创建一个名为“ftp_log.txt”的TXT,
每次下载好一个包之后,在文档中写入“IP_config download successfully+时间+位置”
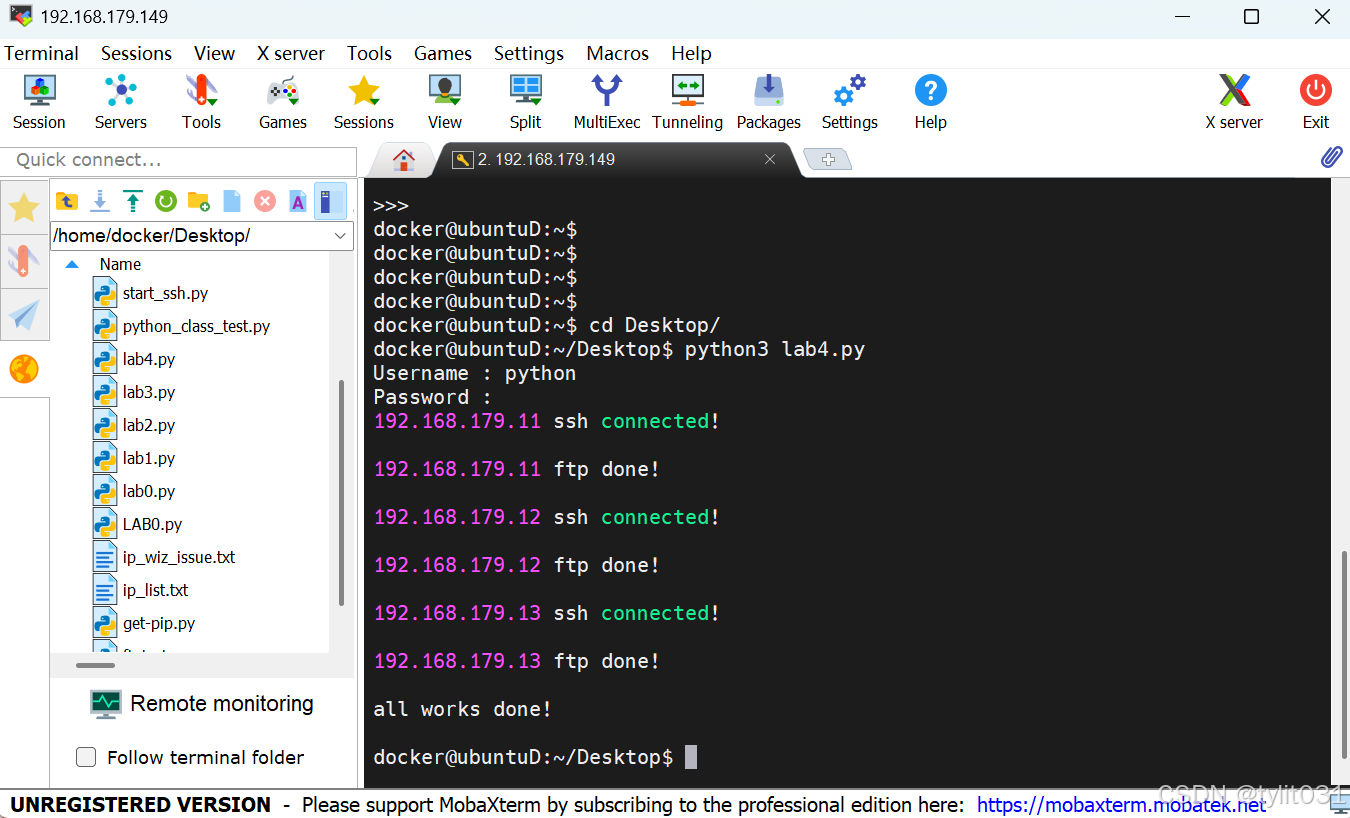
FTP user:python passwd:123。完成所有之后屏幕输出“all work done!”
环境搭建
交换机
三台三层交换机上需要开启SSH与FTP服务,并对相应的用户Python进行权限设置。
<SW1>un ter mon #关闭日志弹窗
Info: Current terminal monitor is off.
<SW1>sy #进入系统视图
Enter system view, return user view with Ctrl+Z.
[SW1]aaa #进入aaa配置
[SW1-aaa]local-user python password cipher 123 #配置用户名以及密码,密文形式
Info: Add a new user.
[SW1-aaa]local-user python privilege level 15 #用户权限15
[SW1-aaa]local-user python service-type ssh ftp #用户服务类型ssh、ftp
[SW1-aaa]q
[SW1]stelnet server en #使能ssh服务器
Info: Succeeded in starting the Stelnet server.
[SW1]ssh authentication-type de password #加密方式默认为passwd
[SW1]user-interface vty 0 4 #进入虚接口
[SW1-ui-vty0-4]authentication-mode aaa #认证模式为aaa
[SW1-ui-vty0-4]pro in ssh #允许协议ssh
[SW1-ui-vty0-4]q
[SW1]ftp ser en #使能ftp服务器
Info: Succeeded in starting the FTP server.
Linux服务器
本次使用到Python3中的time、os、paramiko、datetime、ftplib、getpass模块,需要检查模块是否可以正常引用。进入python3即可验证,如下图则是引入成功。
docker@ubuntuD:~$ python3
Python 3.12.3 (main, Feb  4 2025, 14:48:35) [GCC 13.3.0] on linux
Type "help", "copyright", "credits" or "license" for more information.
>>> import time
>>> import os
>>> import paramiko
>>> import ftplib
>>> import datetime
>>> import getpass
>>>
若有模块未安装可执行以下语句进行安装:
sudo apt install python3-ftplib #以安装ftplib模块为例Python脚本
以下是本次实验用到的脚本
import time
import os
import paramiko
import datetime
from ftplib import FTP
from getpass import getpass

SW_IP_pre = '192.168.179.'
username = input('Username : ')
password = getpass('Password : ')
commands = [
'un ter mon',
'sy',
'dis ftp-server',
'ftp server en',
'q',
'sa',
'y',
' '
]

for ip_last in range(11,14):
  ip = SW_IP_pre + str(ip_last)

  ssh_client = paramiko.SSHClient()
  ssh_client.set_missing_host_key_policy(paramiko.AutoAddPolicy())
  ssh_client.connect(hostname=ip,username=username,password=password)
  cmd = ssh_client.invoke_shell()
  print(ip+' ssh connected!\n')
  time.sleep(1)

  for i in range(0,3):
    cmd.send(commands[i]+'\n')
  time.sleep(1)
  output=cmd.recv(65535).decode("ascii")
  if 'The FTP server is already disabled' in output:
    cmd.send(commands[3]+'\n')
    time.sleep(1)
    for x in range(4,8):
      cmd.send(commands[x]+'\n')
    time.sleep(1)
  ssh_client.close()

  ftp = FTP(ip)
  ftp.login(user=username,passwd=password)
  remote_file = "vrpcfg.zip"
  local_file =os.path.join(os.path.expanduser('~'),'Desktop',f'{ip}_config.zip')
  with open(local_file,'wb') as f:
    ftp.retrbinary(f"RETR {remote_file}",f.write)
    timestamp = datetime.datetime.now().strftime("%Y%m%d%H%M%S")
  with open('ftp_log.txt','a') as h:
    h.write(f"{ip}_config download successfully\n{timestamp}\n{local_file}\n\n")
  print(ip+' ftp done!\n')
  time.sleep(1)
  ftp.quit()

print('all works done!\n')
大致可以分为三个部分:
①初始化配置信息。
②建立SSH连接,并检查交换机是否开启FTP服务。
③建立FTP连接,下载目标文件备份至本地。
初始化配置信息
import time
import os
import paramiko
import datetime
from ftplib import FTP
from getpass import getpass

SW_IP_pre = '192.168.179.'
username = input('Username : ')
password = getpass('Password : ')
commands = [
'un ter mon',
'sy',
'dis ftp-server',
'ftp server en',
'q',
'sa',
'y',
' '
]
引入各模块。getpass()函数其实用法与input()一致,只不过在输入时是不可见的,这样更符合密码输入环境下的安全需求。本次实验的交换机IP地址仍然为‘192.168.179.11’、‘192.168.179.12’、‘192.168.179.13’。创建一个SW的IP前缀用于后续拼接形成每个交换机自己的IP地址。commands中的命令:
commands = [
'un ter mon', #关闭日志弹窗
'sy', #进入系统视图
'dis ftp-server', #查看ftp服务器配置
'ftp server en', #开启ftp服务
'q', #退回
'sa', #保存
'y', #确认
' '
]
建立SSH连接,并检查交换机是否开启FTP服务
然后是建立SSH连接。在交换机上由于事先已经做了相应配置,这里Linux服务器则可以使用上一篇文章的方法连接到每台交换机。
for ip_last in range(11,14):
  ip = SW_IP_pre + str(ip_last)

  ssh_client = paramiko.SSHClient()
  ssh_client.set_missing_host_key_policy(paramiko.AutoAddPolicy())
  ssh_client.connect(hostname=ip,username=username,password=password)
  cmd = ssh_client.invoke_shell()
  print(ip+' ssh connected!\n')
  time.sleep(1)

  for i in range(0,3):
    cmd.send(commands[i]+'\n')
  time.sleep(1)
  output=cmd.recv(65535).decode("ascii")
  if 'The FTP server is already disabled' in output:
    cmd.send(commands[3]+'\n')
    time.sleep(1)
    for x in range(4,8):
      cmd.send(commands[x]+'\n')
    time.sleep(1)
  ssh_client.close()
SSH连接暂且略过,重点在于检查FTP服务端是否正常开启。
可以看到,在建立SSH连接之后,我首先对交换机输入了commands中的前三条命令,他们的作用是检查ftp服务是否正常开启。我们来到交换机这边看一下,正常开启FTP服务和未开启FTP服务的情况下,输入‘dis ftp-server’这条命令,会有怎样的回显内容。
正常开启:
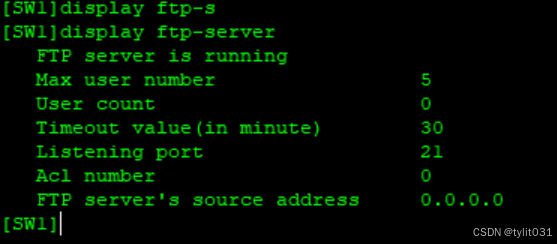
未开启:
可以发现,如果交换机没有开启FTP Server,回显内容会显示:
"Info: The FTP server is already disabled."
那么接下来我们需要解决两个问题:第一个问题,怎样获取到FTP开启失败的回显信息?第二个问题,怎样重新开启FTP服务?
 output=cmd.recv(65535).decode("ascii")
  if 'The FTP server is already disabled' in output:
    cmd.send(commands[3]+'\n')
    time.sleep(1)
    for x in range(4,8):
      cmd.send(commands[x]+'\n')
    time.sleep(1)
  ssh_client.close()
cmd.recv(65535).decode("ascii")语句用于接收来自ssh被连接端的shell中返回的信息,窗口大小为65535,使用"ascii"方式进行decode。
如果没有开启FTP服务的回显信息出现在了获取到的内容中,输入commands中对应的指令,开启ftp。等待一秒给交换机进行启动,随后关闭ssh连接。如果事先交换机FTP服务正常开启则会直接关闭ssh连接。
建立FTP连接,下载目标文件备份至本地
  ftp = FTP(ip)
  ftp.login(user=username,passwd=password)
  remote_file = "vrpcfg.zip"
  local_file =os.path.join(os.path.expanduser('~'),'Desktop',f'{ip}_config.zip')
  with open(local_file,'wb') as f:
    ftp.retrbinary(f"RETR {remote_file}",f.write)
    timestamp = datetime.datetime.now().strftime("%Y%m%d%H%M%S")
  with open('ftp_log.txt','a') as h:
    h.write(f"{ip}_config download successfully\n{timestamp}\n{local_file}\n\n")
  print(ip+' ftp done!\n')
  time.sleep(1)
  ftp.quit()
FTP的连接操作与SSH有所不同,还是类似的,会先调用FTP类,随后使用方法login实现登陆。其中包含两个参数,user与passwd。由于之前统一设置为python与123,此处可以直接登陆。remote_file即为远端文件,我们需要下载的文件。华为交换机一般的配置都会在本地保存为"vrpcfg.zip",如果在实际工作中工程师将不同的配置文件或日志保存为了不同的文件名,我们也可以用remote_file来进行指定。local_file即我们将要下载到本地的位置,如果该位置为空则会自动创建。我们这里使用的是os库中的函数来进行路径拼接。"os.path.join()"用于路径拼接,"os.path.expanduser('~')"则是会根据在不同的操作系统返回不同的根目录路径。f"{ip}_config.zip"则是根据要求,不同的交换机保存为不同的文件名。
随后使用with语句来进行文件操作,这样可以自动在操作之后执行关闭操作,比较方便。
  with open(local_file,'wb') as f:
    ftp.retrbinary(f"RETR {remote_file}",f.write)
    timestamp = datetime.datetime.now().strftime("%Y%m%d%H%M%S")
  with open('ftp_log.txt','a') as h:
    h.write(f"{ip}_config download successfully\n{timestamp}\n{local_file}\n\n")
  print(ip+' ftp done!\n')
第一个with语句,以"wb"的方式打开local_file(由于需要写入的文件形式为二进制,因此使用wb),使用ftplib语句进行下载。ftp.retrbinary()执行操作。
第二个with语句,以 "a"追写的方式打开"ftp_log.txt",不存在则会自动创建。追写的规则是新内容自动写在原内容后面,不会进行覆盖。
每台交换机执行完毕后会显示ftp执行完成。
执行结果
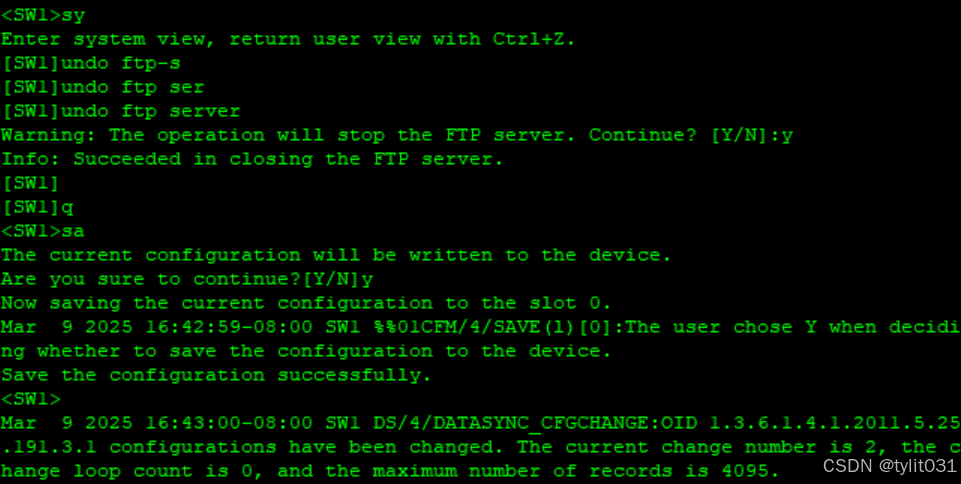
提前关闭SW1的FTP服务
运行脚本
查看本地
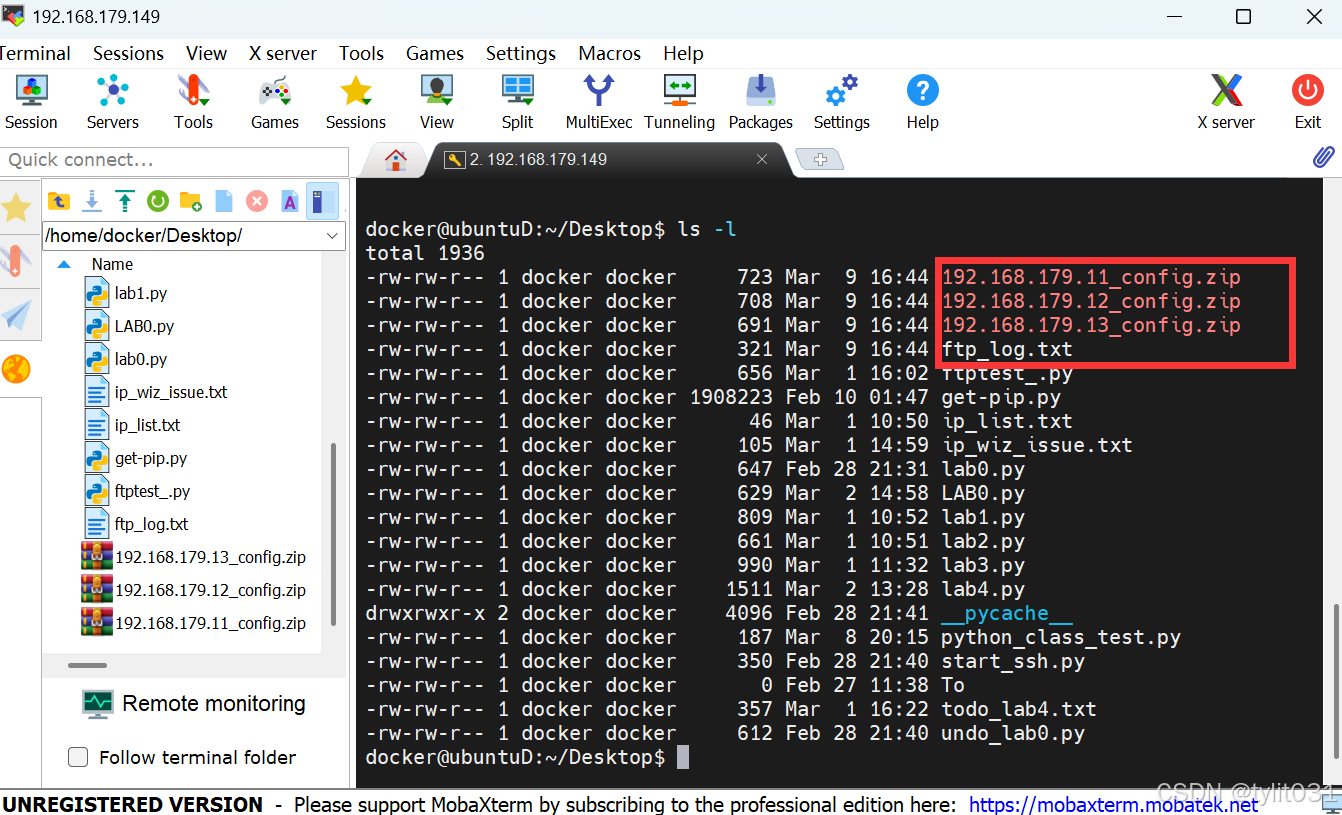 所需要的三个zip配置文件和一个操作日志均出现在本地。
来查看一下日志
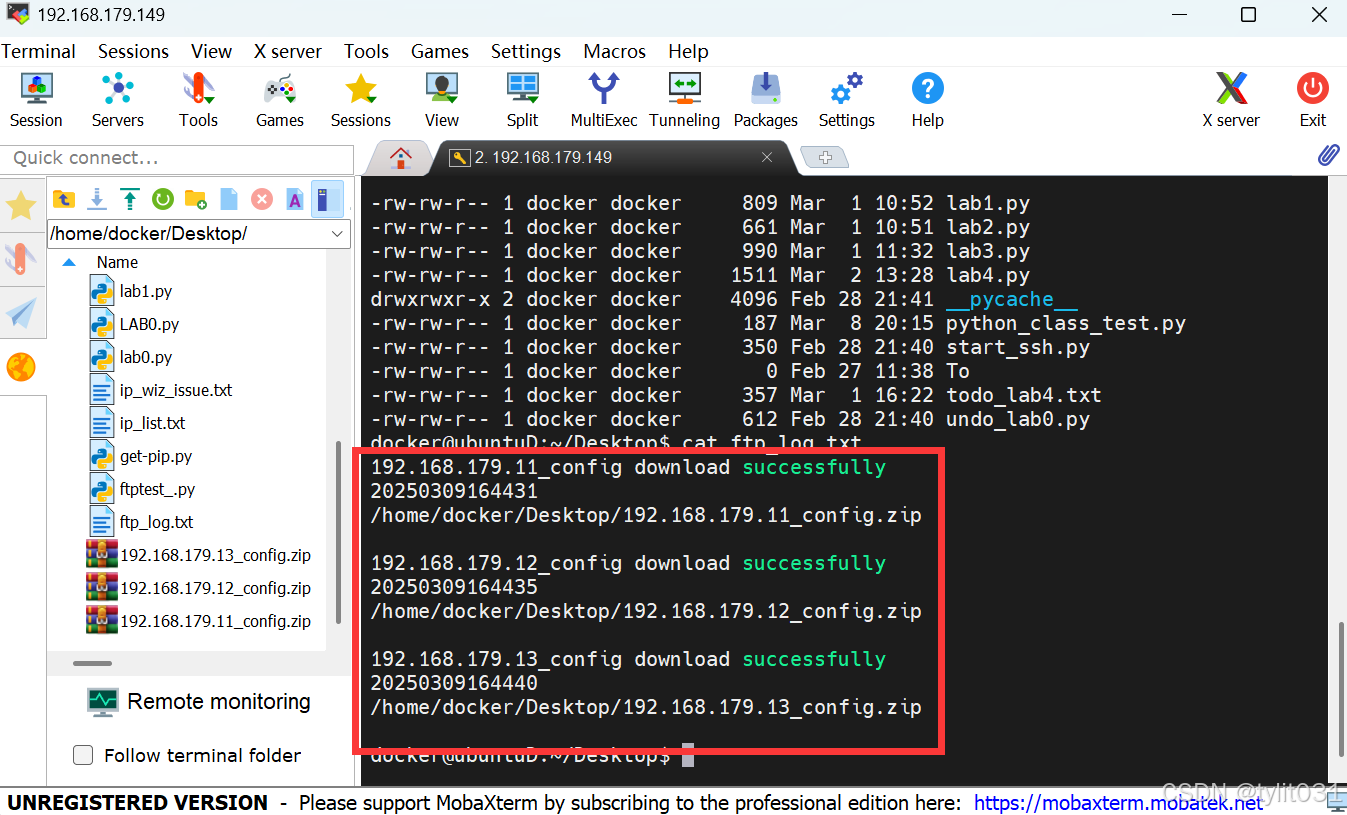
准确记录了每台交换机下载配置文件的时间以及本地位置。
由于我们之前在SW1上关闭了FTP服务,现在进入到交换机来看一下FTP服务有没有被重新拉起。
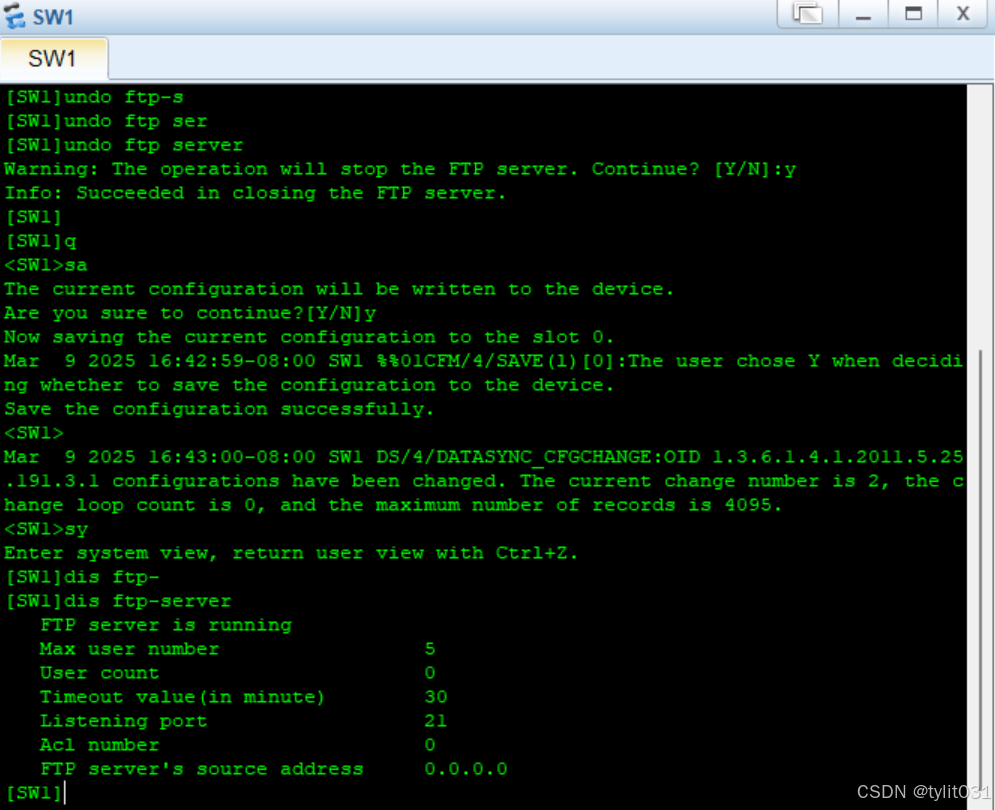
确实是被脚本重新打开了FTP服务。


 被折叠的 条评论
为什么被折叠?
被折叠的 条评论
为什么被折叠?
 到【灌水乐园】发言


