


 本文围绕服务计算Homework09展开,课程任务要点是建立API First开发理念,实现前后端分离。实现过程包括用swagger生成接口文件,基于此编写客户端,涉及安装node.js、vue等,还展示了API实例。作者负责前端和API编写,虽未多接触后端,但学到后端处理思路。
服务计算Homework09
项目地址
文件说明:
- 见下文
主要界面及其结构使用说明:
- 使用命令
npm install安装好对应的依赖- 使用命令
npm run dev运行项目后进入网址localhost:8080即可
课程任务
利用 web 客户端调用远端服务是服务开发本实验的重要内容。其中,要点建立 API First 的开发理念,实现前后端分离,使得团队协作变得更有效率
任务目标
- 选择合适的 API,实现从接口或资源(领域)建模,到 API 设计的过程
- 使用 API 工具,编制 API 描述文件,编译生成服务器、客户端原型
- 使用 Github 建立一个组织,通过 API 文档,实现 客户端项目 与 RESTful 服务项目同步开发
- 使用 API 设计工具提供 Mock 服务,两个团队独立测试 API
- 使用 travis 测试相关模块
实现过程
-
使用swagger生成接口文件
为了便于前后端分离,首先做好API的编写。
使用Swagger编辑器进行yaml文件的编写,以生成API文件。使用较为简单,详细教程参考博客,yaml代码及API文档展示如下swagger: '2.0' info: description: 极简博客 version: 1.0.0 title: The minimalist blog tags: - name: Article description: API about Articles - name: Action description: user activity schemes: - https - http paths: /articles: get: tags: - Article summary: Get articles from currenge page description: '' parameters: - name: page in: query description: currenge page required: true type: string x-exportParamName: Page responses: '200': description: OK schema: $ref: '#/definitions/ArtitleList' '/article/{id}': get: tags: - Article summary: Get article by article_id description: '' parameters: - name: id in: path required: true type: integer x-exportParamName: Id responses: '200': description: OK schema: $ref: '#/definitions/Artitle' '/article/{id}/comments': get: tags: - Article summary: Get comments about current article description: '' parameters: - name: id in: path required: true type: integer x-exportParamName: Id responses: '200': description: OK schema: $ref: '#/definitions/CommentList' /user/register: post: tags: - Action summary: Sign up a user description: '' parameters: - in: body name: body required: true schema: $ref: '#/definitions/User' x-exportParamName: Body responses: '200': description: OK /user/login: post: tags: - Action summary: user sign in description: '' parameters: - in: body name: body required: true schema: $ref: '#/definitions/User' x-exportParamName: Body responses: '200': description: OK '/article/{id}/comment': post: tags: - Action summary: Post a comment by user description: '' parameters: - name: id in: path required: true type: integer format: int64 x-exportParamName: Id - in: body name: body required: true schema: $ref: '#/definitions/Comment' x-exportParamName: Body responses: '200': description: OK definitions: Artitle: type: object properties: id: type: integer format: int64 title: type: string username: type: string tags: type: array xml: name: tag wrapped: true items: $ref: '#/definitions/Tag' date: type: string format: date content: type: string example: date: '2000-01-23' content: content id: 0 title: title username: "myUser" tags: - name: name id: 6 - name: name id: 6 ArtitleList: type: array items: $ref: '#/definitions/Artitle' Comment: type: object properties: user: type: string artitle_id: type: integer format: int64 date: type: string format: date cotent: type: string CommentList: type: array items: $ref: '#/definitions/Comment' Tag: type: object properties: id: type: integer format: int64 name: type: string xml: name: Tag example: name: name id: 6 User: type: object properties: username: type: string password: type: string format: password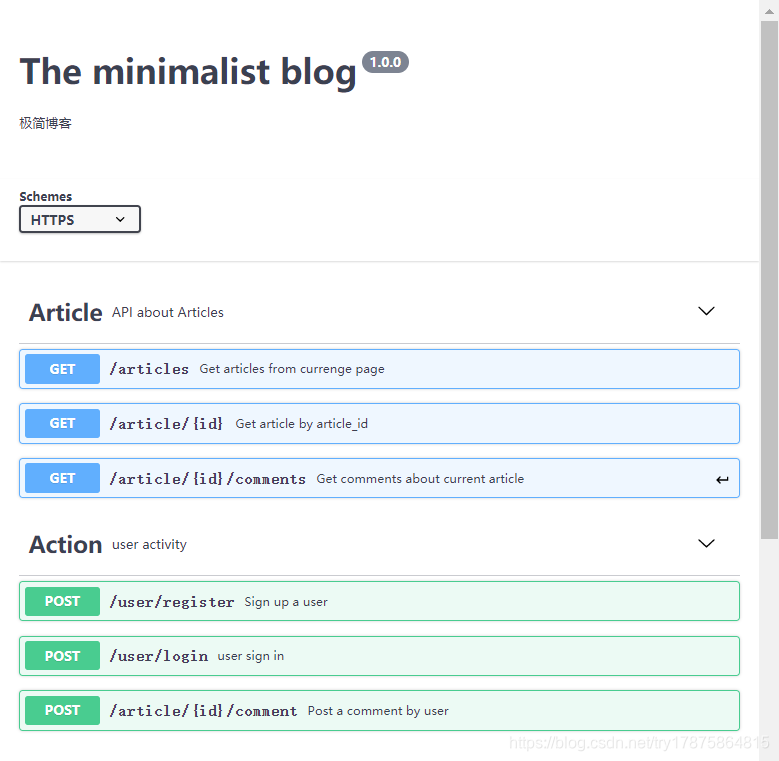
点击
Generate Client选择html即可生成对应文档,其中index.html即为可视化界面 -
基于
Vue.js编写客户端 -
API实例展示
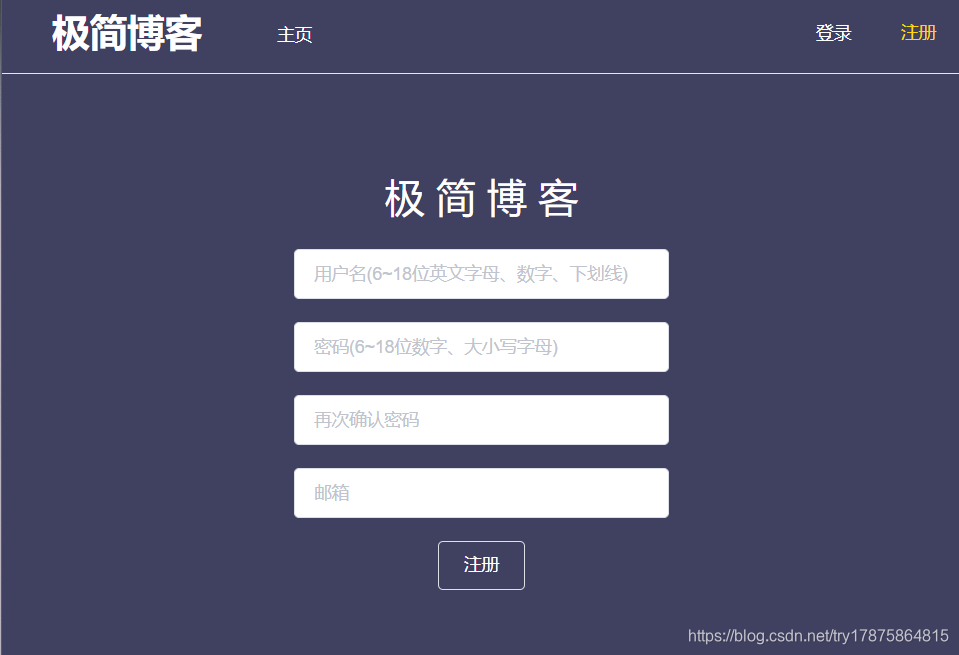
以
Signup.vue为例,其中用到上述的POST /user/register接口- 基本页面内容如下
<template> <div class="hello"> <h1>{{ msg }}</h1> <div> <el-input v-model="userID" placeholder="用户名(6~18位英文字母、数字、下划线)" class='inputClass' @blur='userValidateCheck()'></el-input> </div> <span class='info' id='user'>{{userinfo}}</span> <br> <div> <el-input v-model="password" placeholder="密码(6~18位数字、大小写字母)" class='inputClass' type='password' @blur ='passwordCheck()'></el-input> </div> <span class='info' id='pswd'>{{pswdinfo1}}</span> <br> <div> <el-input v-model="passwordConfirm" placeholder="再次确认密码" class='inputClass' type='password' @blur='passwordValidateCheck()'></el-input> </div> <span class='info' id='pswd'>{{pswdinfo2}}</span> <br> <div> <el-input v-model="mail" placeholder="邮箱" class='inputClass' @blur='mailValidateCheck()'></el-input> </div> <span class='info' id='email'>{{emailinfo}}</span> <br> <div> <el-button type="login" @click='clickJoin()'>注册</el-button> </div> </div> </template> - 调用接口进行注册(包括用户名、密码、邮箱的格式校验)
<script> export default { name: 'HelloWorld', data () { return { msg: '极 简 博 客', userID: '', password: '', passwordConfirm: '', mail: '', userinfo: '', pswdinfo1: '', pswdinfo2: '', emailinfo: '' } }, methods: { clickJoin: function () { var that = this this.$axios.request({ url: 'http://localhost:8081/user/register', method: 'Post', data: JSON.stringify({ Username: this.userID, Password: this.password }), responseType: 'json' }).then(function (response) { console.log(response.data) if (response.data.ok) { that.$store.commit('saveToken', { username: that.userID, token: response.data.ok }) that.$router.push('/') } else { alert(response.data.error) } }) }, userValidateCheck: function () { if (!(/[0-9a-zA-Z_]{6,18}/.test(this.userID))) { this.userinfo = '用户名格式不正确' } else { this.userinfo = '' } }, passwordCheck: function () { if (!(/[0-9a-zA-Z]{6,18}/.test(this.password))) { this.pswdinfo1 = '密码格式不正确' } else { this.pswdinfo1 = '' } }, passwordValidateCheck: function () { if (this.password !== this.passwordConfirm) { this.pswdinfo2 = '两次密码输入不相同' } else { this.pswdinfo2 = '' } }, mailValidateCheck: function () { if (/^([A-Za-z0-9_])+([A-Za-z0-9_])+\.([A-Za-z]{2,4})/.test(this.mail)) { this.emailinfo = '' } else { this.emailinfo = '邮箱格式不正确' } } } } </script> - style没有要求,实现比较简洁,代码如下
<style scoped>
body {
  font-family: "Helvetica Neue",Helvetica,"PingFang SC","Hiragino Sans GB","Microsoft YaHei","微软雅黑",Arial,sans-serif;
}
h1, h2 {
  font-weight: normal;
  color: #ffffff;
}
ul {
  list-style-type: none;
  padding: 0;
}
li {
  display: inline-block;
  margin: 0 10px;
}
.hello {
  margin-top: 10%;
  width: 100%;
  height: 100%;
}
.info {
  color: #FFD700;
}
.inputClass{
  width:300px
}
.el-button--login {
  color: #ffffff;
  background-color: #404060;
}
</style>
- 基本页面内容如下
-
结果展示


总结
本次实验我主要负责前端工作和API的编写,由于之前从来没有接触过Vue和swagger,所以这次作业的难度和工作量还是比较大的,好在这两个工具都比较轻量级,配置上手也比较简单。虽然没有太多的接触到后端的开发,但通过在与小组其他成员研究分离前后端的过程中也学到了一些关于后端的处理和思考方式。


 1172
1172


 到【灌水乐园】发言


