 Nginx反向代理集群部署实战


 本文介绍了在一个三台VM虚拟机的环境中,如何进行Nginx反向代理的配置。首先,确保所有机器都装有CentOS7.x和Nginx,然后在两台Web服务器上配置虚拟主机和测试网页,最后在代理主机上设置反向代理并进行语法检查,重启Nginx服务以完成部署。
硬件准备
三台VM虚拟机
|
Role |
HOSTNAME |
IP |
说明 |
|
Proxy host |
Node1 |
192.168.74.153 |
Nginx反向代理主机 |
|
Web Server 1 |
Node2 |
192.168.74.162 |
Web服务器1 |
|
Web Server 2 |
Node3 |
192.168.74.163 |
Web服务器2 |
软件准备
系统:CentOS7.x x86_64
软件:nginx-1.16.0-1.el7.ngx.x86_64.rpm
配置
1、添加epel扩展源(三台主机均配置)
[root@node1 ~]# wget -O /etc/yum.repos.d/epel.repo http://mirrors.aliyun.com/repo/epel-7.repo
[root@node2 ~]# wget -O /etc/yum.repos.d/epel.repo http://mirrors.aliyun.com/repo/epel-7.repo
[root@node3 ~]# wget -O /etc/yum.repos.d/epel.repo http://mirrors.aliyun.com/repo/epel-7.repo
2、安装Nginx(三台主机均配置)
#node1已源码安装nginx
[root@node2 ~]# yum install nginx -y
[root@node3 ~]# yum install nginx -y
3、配置虚拟主机(两台web服务器配置)
#node2与node3相同
[root@node2 ~]# vim /etc/nginx/conf.d/vhost.conf

server {
        listen       80;
        server_name  bbs.yunjisuan.com;

        location / {
            root  /usr/share/nginx/html/bbs;
            index  index.html index.htm;
        }
}

    server {
        listen       80;
        server_name  blog.yunjisuan.com;

        location / {
            root   /usr/share/nginx/html/blog;
            index  index.html index.htm;
        }
}
4、准备Web测试界面(两台web服务器配置)
#node2与node3相同
[root@node2 ~]# mkdir -p /usr/share/nginx/html/{blog,bbs}/logs
[root@node2 ~]# echo "`hostname -I `blog test page" > /usr/share/nginx/html/blog/index.html
[root@node2 ~]# echo "`hostname -I `bbs test page" > /usr/share/nginx/html/bbs/index.html
5、启动Nginx服务(两台web服务器配置)
[root@node2 ~]# systemctl start nginx.service
[root@node2 ~]# systemctl enable nginx.service
Created symlink from /etc/systemd/system/multi-user.target.wants/nginx.service to /usr/lib/systemd/system/nginx.service.
6、配置反向代理(代理主机配置)
[root@node1 ~]# cd /usr/local/nginx/conf/
[root@node1 conf]# vim nginx.conf
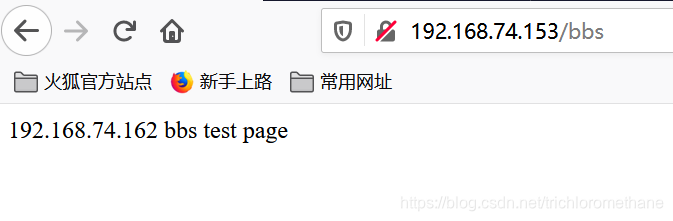
location /bbs {
proxy_pass http://192.168.74.162/bbs/;
}
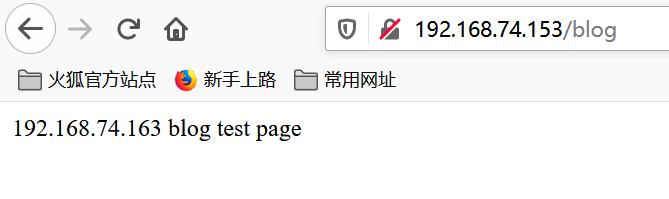
location /blog {
proxy_pass http://192.168.74.163/blog/;
}
7、检测是否有语法错误(代理主机配置)
[root@node1 conf]# nginx -t
nginx: the configuration file /usr/local/nginx/conf/nginx.conf syntax is ok
nginx: configuration file /usr/local/nginx/conf/nginx.conf test is successful
8、重启Nginx服务(代理主机配置)
[root@node1 conf]# systemctl restart nginx.service
9、测试


 1738
1738

 被折叠的 条评论
为什么被折叠?
被折叠的 条评论
为什么被折叠?
 到【灌水乐园】发言


