


字体阴影需要四个相关参数:
1. android:shadowColor:阴影的颜色
2. android:shadowDx:水平方向上的偏移量
3. android:shadowDy:垂直方向上的偏移量
4. android:shadowRadius:是阴影的的半径大少
最好这4个值都一起设计
shadowColor这个属性就不多说了,android:shadowDx跟android:shadowDy
为了更清楚的演示就做个试验,分三组xml布局如下:
-
<LinearLayout xmlns:android="http://schemas.android.com/apk/res/android" -
xmlns:tools="http://schemas.android.com/tools" -
android:layout_width="match_parent" -
android:layout_height="match_parent" -
android:orientation="vertical" -
android:background="#ff895544" > -
<TextView -
android:id="@+id/test_shadow" -
android:layout_width="wrap_content" -
android:layout_height="wrap_content" -
android:textSize="60sp" -
android:textColor="#ffffffff" -
android:shadowColor="#ff000000" -
android:text="Test Shadow" -
android:layout_gravity="center" -
android:shadowRadius="1" -
android:shadowDx="0" -
android:shadowDy="0" -
/> -
<TextView -
android:id="@+id/test_shadow2" -
android:layout_width="wrap_content" -
android:layout_height="wrap_content" -
android:textSize="60sp" -
android:textColor="#ffffffff" -
android:layout_gravity="center" -
android:text="Test Shadow" -
android:shadowColor="#ff000000" -
android:shadowRadius="1" -
android:shadowDx="10" -
android:shadowDy="10" -
/> -
<TextView -
android:id="@+id/test_shadow3" -
android:layout_width="wrap_content" -
android:layout_height="wrap_content" -
android:textSize="60sp" -
android:textColor="#ffffffff" -
android:layout_gravity="center" -
android:text="Test Shadow" -
android:shadowColor="#ff000000" -
android:shadowRadius="1" -
android:shadowDx="30" -
android:shadowDy="30" -
/> -
</LinearLayout>
dx dy 分别为 (0 , 0) , (10 , 10 ) , (30 , 30)
结果如下: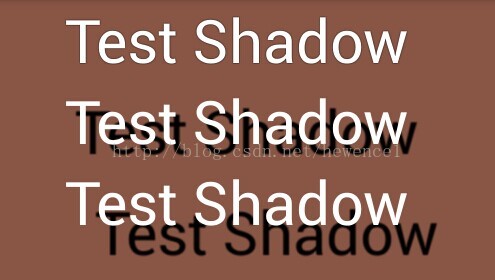
现在更加清楚了吧!
下一个属性是android:shadowRadius 是阴影的的半径大少
对于此属性进行6组试验:
dx dy 都是 30 shadowRadius 分别为: 0 , 0.01 , 1 , 2 , 5 , 10
结果如下:
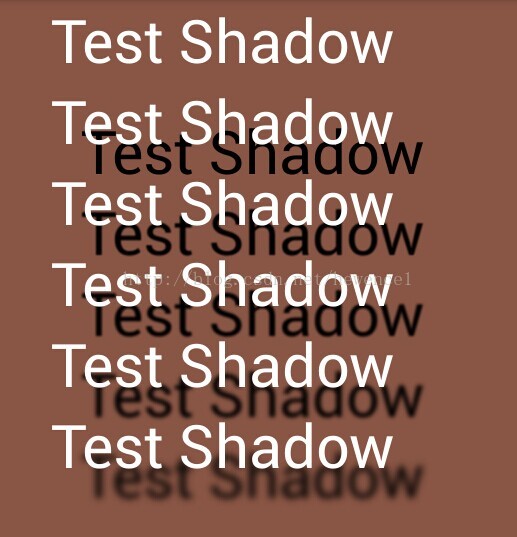
从结果分析:
1 这个值为0的话是不会显示的
2 值越大,阴影就越大,而且越模糊
到现在应该都清楚这4个值会影响什么效果了,经验丰富的从属性名字就大概知道是什么意思了。
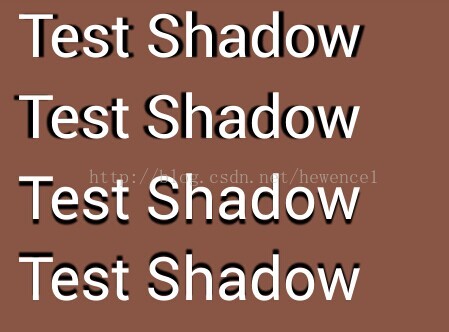
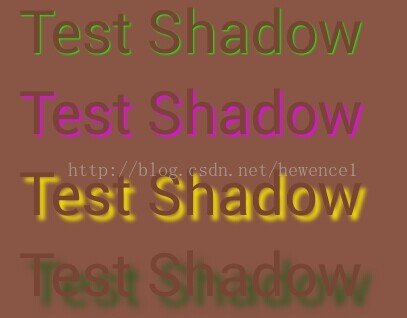
现在回到正常阴影的效果:
1.可以把shadowRadius 变大来实现阴影模糊,使得看起来更加的自然:
代码:
<TextView
android:id="@+id/test_shadow"
android:layout_width="wrap_content"
android:layout_height="wrap_content"
android:textSize="60sp"
android:textColor="#ffffffff"
android:shadowColor="#ff000000"
android:text="Test Shadow"
android:layout_gravity="center"
android:shadowRadius="1"
android:shadowDx="5"
android:shadowDy="5"
/>
<TextView
android:id="@+id/test_shadow2"
android:layout_width="wrap_content"
android:layout_height="wrap_content"
android:textSize="60sp"
android:textColor="#ffffffff"
android:layout_gravity="center"
android:text="Test Shadow"
android:shadowColor="#ff000000"
android:shadowRadius="5"
android:shadowDx="5"
android:shadowDy="5"
/>
<TextView
android:id="@+id/test_shadow2"
android:layout_width="wrap_content"
android:layout_height="wrap_content"
android:textSize="60sp"
android:textColor="#ffffffff"
android:layout_gravity="center"
android:text="Test Shadow"
android:shadowColor="#ff000000"
android:shadowRadius="10"
android:shadowDx="5"
android:shadowDy="5"
/>
效果:
调节shadowRadius来确定最适合自己的阴影
2.调试dx 跟 dy来改变光源,使阴影偏向不同的方向 跟 距离
如果光源是在左边,那么dx 是为正的,
光源在最右边,那么dx就是负
光源在上 那么dy 为 正
光源在下, 那么dy 为 负
那么左上 , 右下 就是。。。。。。
dx 跟 dy 的正负调节方向, 其值的大少影响距离 ,dx 跟 dy 的 比值 就影响光源的角度
-
<TextView -
android:id="@+id/test_shadow" -
android:layout_width="wrap_content" -
android:layout_height="wrap_content" -
android:textSize="60sp" -
android:textColor="#ffffffff" -
android:shadowColor="#ff000000" -
android:text="Test Shadow" -
android:layout_gravity="center" -
android:shadowRadius="1" -
android:shadowDx="5" -
android:shadowDy="0" -
/> -
<TextView -
android:id="@+id/test_shadow2" -
android:layout_width="wrap_content" -
android:layout_height="wrap_content" -
android:textSize="60sp" -
android:textColor="#ffffffff" -
android:layout_gravity="center" -
android:text="Test Shadow" -
android:shadowColor="#ff000000" -
android:shadowRadius="1" -
android:shadowDx="-5" -
android:shadowDy="0" -
/> -
<TextView -
android:id="@+id/test_shadow2" -
android:layout_width="wrap_content" -
android:layout_height="wrap_content" -
android:textSize="60sp" -
android:textColor="#ffffffff" -
android:layout_gravity="center" -
android:text="Test Shadow" -
android:shadowColor="#ff000000" -
android:shadowRadius="1" -
android:shadowDx="0" -
android:shadowDy="5" -
/> -
<TextView -
android:id="@+id/test_shadow3" -
android:layout_width="wrap_content" -
android:layout_height="wrap_content" -
android:textSize="60sp" -
android:textColor="#ffffffff" -
android:layout_gravity="center" -
android:text="Test Shadow" -
android:shadowColor="#ff000000" -
android:shadowRadius="1" -
android:shadowDx="0" -
android:shadowDy="-5" -
/>
带一点浮雕效果的,把dx dy都设置较小的值
现在三组 设置为 (0.2 , 0.2) , (1 , 1) , (2 , 2)
结果
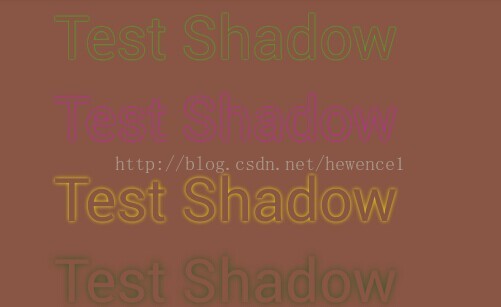
光圈效果:
把dx dy设置为0 , Raduis位置较大就行了,字体颜色跟阴影颜色要协调(建议使用相同,相近,相差太大就难看比如黑色跟白色)
试验代码:
-
<TextView -
android:id="@+id/test_shadow" -
android:layout_width="wrap_content" -
android:layout_height="wrap_content" -
android:textSize="60sp" -
android:textColor="#ffffffff" -
android:layout_gravity="center" -
android:text="Test Shadow" -
android:shadowColor="#ff00ff00" -
android:shadowRadius="1" -
android:shadowDx="0" -
android:shadowDy="0" -
/> -
<TextView -
android:id="@+id/test_shadow2" -
android:layout_width="wrap_content" -
android:layout_height="wrap_content" -
android:textSize="60sp" -
android:textColor="#ffffffff" -
android:layout_gravity="center" -
android:text="Test Shadow" -
android:shadowColor="#ffee00ff" -
android:shadowRadius="2" -
android:shadowDx="0" -
android:shadowDy="0" -
/> -
<TextView -
android:id="@+id/test_shadow2" -
android:layout_width="wrap_content" -
android:layout_height="wrap_content" -
android:textSize="60sp" -
android:textColor="#ffffffff" -
android:layout_gravity="center" -
android:text="Test Shadow" -
android:shadowColor="#ffeedd00" -
android:shadowRadius="5" -
android:shadowDx="0" -
android:shadowDy="0" -
/> -
<TextView -
android:id="@+id/test_shadow2" -
android:layout_width="wrap_content" -
android:layout_height="wrap_content" -
android:textSize="60sp" -
android:textColor="#ffffffff" -
android:layout_gravity="center" -
android:text="Test Shadow" -
android:shadowColor="#ff335824" -
android:shadowRadius="10" -
android:shadowDx="0" -
android:shadowDy="0" -
/>
结果: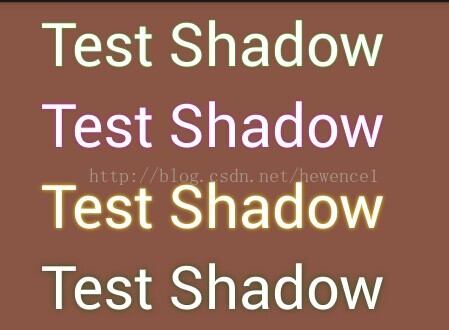 这样看起来还算好看把
荧光灯的效果: 把把dx dy设置为0 , Raduis位置较大就行了,最重要的事字体颜色 跟背景颜色一样(或者非常相近)
如果再把dx 跟 dy再设置一下的话 就会变成这样的dx dy 分别为 (1 ,1) , (2 , 2) , (5 , 5) ,(10 , 10)
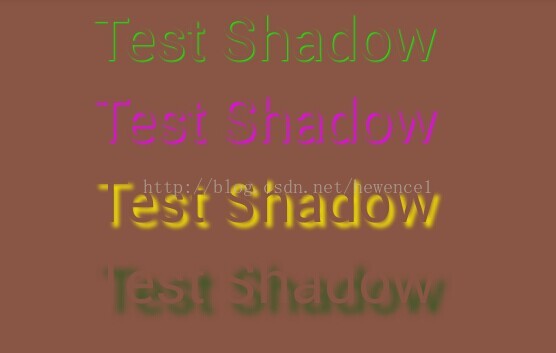
上面使用的背景色跟字体都是为(#ff895544) 那么我们把字体设置为相近(#ff784433)的那么结果为:
代码:
-
<LinearLayout xmlns:android="http://schemas.android.com/apk/res/android" -
xmlns:tools="http://schemas.android.com/tools" -
android:layout_width="match_parent" -
android:layout_height="match_parent" -
android:orientation="vertical" -
android:background="#ff895544" > -
<TextView -
android:id="@+id/test_shadow" -
android:layout_width="wrap_content" -
android:layout_height="wrap_content" -
android:textSize="60sp" -
android:textColor="#ff784433" -
android:layout_gravity="center" -
android:text="Test Shadow" -
android:shadowColor="#ff00ff00" -
android:shadowRadius="1" -
android:shadowDx="1" -
android:shadowDy="1" -
/> -
<TextView -
android:id="@+id/test_shadow2" -
android:layout_width="wrap_content" -
android:layout_height="wrap_content" -
android:textSize="60sp" -
android:textColor="#ff784433" -
android:layout_gravity="center" -
android:text="Test Shadow" -
android:shadowColor="#ffee00ff" -
android:shadowRadius="2" -
android:shadowDx="2" -
android:shadowDy="2" -
/> -
<TextView -
android:id="@+id/test_shadow2" -
android:layout_width="wrap_content" -
android:layout_height="wrap_content" -
android:textSize="60sp" -
android:textColor="#ff784433" -
android:layout_gravity="center" -
android:text="Test Shadow" -
android:shadowColor="#ffeedd00" -
android:shadowRadius="5" -
android:shadowDx="5" -
android:shadowDy="5" -
/> -
<TextView -
android:id="@+id/test_shadow2" -
android:layout_width="wrap_content" -
android:layout_height="wrap_content" -
android:textSize="60sp" -
android:textColor="#ff784433" -
android:layout_gravity="center" -
android:text="Test Shadow" -
android:shadowColor="#ff335824" -
android:shadowRadius="10" -
android:shadowDx="10" -
android:shadowDy="10" -
/> -
</LinearLayout>
结果就是:
 这个更明显一点
再把dx dy 都设置为0
结果: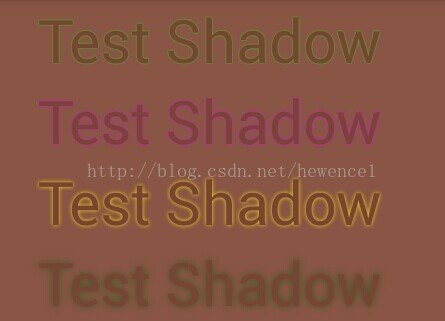
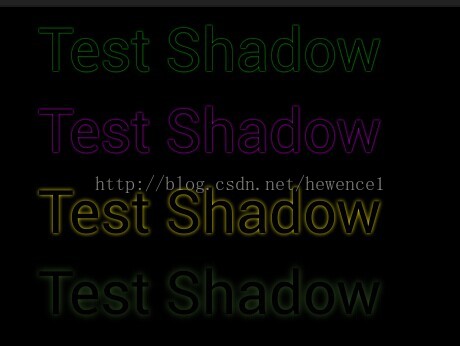
颜色混合:主要是修改字体颜色的alpha值
代码:
-
<LinearLayout xmlns:android="http://schemas.android.com/apk/res/android" -
xmlns:tools="http://schemas.android.com/tools" -
android:layout_width="match_parent" -
android:layout_height="match_parent" -
android:orientation="vertical" -
android:background="#ff000000" > -
<TextView -
android:id="@+id/test_shadow" -
android:layout_width="wrap_content" -
android:layout_height="wrap_content" -
android:textSize="60sp" -
android:textColor="#ffffffff" -
android:layout_gravity="center" -
android:text="Test Shadow" -
android:shadowColor="#ffffff00" -
android:shadowRadius="5" -
android:shadowDx="0" -
android:shadowDy="0" -
/> -
<TextView -
android:id="@+id/test_shadow" -
android:layout_width="wrap_content" -
android:layout_height="wrap_content" -
android:textSize="60sp" -
android:textColor="#afffffff" -
android:layout_gravity="center" -
android:text="Test Shadow" -
android:shadowColor="#ffffff00" -
android:shadowRadius="5" -
android:shadowDx="0" -
android:shadowDy="0" -
/> -
<TextView -
android:id="@+id/test_shadow" -
android:layout_width="wrap_content" -
android:layout_height="wrap_content" -
android:textSize="60sp" -
android:textColor="#9fffffff" -
android:layout_gravity="center" -
android:text="Test Shadow" -
android:shadowColor="#ffffff00" -
android:shadowRadius="5" -
android:shadowDx="0" -
android:shadowDy="0" -
/> -
<TextView -
android:id="@+id/test_shadow" -
android:layout_width="wrap_content" -
android:layout_height="wrap_content" -
android:textSize="60sp" -
android:textColor="#6fffffff" -
android:layout_gravity="center" -
android:text="Test Shadow" -
android:shadowColor="#ffffff00" -
android:shadowRadius="5" -
android:shadowDx="0" -
android:shadowDy="0" -
/> -
<TextView -
android:id="@+id/test_shadow" -
android:layout_width="wrap_content" -
android:layout_height="wrap_content" -
android:textSize="60sp" -
android:textColor="#3fffffff" -
android:layout_gravity="center" -
android:text="Test Shadow" -
android:shadowColor="#ffffff00" -
android:shadowRadius="5" -
android:shadowDx="0" -
android:shadowDy="0" -
/> -
</LinearLayout>
结果: 可以让阴影颜色现在显示在字体颜色中
代码:
-
<LinearLayout xmlns:android="http://schemas.android.com/apk/res/android" -
xmlns:tools="http://schemas.android.com/tools" -
android:layout_width="match_parent" -
android:layout_height="match_parent" -
android:orientation="vertical" -
android:background="#ff000000" > -
<TextView -
android:id="@+id/test_shadow" -
android:layout_width="wrap_content" -
android:layout_height="wrap_content" -
android:textSize="60sp" -
android:textColor="#cc000000" -
android:text="Test Shadow" -
android:layout_gravity="center" -
android:shadowColor="#aa22ff22" -
android:shadowRadius="10" -
android:shadowDx="0" -
android:shadowDy="0" -
/> -
<TextView -
android:id="@+id/test_shadow" -
android:layout_width="wrap_content" -
android:layout_height="wrap_content" -
android:textSize="60sp" -
android:textColor="#aa000000" -
android:text="Test Shadow" -
android:layout_gravity="center" -
android:shadowColor="#aa22ff22" -
android:shadowRadius="10" -
android:shadowDx="0" -
android:shadowDy="0" -
/> -
<TextView -
android:id="@+id/test_shadow" -
android:layout_width="wrap_content" -
android:layout_height="wrap_content" -
android:textSize="60sp" -
android:textColor="#77000000" -
android:text="Test Shadow" -
android:layout_gravity="center" -
android:shadowColor="#aa22ff22" -
android:shadowRadius="10" -
android:shadowDx="0" -
android:shadowDy="0" -
/> -
<TextView -
android:id="@+id/test_shadow" -
android:layout_width="wrap_content" -
android:layout_height="wrap_content" -
android:textSize="60sp" -
android:textColor="#33000000" -
android:text="Test Shadow" -
android:layout_gravity="center" -
android:shadowColor="#aa22ff22" -
android:shadowRadius="10" -
android:shadowDx="0" -
android:shadowDy="0" -
/> -
<TextView -
android:id="@+id/test_shadow2" -
android:layout_width="wrap_content" -
android:layout_height="wrap_content" -
android:textSize="60sp" -
android:textColor="#33000000" -
android:text="Test Shadow" -
android:layout_gravity="center" -
android:shadowColor="#aaffffff" -
android:shadowRadius="10" -
android:shadowDx="0" -
android:shadowDy="0" -
/> -
<TextView -
android:id="@+id/test_shadow2" -
android:layout_width="wrap_content" -
android:layout_height="wrap_content" -
android:textSize="60sp" -
android:textColor="#55000000" -
android:text="Test Shadow" -
android:layout_gravity="center" -
android:shadowColor="#ffffffff" -
android:shadowRadius="10" -
android:shadowDx="0" -
android:shadowDy="0" -
/> -
<TextView -
android:id="@+id/test_shadow2" -
android:layout_width="wrap_content" -
android:layout_height="wrap_content" -
android:textSize="60sp" -
android:textColor="#77000000" -
android:text="Test Shadow" -
android:layout_gravity="center" -
android:shadowColor="#ffffffff" -
android:shadowRadius="10" -
android:shadowDx="0" -
android:shadowDy="0" -
/> -
<TextView -
android:id="@+id/test_shadow2" -
android:layout_width="wrap_content" -
android:layout_height="wrap_content" -
android:textSize="60sp" -
android:textColor="#99000000" -
android:text="Test Shadow" -
android:layout_gravity="center" -
android:shadowColor="#ffffffff" -
android:shadowRadius="10" -
android:shadowDx="0" -
android:shadowDy="0" -
/> -
<TextView -
android:id="@+id/test_shadow2" -
android:layout_width="wrap_content" -
android:layout_height="wrap_content" -
android:textSize="60sp" -
android:textColor="#aa000000" -
android:text="Test Shadow" -
android:layout_gravity="center" -
android:shadowColor="#ffffffff" -
android:shadowRadius="10" -
android:shadowDx="0" -
android:shadowDy="0" -
/> -
</LinearLayout>
结果2: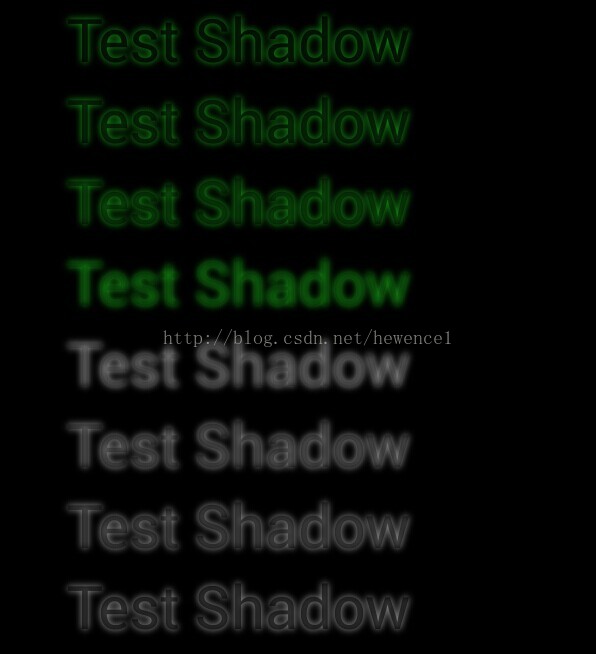
通过改变 字体背景色, 字体颜色 字体阴影色 阴影半径 dx dy alpha 就可以实现这么多种效果(当然还有更多的效果,主要是颜色搭配)
原来textView也可以这么美,完全不需要使用图片
https://blog.youkuaiyun.com/hewence1/article/details/39993415


 1329
1329

 被折叠的 条评论
为什么被折叠?
被折叠的 条评论
为什么被折叠?
 到【灌水乐园】发言


