


 本文详细介绍了Maven的pom.xml模板、maven-compiler-plugin编译插件配置、dependencyManagement与dependencies的区别,以及如何进行依赖版本控制。此外,还讲解了在不同环境下如何通过maven命令进行打包操作,包括开发、测试和生产环境的打包指令。
18.11.12~13 松江图书馆
本章主要涉及以下几点 :
pom.xml模板
maven项目在实际开发过程中,经常会依赖jar包或者安装插件,这都会涉及到对pom.xml文件的修改。
而充分了解标签的功能和标签层级嵌套关系,显得尤为重要
以下pom.xml可以作为配置模板,方便我们去理解标签内容,关键是,知道如果引入一个标签时,它应当如何放置在合适的上下级标签位置中。
模板:
<project xmlns="http://maven.apache.org/POM/4.0.0" xmlns:xsi="http://www.w3.org/2001/XMLSchema-instance" xsi:schemaLocation="http://maven.apache.org/POM/4.0.0 http://maven.apache.org/xsd/maven-4.0.0.xsd">
<modelVersion>4.0.0</modelVersion>
<groupId>com.pubei</groupId>
<artifactId>afdre</artifactId>
<version>0.0.1-SNAPSHOT</version>
<packaging>war</packaging>
<!--以上标签信息,在创建maven项目时,就会自动添加,本章不作讨论-->
<!--在pro.xml priject中,日常会经常用到的4个子标签 dependencyManagment、dependencies、build和profiles-->
<!--dependencies标签中,配置dependency 和 exclusions 2部分-->
<dependencies>
<dependency>
<groupId>org.springframework</groupId>
<artifactId>spring-core</artifactId>
<version>4.3.2.RELEASE</version>
</dependency>
...多个dependency标签...
<exclusions>
<exclusion>
<groupId>com.centit.framework</groupId>
</exclusion>
...多个exclusion标签...
</exclusions>
</dependencies>
<!--dependencyManagement标签中配置dependencies-->
<dependencyManagement>
<dependencies>
<dependency>
<groupId>javax.servlet</groupId>
<artifactId>javax.servlet-api</artifactId>
<version>3.0.1</version>
<scope>provided</scope>
</dependency>
...多个dependency标签...
</dependencies>
</dependencyManagement>
<!--bulid标签中,配置plugins 和 resources 2部分-->
<build>
<plugins>
<plugin>
<groupId>org.apache.maven.plugins</groupId>
<artifactId>maven-compiler-plugin</artifactId>
<configuration>
<source>1.8</source>
<target>1.8</target>
</configuration>
</plugin>
...配置多个plugin标签...
</plugins>
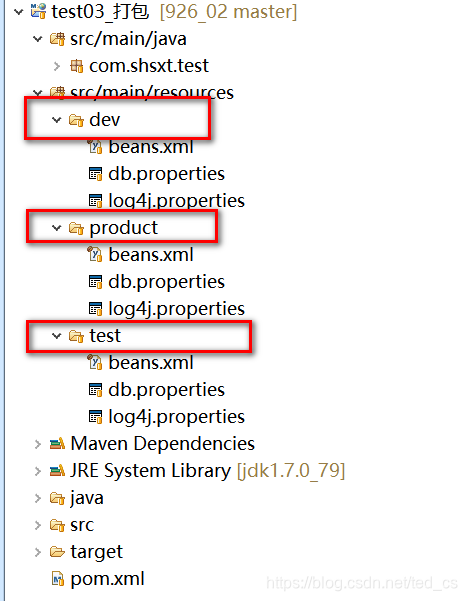
<resources>
<!--设置配置文件读取的路径,配合profiles标签中使用-->
<resource>
<directory>src/main/resources/${env}</directory>
</resource>
<resource>
<directory>src/main/java</directory>
<includes>
<include>**/*.xml</include>
<include>**/*.properties</include>
<include>**/*.tld</include>
</includes>
<filtering>false</filtering>
</resource>
... 多个resource标签...
</resources>
</build>
<!--profiles 标签中,设置配置文件加载的文件夹-->
<profiles>
<profile>
<id>dev</id>
<properties>
<env>dev</env>
</properties>
<activation>
<activeByDefault>true</activeByDefault> //表示默认加载文件夹
</activation>
</profile>
<profile>
<id>test</id>
<properties>
<env>test</env>
</properties>
</profile>
<profile>
<id>product</id>
<properties>
<env>product</env>
</properties>
</profile>
</profiles>
</project>
maven-compiler-plugin 编译插件,配置默认jdk
通过eclipse构建的maven web项目,默认使用的jdk是1.5版本,默认servlet为2.3版本。 而目前我们主流开发用的的jdk是1.7或1.8,servlet也是基于注解功能的3.o,版; 而maven编译和动行本身是需要我们本地的java环境作为支持的,所以,统一版本,就很有必要;
我本人用的本地java是1.8的,所以我配置了 <source>1.8</source> <target>1.8</target> maven编译环境;
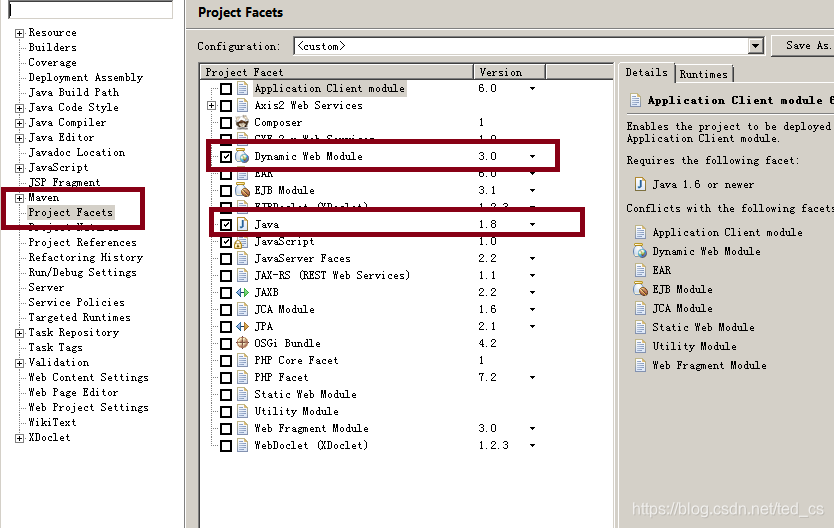
eclipse打开 windows–properties–maven–project Facets 修改jdk为1.8,同时修改Dynamic Web Module为 3.0
dependencyManagment和dependencies 区别
dependencyManagement标签和denpendencise标签和可作为同级标签,也可作为上下级标签;
同级:dependencyManagement标签功能在于“申明”依赖,denpendencise标签在于“申明和使用”依赖
上下级: 因为dependencyManagement 申明一个依赖需要借助denpendencise标签,此时denpendencise标签为子标签
关于“申明”和“申明和使用”依赖的解释:
dependencyManagement标签申明依赖,主要功能为是版本version控制;
尤其在多模构建项目时,在统一的父模块中(父模块<packaging>pom</packaging>),通过dependencyManagement标签,申明依赖,确认了依赖的版本version信息,子模块只需要通过denpendencise标签来引入依赖,不用指定版本,默认用的就是父类版本; 此时要注意: 子项目依赖父类没有申明的依赖,一定要加版本号,此时子类会仓库自行找对应的依赖信息;子项目依赖父类申明的依赖,version版本和父类不同,此时子类也会在仓库中找对应自己的依赖信息;
maven依赖的版本控制
通过对dependencyManagement认识,它的功能其实是在父模块中对引入依赖的版本进行统一控制,有“总体把控”多模块项目的依赖版本的特别;
下面介绍另一种版本控控制的思维:
  <properties>
   <spring-framework-version>4.3.7.REALEASE</spring-framework-version>
   </properties>
    <dependencies>
    <dependency>
      <groupId>org.springframework</groupId>
      <artifactId>spring-webmvc</artifactId>
      <version>${spring-framework-version}</version>
      <scope>compile</scope>
    </dependency>
    </dependencies>
properties标签是project根标签下的一级子标签,通过它可以配置不同依赖的版本号,然后用类似EL表达式的取值;
当一个pom引入大量的依赖信息时,这种方式,把版本号当作作为一种“变量”,然后取值,方便我们统一管理依赖版本
不同环境下打包项目,选取不同配置文件,对应的打包指令
对于企业级项目,无论是进行本地测试,还是测试环境测试以及最终的项目上线,都会涉及项目的打包操作,对于每个环境下项目打包时,对应的项目所有要的配置资源就会有所区别,实现打包的方式有很多种,可以通过ant,获取通过ide 自带的打包功能实现项目打包,但当项目很大并且需要的外界配置很多时,此时打包的配置就会异常复杂,对于maven 项目,我们可以用过pom.xml 配置的方式来实现打包时的环境选择,相比较其他形式打包工具,通过maven 只需要通过简单的配置,就可以轻松完成不同环境先项目的整体打包。
可以借肋eclipse中的m2e插件,选中项目,右键 run as -maven builde-输入命令
clean compile package -Dmaven.test.skip=true 打包默认环境(开发环境)并且跳过maven 测试操作
clean compile package -Ptest -Dmaven.test.skip=true 打包测试环境并且跳过maven 测试操作
clean compile package -Pproduct -Dmaven.test.skip=true 打包生产环境并且跳过maven 测试操作


 被折叠的 条评论
为什么被折叠?
被折叠的 条评论
为什么被折叠?
 到【灌水乐园】发言


