


一、前言
Nexus有诸多优点,比如集中管理版本,依赖缓存,安全访问等,用来做maven库,npm库,docker镜像库等。公司内部一般都会使用。当然也有其他优秀的产品,主要看公司开发人员的规模,访问量大小。
本篇博客以最新的nexus版本为例,演示如何部署,文章最后也提供了快速部署脚本;可供大家参考。
二、软件环境
操作系统: ubuntu24.04
nexus: 3.73.012 java17
2.1 版本变更:
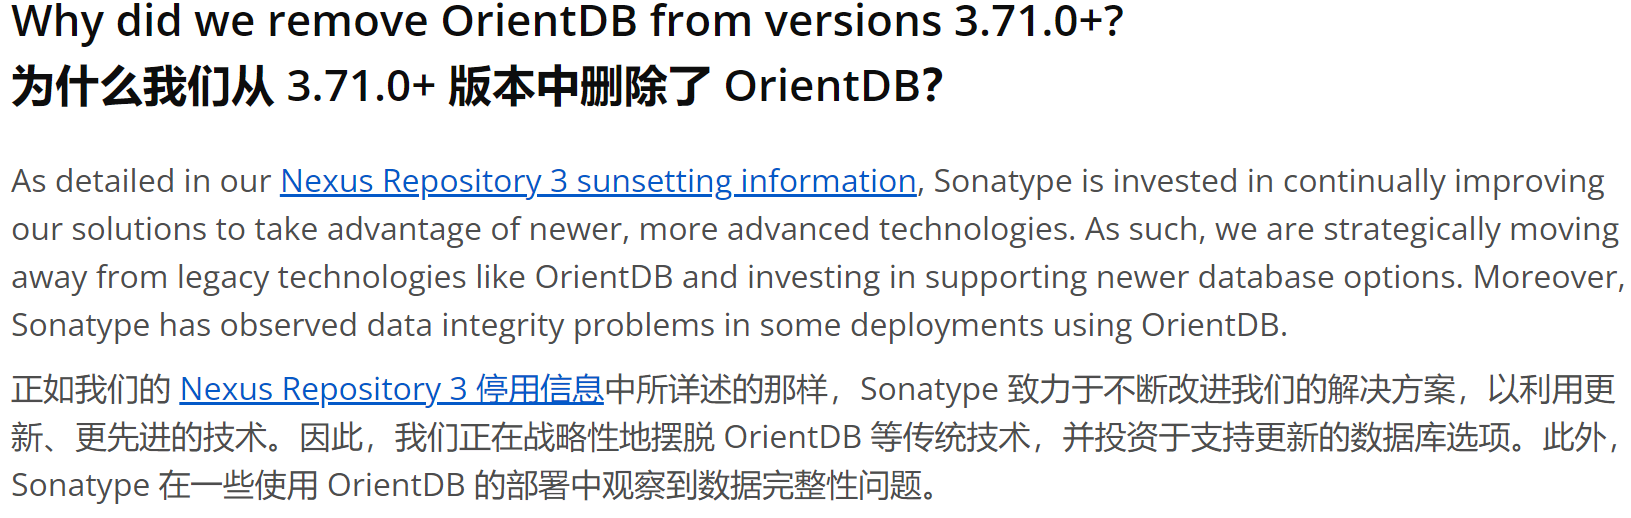
在3.70.x 之前的版本是用OrientDB作为存储;
3.71.0及之后的版本是用 postgresql 或者 H2 作为存储的;
使用外部 PostgreSQL 数据库需要付费的 Pro 许可证,由于本公司内部人员规模不大,所以采用他默认的嵌入式 H2 数据库。
2.1.1 变更存储的原因
https://help.sonatype.com/en/upgrading-to-nexus-repository-3-71-0-and-beyond.html
2.2.2 H2作为存储的注意点
https://help.sonatype.com/en/sonatype-nexus-repository-system-requirements.html
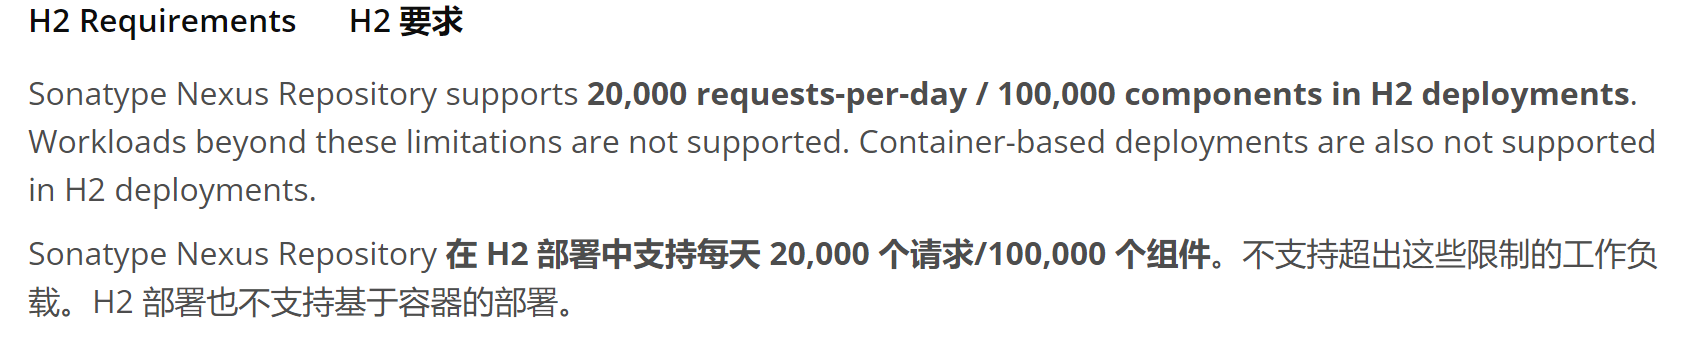
不过也不用担心,10W个组件一般用不了;目前我们研发部几个部门公用才5W多的组件

至于20000个请求一般来说也不会超过,而且超过只是对性能有影响。
三、资源配置
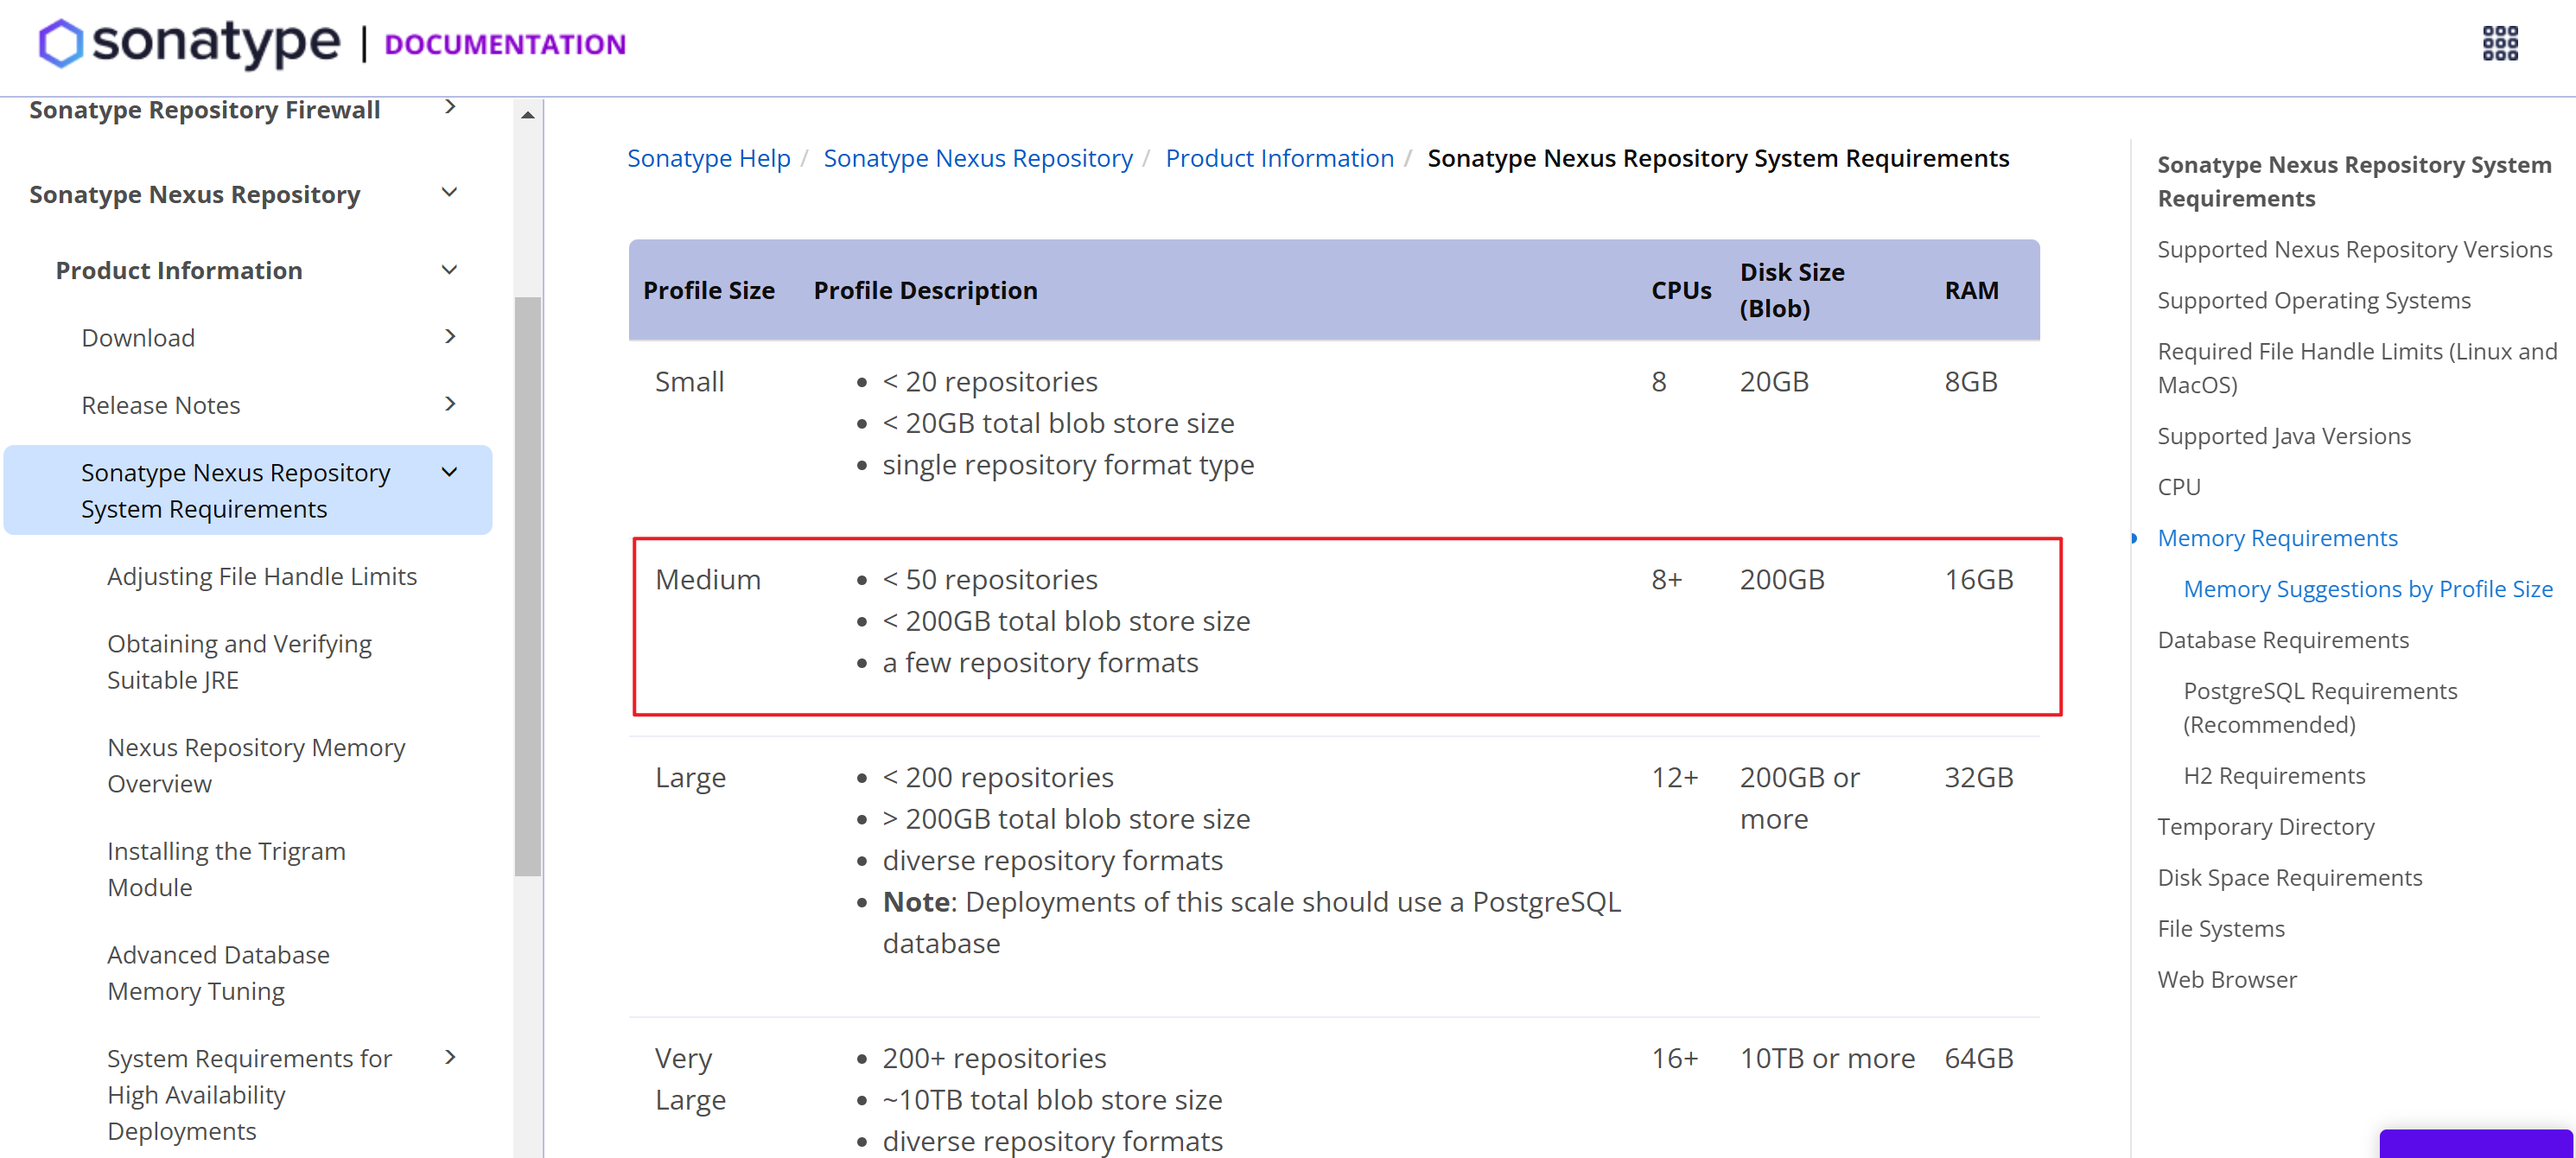
CPU: 8核
内存: 16 GB
磁盘: 300 GB
sda[系统盘] 100GB, 默认分区
sdc[数据盘] 200GB 挂载点 /data
四、开始部署
4.1 部署jdk17
4.2 离线部署nexus
4.2.1 下载
下载地址: https://download.sonatype.com/nexus/3/nexus-3.73.0-12-unix.tar.gz

4.2.2 部署
1. 上传到服务器

2. 解压
tar -zxf nexus-3.73.0-12-unix.tar.gz -C /opt
3. 添加用户
# 添加用户
groupadd nexus
useradd -r -g nexus -s /bin/false nexus
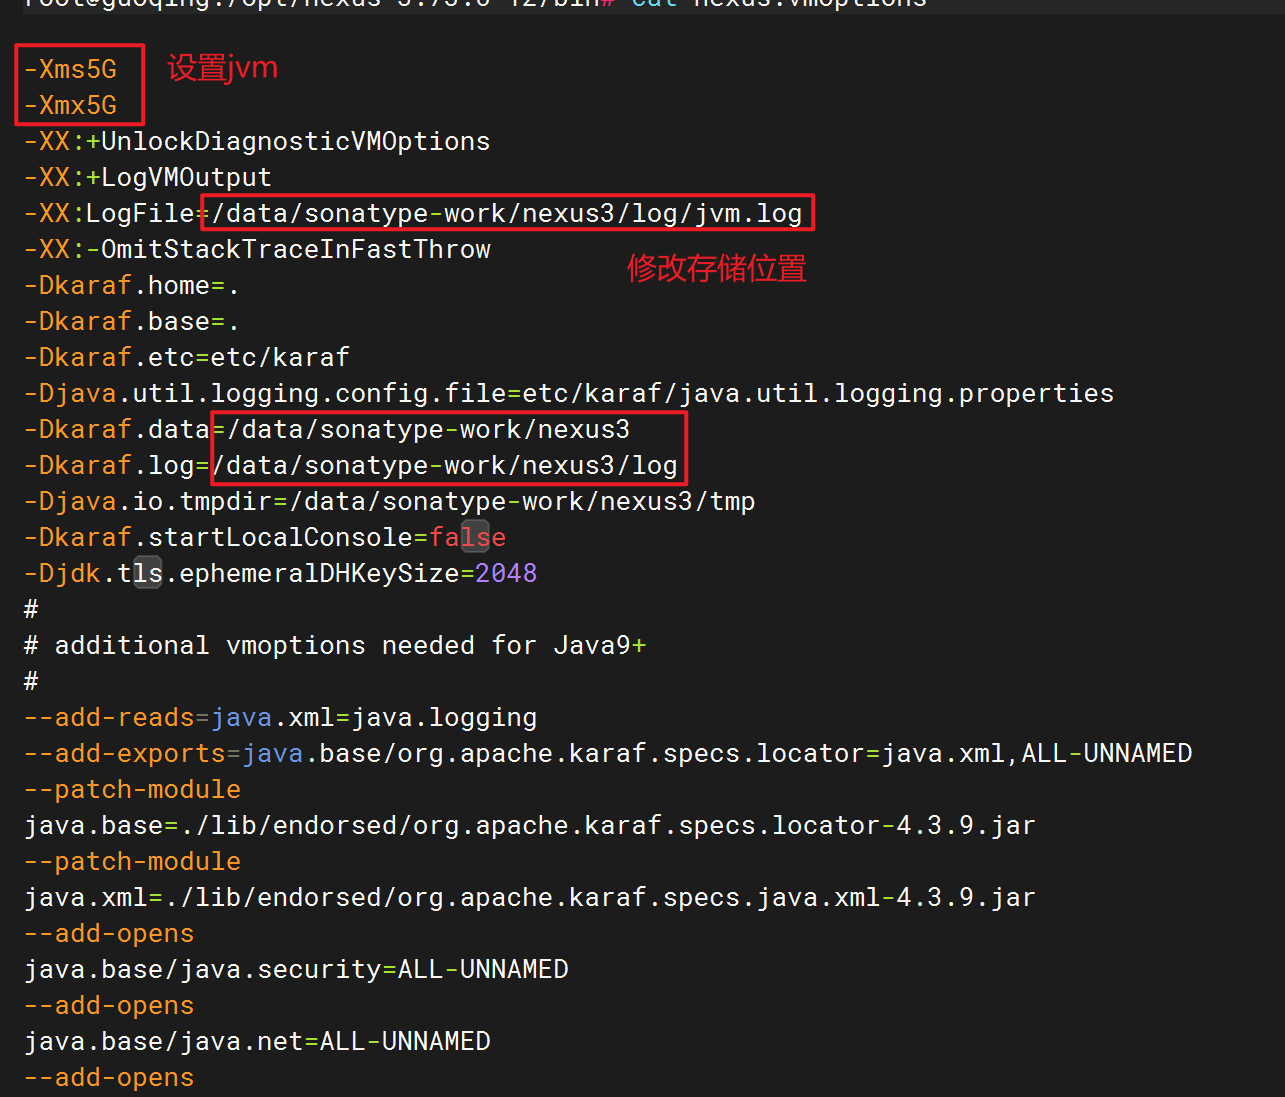
4. 修改启动参数
如何修改jvm参数,可参考官方文档: Nexus Repository Memory Overview

vim /opt/nexus-3.73.0-12/bin/nexus.vmoptions
5. 迁移sonatype-work ,并授权
mkdir /data && mv /opt/sonatype-work/ /data
chown -R nexus:nexus /data/sonatype-work
chown -R nexus:nexus /opt/nexus-3.73.0-12
6. 创建软链接
ln -s /opt/nexus-3.73.0-12/bin/nexus /etc/init.d/nexus
7. 创建nexus.service
vim /etc/systemd/system/nexus.service
[Unit]
Description=nexus service
After=network.target

[Service]
Type=forking
LimitNOFILE=65536
Environment="JAVA_HOME=/usr/share/jdk-17.0.12"
ExecStart=/etc/init.d/nexus start
ExecStop=/etc/init.d/nexus stop
User=nexus
Restart=on-abort
TimeoutSec=600

[Install]
WantedBy=multi-user.target
注: 如果你的java环境配置在了/etc/profile中,nexus是没有权限获取到的,启动会报错; 所以在启动脚本中指定了JAVA_HOME的地址;
激活服务
systemctl daemon-reload
systemctl enable nexus.service
systemctl start nexus.service
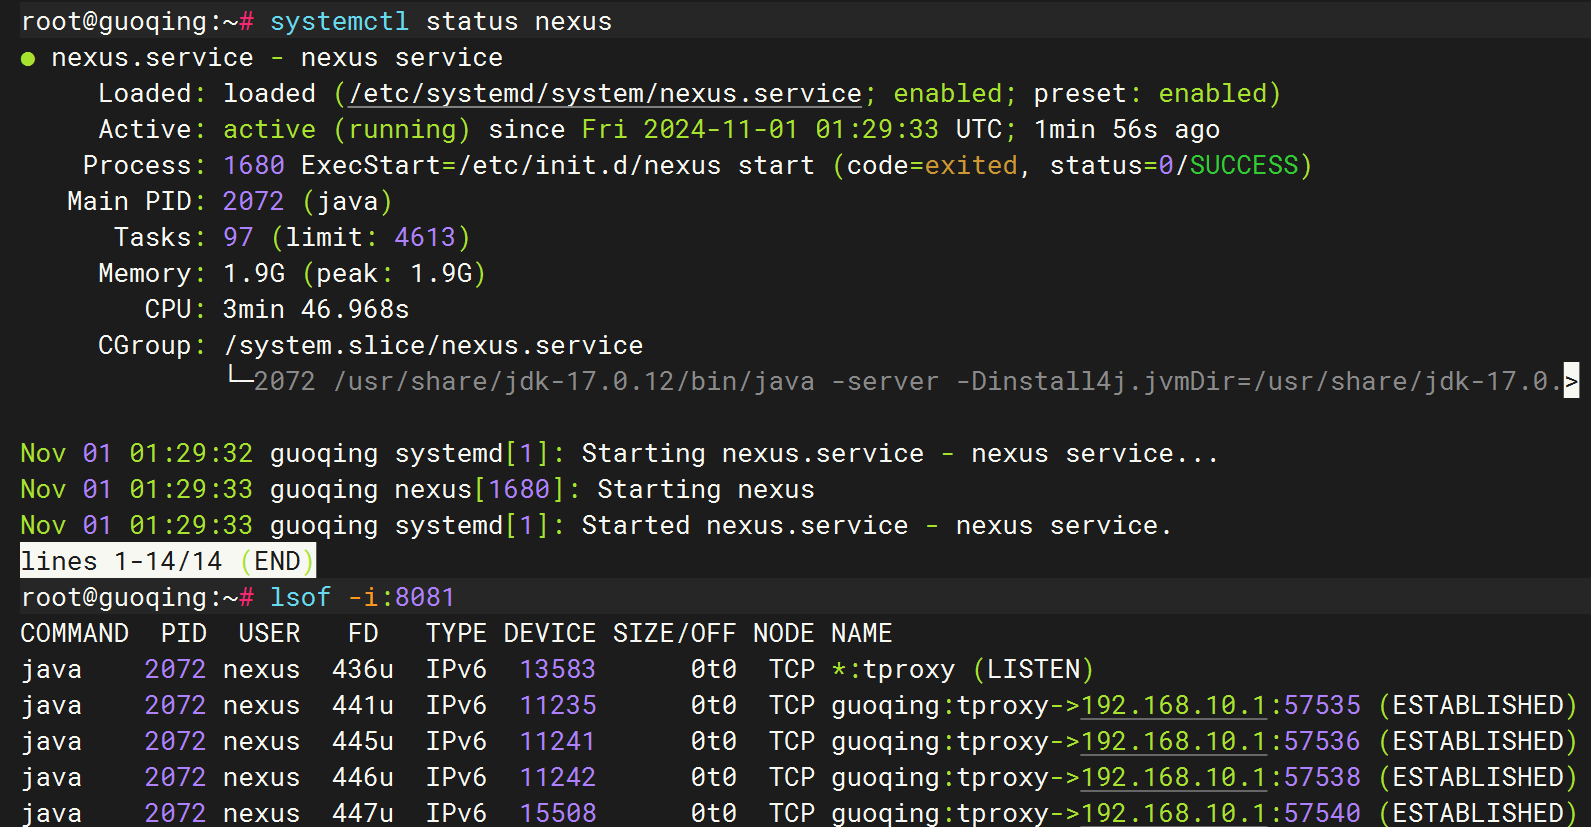
启动大概2~3分钟

启动成功;
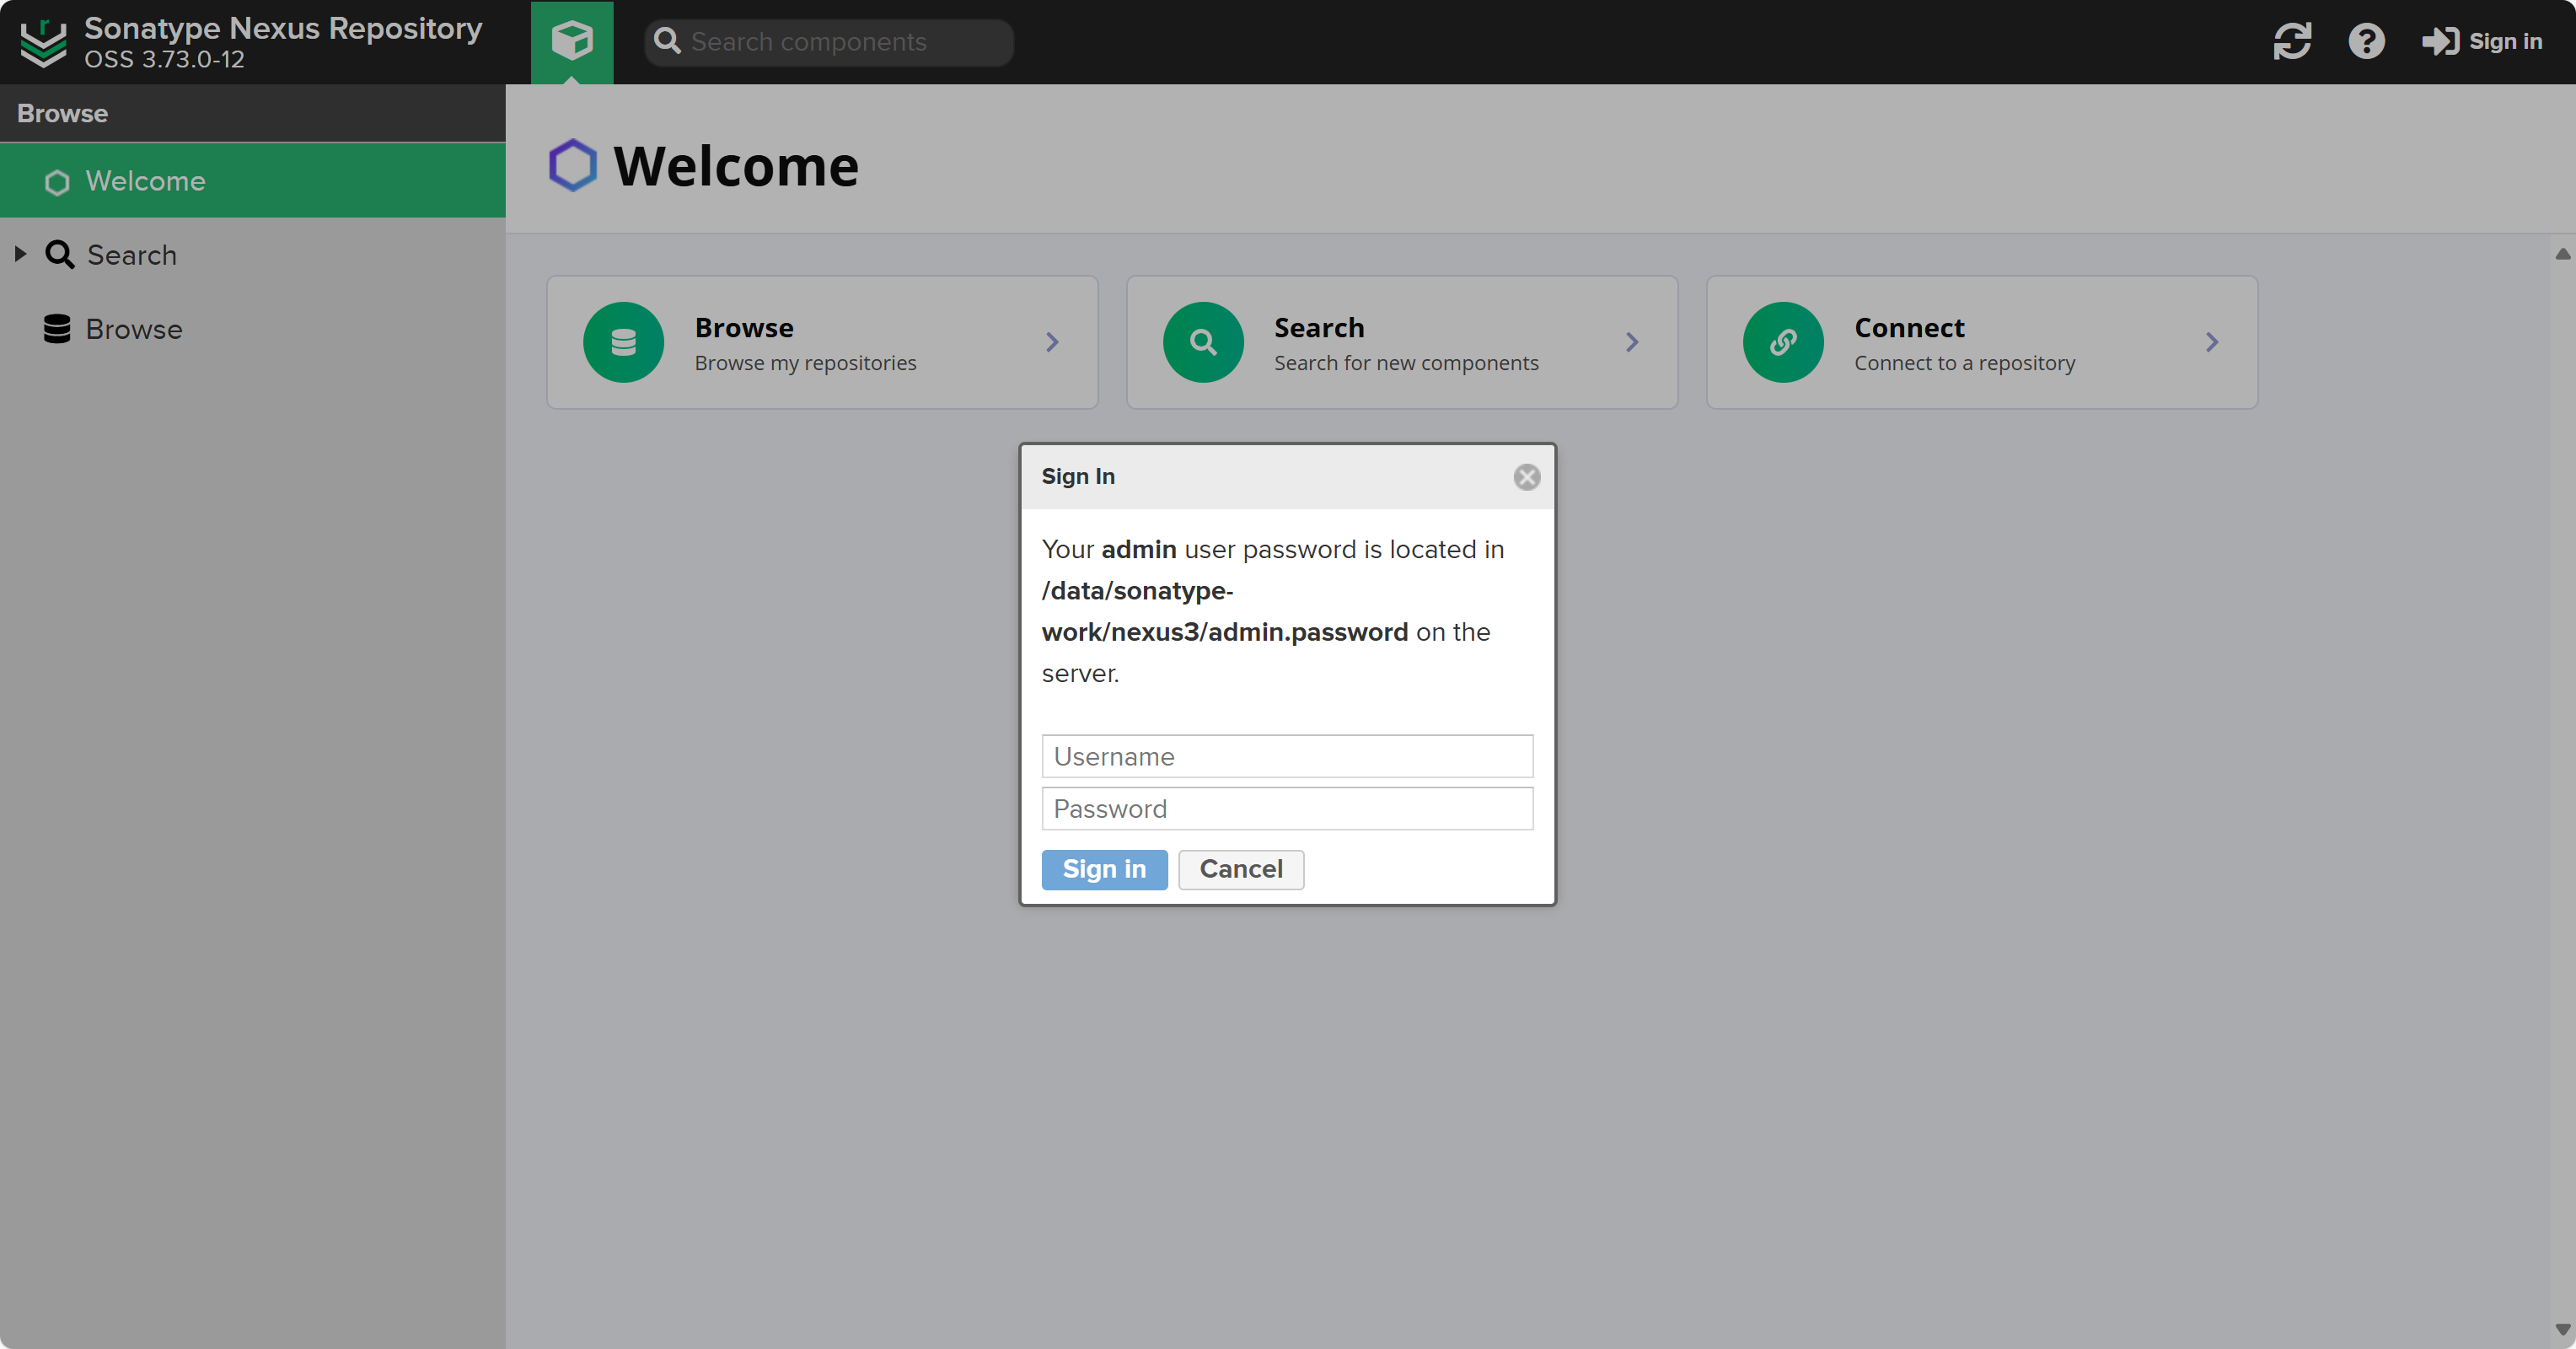
五、登录
访问 http://ip:8081
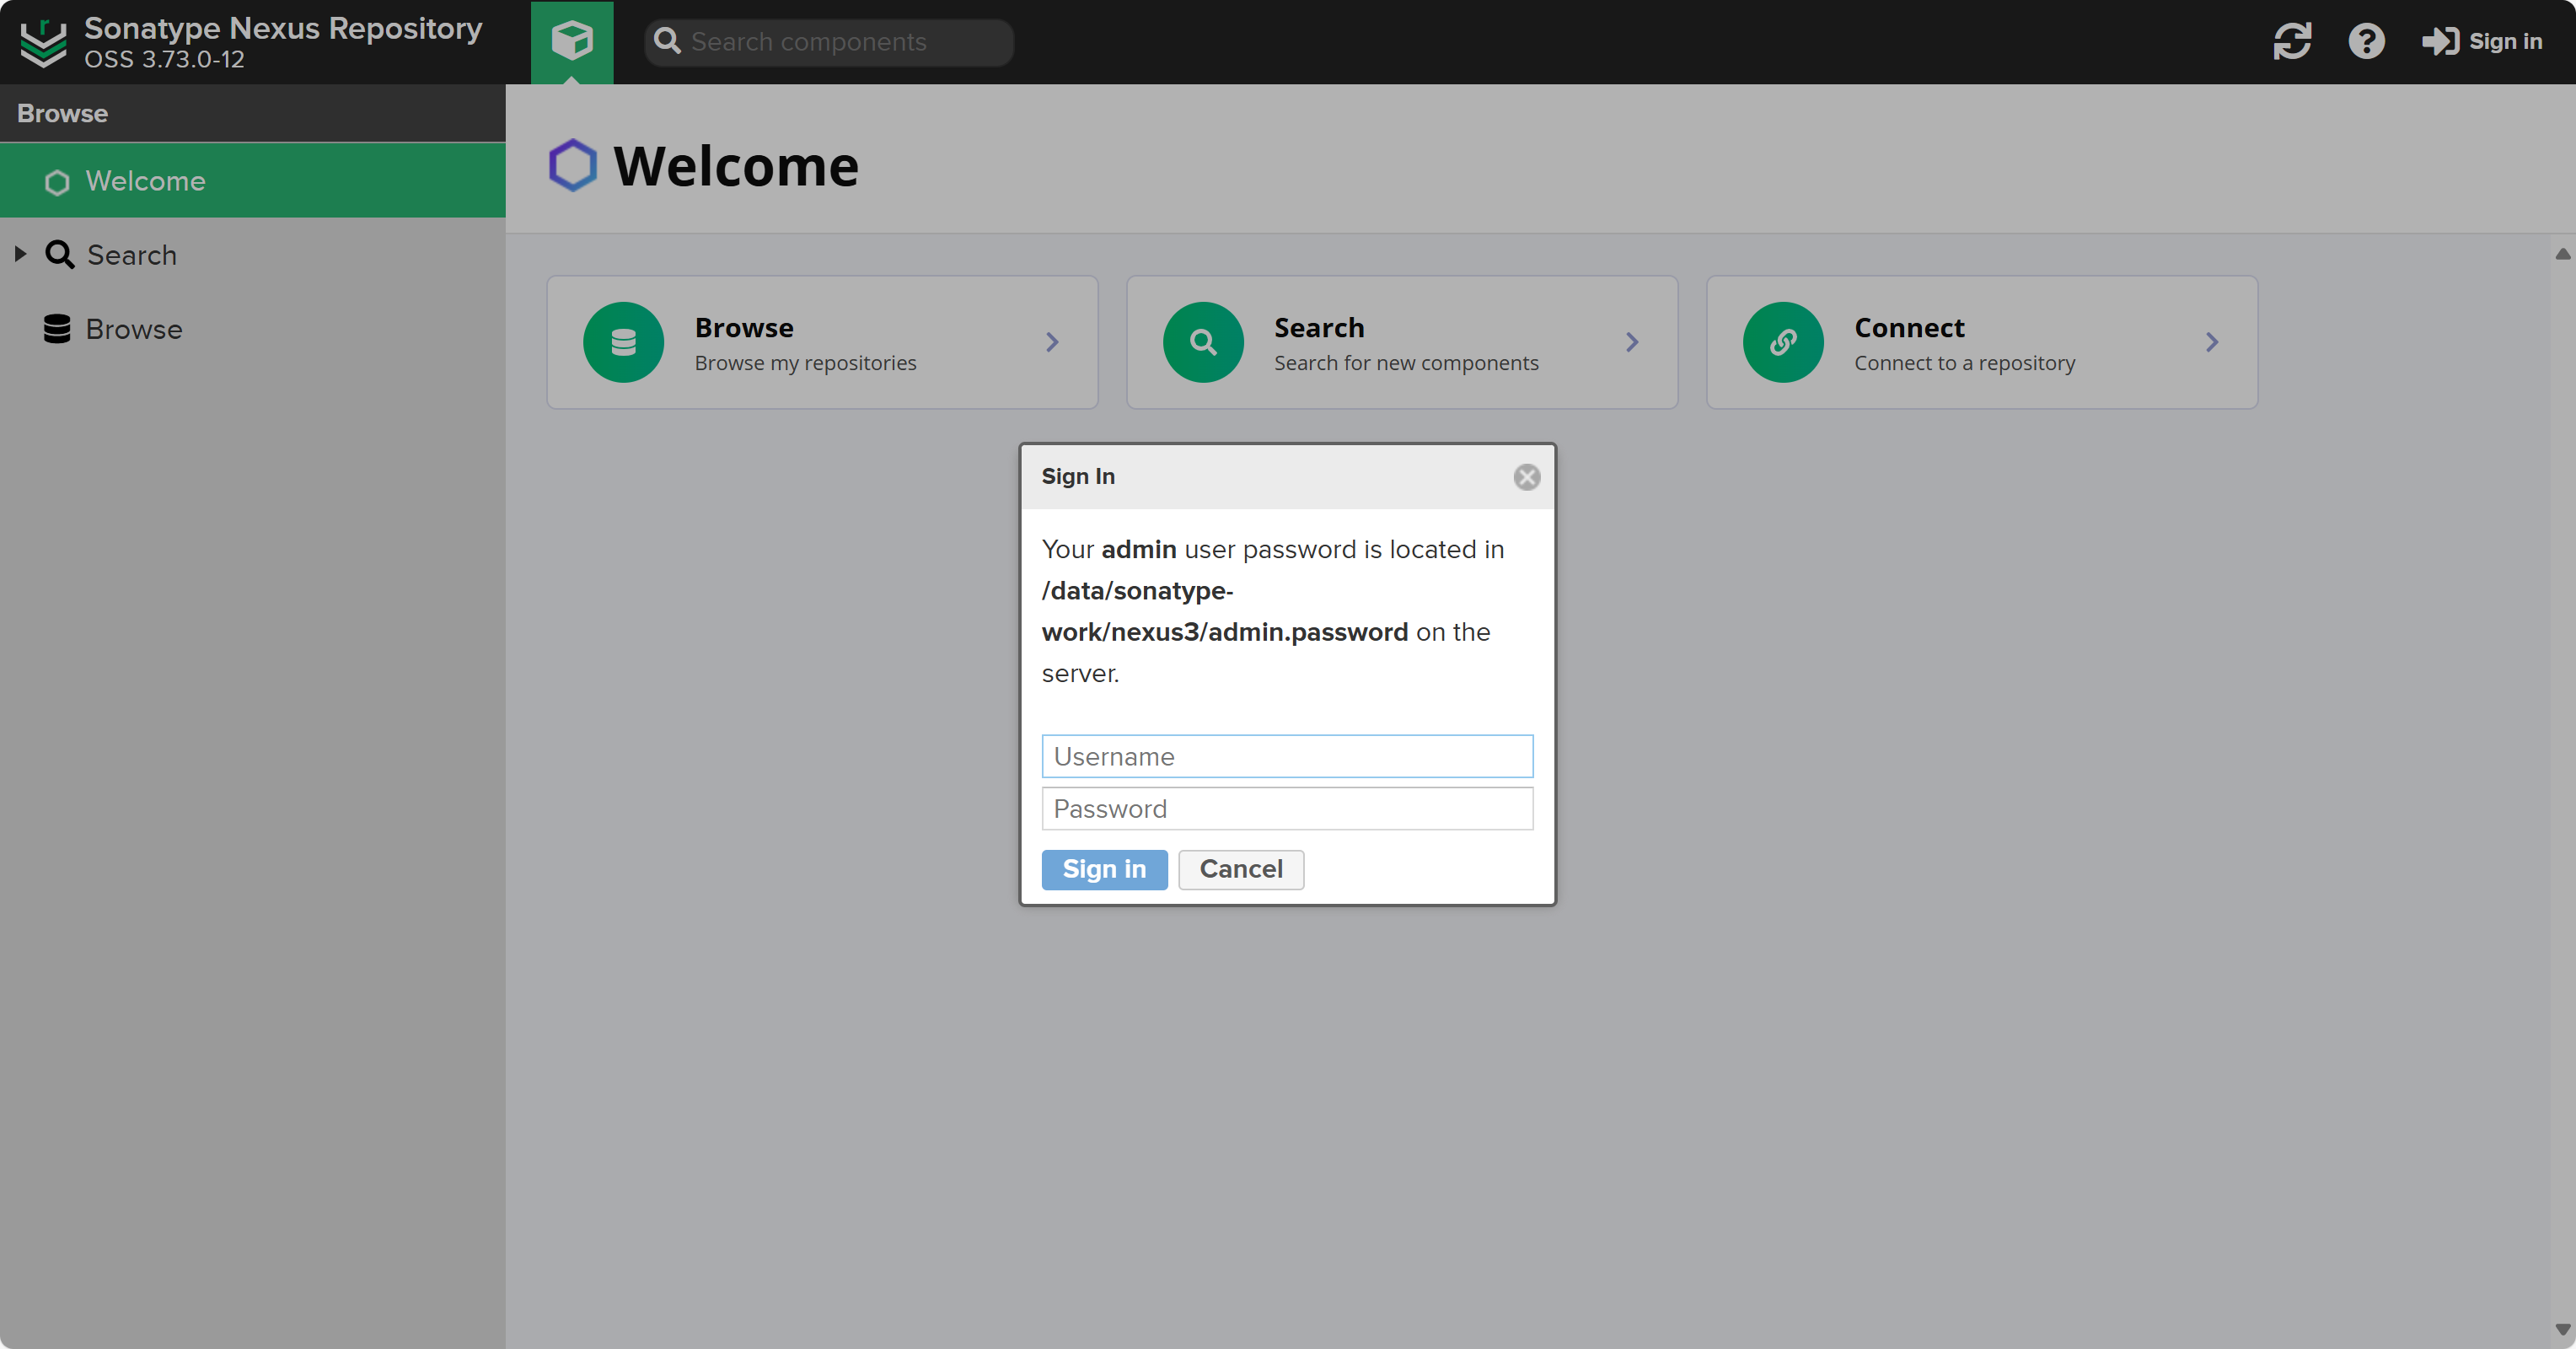
5.1 获取初始化密码:
cat /data/sonatype-work/nexus3/admin.password
登录后让你修改密码;
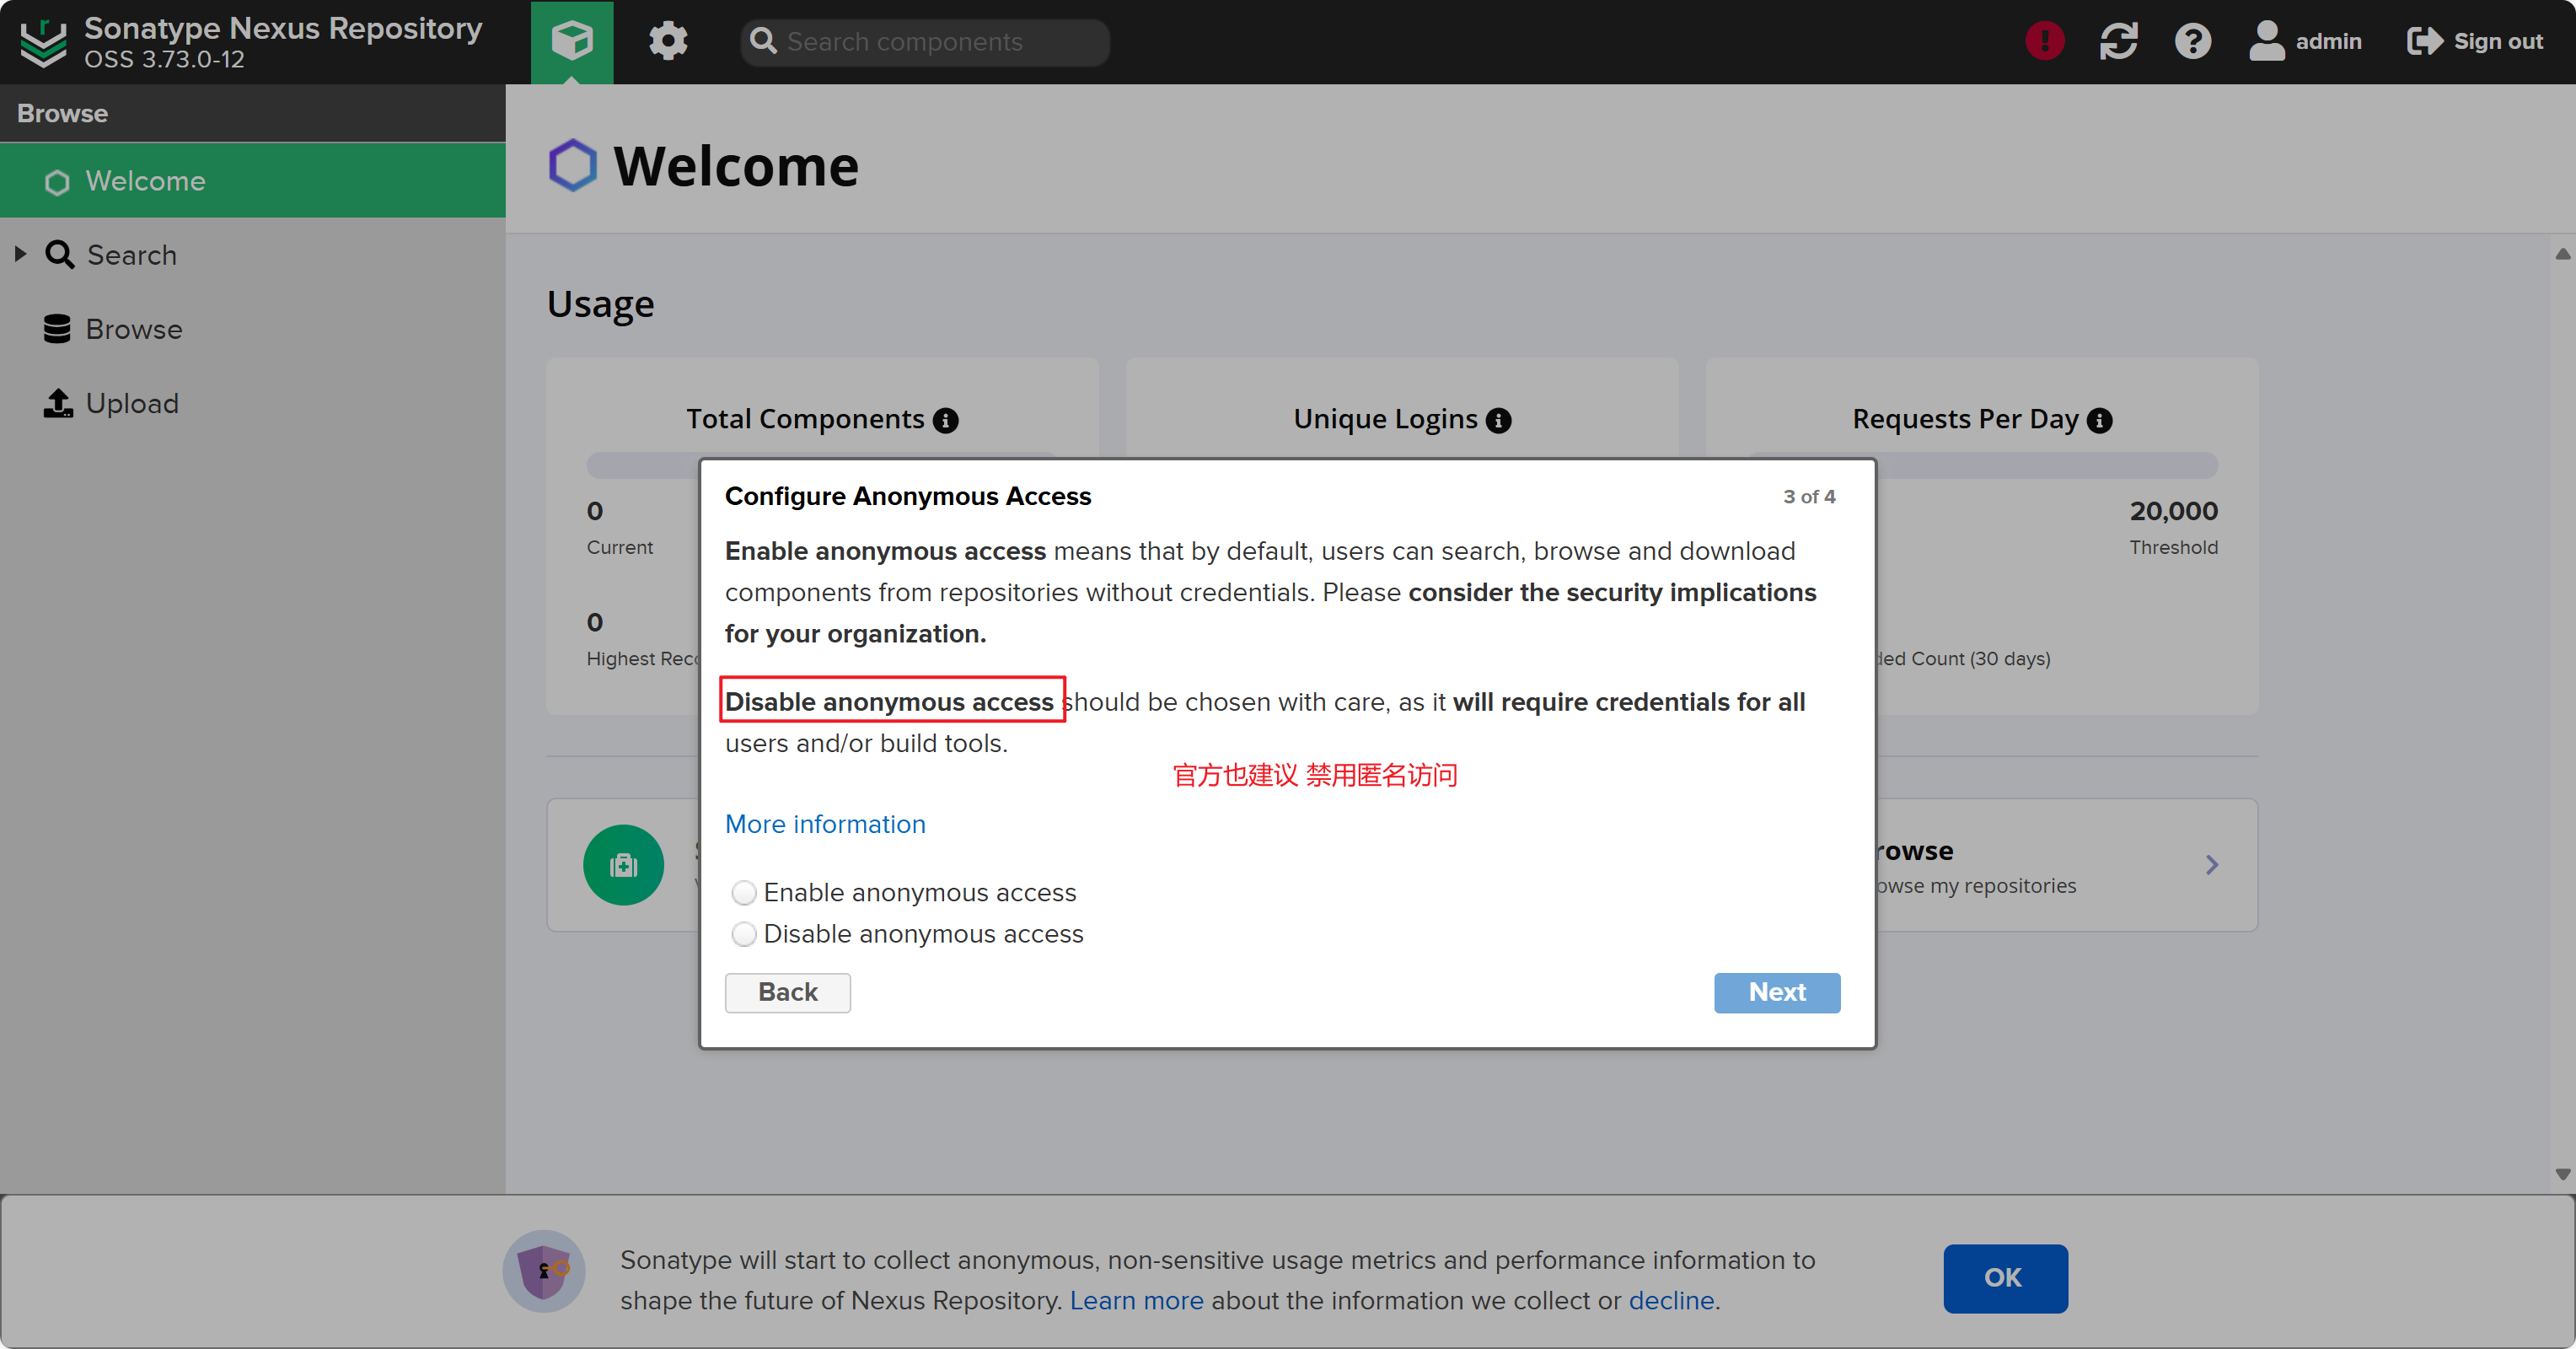
5.2 禁用匿名访问
5.3 Nexus was not configured with an encryption key and is using the Default key
登录进去你会发现有告警;
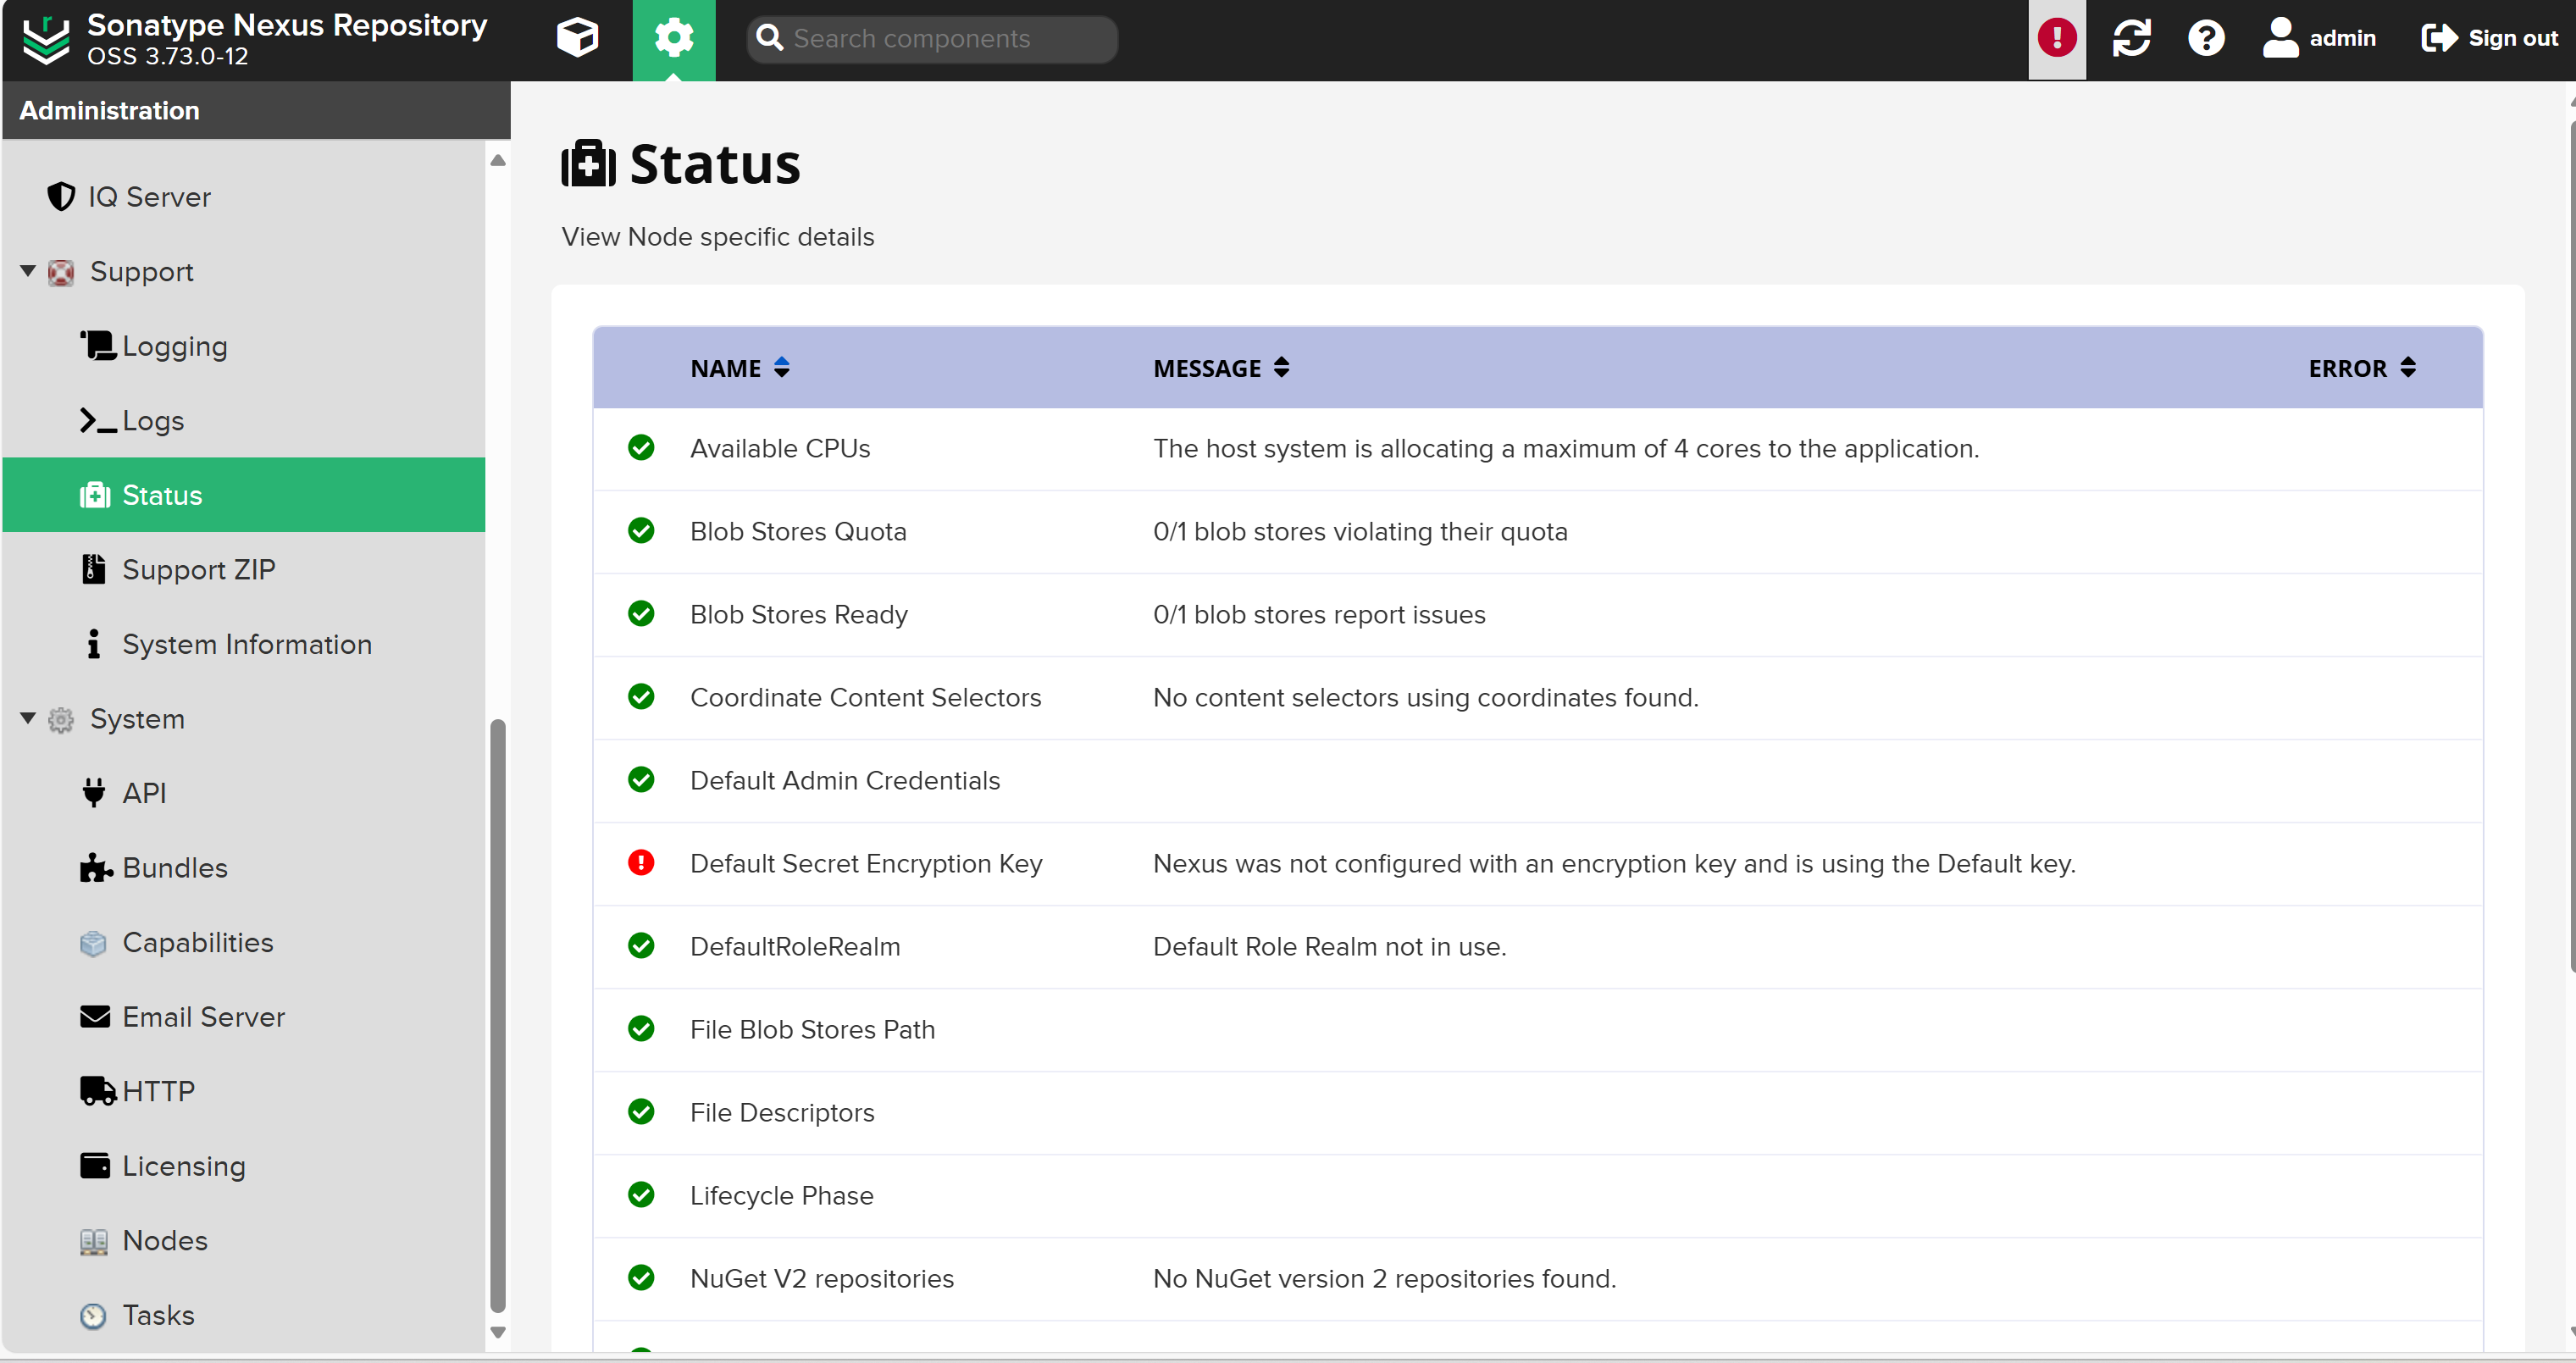
这个告警在官网中也有说明
Re-encryption in Nexus Repository
这是nexus 3.73.0+ 为了增强安全性,让修改密钥。
官网中有详细步骤;以下是处理步骤
5.3.1 创建 JSON 密钥文件
mkdir -p /usr/local/secrets && vim /usr/local/secrets/file.json
填写以下内容:
{
  "active": "nexus-private-newkey123",
  "keys": [
    {
      "id": "nexus-private-newkey123",
      "key": "JavaOpsPro"
    }
  ]
}
注: active中的值与 keys中的id要对应
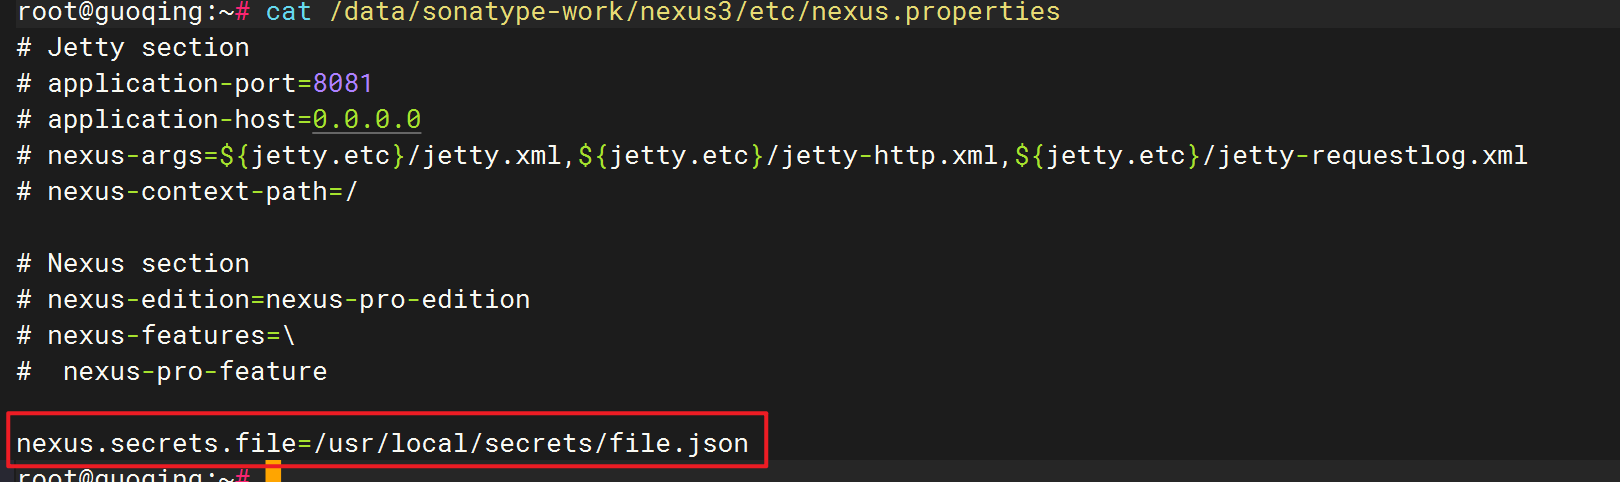
5.3.2 启用重新加密
找到并打开 /data/sonatype-work/nexus3/etc/nexus.properties 文件
添加 nexus.secrets.file 属性并将其设置为指向密钥 JSON 文件的完整路径
nexus.secrets.file=/usr/local/secrets/file.json
5.3.3 通过 API 创建重新加密任务
打开网站,F12 随便刷新一个页面,找到请求接口;找到请求头中的token
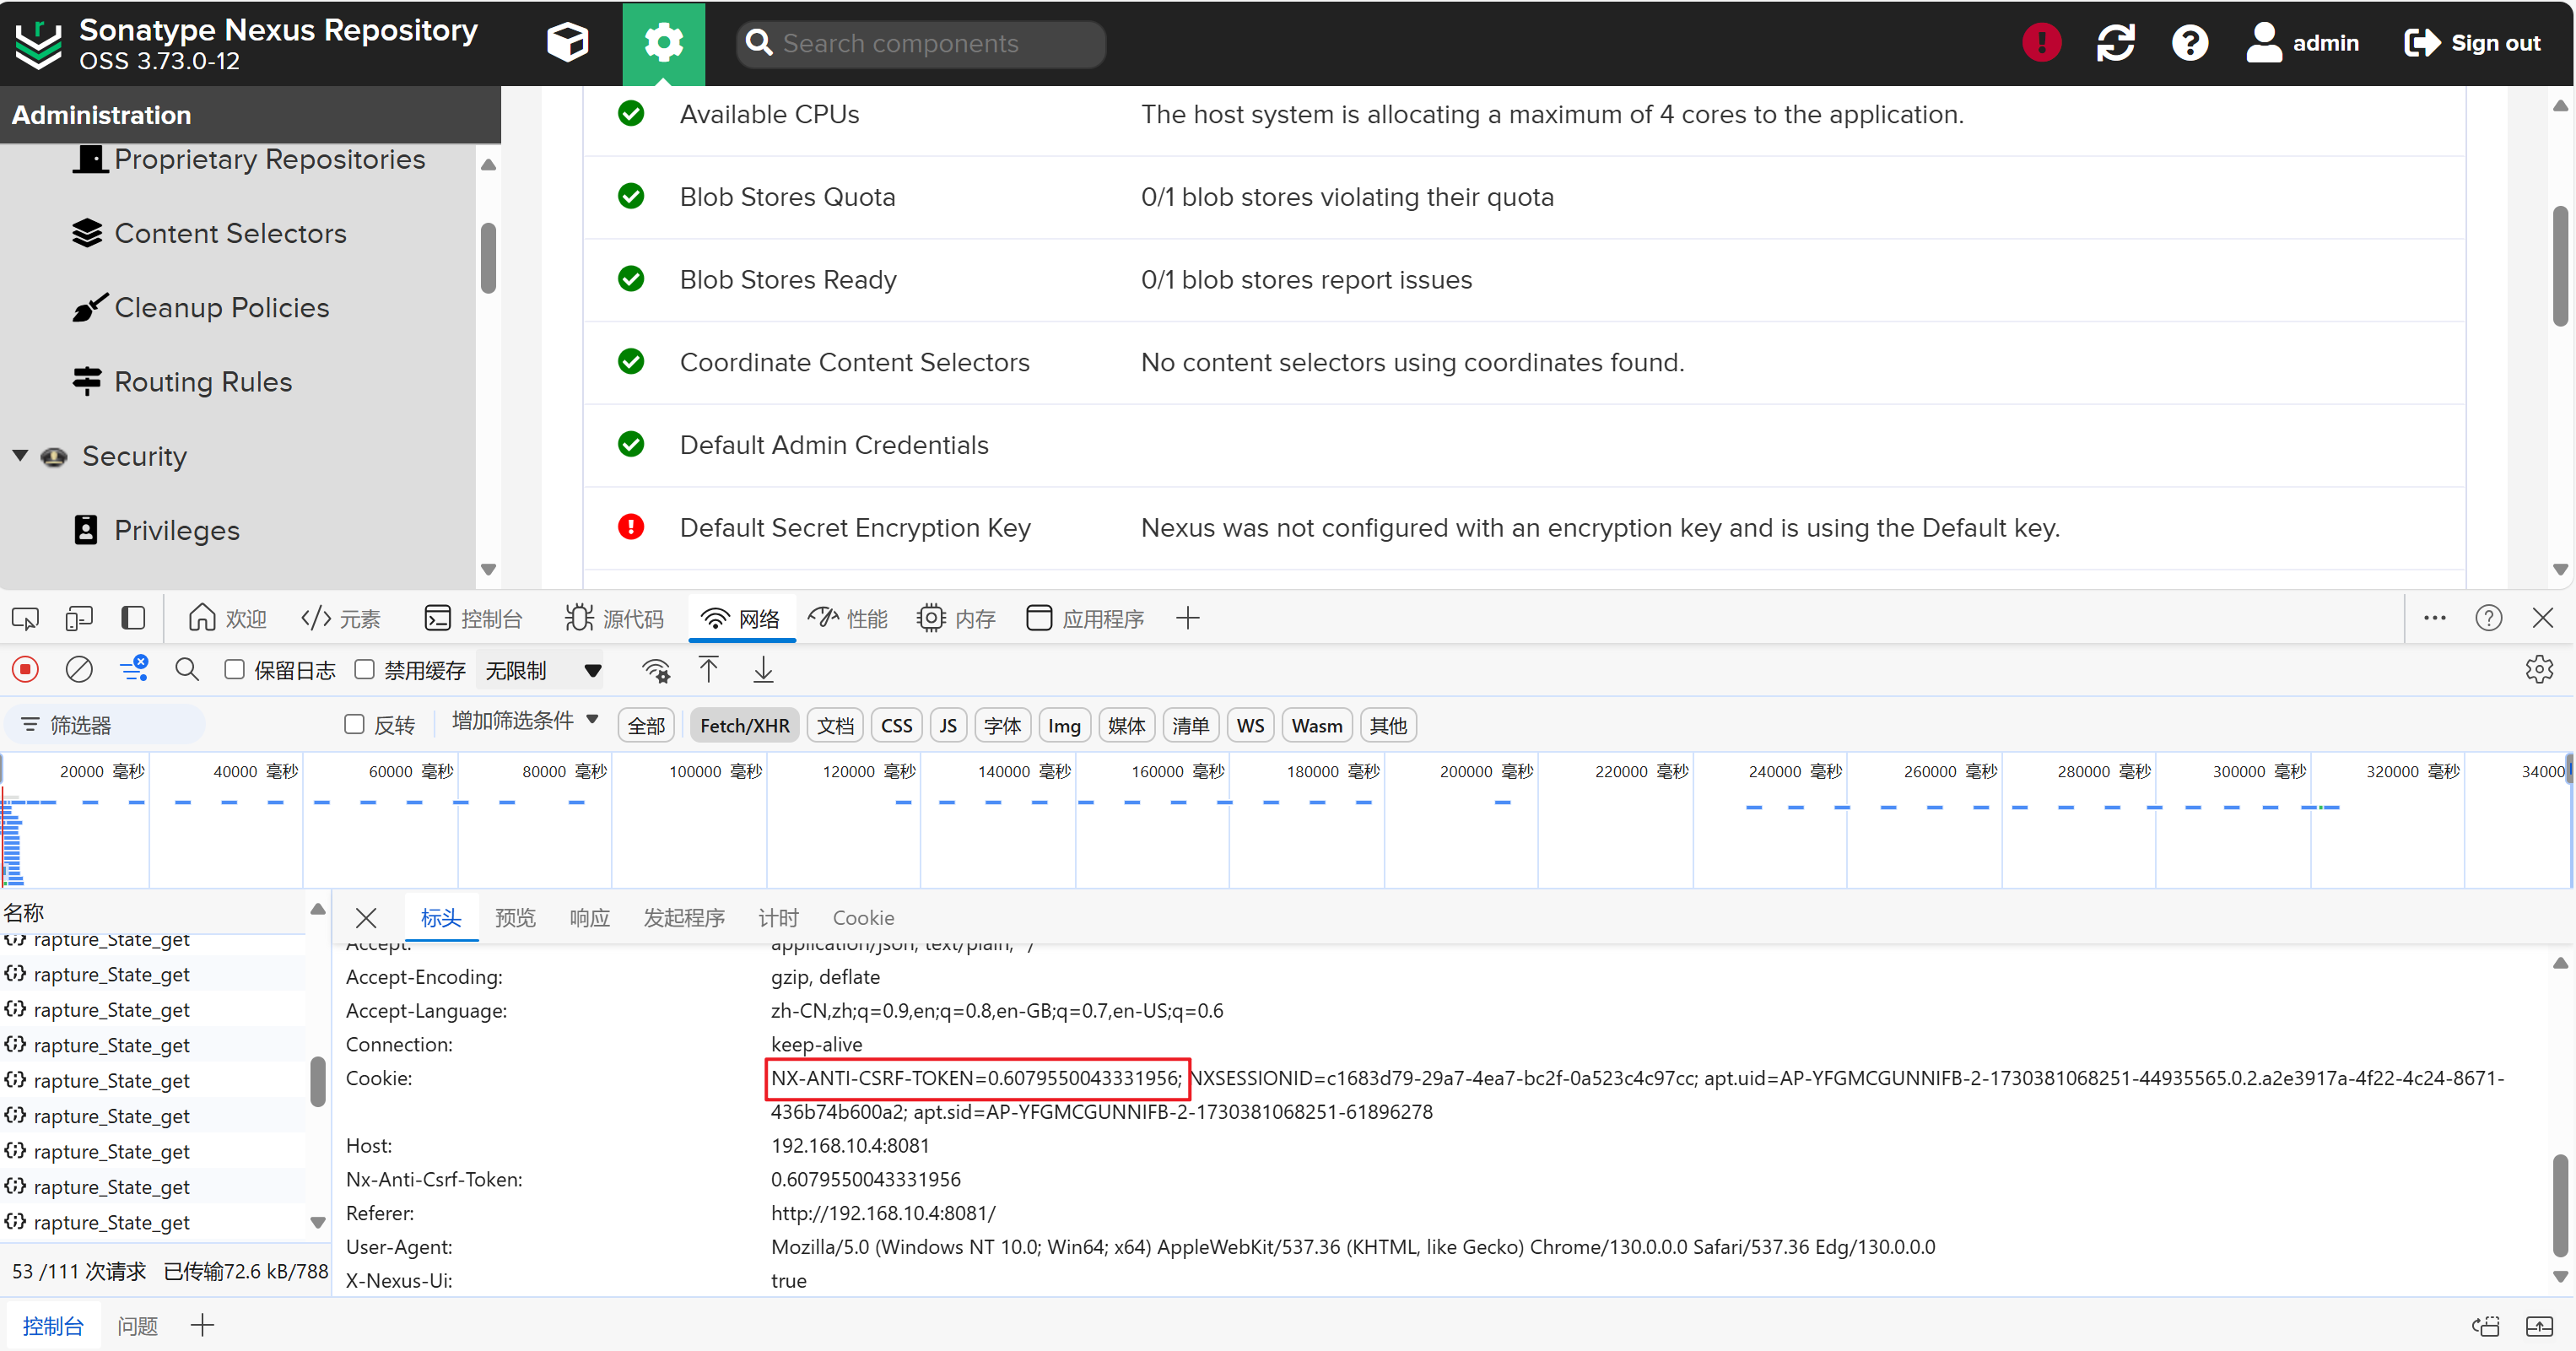
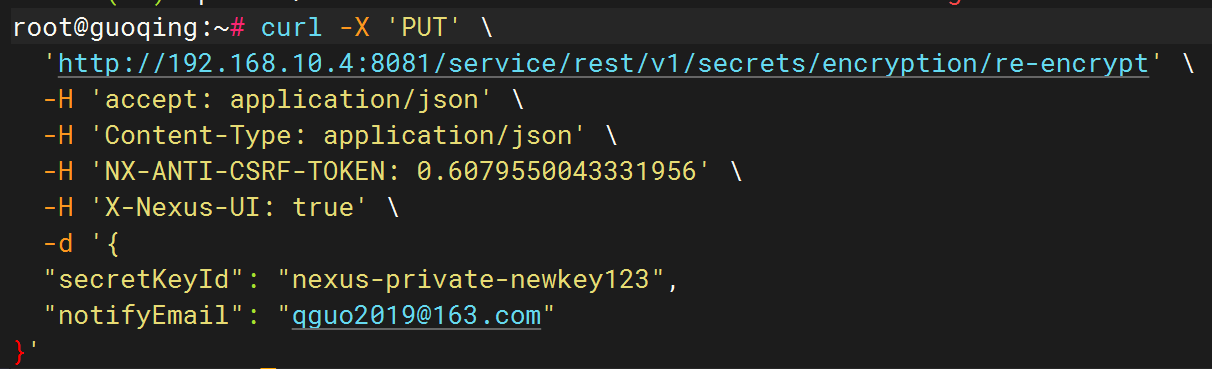
curl -X 'PUT' \
  'http://192.168.10.4:8081/service/rest/v1/secrets/encryption/re-encrypt' \
  -H 'accept: application/json' \
  -H 'Content-Type: application/json' \
  -H 'NX-ANTI-CSRF-TOKEN: 0.6079550043331956' \
  -H 'X-Nexus-UI: true' \
  -d '{
  "secretKeyId": "nexus-private-newkey123",
  "notifyEmail": "qguo2019@163.com"
}'
5.3.4 重启nexus
systemctl restart neuxs
这步重启也可在5.3.2 后做;官网中没说需要重启,但实践后发现必须重启;否则不生效。
重启后重新登录并验证。

部署完成!
六、快速部署脚本
提供一个快速部署脚本,方便运维人员快速部署使用。请注意环境和版本,适当修改。
6.1 上传安装包

6.2 部署脚本deploy_nexus.sh
#!/bin/bash

# 定义变量
NEXUS_VERSION="3.73.0-12"
JDK_VERSION="17.0.12"
NEXUS_PACKAGE="nexus-${NEXUS_VERSION}-unix.tar.gz"
JDK_PACKAGE="jdk-${JDK_VERSION}_linux-x64_bin.tar.gz"
INSTALL_DIR="/opt"
DATA_DIR="/data"
NEXUS_SERVICE_FILE="/etc/systemd/system/nexus.service"
JAVA_HOME="/usr/share/jdk-${JDK_VERSION}"

# 检查是否为root用户
if [ $EUID -ne 0 ]; then
   echo "脚本必须使用root用户执行"
   exit 1
fi

# 检查Nexus安装包是否存在
if [ ! -f "${NEXUS_PACKAGE}" ]; then
    echo "Nexus安装包 ${NEXUS_PACKAGE} 不存在,请确保已将安装包放置在当前目录。"
    exit 1
fi

# 检查JDK安装包是否存在
if [ ! -f "${JDK_PACKAGE}" ]; then
    echo "JDK安装包 ${JDK_PACKAGE} 不存在,请确保已将安装包放置在当前目录。"
    exit 1
fi

# 安装JDK
if [ ! -d "${JAVA_HOME}" ]; then
    tar -zxf "${JDK_PACKAGE}" -C /usr/share/
fi

# 部署Nexus安装包
tar -zxf "${NEXUS_PACKAGE}" -C "${INSTALL_DIR}"

# 添加用户nexus
groupadd nexus
useradd -r -g nexus -s /bin/false nexus

# 修改启动参数,按照官方推荐的配置
sed -i 's|-Xms2703m|-Xms5G|g' "${INSTALL_DIR}/nexus-${NEXUS_VERSION}/bin/nexus.vmoptions"
sed -i 's|-Xmx2703m|-Xmx5G|g' "${INSTALL_DIR}/nexus-${NEXUS_VERSION}/bin/nexus.vmoptions"
sed -i 's|../sonatype-work|/data/sonatype-work|g' "${INSTALL_DIR}/nexus-${NEXUS_VERSION}/bin/nexus.vmoptions"

# 移动sonatype-work,并授权
mkdir -p "${DATA_DIR}"
mv "${INSTALL_DIR}/sonatype-work/" "${DATA_DIR}"
chown -R nexus:nexus "${DATA_DIR}/sonatype-work"
chown -R nexus:nexus "${INSTALL_DIR}/nexus-${NEXUS_VERSION}"

# 创建软链接
ln -s "${INSTALL_DIR}/nexus-${NEXUS_VERSION}/bin/nexus" /etc/init.d/nexus

# 创建nexus.service,明确指定JAVA_HOME路径
cat <<EOF > "${NEXUS_SERVICE_FILE}"
[Unit]
Description=nexus service
After=network.target

[Service]
Type=forking
LimitNOFILE=65536
Environment="JAVA_HOME=${JAVA_HOME}"
ExecStart=/etc/init.d/nexus start
ExecStop=/etc/init.d/nexus stop
User=nexus
Restart=on-abort
TimeoutSec=600

[Install]
WantedBy=multi-user.target
EOF

# 激活服务
systemctl daemon-reload
systemctl enable nexus.service
systemctl start nexus.service

echo "Nexus部署完成!"
6.3 授权脚本并运行
chmod +x deploy_nexus.sh
./deploy_nexus.sh

6.4启动完成
后续:nexus的配置和使用请参考另一篇博客
Nexus配置手册


 1143
1143

 被折叠的 条评论
为什么被折叠?
被折叠的 条评论
为什么被折叠?
 到【灌水乐园】发言


