


 本文深入讲解了Android中View坐标的概念,包括View在屏幕上的定位原理,如何通过getTop(), getBottom(), getLeft(), getRight()等方法获取View的坐标信息,并通过示例代码展示了实际应用。
各位看官们,大家好,上一回中咱们说的是Android控件之父的例子,这一回咱们说的例子是View的坐标。闲话休提,言归正转。让我们一起Talk Android吧!
看官们,提到坐标大家可能会想起数学中学习过的坐标,View的坐标和此类似,只不过还是有点不同,首先它没有负值,其次它只在两个方向上进行延伸,而且延伸的方向也不同。
为了让大家对坐标有直观的印象,我们绘制了一张对比的图片,请大家参考:
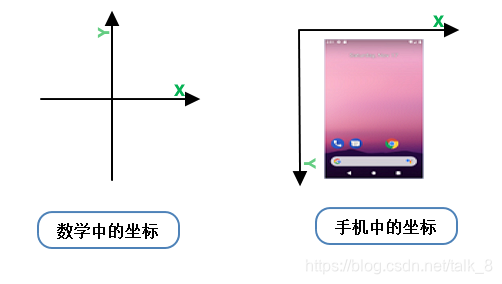
大家在图中,可以看到手机中的坐标是以手机屏幕左上角为原点,向右为X轴方向,向下为Y轴方向(这里只说二维空间)。View的坐标以手机坐标为基础,我们通过View提供的相关方法来获取View在手机屏幕上的坐标。接下来我们介绍这些方法。
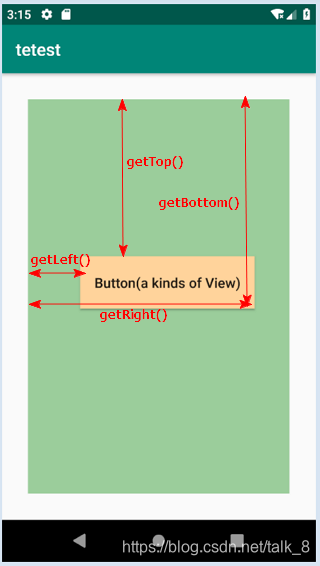
getTop():      获取view顶部到它所在布局顶部的距离,单位为像素(px);
getBottom():   获取view底部到它所在布局顶部的距离,单位为像素(px);
getLeft():     获取view左边到它所在布局左边的距离,单位为像素(px);
getRight():    获取view右边到它所在布局左边的距离,单位为像素(px);
这么说大家肯定有点绕口令的感觉,接下来我们通过文字结合代码的方式来给大家进行演示:
- 1.创建一个Activity并且包含布局文件;
- 2.在布局文件中创建一个Button,把它当作View;
- 3.在布局文件中创建一个TextView,它用来显示View坐标的结果;
- 4.在Activity的onCreate方法中为Button设置点击事件监听器,在监听器中获取Button的坐标,并且通过TextView显示出来;
下面是具体的代码,请大家参考:
<?xml version="1.0" encoding="utf-8"?>
//对应步骤1.使用LinearLayout布局,并且把它当作View(这里使用Button当作View)所在的布局
<LinearLayout xmlns:android="http://schemas.android.com/apk/res/android"
    xmlns:app="http://schemas.android.com/apk/res-auto"
    xmlns:tools="http://schemas.android.com/tools"
    android:orientation="vertical" //布局中的内容垂直排列
    android:background="@color/colorGreen" //布局背景设置为绿色,方便观察
    //布局的边距都为30dp,这样与手机屏幕有了间隔,便于观察
    android:layout_marginLeft="30dp"
    android:layout_marginTop="30dp"
    android:layout_marginRight="30dp"
    android:layout_marginBottom="30dp"
    android:layout_width="match_parent"
    android:layout_height="match_parent"
    tools:context=".Activity2">

//对应步骤2,把它当作View来演示,为了便于观察,给它指定了固定的长度和宽度,背景色设置为纸黄色,而且把它的位置调整到了屏幕中间
    <Button
        android:id="@+id/btn_of_activity2"
        android:layout_width="200dp"
        android:layout_height="60dp"
        android:layout_marginLeft="60dp"
        android:layout_marginTop="180dp"
        android:background="@color/colorYellow"
        android:gravity="center"
        android:text="Button(a kinds of View)"
        android:textAllCaps="false"
        android:textSize="16sp" />
//对应步骤3,用来显示View坐标的结果
    <TextView
        android:id="@+id/tv_of_activity2"
        android:gravity="center"
        android:layout_width="match_parent"
        android:layout_height="wrap_content" />
</LinearLayout>
//对应步骤4
public class Activity2 extends AppCompatActivity {
    private Button mButton;
    private TextView mTextView;
    private String result;

    int getTopValue = 0;
    int getBottonValue = 0;
    int getLeftValue = 0;
    int getRightValue = 0;
    int highOfButton = 0;
    int widthOfButton = 0;

    @Override
    protected void onCreate(Bundle savedInstanceState) {
        super.onCreate(savedInstanceState);
        setContentView(R.layout.activity_2);
        mTextView = (TextView)findViewById(R.id.tv_of_activity2) ;
        mButton = (Button)findViewById(R.id.btn_of_activity2);

        mButton.setOnClickListener(new View.OnClickListener() {
            @Override
            public void onClick(View v) {
                getTopValue = mButton.getTop();
                getBottonValue = mButton.getBottom();
                getLeftValue = mButton.getLeft();
                getRightValue = mButton.getRight();
                highOfButton = mButton.getHeight();
                widthOfButton = mButton.getWidth();

               result = "getTop: "+getTopValue
                       +" getBottom: "+getBottonValue+"\n"
                       +" getLeft: "+getLeftValue
                       +" getRight: "+getRightValue+"\n"
                       +" hight: "+highOfButton
                       +" width: "+widthOfButton;

               mTextView.setText(result);
            }
        });
    }
}
下面是程序的界面效果,为了方便理解各个函数的功能,我把它们放到了程序界面中,大家可以从图中直观地看到各个函数的功能。
下面是程序的运行结果,请大家参考:
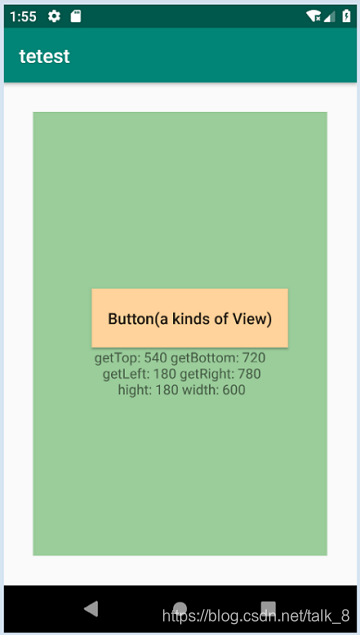
这时有看官说:程序的运行结果不对呀,它的值怎么比布局文件中的数值大那么多呢?看官们,请大家相信程序运行结果是正确的,具体的原因我们在下一章回中分析。
各位看官,关于Androd中View坐标的例子咱们就介绍到这里,欲知后面还有什么例子,且听下回分解!


 1744
1744

 被折叠的 条评论
为什么被折叠?
被折叠的 条评论
为什么被折叠?
 到【灌水乐园】发言


