


一、场景引入
想象这个场景:你需要临时使用一个接口或父类的某个方法,但只想用一次。
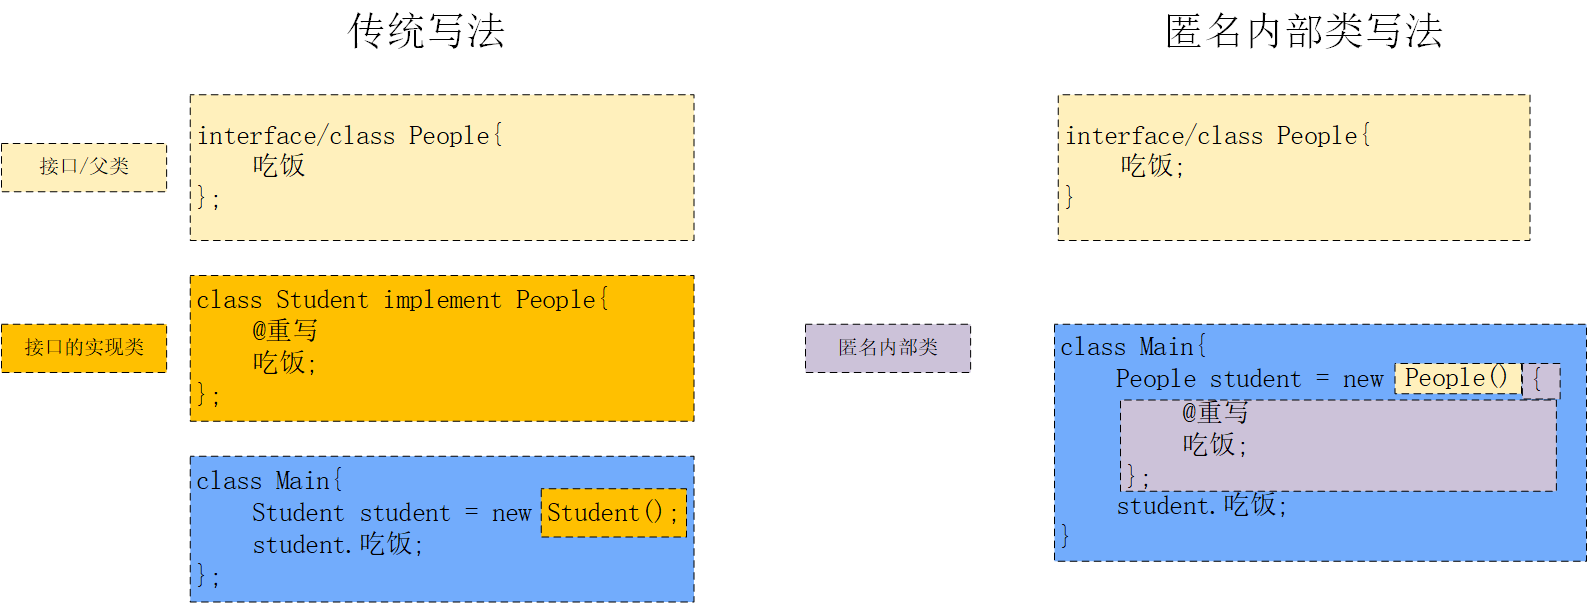
传统做法:
// People接口
interface People {
    void eat();
}
// 写一个实现类Student实现接口People
public class Student implements People{
    @Override
    public void eat(){
        System.out.println("正在吃东西...");
    }
}
// main类中创建student对象,调用eat
public class Main {
    public static void main(String[] args) {
        Student student = new Student();
        student.eat();
    }
}
为了一个简单的方法调用,需要额外创建一个类文件,既麻烦又让代码变得冗长。
匿名内部类解决方案:
// People接口
interface People {
    void eat();
}
public class Main {
    public static void main(String[] args) {

        // 使用匿名内部类实现People接口
        People person = new People() {
            @Override
            public void eat() {
                System.out.println("正在吃东西...");
            }

        };

        // 调用接口方法
        person.eat(); // 输出: 正在吃东西...
    }
}
它的语法如下

二、什么是匿名内部类
匿名内部类是没有名字的内部类,它在声明的同时就创建了唯一的一个对象。由于Java不允许外部类没有名字,所以匿名类一定是内部类。
核心特性:
-
🚫 没有类名
-
🎯 随声明随创建,只有这一个对象
-
🔒 无法重复使用,专为一次性场景设计
三、基本特点
1. 必须基于一个父类或接口
写法如下
// 必须继承类或实现接口
父类/接口 变量名 = new 父类/接口() {
    // 实现或重写方法
};
2. 即声明即使用
// 声明时直接创建对象,立即可用
Thread thread = new Thread(new Runnable() {
    @Override
    public void run() {
        System.out.println("线程运行中");
    }
});
thread.start();
四、使用场景
1. 事件监听器(最常用) 🎯
在GUI编程中,匿名内部类广泛用于事件处理:
// Swing GUI中的按钮点击事件
JButton button = new JButton("点击我");
button.addActionListener(new ActionListener() {
    @Override
    public void actionPerformed(ActionEvent e) {
        System.out.println("按钮被点击了!");
        // 处理点击事件的逻辑
    }
});

// Android开发中的点击事件
button.setOnClickListener(new View.OnClickListener() {
    @Override
    public void onClick(View v) {
        // 处理点击事件
    }
});
2. 多线程实现 ⚡
创建线程时使用Runnable接口:
// 创建并启动新线程
Thread thread = new Thread(new Runnable() {
    @Override
    public void run() {
        // 线程执行的代码
        for (int i = 0; i < 5; i++) {
            System.out.println("线程执行: " + i);
        }
    }
});
thread.start();
3. 集合排序和比较 📊
使用Comparator进行自定义排序:
List<String> names = Arrays.asList("Alice", "Bob", "Charlie", "David");

// 使用匿名内部类按字符串长度排序
Collections.sort(names, new Comparator<String>() {
    @Override
    public int compare(String s1, String s2) {
        return s1.length() - s2.length();
    }
});

// 或者使用匿名内部类按字母顺序逆序排序
names.sort(new Comparator<String>() {
    @Override
    public int compare(String s1, String s2) {
        return s2.compareTo(s1);
    }
});
4. 回调函数 🔄
在各种框架和库中处理回调:
// 模拟一个异步操作的回调
public void fetchData(Callback callback) {
    // 模拟网络请求
    new Thread(new Runnable() {
        @Override
        public void run() {
            try {
                Thread.sleep(1000); // 模拟延迟
                callback.onSuccess("数据获取成功");
            } catch (InterruptedException e) {
                callback.onError(e);
            }
        }
    }).start();
}

// 使用匿名内部类实现回调接口
fetchData(new Callback() {
    @Override
    public void onSuccess(String data) {
        System.out.println("成功: " + data);
    }

    @Override
    public void onError(Exception e) {
        System.err.println("错误: " + e.getMessage());
    }
});
5. 工厂方法模式 🏭
在需要快速创建对象实例时:
// 创建不同类型的动物
interface Animal {
    void speak();
}

class AnimalFactory {
    public static Animal createAnimal(final String type) {
        return new Animal() {
            @Override
    `        public void speak() {
                if ("dog".equals(type)) {
                    System.out.println("汪汪!");
                } else if ("cat".equals(type)) {
                    System.out.println("喵喵!");
                }
            }
        };
    }
}
6. 测试代码 🧪
在单元测试中快速创建测试对象:
@Test
public void testWithAnonymousClass() {
    // 快速创建一个接口的测试实现
    UserService mockService = new UserService() {
        @Override
        public User findUserById(int id) {
            return new User(id, "测试用户");
        }

        @Override
        public boolean saveUser(User user) {
            return true;
        }
    };

    // 使用mock对象进行测试
    User user = mockService.findUserById(1);
    assertEquals("测试用户", user.getName());
}
为什么这些场景常用?
-
简洁性:避免为只使用一次的类创建单独的类文件
-
封装性:相关代码集中在一起,提高可读性
-
便利性:快速实现,特别适合简单的功能
-
上下文感知:可以直接访问外部类的成员变量和方法


 5225
5225

 被折叠的 条评论
为什么被折叠?
被折叠的 条评论
为什么被折叠?
 到【灌水乐园】发言


