


安装
yum install gcc*

yum install glibc*

yum install nginx     // vim /usr/lib/systemd/system/nginx.service

systemctl start nginx.service

systemctl enable nginx.service

systemctl list-unit-files|grep nginx

vim /etc/nginx/nginx.conf内核参数优化(centos)
1. location的语法:
location [ = | ~ | ~* | ^~ ] uri { … }
| 指令 | | 匹配标识 | | 匹配的网站网址 | | 匹配URI之后要执行的配置段|
精确匹配(=) > 字符串打头匹配(^~) > 正则匹配(或 ) > 否定式正则匹配(!或!) > 通用匹配(/)。两种正则当中,区分大小写的优先级高,也就是不带*的优先级高(范围从小到大)
2. 匹配模式:
a. 精确匹配:
| 1 2 3 4 5 6 |
|
b. ^~ 表示以什么打头,关键在于正则的开头符 ^
| 1 2 3 |
|
c. 正则匹配(~ 区分大小写的正则, ~* 不区分大小的正则)
| 1 2 3 4 5 6 |
|
d. 排除法的正则,同样区分大小写优先于不区分大小写
| 1 2 3 4 5 6 7 8 9 10 |
|
f. “@”前缀
| 1 |
|
注意:inginx中配置proxy_pass时,当在后面的url加上了"/",相当于是绝对根路径,则nginx不会把location中匹配的路径部分代理走;如果没有"/",则会把匹配的路径部分也给代理走.
例如:
nginx请求链接:http://localhost:8080/api/getName?name=xiaoming
a.第一种情况:proxy_pass链接的最后不带"/"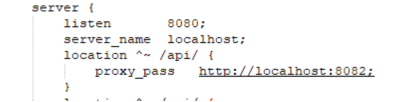
则被代理为:http://localhost:8082/api/getName?name=xiaoming
b.第二种情况:proxy_pass链接的最后带"/"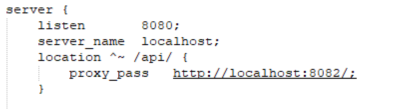
则被代理为:http://localhost:8082/getName?name=xiaoming
| 1 2 3 4 5 6 7 8 9 10 11 12 13 14 15 16 17 18 19 20 21 22 23 24 25 26 27 28 29 30 31 32 33 34 35 36 37 38 39 40 41 42 43 44 45 46 47 48 49 50 51 52 53 54 55 56 57 58 59 60 61 62 63 64 65 66 67 68 69 70 71 72 73 74 75 76 77 78 79 80 81 82 83 84 85 86 87 88 89 90 91 92 93 94 95 96 97 98 99 100 101 102 103 104 105 106 107 108 109 110 111 112 113 114 115 116 117 118 119 120 121 122 123 124 125 126 127 128 129 130 131 132 133 134 135 136 137 138 139 140 141 142 143 144 145 146 147 148 149 150 151 152 153 154 155 156 157 158 159 160 161 162 163 164 165 166 167 168 169 170 171 172 173 174 175 176 177 178 179 180 181 182 183 |
error_log file | stderr | syslog:server=address[,parameter=value] [debug | info | notice | warn | error | crit | alert | emerg];
# 告诉nginx收到一个新连接通知后接受尽可能多的连接
multi_accept on;
$connection : 连接的序列号。 $connection_requests :当前通过一个连接获得的请求数量 $msec : 日志写入时间。单位为秒,精度是毫秒。 $pipe :如果请求是通过 HTTP 流水线(pipelined)发送,pipe 值为“p”,否则为“.”。
$request_time :请求处理时间,单位为秒,精度毫秒; 从读入客户端的第一个字节开始,直到把最后一个字符发送 给客户端后进行日志写入为止。
$time_local 通用日志格式下的本地时间。
#默认是off关闭 日志文件缓存open_log_file_cache max=N [inactive=time] [min_uses=N] [valid=time];
max:设置缓存中的最大文件描述符数量,如果缓存被占满,采用 LRU 算法将描述符关闭。
inactive:设置存活时间,默认是 10s
min_uses:设置在 inactive 时间段内,日志文件最少使用多少次后,该日志文件描述符记入缓存中,默认是 1 次
valid:设置检查频率,默认 60s
open_log_file_cache max=1000 inactive=60s valid=1m min_uses=2;
# gzip压缩等级,buffer设置内存缓存区大小,flush保存在缓存区中的最长时间。
# 告诉nginx在一个数据包里发送所有头文件,而不一个接一个的发送
# 告诉 nginx 不要缓存数据,而是一段一段的发送–当需要及时发送数据时,就应该给应用设置这个 属性,这样发送一小块数据信息时就不能立即得到返回值
#不显示版本
client_body_timeout 3m; # 告诉 nginx 关闭不响应的客户端连接。这将会释放那个客户端所占有的内存空间 reset_timedout_connection on; # 指定客户端的响应超时时间。这个设置不会用于整个转发器,而是在两次客户端读取操作之间。如 果在这段时间内,客户端没有读取任何数据,nginx 就会关闭连接 send_timeout 3m; proxy_connect_timeout 300s; #nginx 跟后端服务器连接超时时间(代理连接超时)
proxy_read_timeout 300s;
#连接成功后,后端服务器响应时间(代理接收超时)
proxy_send_timeout 300s;
proxy_buffer_size 64k;
#设置代理服务器(nginx)保存用户头信息的缓冲区大小
proxy_buffers 4 32k;
#proxy_buffers 缓冲区,网页平均在 32k 以下的话,这样设置
proxy_busy_buffers_size 64k;
#高负荷下缓冲大小(proxy_buffers*2)
proxy_temp_file_write_size 64k;
#设定缓存文件夹大小,大于这个值,将从 upstream 服务器传递请求,而不缓冲到磁盘
proxy_ignore_client_abort on;
#不允许代理端主动关闭连接
# 索引文件 index index.html index.htm;
|
pid logs/nginx.pid;  #pid(进程标识符):存放路径。


worker_rlimit_nofile 204800;  #指定进程可以打开的最大描述符:数目。

#这个指令是指当一个nginx进程打开的最多文件描述符数目,理论值应该是最多打开文件数(ulimit -n)与nginx进程数相除,但是nginx分配请求并不是那么均匀,所以最好与ulimit -n 的值保持一致。

#现在在linux 2.6内核下开启文件打开数为65535,worker_rlimit_nofile就相应应该填写65535。

#这是因为nginx调度时分配请求到进程并不是那么的均衡,所以假如填写10240,总并发量达到3-4万时就有进程可能超过10240了,这时会返回502错误。


events{

    use epoll;  #使用epoll的I/O 模型。linux建议epoll,FreeBSD建议采用kqueue,window下不指定。
#补充说明:与apache相类,nginx针对不同的操作系统,有不同的事件模型

# A)标准事件模型
# Select、poll属于标准事件模型,如果当前系统不存在更有效的方法,nginx会选择select或poll

# B)高效事件模型

# - Kqueue:使用于FreeBSD 4.1+, OpenBSD 2.9+, NetBSD 2.0 和 MacOS X.使用双处理器的MacOS X系统使用kqueue可能会造成内核崩溃。

# - Epoll:使用于Linux内核2.6版本及以后的系统。
#/dev/poll:使用于Solaris 7 11/99+,HP/UX 11.22+ (eventport),IRIX 6.5.15+ 和 Tru64 UNIX 5.1A+。
#Eventport:使用于Solaris 10。 为了防止出现内核崩溃的问题, 有必要安装安全补丁。

worker_connections 204800;
#没个工作进程的最大连接数量。根据硬件调整,和前面工作进程配合起来用,尽量大,但是别把cpu跑到100%就行。每个进程允许的最多连接数,理论上每台nginx服务器的最大连接数为。

worker_processes*worker_connections

keepalive_timeout 60;    #keepalive超时时间。

client_header_buffer_size 4k; #客户端请求头部的缓冲区大小。这个可以根据你的系统分页大小来设置,一般一个请求头的大小不会超过1k,不过由于一般系统分页都要大于1k,所以这里设置为分页大小。
# 分页大小可以用命令getconf PAGESIZE 取得。
#  [root@web001 ~]# getconf PAGESIZE
#   4096
#但也有client_header_buffer_size超过4k的情况,但是client_header_buffer_size该值必须设置为“系统分页大小”的整倍数。

open_file_cache max=65535 inactive=60s;
#这个将为打开文件指定缓存,默认是没有启用的,max指定缓存数量,建议和打开文件数一致,inactive是指经过多长时间文件没被请求后删除缓存。

open_file_cache_valid 80s;  #这个是指多长时间检查一次缓存的有效信息。

open_file_cache_min_uses 1;
# open_file_cache指令中的inactive参数时间内文件的最少使用次数,如果超过这个数字,文件描述符一直是在缓存中打开的,如上例,如果有一个文件在inactive时间内一次没被使用,它将被移除。

}


##设定http服务器,利用它的反向代理功能提供负载均衡支持
http{

    include mime.types; #设定mime类型,类型由mime.type文件定义
    default_type application/octet-stream;
    log_format main '$remote_addr - $remote_user [$time_local] "$request" '
'$status $body_bytes_sent "$http_referer" '
'"$http_user_agent" "$http_x_forwarded_for"';
    log_format log404 '$status [$time_local] $remote_addr $host$request_uri $sent_http_location';
    # 日志格式设置。
    # $HTTP_X_REAL_IP
    # $remote_addr与$http_x_forwarded_for用以记录客户端的ip地址;
    # $remote_user:用来记录客户端用户名称;
    # $time_local: 用来记录访问时间与时区;
    # $request: 用来记录请求的url与http协议;
    # $status: 用来记录请求状态;成功是200,
    # $body_bytes_sent :记录发送给客户端文件主体内容大小;
    # $http_referer:用来记录从那个页面链接访问过来的;
    # $http_user_agent:记录客户浏览器的相关信息;
    #通常web服务器放在反向代理的后面,这样就不能获取到客户的IP地址了,通过$remote_add拿到的IP地址是反向代理服务器的iP地址。反向代理服务器在转发请求的http头信息中,可以增加x_forwarded_for信息,用以记录原有客户端的IP地址和原来客户端的请求的服务器地址。

    access_log  logs/host.access.log  main;

    access_log  logs/host.access.404.log  log404; #用了log_format指令设置了日志格式之后,需要用access_log指令指定日志文件的存放路径;

    server_names_hash_bucket_size 128;
    #保存服务器名字的hash表是由指令server_names_hash_max_size 和server_names_hash_bucket_size所控制的。参数hash bucket size总是等于hash表的大小,并且是一路处理器缓存大小的倍数。在减少了在内存中的存取次数后,使在处理器中加速查找hash表键值成为可能。如果hash bucket size等于一路处理器缓存的大小,那么在查找键的时候,最坏的情况下在内存中查找的次数为2。第一次是确定存储单元的地址,第二次是在存储单元中查找键 值。因此,如果Nginx给出需要增大hash max size 或 hash bucket size的提示,那么首要的是增大前一个参数的大小.

    client_header_buffer_size 4k;
    #客户端请求头部的缓冲区大小。这个可以根据你的系统分页大小来设置,一般一个请求的头部大小不会超过1k,不过由于一般系统分页都要大于1k,所以这里设置为分页大小。分页大小可以用命令getconf PAGESIZE取得。

    large_client_header_buffers 8 128k; #客户请求头缓冲大小。nginx默认会用client_header_buffer_size这个buffer来读取header值,如果header过大,它会使用large_client_header_buffers来读取。

    open_file_cache max=102400 inactive=20s; #这个指令指定缓存是否启用。

    open_file_cache_valid 30s;

    open_file_cache_min_uses 2;

    open_file_cache_errors on;

    open_file_cache_errors
    #语法:open_file_cache_errors on | off 默认值:open_file_cache_errors off 使用字段:http, server, location 这个指令指定是否在搜索一个文件是记录cache错误.

    open_file_cache_min_uses
    #语法:open_file_cache_min_uses number 默认值:open_file_cache_min_uses 1 使用字段:http, server, location 这个指令指定了在open_file_cache指令无效的参数中一定的时间范围内可以使用的最小文件数,如果使用更大的值,文件描述符在cache中总是打开状态.

    open_file_cache_valid
    #语法:open_file_cache_valid time 默认值:open_file_cache_valid 60 使用字段:http, server, location 这个指令指定了何时需要检查open_file_cache中缓存项目的有效信息.

    client_max_body_size 300m; # 设定通过nginx上传文件的大小

    sendfile on;
    #sendfile指令指定 nginx 是否调用sendfile 函数(zero copy 方式)来输出文件,对于普通应用,必须设为on。如果用来进行下载等应用磁盘IO重负载应用,可设置为off,以平衡磁盘与网络IO处理速度,降低系统uptime。

    tcp_nopush on; #此选项允许或禁止使用socke的TCP_CORK的选项,此选项仅在使用sendfile的时候使用
    proxy_connect_timeout 90; #后端服务器连接的超时时间_发起握手等候响应超时时间

    proxy_read_timeout 180; #连接成功后_等候后端服务器响应时间_其实已经进入后端的排队之中等候处理(也可以说是后端服务器处理请求的时间)

    proxy_send_timeout 180; #端服务器数据回传时间_就是在规定时间之内后端服务器必须传完所有的数据
    proxy_buffer_size 256k;
    #设置从被代理服务器读取的第一部分应答的缓冲区大小,通常情况下这部分应答中包含一个小的应答头,默认情况下这个值的大小为指令proxy_buffers中指定的一个缓冲区的大小,不过可以将其设置为更小

    proxy_buffers 4 256k;
    #设置用于读取应答(来自被代理服务器)的缓冲区数目和大小,默认情况也为分页大小,根据操作系统的不同可能是4k或者8k

    proxy_busy_buffers_size 256k;

    proxy_temp_file_write_size 256k; #设置在写入proxy_temp_path时数据的大小,预防一个工作进程在传递文件时阻塞太长
    proxy_temp_path /data0/proxy_temp_dir; # proxy_temp_path和proxy_cache_path指定的路径必须在同一分区

    proxy_cache_path /data0/proxy_cache_dir levels=1:2 keys_zone=cache_one:200m inactive=1d max_size=30g;  #设置内存缓存空间大小为200MB,1天没有被访问的内容自动清除,硬盘缓存空间大小为30GB。

    keepalive_timeout 120; #keepalive超时时间。

    tcp_nodelay on;

    client_body_buffer_size 512k;
    #如果把它设置为比较大的数值,例如256k,那么,无论使用firefox还是IE浏览器,来提交任意小于256k的图片,都很正常。如果注释该指令,使用默认的client_body_buffer_size设置,也就是操作系统页面大小的两倍,8k或者16k,问题就出现了。
    #无论使用firefox4.0还是IE8.0,提交一个比较大,200k左右的图片,都返回500 Internal Server Error错误

    proxy_intercept_errors on; #表示使nginx阻止HTTP应答代码为400或者更高的应答。


upstream bakend {

    server 127.0.0.1:8027;
    server 127.0.0.1:8028;
    server 127.0.0.1:8029;
    hash $request_uri;
}
# nginx的upstream目前支持4种方式的分配
# 1、轮询(默认):每个请求按时间顺序逐一分配到不同的后端服务器,如果后端服务器down掉,能自动剔除。
# 2、weight:指定轮询几率,weight和访问比率成正比,用于后端服务器性能不均的情况。
upstream bakend {
    server 192.168.0.14 weight=10;
    server 192.168.0.15 weight=10;
}

# 3、ip_hash:每个请求按访问ip的hash结果分配,这样每个访客固定访问一个后端服务器,可以解决session的问题。例如:
upstream bakend {
    ip_hash;
    server 192.168.0.14:88;
    server 192.168.0.15:80;
}

# 4、fair(第三方):按后端服务器的响应时间来分配请求,响应时间短的优先分配。
upstream backend {
    server server1;
    server server2;
    fair;
}

# 5、url_hash(第三方):按访问url的hash结果来分配请求,使每个url定向到同一个后端服务器,后端服务器为缓存时比较有效。例:在upstream中加入hash语句,server语句中不能写入weight等其他的参数,hash_method是使用的hash算法
upstream backend {
    server squid1:3128;
    server squid2:3128;
    hash $request_uri;
    hash_method crc32;
}


upstream bakend{                      #定义负载均衡设备的Ip及设备状态
    ip_hash;
    server 127.0.0.1:9090 down;       #down表示单前的server暂时不参与负载
    server 127.0.0.1:8080 weight=2;   #weight为weight越大,负载的权重就越大
    server 127.0.0.1:6060;
    server 127.0.0.1:7070 backup;    # 其它所有的非backup机器down或者忙的时候,请求backup机器。所以这台机器压力会最轻
    #max_fails:允许请求失败的次数默认为1.当超过最大次数时,返回proxy_next_upstream模块定义的错误
    #fail_timeout:max_fails次失败后,暂停的时间
}

# 在需要使用负载均衡的server中增加 proxy_pass http://bakend/;

# nginx支持同时设置多组的负载均衡,用来给不用的server来使用。
# client_body_in_file_only设置为On 可以讲client post过来的数据记录到文件中用来做debug
# client_body_temp_path设置记录文件的目录 可以设置最多3层目录
# location对URL进行匹配.可以进行重定向或者进行新的代理 负载均衡


##配置虚拟机

server{

    listen 80; # 配置监听端口

    server_name image.***.com; #配置访问域名

    location ~* \.(mp3|exe)$ {   #对以“mp3或exe”结尾的地址进行负载均衡
        proxy_pass http://img_relay$request_uri;    #设置被代理服务器的端口或套接字,以及URL
        proxy_set_header Host $host;
        proxy_set_header X-Real-IP $remote_addr;
        proxy_set_header X-Forwarded-For $proxy_add_x_forwarded_for;
        #以上三行,目的是将代理服务器收到的用户的信息传到真实服务器上
    }

    location /face {
        if ($http_user_agent ~* "xnp") {
            rewrite ^(.*)$ http://211.151.188.190:8080/face.jpg redirect;
        }
        proxy_pass http://img_relay$request_uri;
        proxy_set_header Host $host;
        proxy_set_header X-Real-IP $remote_addr;
        proxy_set_header X-Forwarded-For $proxy_add_x_forwarded_for;
        error_page 404 502 = @fetch;
    }

    location @fetch {
        access_log /data/logs/face.log log404;
        rewrite ^(.*)$ http://211.151.188.190:8080/face.jpg redirect;
    }

    location /image {
        if ($http_user_agent ~* "xnp") {
            rewrite ^(.*)$ http://211.151.188.190:8080/face.jpg redirect;
        }
        proxy_pass http://img_relay$request_uri;
        proxy_set_header Host $host;
        proxy_set_header X-Real-IP $remote_addr;
        proxy_set_header X-Forwarded-For $proxy_add_x_forwarded_for;
        error_page 404 502 = @fetch;
    }
}

##其他举例

server{

    listen 80;
    server_name *.***.com *.***.cn;
    location ~* \.(mp3|exe)$ {
        proxy_pass http://img_relay$request_uri;
        proxy_set_header Host $host;
        proxy_set_header X-Real-IP $remote_addr;
        proxy_set_header X-Forwarded-For $proxy_add_x_forwarded_for;
    }
    location / {
        if ($http_user_agent ~* "xnp") {
            rewrite ^(.*)$ http://i1.***img.com/help/noimg.gif redirect;
        }
        proxy_pass http://img_relay$request_uri;
        proxy_set_header Host $host;
        proxy_set_header X-Real-IP $remote_addr;
        proxy_set_header X-Forwarded-For $proxy_add_x_forwarded_for;
        #error_page 404 http://i1.***img.com/help/noimg.gif;
        error_page 404 502 = @fetch;
    }
    #access_log off;
    location @fetch {
        access_log /data/logs/baijiaqi.log log404;
        rewrite ^(.*)$ http://i1.***img.com/help/noimg.gif redirect;
    }
}


server{
    listen 80;
    server_name *.***img.com;
    location ~* \.(mp3|exe)$ {
        proxy_pass http://img_relay$request_uri;
        proxy_set_header Host $host;
        proxy_set_header X-Real-IP $remote_addr;
        proxy_set_header X-Forwarded-For $proxy_add_x_forwarded_for;
    }
    location / {
        if ($http_user_agent ~* "xnp") {
            rewrite ^(.*)$ http://i1.***img.com/help/noimg.gif;
        }
        proxy_pass http://img_relay$request_uri;
        proxy_set_header Host $host;
        proxy_set_header X-Real-IP $remote_addr;
        proxy_set_header X-Forwarded-For $proxy_add_x_forwarded_for;
        #error_page 404 http://i1.***img.com/help/noimg.gif;
        error_page 404 = @fetch;
    }
}


server{
    listen 8080;
    server_name ngx-ha.***img.com;
    location / {
        stub_status on;
        access_log off;
    }
}

server {
    listen 80;
    server_name imgsrc1.***.net;
    root html;
}

server {
    listen 80;
    server_name ***.com w.***.com;
    # access_log /usr/local/nginx/logs/access_log main;
    location / {
        rewrite ^(.*)$ http://www.***.com/ ;
    }
    location /NginxStatus {   #设定查看Nginx状态的地址
        stub_status on;
        access_log on;
        auth_basic "NginxStatus";
        auth_basic_user_file conf/htpasswd;
    }
    location ~ /\.ht {      #禁止访问.htxxx文件
        deny all;
    }
}


#注释:变量
Ngx_http_core_module模块支持内置变量,他们的名字和apache的内置变量是一致的。
首先是说明客户请求title中的行,例如$http_user_agent,$http_cookie等等。
$args此变量与请求行中的参数相等
$content_length等于请求行的“Content_Length”的值。
$content_type等同与请求头部的”Content_Type”的值
$document_root等同于当前请求的root指令指定的值
$document_uri与$uri一样
$host与请求头部中“Host”行指定的值或是request到达的server的名字(没有Host行)一样
$limit_rate允许限制的连接速率
$request_method等同于request的method,通常是“GET”或“POST”
$remote_addr客户端ip
$remote_port客户端port
$remote_user等同于用户名,由ngx_http_auth_basic_module认证
$request_filename当前请求的文件的路径名,由root或alias和URI request组合而成
$request_body_file
$request_uri含有参数的完整的初始URI
$query_string与$args一样
$sheeme http模式(http,https)尽在要求是评估例如
Rewrite ^(.+)$ $sheme://example.com$; Redirect;
$server_protocol等同于request的协议,使用“HTTP/或“HTTP/
$server_addr request到达的server的ip,一般获得此变量的值的目的是进行系统调用。为了避免系统调用,有必要在listen指令中指明ip,并使用bind参数。
$server_name请求到达的服务器名
$server_port请求到达的服务器的端口号
$uri等同于当前request中的URI,可不同于初始值,例如内部重定向时或使用index| 1 2 3 4 5 |
|
反向代理服务器配置文件:
include /usr/local/nginx/conf/reverse-proxy.conf
server{
     listen 80;
     server_name xxx123.tk;
     location / {
         proxy_redirect off;
         proxy_set_header Host $host;
         proxy_set_header X-Real-IP $remote_addr;
         proxy_set_header X-Forwarded-For $proxy_add_x_forwarded_for;
         proxy_pass http://192.168.10.38:3000;
     }
     access_log logs/xxx123.tk_access.log;
}
server{
     listen 80;
     server_name xxx456.tk;
     location / {
         proxy_redirect off;
         proxy_set_header Host $host;
         proxy_set_header X-Real-IP $remote_addr;
         proxy_set_header X-Forwarded-For $proxy_add_x_forwarded_for;
         proxy_pass http://192.168.10.40:80;
     }
     access_log logs/xxx456.tk_access.log;
}
配置一个 lograte 就好
vi /etc/logrotate.conf
# see "man logrotate" for details
# rotate log files weekly
weekly
#daily# keep 4 weeks worth of backlogs
rotate 4# create new (empty) log files after rotating old ones
create# use date as a suffix of the rotated file
dateext# uncomment this if you want your log files compressed
#compress# RPM packages drop log rotation information into this directory
include /etc/logrotate.d# no packages own wtmp and btmp -- we'll rotate them here
/var/log/wtmp {
monthly
create 0664 root utmp
minsize 1M
rotate 1
}/var/log/btmp {
missingok
monthly
create 0600 root utmp
rotate 1
}# system-specific logs may be also be configured here.
vi /etc/logrotate.d/nginx
/usr/local/nginx/logs/*.log {
# 指定转储周期为每天
daily
# 使用当期日期作为命名格式
dateext
# 如果日志丢失,不报错继续滚动下一个日志
missingok
# 保留 31 个备份
rotate 31
# 不压缩
nocompress
# 整个日志组运行一次的脚本
sharedscripts
# 转储以后需要执行的命令
postrotate
# 重新打开日志文件
[ ! -f /usr/local/nginx/logs/nginx.pid ] || kill -USR1 `cat /usr/local/nginx/logs/nginx.pid`
endscript
}
阿里云代金券
好评 00差评 0


 702
702

 被折叠的 条评论
为什么被折叠?
被折叠的 条评论
为什么被折叠?
 到【灌水乐园】发言


