


在 ESXi 上运行 Cisco Nexus 9000v (NX-OS 10)
在 VMware vSphere 中部署 Cisco Nexus 9000v (NX-OS 10)
请访问原文链接:https://sysin.org/blog/run-nxos-on-esxi/ 查看最新版。原创作品,转载请保留出处。
作者主页:sysin.org
Nexus 9000v 概述
Cisco Nexus 9000v 是虚拟化的 Nexus 9000 NX-OS 交换机,用于在虚拟化中构建和测试网络原型环境,是学习 Cisco NX-OS 和 SDN 的便捷途径。
平台系列和资源要求
从 Cisco NX-OS 版本 9.3.3 (sysin) 开始,Nexus 9000v 已转变为具有两个版本的平台系列:Nexus 9300v 和 Nexus 9500v。
- Nexus 9300v 代表一个虚拟的非模块化交换机,包括一个带有 64 个虚拟接口的线卡。
- Nexus 9500v 代表虚拟模块化交换机,最多可支持 16 个线卡和 400 个虚拟接口。
Nexus 9300v 规格
Form-Factor
| Component/Parameter | Specification |
|---|---|
| Usage | Simulation |
| Binary | Same as NX-OS Hardware |
| Management Interface | 1 |
| Line Cards | 1 |
| Line Card Interfaces | 64 |
Resource Requirements
| Resource | Specification |
|---|---|
| Minimum RAM | 10.0 G (basic bootup) |
| Recommended RAM | 12.0 G (depending on the number of features) |
| Minimum vCPUs | 1 |
| Recommended vCPUs | 2 |
| Minimum vNICs | 1 |
| Maximum vNICs | 65 |
Nexus 9500v 规格
Form-Factor
| Component/Parameter | Specification |
|---|---|
| Usage | Simulation |
| Binary | Same as NX-OS Hardware |
| Management Interface | 1 |
| Line Cards | Up to 16 |
| Line Card Interfaces | Up to 400 interfaces in the KVM/QEMU environment |
Resource Requirements
| Resource | Specification |
|---|---|
| Minimum RAM | 10.0G (basic bootup with one line card; 1.2G for each additional line card) |
| Recommended RAM | 12.0G (depending on the number of features) |
| Minimum vCPUs | 4 (if you configure 16 line cards, we recommend 6 vCPUs) |
| Minimum vNICs | 1 |
| Maximum vNICs | 400 interfaces in the KVM/QEMU environment |
支持的 Hypervisor
Nexus 9000v 10.4.x 系列官方系统要求:
- KVM/QEMU 4.2.0
- ESXi 8.0
- Vagrant 2.3.7(VirtualBox 7.0)(仅有 9300v 版本,不支持 9500v)
以上为官方列出版本要求,并非严格限制。
本文描述在 VMware 产品中部署。可支持如下版本。
建议在以下版本的 VMware 软件中运行(Linux OVF 无需本站定制版可以正常运行,macOS 虚拟化如果不是 Mac 必须使用定制版才能运行,Windows OVF 需要定制版才能启用完整功能):
- Server:VMware ESXi 8.0 or with driver & vCenter Server 8.0,ESXi 7.0 or with driver & vCenter Server 7.0
- macOS:VMware Fusion 13
- Linux:VMware Workstation 17 for Linux
- Windows:VMware Workstation 17 for Windows
对于 VMware Fusion 或者 VMware Workstation,另有文章描述:
使用 VMware vSphere 部署
导入 OVA
支持 vSphere Client 和 ESXi Host Client,本文相关截图使用 vSphere Client。
过程略。
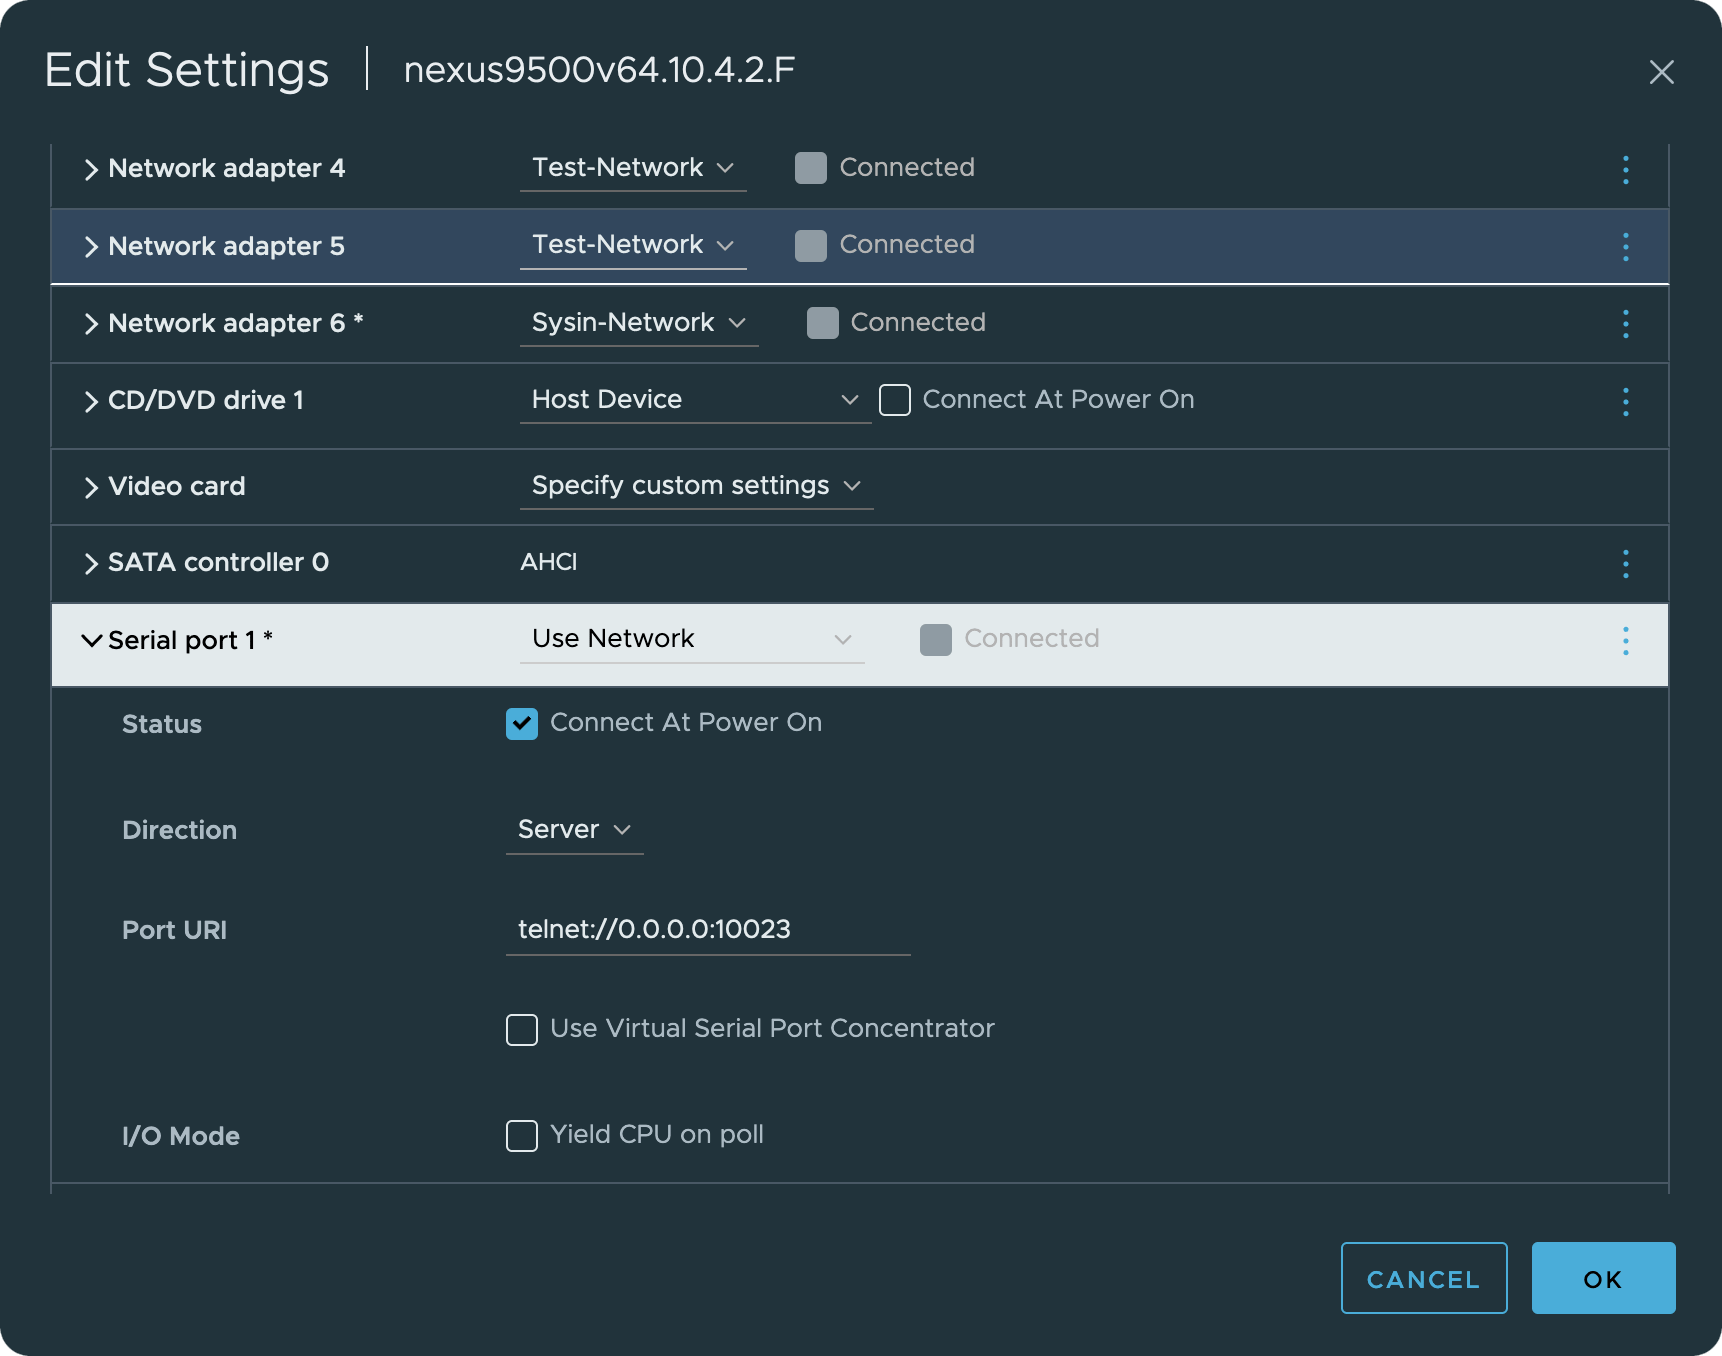
编辑 vNIC
- 第一个网卡用作管理口 m0(mgmt0),使用 VM Network(非必须)
- 其他网口(数据接口),分别放到不同的网络
- 数据接口所在虚拟交换机需要开启混杂模式(Promiscuous mode)
添加或者编辑虚拟串口
VMware ESXi 中直接编辑现有网络串口即可。
1、开启防火墙规则:ESXi 配置 – 系统 – 防火墙,启用防火墙规则:VM serial port connected over network 23, 1024-65535 (TCP)
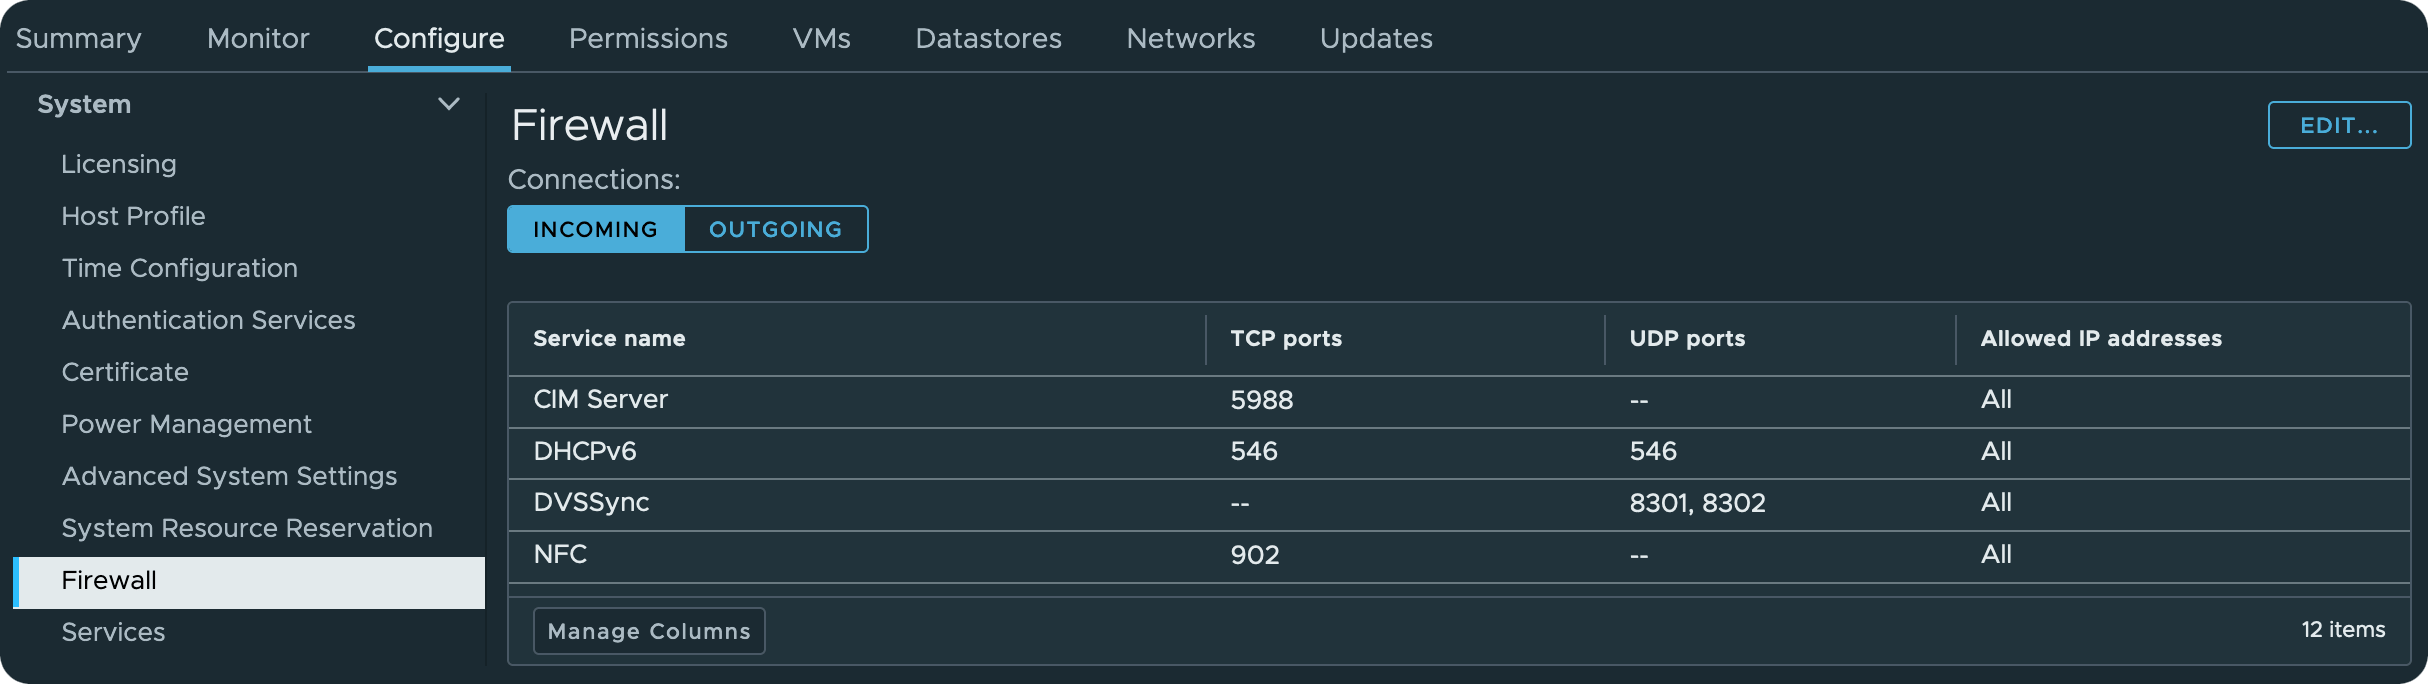

2、编辑串口如下:
- 编辑虚机,选择 串行端口(Serial Port),类型:通过网络访问 (User Network),方向:服务器(虚拟机侦听连接)
- 端口 URL:
telnet://telnet://0.0.0.0:端口(端口应在防火墙开启的端口范围),或者telnet://ESXi-IP:端口 - vSPC (Use Virtual Serial Port Concentrator) 是使用 vMotion 时的可选项 (需要启用防火墙规则 VM serial port connected to vSPC),如果没有 HA 可以忽略。
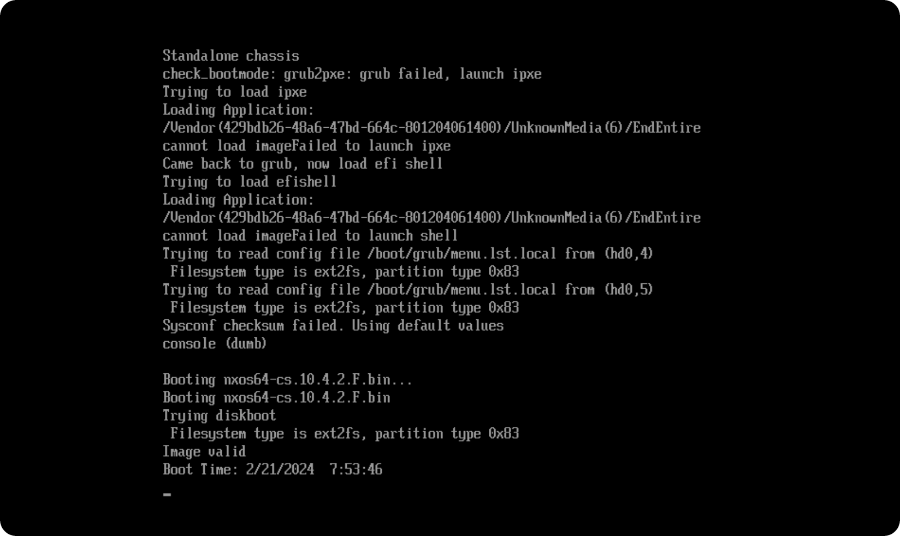
虚机默认 EFI 引导
Boot Options 默认为 EFI。
编辑 vmx 文件(或者 vm 高级选项),添加:efi.serialconsole.enabled = “TRUE”
启动虚拟机
启动状态如下:
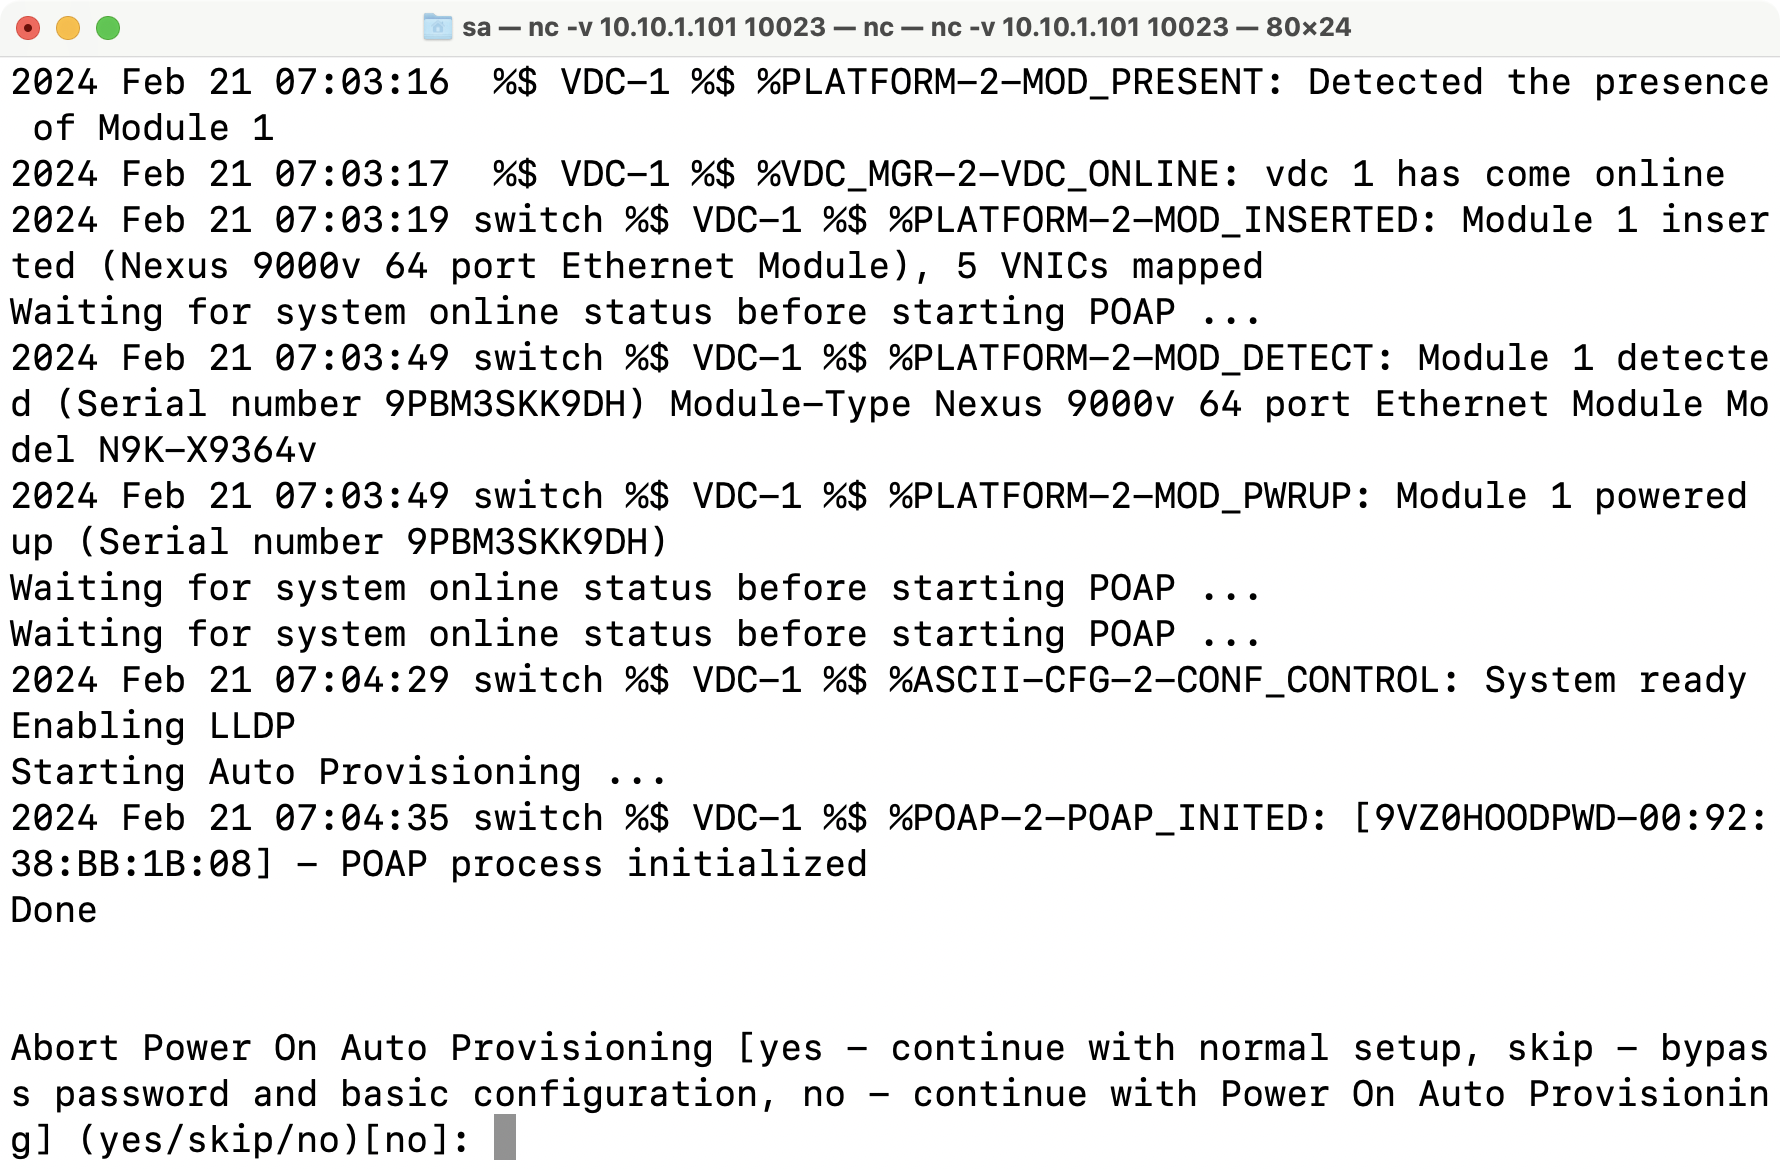
连接虚拟串口
连接 ESXi 服务器 IP,端口使用前述配置的端口。
在 macOS、Linux(或其他类 UNIX 系统)下,使用 nc,例如:nc 10.10.1.101 10023,推荐!
等待虚拟机控制台界面显示:Boot Time: xxxx,连接虚拟串口,此时接管 Console 画面如下(尚未完成也可以,稍后自动出现):
在 Windows 下使用 telnet,例如:telnet 10.10.1.101 10023,似乎不容易连接成功,不推荐。
在 Windows 下,可以使用 MTPuTTY,或者 PuTTY。
下面开始初始化配置了。
Abort Power On Auto Provisioning [yes - continue with normal setup, skip - bypass password and basic configuration, no - continue with Power On Auto Provisioning] (yes/skip/no)[no]:yes <---- 这里 yes

Disabling POAP.......Disabling POAP

         ---- System Admin Account Setup ----

Do you want to enforce secure password standard (yes/no) [y]:y  <---- 这里回车,然后根据提示设置 admin 账号的密码

    Enter the password for "admin":
  Confirm the password for "admin":

         ---- Basic System Configuration Dialog VDC: 1 ----

This setup utility will guide you through the basic configuration of
the system. Setup configures only enough connectivity for management
of the system.

Please register Cisco Nexus9000 Family devices promptly with your
supplier. Failure to register may affect response times for initial
service calls (sysin). Nexus9000 devices must be registered to receive
entitled support services.

Press Enter at anytime to skip a dialog. Use ctrl-c at anytime
to skip the remaining dialogs.

 Would you like to enter the basic configuration dialog (yes/no): no  <---- 这里 no
进入登录提示,输入上述用户名 admin 和密码。
必要配置
配置管理 IP
switch# conf t
Enter configuration commands, one per line. End with CNTL/Z.
switch(config)# int m0
switch(config-if)# ip addr 10.10.188.101/24
switch(config-if)# no shut
switch(config-if)# exit
在 vrf management 配置缺省路由:
switch(config)#vrf context management
switch(config-vrf)# ip route 0.0.0.0/0 10.10.188.1
配置 m0 IP 地址后,然后使用 ssh 登录管理
配置启动镜像
以下镜像名称为 nxos64-cs.10.2.5.M.bin,根据实际版本修改。
switch# conf t
Enter configuration commands, one per line. End with CNTL/Z.
switch(config)# boot nxos bootflash:nxos64-cs.10.2.5.M.bin
# 或者直接 boot nxos xxx.bin,不加 bootflash:,此镜像名称通过 dir 命令查看
switch(config)# boot nxos nxos64-cs.10.2.5.M.bin
# <--- Note: use correct imagename from "dir" command output
Performing image verification and compatibility check, please wait....
switch(config)# end
switch# copy r s
[########################################] 100%
Copy complete, now saving to disk (please wait)...
Copy complete.
默认 ssh 开启
# 查看 telnet 是否启用(默认禁用)
switch# show feature | grep telnet
# 查看 ssh 是否启用(默认启用)
switch# show feature | grep ssh
switch#
# 开启 ssh
switch# conf t
Enter configuration commands, one per line. End with CNTL/Z.
switch(config)# feature ssh
switch(config)# end
switch# copy r s
创建一个新用户(可选)
switch(config)# username sysadmin password <password> role network-admin
switch(config)# username sysadmin shelltype bash
下一步
以后可以直接使用 SSH 访问,串口可用于 SSH 无法访问之时进行问题排查。
请访问官方文档,开启你的 Nexus 之旅:
Cisco Nexus 9000 Series Switches Configuration Guides
小贴士:开启 shell 访问,可以看到 NX-OS 10 是基于 Linux kernel 4.19(10.2.x 开始为 5.10)。
switch# show feature | grep bash
bash-shell             1          disabled
switch# conf t
Enter configuration commands, one per line. End with CNTL/Z.
switch(config)# feature bash-shell
switch(config)# end
switch# run bash sudo su -
root@switch#whoami
root
root@switch#uname -a
Linux switch 4.19.179 #1 SMP Thu May 13 16:52:16 PDT 2021 x86_64 x86_64 x86_64 GNU/Linux
root@switch#
# 10.4.2 版本为 5.10
Linux switch 5.10.188 #1 SMP Wed Dec 13 17:01:10 PST 2023 x86_64 x86_64 x86_64 GNU/Linux
相关软件下载
VMware vSphere:VMware ESXi 8.0 or with driver & vCenter Server 8.0,ESXi 7.0 or with driver & vCenter Server 7.0
Cisco Nexus 9000v:Cisco Nexus 9000v Switch, NX-OS Release 10.x


 4331
4331

 被折叠的 条评论
为什么被折叠?
被折叠的 条评论
为什么被折叠?
 到【灌水乐园】发言


