


一、setState函数
一个异步函数,接受第二个参数,是一个回调函数
不能直接修改state中的值,可以进行一次深拷贝
this.state.inputValue (大大的错误)
二、生命周期函数
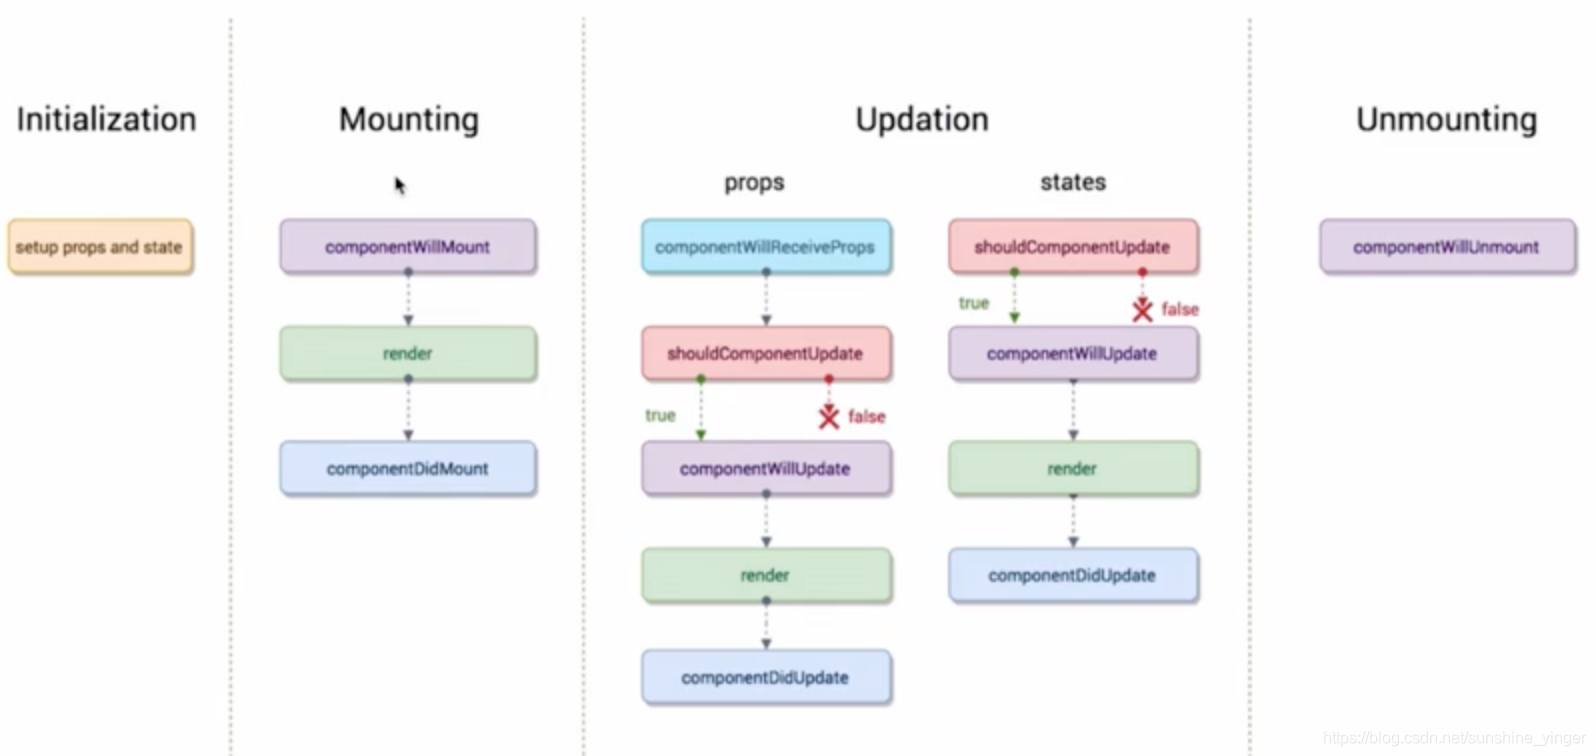
1.进行props和state的初始化
2.mounting组件在页面挂载中
componentWillMount 组件在被挂载之前
render 组件被渲染进行挂载
componentDidMount 组件挂载完成
3.updation组件被更新
componentWillReceiveProps该生命周期的执行需要接受到父组件传过来的参数,并且是在组件已经存在于父组件中才会执行,第一次存在是不会执行的
shouldComponentUpdate 询问组件是否可以更新,return true便让其进行接下来的更新和生命周期函数;return false 则不行
componentWillUpdate 组件即将被更新
render组件渲染
componentDidUpdate组件更新完毕
4.unmounting
componentWillUnmounting 组件被页面祛除之前执行
生命周期的使用场景:
1. render生命周期的执行是props和state更新时或者父组件render时,子组件render就会重新更新,这样会导致一个问题,一旦父组件更新,子组件就更新,但是有的时候子组件是没有必要的
shouldComponentUpdate:可以优化这个性能损耗
shouldComponentUpdate(nextProps,nextState){
    if(nextProps.xxx !== this.props.xxx){
        return true;
    }else{
        return false;
    }
}
2.ajax请求发送,在componentDidMount中执行
yarn add axios

import axis from 'axios';

axios.get('xxx').then(()=>{
    xxxx
}).catch(() => {
    xxx
})
3.关于render什么时候会执行
1)初始化
2)setState()在任何情况下都会导致组件的重新渲染,即使state未发生变化
3)父组件render则子组件就会render
三、redux

四、无状态组件
当一个组件只有render函数的时候,比如UI组件,不做逻辑处理时,我们可以不吧它写成一个类的形式, 可以写成一个函数爆露出去
const ComponentUI = (props) => {
    ...
}

export default ComponentUI;
五、redux-thunk中间件
1.在github上搜索redux-thunk安装并引入相应插件,本来action只能接受一个对象,然后传递给store,但是当我们需要传递一个函数,让action变成一个函数的时候,函数处理后得到结果在传递给store的时候就可以利用中间件进行实现

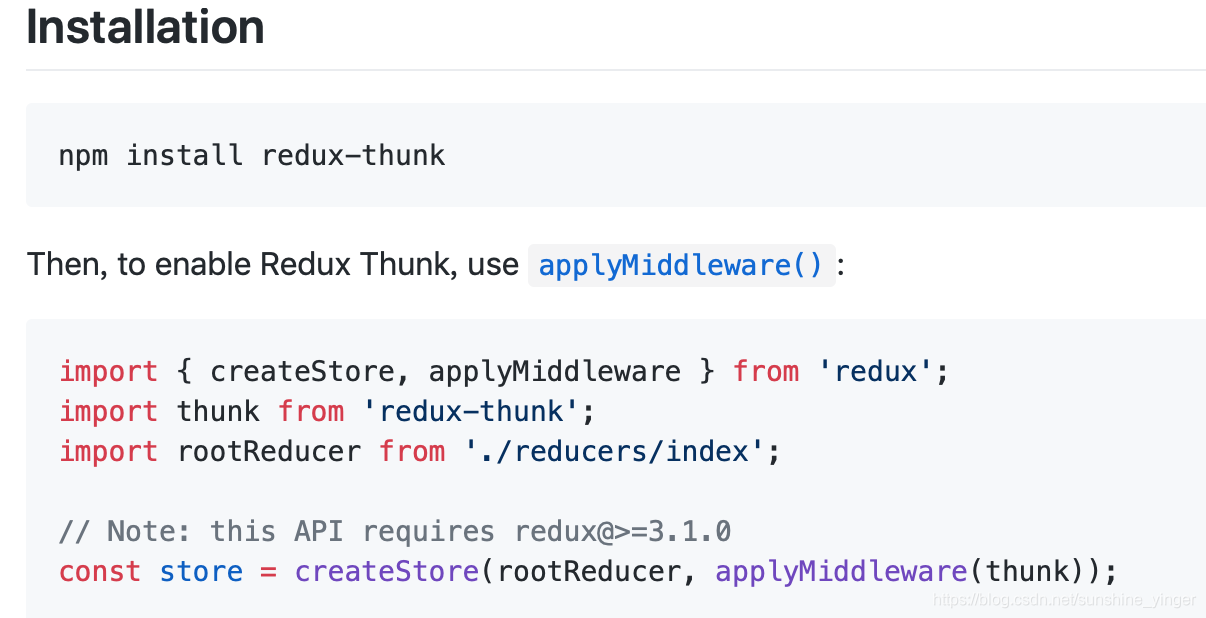
2.如果想这个中间件和devtools一起使用,可以在github上搜索redux-devtools-extension查看高级的store配置
3.我的项目配置
import { createStore ,applyMiddleware ,compose} from 'redux'
import thunk from 'redux-thunk';
import reducer from './reducer.js'

const composeEnhancers =
  typeof window === 'object' &&
  window.__REDUX_DEVTOOLS_EXTENSION_COMPOSE__ ?
    window.__REDUX_DEVTOOLS_EXTENSION_COMPOSE__({}) : compose;

const enhancer = composeEnhancers(
  applyMiddleware(thunk)
);
const store = createStore(reducer, enhancer);

export default store;
//在组件中这么写,来执行这个异步的请求
const action = getTodoList();
//store.dispatch会自动执行action,action便是一个异步请求函数
store.dispatch(action);

//在actionCreators.js action文件中这样写
export const getTodoList = () => {
  //返回一个函数
  return (dispatch) => {
    axios.get('/todo.json').then((res) => {
      const data = res.data;
      const action = initListAction(data);
      dispatch(action);
    })
  }
};
六、redux-saga
1.他也是类似于redux-thunk的中间件,但是他的优势是将所有的action异步操作放在一个文件夹中进行维护
2.在github中进行搜索
3.关于我项目中的配置,当于devtools并存时
//todolist.js
componentDidMount(){
    //将这个action让saga捕获到,并不是真正的渲染页面进行的action
    const action = getInitList();
    store.dispatch(action);
  }


//sagas.js中接受到这个action,获得到异步数据之后才进行真正的初始化action
function* getInitListAction() {
  console.log('abc');
  const list = [4,2,3];
  //这里的action就是真正的初始化渲染页面,发给reducer.js中去操作
  const action = initList(list);
  yield put(action);
}
//generator
function* todoSaga() {
  // 第一个参数为action的value
  yield takeEvery(GET_INIT_LIST_ACTION, getInitListAction);
}
export default todoSaga;


//store/index.js
import { createStore ,applyMiddleware ,compose} from 'redux'
import reducer from './reducer'
import createSagaMiddleware from 'redux-saga'
import todoSaga from './sagas';

const sagaMiddleware = createSagaMiddleware();

const composeEnhancers =
  typeof window === 'object' &&
  window.__REDUX_DEVTOOLS_EXTENSION_COMPOSE__ ?
    window.__REDUX_DEVTOOLS_EXTENSION_COMPOSE__({
      // Specify extension’s options like name, actionsBlacklist, actionsCreators, serialize...
    }) : compose;

const enhancer = composeEnhancers(
  applyMiddleware(sagaMiddleware)
);
const store = createStore(reducer, enhancer);
七、react-redux
1.他是redux的一个组件,直接安装使用即可
可以看一下别人的分享(感谢这个小可爱)https://segmentfault.com/a/1190000017064759
2.mapStateToProps :用来接收store数据的规则,将state映射成props,在子组件中直接用this.props.xx来使用即可
const mapStateToProps = (state) => {
  return {
    inputValue: state.inputValue,
    list: state.list
  };
};
mapDispatchToProps:用来向store中传递action的改变state的规则,在执行方法时,直接this.props.handleDel即可
const mapDispatchToProps = (dispatch) => {
  return {
    handleDel(index){
      const action={
        type:'del_item',
        index
      }
      dispatch(action);
    }
  }
}
八、关于动画
import React,{Component,Fragment} from 'react';
import './transition.css';

class Transition extends Component {
  constructor(props){
    super(props);
    this.state = {
      show : true
    }
    this.handleToggle = this.handleToggle.bind(this);
  }
  render(){
    return (
      <Fragment>
        <div className={this.state.show ? 'show':'hide'}>hello</div>
        <button onClick={this.handleToggle}>toggle</button>
      </Fragment>
    )
  }

  handleToggle(){
    this.setState({
      show : this.state.show ? false : true
    })
  }
}

export default Transition;
1.第一种:过渡动画
.show{
  /* 过度动画效果 */
  /* opacity: 1;
  transition: all 1s ease-in; */
}
.hide{
  /* opacity: 0;
  transition: all 1s ease-in; */
}
2.第二种:css3动画
.show{
  animation: show-item 2s ease-in forwards;
}
.hide{
  /*forwards代表最后一帧保留*/
  animation: hide-item 2s ease-in forwards;
}

/* css3动画效果 */
@keyframes hide-item{
  0% {
    opacity:1;
    color:red;
  }
  50% {
    opacity:0.5;
    color:blue;
  }
  100% {
    opacity:0;
    color: green;
  }
}

@keyframes show-item{
  0% {
    opacity:0;
    color:red;
  }
  50% {
    opacity:0.5;
    color:blue;
  }
  100% {
    opacity:1;
    color:purple;
  }
}
3.第三种:用第三方组件 react-transition-group
在github上进行查看,点击Main documentation
//带动画的组件
import { CSSTransition } from 'react-transition-group';

render(){
    return (
      <Fragment>
        <CSSTransition
          in={ this.state.show }
          timeout={1000}
          classNames="fade"
        >
          <div>hello</div>
        </CSSTransition>
        <button onClick={this.handleToggle}>toggle</button>
      </Fragment>
    )
}
//css文件
.fade-enter{
  opacity: 0;
}
.fade-enter-active{
  opacity: 1;
  transition: opacity 1s ease-in;
}
.fade-enter-done{
  opacity: 1;
}
.fade-exit {
  opacity: 1;
}
.fade-exit-active {
  opacity: 0;
  transition: opacity 200ms;
}
.fade-exit-done {
  opacity: 0;
}


 580
580

 被折叠的 条评论
为什么被折叠?
被折叠的 条评论
为什么被折叠?
 到【灌水乐园】发言


