用delphi Xe2创建您的第一个iOS程式
I have been excited for a while to build my own iOS application using Delphi XE2 and FireMonkey. First I installed RAD Studio XE2 on my Windows 7 machine and then went to the Apple Developer website to sign up for an account. Once my Apple Developer account was setup, I went ahead and installed Xcode and the iOS SDK on my Lion machine.
Also included with RAD Studio XE2 was ‘FireMonkey-iOS.dmg’ which includes two installer packages (Free Pascal compiler and FireMonkey iOS libraries) that you will need to run on your Mac. You can find the disk image in the Embarcadero RAD Studio program files subfolder, titled ‘FireMonkey-iOS’ on your Windows machine. Just copy it to your Mac and then run the installers.

After provisioning my iPhone following the steps explained on the Apple Developer site, I was excited to build my iPhone application. The project shown here didn’t take more than a couple of minutes to setup.
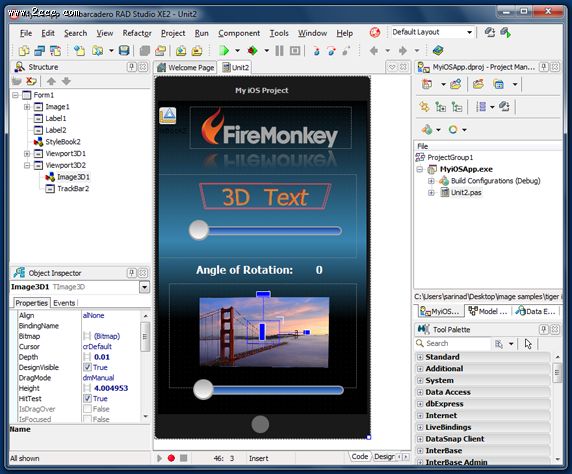
Using Delphi XE2, I started out with a new FireMonkey HD iOS application and added a TImage component for my FireMonkey logo and a Reflection effect which I adjusted the properties for to get desired look. Next, two Viewport 3D components were added to the form. One that contained a 3D Text component and a trackbar and one that contained a 3D Image component and a trackbar. I then dropped a couple of labels onto my form to display the angle of rotation. The form background color was changed to a nice gradient and the style changed to the FireMonkey iOS style.
This sample application with rotating 3D components, a cool reflection effect and a nice gradient was created in about 5 minutes with only three lines of code.
The 3D text component is linked to the trackbar, rotating around the y axis:
Text3D1.RotationAngle.y := TrackBar1.ValueThe 3D image component is linked to the trackbar, rotating around the x axis and displaying the angle of rotation in Label2.
Image3D1.RotationAngle.x := TrackBar2.Value;//-19 to adjust for initial angle of rotation Label2.Text := IntToStr(Round(TrackBar2.Value - (-19)));
After I finished my project, I hit Run to view it on my Win 7 development machine, after making sure that my files were saved to a folder that I could easily access on my Mac.
By going to ‘Tools ->Export to Xcode’, you can export your project to Xcode. (You have to configure your Windows development machine to export Xcode project files which takes a couple of easy steps to complete. Configuration info can be found here: http://docwiki.embarcadero.com/RADStudio/en/FireMonkey_Platform_Prerequisites )

I then switched to my Mac and browsed to my shared projects folder and the Xcode subfolder. I also created a custom app icon quickly in Photoshop and swapped it out for the Delphi one that was previously found in my Xcode folder. I then opened my Xcode project in Xcode and hit run.
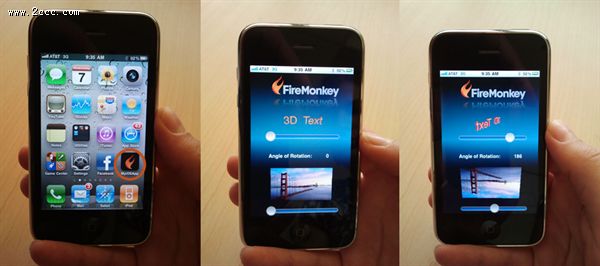
First I viewed my app in the simulator and then ran it on my iPhone. The included pictures and short video show you my running iOS application.


引文来源 用delphi Xe2创建您的第一个iOS程式-FireMonkey-盒子文章


 本文介绍使用DelphiXe2与FireMonkey快速创建iOS应用的过程。作者首先安装了RADStudioXe2并注册成为Apple开发者,接着在Mac上安装了Xcode和iOSSDK。通过简单的步骤,在几分钟内就构建了一个包含3D组件旋转效果的应用,并成功部署到iPhone。


 774
774

 被折叠的 条评论
为什么被折叠?


