linux下安装xdebug

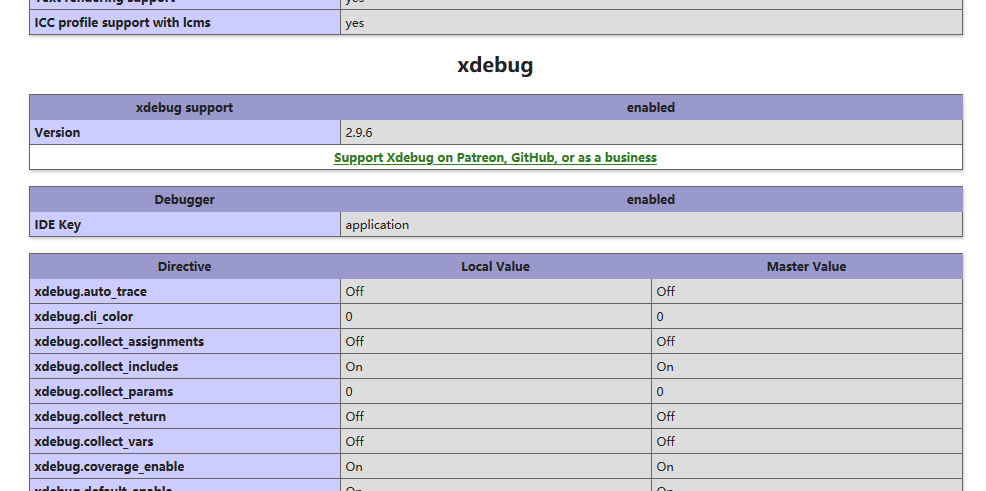
本文详细介绍了如何下载并针对不同PHP版本安装xdebug,包括使用phpinfo确定版本、选择对应文件,以及配置xdebug选项如远程调试设置。

时间:2020-08-06 16:20:29

一、下载xdebug

  xdebug官网:https://xdebug.org/download.php

  在选择下载哪个版本的xdebug的时候需要注意了,下面有两种方法,让你准确的下载自己环境对应的xdebug文件:

  1>.打印出phpinfo()信息,如下


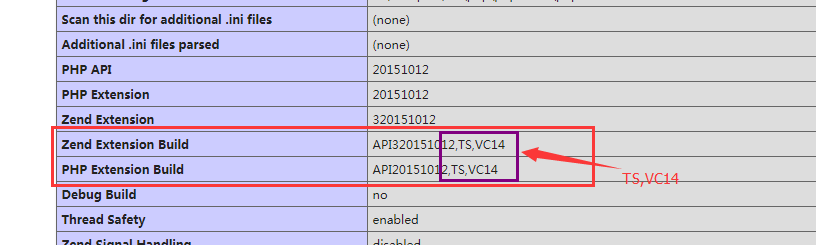
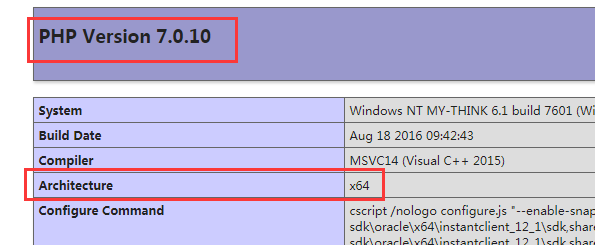
    然后还要注意一点就是看看自己php对应的版本和操作系统的位数,结合这四点去官网找到对应的xdebug文件(本人是php是7.0.1的版本,文件名:php_xdebug-2.6.0-7.0-vc14-x86_64.dll)
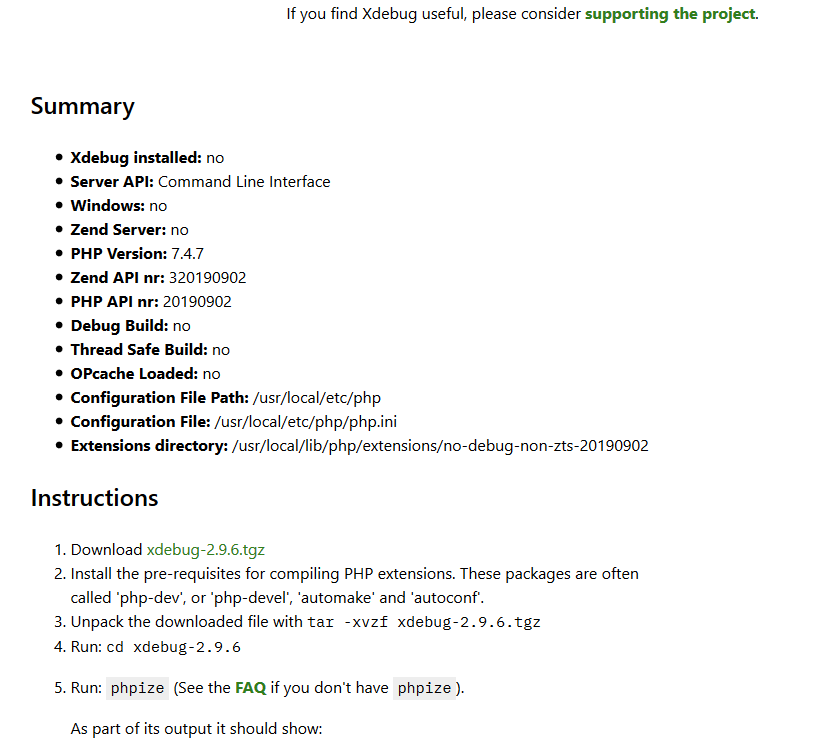
        2>.使用xdebug官方提供的一个检测工具Xdebug: Support — Tailored Installation Instructions


图片.png

        意思是在命令行执行 php -i 把内容复制进来进下下载编译安装


图片.png

1

2

3

4

5

6

7

8

9

10

11

12

13

14

15

16

17

18

19

20

21

22

23

24

25

26

27

28

29

30

安装步骤

    Download xdebug-2.9.6.tgz

Install the pre-requisites for compiling PHP extensions.

These packages are often called 'php-dev', or 'php-devel', 'automake' and 'autoconf'.            

Unpack the downloaded file with tar -xvzf xdebug-2.9.6.tgz

Run: cd xdebug-2.9.6

Run: phpize (See the FAQ if you don't have phpize).


As part of its output it should show:

Configuring for:

...

Zend Module Api No:      20190902

Zend Extension Api No:   320190902


If it does not, you are using the wrong phpize. Please follow                   

this FAQ entry and skip the next step.              


Run: ./configure

Run: make

Run: cp modules/xdebug.so /usr/local/lib/php/extensions/no-debug-non-zts-20190902

Create /usr/local/etc/php/php.ini

and add the line

zend_extension = /usr/local/lib/php/extensions/no-debug-non-zts-20190902/xdebug.so


图片.png

[Xdebug] ;xdebug配置

zend_extension="e:/php/ext/php_xdebug-2.2.1-5.4-vc9.dll" ;载入Xdebug

xdebug.profiler_enable=on

xdebug.trace_output_dir="e:/xdebug-log" ;xdebug 的数据文件目录

xdebug.profiler_output_dir="e:/xdebug-log" ;xdebug 的数据文件目录

xdebug.auto_trace = On ;开启自动跟踪

xdebug.show_exception_trace = On ;开启异常跟踪

xdebug.remote_autostart = Off ;开启远程调试自动启动

xdebug.remote_enable = On ;开启远程调试

xdebug.remote_handler=dbgp ;用于zend studio远程调试的应用层通信协议

xdebug.remote_host=127.0.0.1 ;允许连接的zend studio的IP地址

xdebug.remote_port=9000 ;反向连接zend studio使用的端口

xdebug.collect_vars = On ;收集变量

xdebug.collect_return = On ;收集返回值

xdebug.collect_params = On ;收集参数

xdebugbug.max_nesting_level = 10000 ;如果设得太小,函数中有递归调用自身次数太多时会报超过最大嵌套数错

### 如何在Linux安装和配置Xdebug进行PHP调试 #### 配置环境准备 为了确保顺利安装并使用Xdebug,在开始之前需确认已正确安装了PHP开发环境。通常情况下,通过包管理器如`yum`或`apt-get`可轻松获取所需依赖项。 #### 下载与编译Xdebug模块 下载最新版本的Xdebug源码包,并解压至工作目录。之后执行如下命令完成编译过程: ```bash phpize ./configure --enable-xdebug --with-php-config=/usr/local/php/bin/php-config[^1] make && make install ``` 上述指令中的`--with-php-config`参数用于指定PHP配置脚本的位置,这有助于构建过程中自动检测必要的设置选项。 #### 修改PHP配置文件 编辑当前使用的`php.ini`文件,加入以下几行以加载新编译好的Xdebug扩展库: ```ini [xdebug] zend_extension="/path/to/xdebug.so"[^5] xdebug.remote_enable=on xdebug.remote_autostart=off ``` 注意替换`/path/to/xdebug.so`为实际存放`.so`动态链接库的具体路径。 #### 测试安装成果 重启Web服务器使更改生效后,可以通过创建一个简单的PHP页面来验证是否成功启用了Xdebug功能。该页面应包含`<?php phpinfo(); ?>`语句,访问此页时如果能看到关于Xdebug的信息,则说明一切正常[^3]。 #### 使用IDE集成Xdebug 对于希望获得更友好用户体验的人来说,可以在支持插件机制的集成开发环境中启用对Xdebug的支持。例如Zend Studio、EditPlus或是Visual Studio Code等都可以方便地实现这一点[^2]。宝塔面板也提供了便捷的方式来进行此类操作[^4]。
评论
添加红包

请填写红包祝福语或标题

红包个数最小为10个

红包金额最低5元

当前余额3.43前往充值 >
需支付:10.00
成就一亿技术人!
领取后你会自动成为博主和红包主的粉丝 规则
hope_wisdom
发出的红包
实付
使用余额支付
点击重新获取
扫码支付
钱包余额 0

抵扣说明:

1.余额是钱包充值的虚拟货币,按照1:1的比例进行支付金额的抵扣。
2.余额无法直接购买下载,可以购买VIP、付费专栏及课程。

余额充值