


 本文介绍如何在MyEclipse中搭建Struts2框架,并详细讲解了Struts2与Spring框架的整合过程,包括所需jar包、配置文件及关键步骤。
一.在myeclipse中搭建struts2框架
1.下载struts2的全量包struts-2.2.3-all.zip,官方下载地址:http://struts.apache.org/
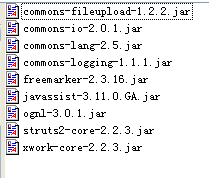
2.在myeclipse导入所需要的jar包,这里用的版本是2.2.3,至少需要如下jar包(放入工程中的WEB-INF\lib目录下即可,eclipse会自动导入到Referenced Libraries中):
3.创建struts.xml文件放于工程的src目录下,该文件可以在struts-2.2.3-all.zip的解压目录\struts-2.2.3\apps\struts2-blank.war中找到,代码片段如下:
<package name="default" extends="struts-default">


        <action name="testStruts" class="com.wwq.struts2.test.TestStruts2Action">
            <result name="success">/index.jsp</result>
        </action>

         <action name="userAction" class="userAction">
            <result name="success">/user.jsp</result>
        </action>

    </package>
4.配置web.xml文件导入struts2的过滤器
     <filter>
        <filter-class>org.apache.struts2.dispatcher.ng.filter.StrutsPrepareAndExecuteFilter</filter-class>
        <filter-name>struts2</filter-name>
     </filter>

    <filter-mapping>
        <filter-name>struts2</filter-name>
        <url-pattern>/*</url-pattern>
    </filter-mapping>
tips: 如果是struts2 2.1.3以前的版本,该过滤器是FilterDispatcher,之后的版本中该类已经过期改用StrutsPrepareAndExecuteFilter
5.在工程中添入相应的Action类和jsp文件就可以在tomcat中运行了
二、在struts2中整合spring
1.struts2通过提供插件jar的方式支持spring,所以需要导入struts2-spring-plugin-2.2.3.jar
2.需要下载spring jar包,下载地址:http://www.springsource.com/download/community?sid=1265530 (需要简单注册就可以下载),下载全量包spring-framework-3.1.0.M2-with-docs.zip
3.经过测试只需导入如下jar包即可:
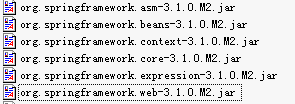
以上jar包可以在全量包的解压路径\spring-framework-3.1.0.M2\dist中找到,将以上jar包复制到工程中的WEB-INF/lib目录中即可
4.在eclipse中添加applicationContext.xml文件,放入WEB-INF目录下即可,该文件是spring会默认加载的无需在web.xml中进行路径配置,后面会提到如何配置自定义目录,applicationContext.xml代码示例如下:
<?xml version="1.0" encoding="UTF-8"?>
<beans
	xmlns="http://www.springframework.org/schema/beans"
	xmlns:xsi="http://www.w3.org/2001/XMLSchema-instance"
	xmlns:p="http://www.springframework.org/schema/p"
	xsi:schemaLocation="http://www.springframework.org/schema/beans http://www.springframework.org/schema/beans/spring-beans-2.5.xsd">

	<bean id="userAction" class="com.wwq.struts2.test.action.UserAction">
		<property name="userService" ref="userService"></property>
	</bean>
	<bean id="userService" class="com.wwq.struts2.test.service.UserService">
		<property name="userDao" ref="userDao"></property>
	</bean>
	<bean id="userDao" class="com.wwq.struts2.test.dao.UserDao">
	</bean>
</beans>
5.在web.xml中配置spring的监听器
<listener>
		<listener-class>org.springframework.web.context.ContextLoaderListener</listener-class>
</listener>
6.自定义spring service.xml文件目录需在web.xml中配置如下上下文参数
<context-param>
		<param-name>contextConfigLocation</param-name>
		<param-value>/WEB-INF/conf/spring/*.service.xml</param-value>
</context-param>
这样容器启动时spring就会去注入/WEB-INF/conf/spring/*.service.xml中配置的类
7.struts是如何让action类交给spring注入的,是通过下图中的struts-plugin.xml中配置好的
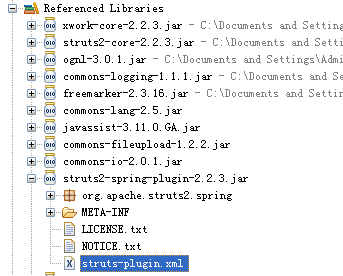
struts-plugin.xml文件内容如下:
<!DOCTYPE struts PUBLIC
    "-//Apache Software Foundation//DTD Struts Configuration 2.0//EN"
    "http://struts.apache.org/dtds/struts-2.0.dtd">

<struts>
    <bean type="com.opensymphony.xwork2.ObjectFactory" name="spring" class="org.apache.struts2.spring.StrutsSpringObjectFactory" />

    <!--  Make the Spring object factory the automatic default -->
    <constant name="struts.objectFactory" value="spring" />

    <constant name="struts.class.reloading.watchList" value="" />
    <constant name="struts.class.reloading.acceptClasses" value="" />
    <constant name="struts.class.reloading.reloadConfig" value="false" />

    <package name="spring-default">
        <interceptors>
            <interceptor name="autowiring" class="com.opensymphony.xwork2.spring.interceptor.ActionAutowiringInterceptor"/>
        </interceptors>
    </package>
</struts>
spring插件通过覆盖struts2的ObjectFactory来工作
8.配置好以上步骤后只需在struts.xml中的class指定service.xml中配置的bean id即可,代码示例如下
<!-- 红色字体部分就是在service.xml中配置的bean id-->
<action name="userAction" class="userAction
">
            <result name="success">/user.jsp</result>
 </action>
写文章真的很累,如果看后对你有一点帮助帮忙踩一个!


 1987
1987

 被折叠的 条评论
为什么被折叠?
被折叠的 条评论
为什么被折叠?
 到【灌水乐园】发言


